
Popular categories
Looking for a yarn?


|
|||||||||||||||||||
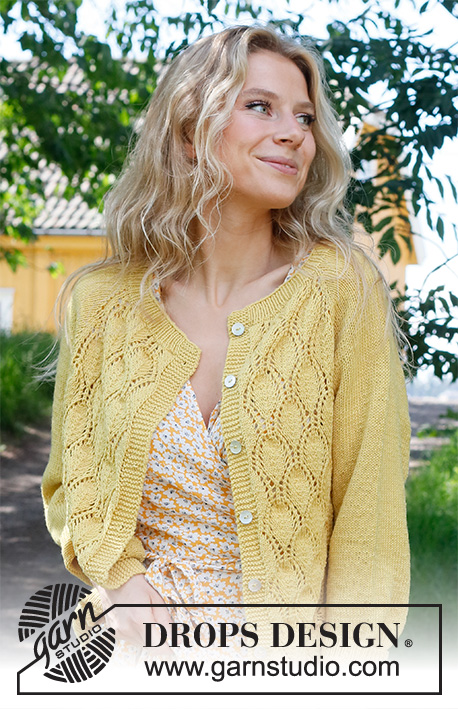
Queen Bee Cardigan |
|||||||||||||||||||
 |
 |
||||||||||||||||||
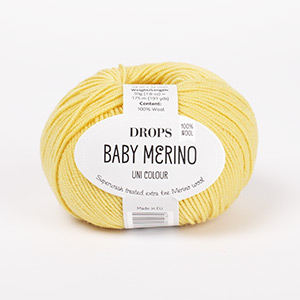
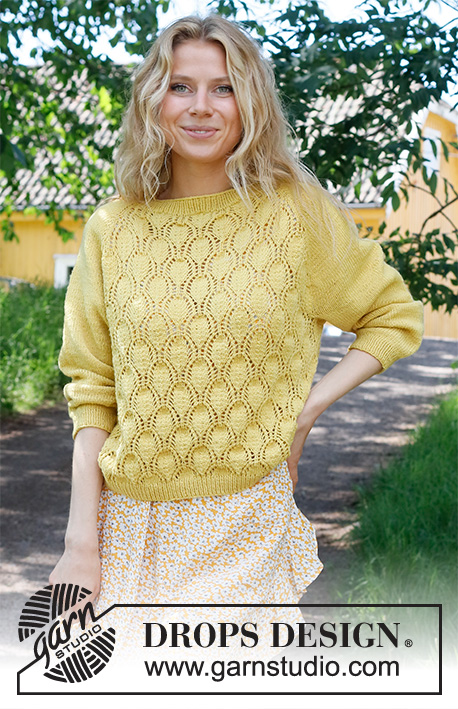
Knitted jacket in DROPS BabyMerino. The piece is worked top down, with raglan and lace pattern. Sizes S - XXXL
DROPS 231-15 |
|||||||||||||||||||
|
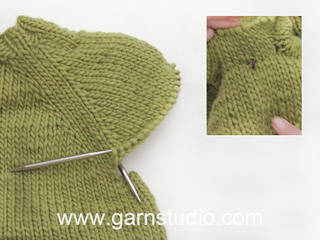
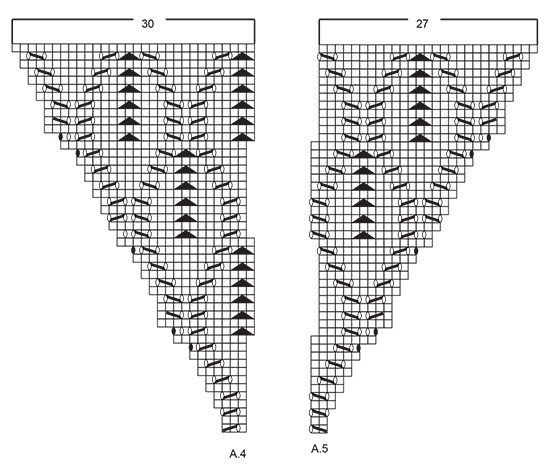
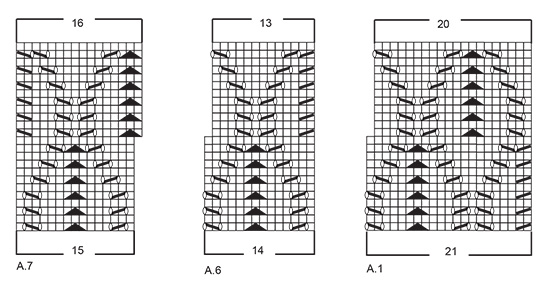
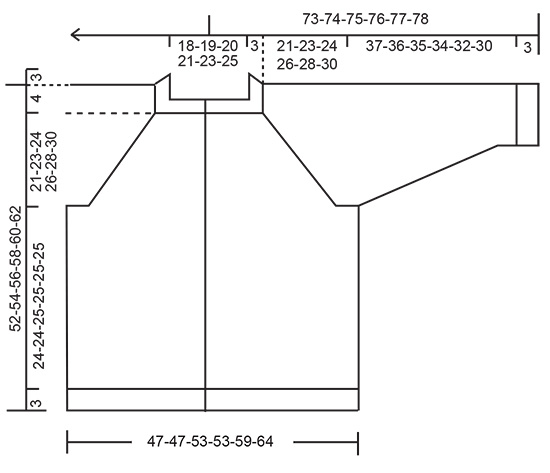
------------------------------------------------------- EXPLANATIONS FOR THE PATTERN: ------------------------------------------------------- RIDGE/GARTER STITCH (worked back and forth): Knit all rows. 1 ridge = knit 2 rows. PATTERN: See diagrams A.1 to A.7. RAGLAN: All increases are worked from the right side! The increases to raglan on the front and back piece are included in the diagrams. Increase to raglan on each side of the sleeves as follows: Increase 1 stitch after markers 1 and 3 and before markers 2 and 4 by making 1 yarn over. The yarn overs are purled twisted on the next row (= from the wrong side) to avoid holes. Then work the new stitches in stockinette stitch. When A.4 and A.5 are finished, the increases on the front and back pieces are finished. Continue increasing only on the sleeves. BUTTONHOLES: Work buttonholes on the right band (when the garment is worn). Work from the right side until there are 4 stitches left, make 1 yarn over, knit 2 together and knit 2. On the next row (wrong side), knit the yarn over to leave a hole. The first buttonhole is worked when the rib on the neck measures approx. 3 cm = 1⅛". Then work the other 5-5-5-6-6-6 buttonholes with approx. 8-8-8½-8-8-8½ cm = 3⅛"-3⅛"-3¼"-3⅛"-3⅛"-3¼" between each one. DECREASE TIP (for sleeves): Decrease 1 stitch on either side of the marker as follows: Work until there are 3 stitches left before the marker, knit 2 together, knit 3 (marker sits in the middle stitch of these 3 stitches), slip 1 stitch as if to knit, knit 1 and pass the slipped stitch over the knitted stitch (2 stitches decreased). ------------------------------------------------------- START THE PIECE HERE: ------------------------------------------------------- JACKET - SHORT OVERVIEW OF THE PIECE: The piece is worked back and forth with circular needle, from mid-front and top down. The sleeves are worked in the round with short circular needle/double pointed needles. NECK: Cast on 139-145-149-153-163-173 stitches with circular needle size 2.5 MM = US 1.5 and DROPS Baby Merino. Purl 1 row from the wrong side, then work rib from the right side as follows: 7 band stitches in GARTER STITCH – read description above, * knit 1, purl 1 *, work from *-* until there are 8 stitches left, knit 1 and 7 band stitches in garter stitch. Work this rib for 3 cm = 1⅛". Remember the BUTTONHOLES on the right band – read description above. Change to circular needle size 3 MM = US 2.5. Knit 1 row from the right side and increase 10-4-28-24-42-60 stitches evenly spaced (increase by working yarn overs; do not increase over the bands) = 149-149-177-177-205-233 stitches. Purl 1 row from the wrong side (band stitches in garter stitch and yarn overs purled twisted). Insert 1 marker after the band at the beginning of the row. THE PIECE IS NOW MEASURED FROM HERE! REMEMBER THE KNITTING GAUGE! YOKE: Sizes S-M: Work the next row from the right side as follows: Left front piece: 7 band stitches in garter stitch, A.1, A.4. Left sleeve: 1 stitch in stockinette stitch, insert marker-1, make 1 yarn over, 18 stitches in stockinette stitch, 1 yarn over, insert marker-2, 1 stitch in stockinette stitch. Back piece: Work A.5, A.2 over 42 stitches, A.4. Right sleeve: 1 stitch in stockinette stitch, insert marker-3, make 1 yarn over, 18 stitches in stockinette stitch, 1 yarn over, insert marker-4, 1 stitch in stockinette stitch. Right front piece: Work A.5, A.3 and 7 band stitches in garter stitch = 153-153 stitches (including the yarn overs). Continue this pattern and increase to RAGLAN – read description above, on the sleeves a total of 24-27 times on every row from the right side. When A.4 and A.5 are finished continue as follows from the right side: Left front piece: 7 band stitches in garter stitch, A.1, A.2, A.7. Left sleeve: Continue with stockinette stitch and increase every 2nd row as before. Back piece: Work A.6, A.2 over 70 stitches, A.7. Right sleeve: Continue with stockinette stitch and increase every 2nd row as before. Right front piece: Work A.6, A.2, A.3 and 7 band stitches in garter stitch. Sizes L-XL-XXXL: Work the next row from the right side as follows: Left front piece: 7 band stitches in garter stitch, A.6, A.2 over 14-14-28 stitches, A.4. Left sleeve: 1 stitch in stockinette stitch, insert marker-1, make 1 yarn over, 18 stitches in stockinette stitch, 1 yarn over, insert marker-2, 1 stitch in stockinette stitch. Back piece: Work A.5, A.2 over 56-56-84 stitches, A.4. Right sleeve: 1 stitch in stockinette stitch, insert marker-3, make 1 yarn over, 18 stitches in stockinette stitch, 1 yarn over, insert marker-4, 1 stitch in stockinette stitch. Right front piece: Work A.5, A.2 over 14-14-28 stitches, A.7 and 7 band stitches in garter stitch = 181-181-237 stitches (including the yarn overs). Continue this pattern and increase to RAGLAN – read description above, on the sleeves a total of 32-36-41 times on every row from the right side. When A.4 and A.5 are finished continue as follows from the right side: Left front piece: 7 band stitches in garter stitch, A.6. A.2 over 28-28-42 stitches, A.7. Left sleeve: Continue with stockinette stitch and increase every 2nd row as before. Back piece: Work A.6, A.2 over 84-84-112 stitches, A.7. Right sleeve: Continue with stockinette stitch and increase every 2nd row as before. Right front piece: Work A.6, A.2 over 28-28-42 stitches, A.7 and 7 band stitches in garter stitch. Size XXL: Work the next row from the right side as follows: Left front piece: 7 band stitches in garter stitch, A.1, A.2, A.4. Left sleeve: 1 stitch in stockinette stitch, insert marker-1, make 1 yarn over, 18 stitches in stockinette stitch, 1 yarn over, insert marker-2, 1 stitch in stockinette stitch. Back piece: Work A.5, A.2 over 70 stitches, A.4. Right sleeve: 1 stitch in stockinette stitch, insert marker-3, make 1 yarn over, 18 stitches in stockinette stitch, 1 yarn over, insert marker-4, 1 stitch in stockinette stitch. Right front piece: Work A.5, A.2, A.3 and 7 band stitches in garter stitch = 209 stitches (including the yarn overs). Continue this pattern and increase to RAGLAN – read description above, on the sleeves a total of 39 times on every row from the right side. When A.4 and A.5 are finished continue as follows from the right side: Left front piece: 7 band stitches in garter stitch, A.1, A.2 over 28 stitches, A.7. Left sleeve: Continue with stockinette stitch and increase every 2nd row as before. Back piece: Work A.6, A.2 over 98 stitches, A.7. Right sleeve: Continue with stockinette stitch and increase every 2nd row as before. Right front piece: Work A.6, A.2 over 28 stitches, A.3 and 7 band stitches in garter stitch. Continue this pattern until the piece measures 21-23-24-26-28-30 cm = 8¼"-9"-9½"-10¼"-11"-11¾" from the marker on the neck – finish after a row from the right side. When all the sleeve-increases are finished there are 349-361-409-425-465-501 stitches. Work the next row from the wrong side as follows: Work as before over the first 57-57-64-64-71-78 stitches (= front piece), place the next 68-74-84-92-98-102 stitches on 1 thread for the sleeve, cast on 13 stitches (in side under sleeve), work pattern as before over the next 99-99-113-113-127-141 stitches (= back piece), place the next 68-74-84-92-98-102 stitches on 1 thread for the sleeve, cast on 13 stitches (in side under sleeve), work pattern as before over the last 57-57-64-64-71-78 stitches (= front piece). The body and sleeves are finished separately. BODY: = 239-239-267-267-295-323 stitches. Work the next row from the right side as follows (continuing from the correct row in the diagrams): SIZE S-M-XXL: 7 band stitches in garter stitch, A.1, A.2 over 182-182-238 stitches, A.3, and 7 band stitches in garter stitch. SIZE L-XL-XXXL: 7 band stitches in garter stitch, A.6, A.2 over 224-224-280 stitches (= 12 times in width), A.7 and 7 band stitches in garter stitch. Continue working until the piece measures 24-24-25-25-25-25 cm = 9½"-9½"-9¾"-9¾"-9¾"-9¾" from the division – with the next row from the right side. Knit 1 row from the right side where you increase 24-24-26-26-30-32 stitches evenly spaced = 263-263-293-293-325-355 stitches. Change to circular needle size 2.5 MM = US 1.5. Work the next row from the wrong side as follows: 7 band stitches in garter stitch, * purl 1, knit 1 *, work from *-* until there are 8 stitches left, purl 1 and 7 band stitches in garter stitch. Work this rib for 3 cm = 1⅛". Bind off. SLEEVES: Place the 68-74-84-92-98-102 stitches from the thread on the one side of the piece on short circular needle/double pointed needles size 3 MM = US 2.5 and knit up 1 stitch in each of the 13 stitches cast on under the sleeve = 81-87-97-105-111-115 stitches. Insert a marker in the middle of the new stitches under the sleeve and start at the marker. Work stockinette stitch in the round for 3 cm = 1⅛". Now decrease 2 stitches under the sleeve – read DECREASE TIP. Decrease like this every 4-3½-2½-2-1½-1½ cm = 1½"-1¼"-1"-¾"-½"-½" a total of 8-9-12-14-15-15 times = 65-69-73-77-81-85 stitches. Continue working until the sleeve measures 37-36-35-34-32-30 cm = 14½"-14¼"-13¾"-13⅜"-12½"-11¾". Knit 1 round where you increase 1 stitch = 66-70-74-78-82-86 stitches. Change to double pointed needles size 2.5 MM = US 1.5 and work rib (knit 1, purl 1) for 3 cm = 1⅛". Bind off. The sleeve measures approx. 40-39-38-37-35-33 cm = 15¾"-15¼"-15"-14½"-13¾"-13" from the division. Work the other sleeve in the same way. ASSEMBLY: Sew the buttons onto the left band. |
|||||||||||||||||||
Diagram explanations |
|||||||||||||||||||
|
|||||||||||||||||||
|
|||||||||||||||||||
|
|||||||||||||||||||

|
|||||||||||||||||||
|
|||||||||||||||||||
|
Have you made this or any other of our designs? Tag your pictures in social media with #dropsdesign so we can see them! Do you need help with this pattern?You'll find tutorial videos, a Comments/Questions area and more by visiting the pattern on garnstudio.com. © 1982-2024 DROPS Design A/S. We reserve all rights. This document, including all its sub-sections, has copyrights. Read more about what you can do with our patterns at the bottom of each pattern on our site. |
|||||||||||||||||||


With over 40 years in knitting and crochet design, DROPS Design offers one of the most extensive collections of free patterns on the internet - translated to 17 languages. As of today we count 304 catalogs and 11422 patterns - 11417 of which are translated into English (US/in).
We work hard to bring you the best knitting and crochet have to offer, inspiration and advice as well as great quality yarns at incredible prices! Would you like to use our patterns for other than personal use? You can read what you are allowed to do in the Copyright text at the bottom of all our patterns. Happy crafting!
Comments / Questions (44)
Hello. I’m working on L size Back piece. “Work A5, A2 over 56 stitches, A4” means I repeat A2 in 56 stitches? 1 repeat of A2 is 14 stitches, so repeat it 4times?
23.05.2023 - 10:00DROPS Design answered:
Hi Mami, That's correct, you repeat A.2 four times between A.5 and A.4. Happy crafting!
24.05.2023 - 06:58Hallo , ich habe eine Frage . Ich stricke diese Jacke in Groesse L und befide mich grade in der 5.Reihe des Musters nach dem Buendchen. Leider geht das Muster nicht mehr auf und ich habe immer eine Masche ueber . Kann es sein das da ein Fehler ist im Muster ? Ich habe es mehrfach wieder aufgetrennt , aber es ist immer das gleiche .
07.05.2023 - 19:10DROPS Design answered:
Liebe Frau Porfyriadou, am besten setzen Sie Markierungen zwischen jedem Diagram/Rapport, so können Sie am besten immer die Maschenanzahl nach jeder Reihe prüfen - bei jeder Hinreihe nehmen Sie 2 Maschen auf beiden Ärmel, bei den Vorderteilen/Rückenteil nehmen Sie meistens 1 M (manchmal 2)ab der 3. Reihe in A.4 und A.5 . Viel Spaß beim stricken!
08.05.2023 - 08:28Salve, sto lavorando la S alla tensione corretta. Nello sprone, dopo aver lavorato interamente A.4 e A.5, ho 349m totali, quindi avrei già finito gli aumenti sia per il corpo che per le maniche. Non capisco dove sbaglio. Inizio da 20m per le maniche, più 24 giri di aumenti (che corrispondono al num di giri di aum di A.4 e A.5) = 48m aumentate. 20+48= 68m delle maniche. In questo modo però lo sprone è solo di 17cm. Spero di essermi spiegata. Grazie mille!
26.03.2023 - 21:32Ja, jeg strikker i baby marino og overholder strikkefastheden i glatstrikning , så jeg antager at det også gælder mønsterstrikningen. Men generelt kan jeg ikke forstå at garn og strikkefasthed har betydning for et mønsters færdige resultat. Har forstået at et mønster kan strikkes i alle tykkelser garn med tilhørende pinde uden at mønstrets udtryk ændre sig, der er endda nogle der har udgivet bøger om mønsterstrik/ japansk mønsterstrik osv
24.02.2023 - 08:55Mønstret “krøller” arbejdet meget, så det er svært at måle bredde og længde. Skal man presse trøjen med strygejern (kan garnet tåle det) eller retter det sig ud, når man bruger trøjen.
19.02.2023 - 16:59DROPS Design answered:
Hej Elisabeth, Strikker du i DROPS Baby Merino og holder du strikkefastheden? Du skal ikke strikke for stramt for da vil det krølle. Hvis du prøver med et strygejern, så læg et håndklæde imellem :)
23.02.2023 - 15:36Guten Tag, bei der Blende (7 M) ist da die Randmasche mit eingerechnet oder nicht ?
01.11.2022 - 08:32DROPS Design answered:
Liebe Verena, es sind hier keine extra Randmaschen, die Blende-Maschen sind die 7 ersten + die 7 letzten Maschen der Reihen. Viel Spaß beim stricken!
01.11.2022 - 10:32I str s. Skal jeg ifl opskriften strikke Diagr. A1 til A5 til at starte med indtil A4 og A5 er strikket færdigt og så skal jeg bland andet strikke A6 og A7. Men A4og A5 er meget højere end A1, A2 og A3. Skal jeg strikke A1 A2 A3 to gange i højden indtil A4 og A5 er færdige eller skal jeg skifte til A6 og A7 halvvejs igennem A4 og A5?
20.10.2022 - 14:31DROPS Design answered:
Hej, ja du gentager de andre diagrammer til du er færdig med A.4 og A.5 :)
25.10.2022 - 11:47Bonjour, je suis scrupuleusement les diagrammes mais je n'obtiens pas suffisamment de mailles pour les diagrammes A4 et A5, Pouvez-vous m'expliquer pourquoi, faut-il réaliser une augmentation en dehors de ces diagrammes ? Merci
05.08.2022 - 19:15DROPS Design answered:
Bonjour Fanny, vous devez augmenter pour les raglans après les marqueurs -1 (fin du devant gauche), avant le marqueur-2 (début du dos) et après le marqueur-3 (fin du dos) et avant le marqueur -4 (début du devant droit) - cf RAGLAN, ainsi vous allez augmetner votre nombre de mailles progressivement dans A.4 et A.5 - les augmentations figurent dans les diagrammes - il vous faudra parfois augmenter en plus des jetés des raglans (cf ovales noirs). Bon tricot!
08.08.2022 - 08:24Ik wil graag deze breien maar. Het probleem is de beschrijving. Opzetten ✅ Boord ✅ En dan de eerste verdeling dan heb ik veel mee steken nodig dan dat erop mijn nld staat. Als ik alle steken tel mis ik er een heleboel,. Ik heb de uitgeprinte versie.
07.06.2022 - 08:40DROPS Design answered:
Dag Anja,
Welke maat brei je en hoeveel steken heb je ongeveer over? De verdeling van het aantal steken in het patroon zou wel moeten kloppen.
12.06.2022 - 21:02Bsr j ai 113 mailles pour le dos au lieu 99 mailles comment faire svp mer i
26.05.2022 - 20:01DROPS Design answered:
Bonjour Mme Ghouali, avez-vous bien le bon nombre de mailles dans les autres pièces? Aviez-vous bien A.6, 70 m de A.2, A.7 après A.4 et A.5? Essayez de bien vérifier vos diagrammes et vos jetés pour retrouver le bon nombre de mailles correspondant à votre taille. Bon tricot!
27.05.2022 - 09:04