
Popular categories
Looking for a yarn?


|
|
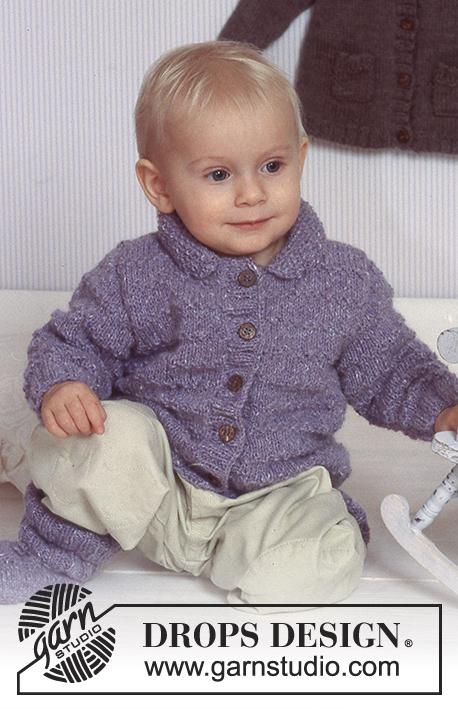
Berlin Jacket |
|
|
|
|
Cardigan with pockets and raglan sleeves in “Karisma Superwash”.
DROPS Baby 11-26 |
|
|
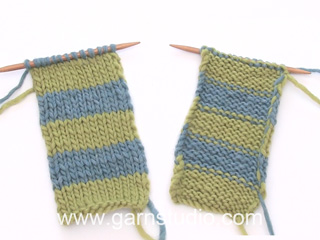
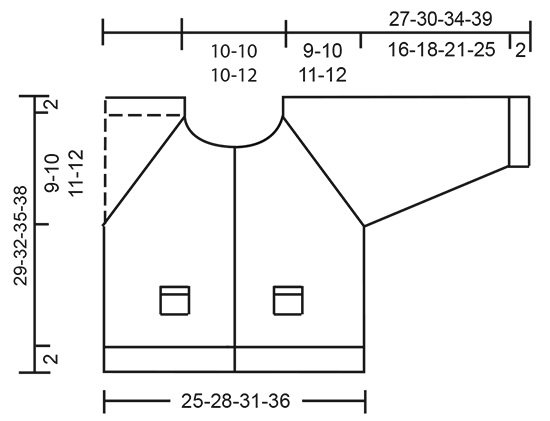
Knitting tension: 20 sts x 26 rows on needles size 4.5 mm with Karisma Superwash in stocking sts = 10 x 10 cm. Garter sts (back and forth on row): Knit all rows. Rib: *K2, P2*, repeat from *-*. Dec. tips (apply to raglan): Dec each side of 2 sts in stocking sts. All dec are done from the RS. Dec 2 or 3 sts each time. After 2 sts: Put 2/3 sts on a cable needle behind the piece, K1 st from the left needle tog with 1 st from the cable needle (= st on cable needle which is furthest to the right), repeat for all sts on cable needle. Before 2 sts: Put 2/3 sts on a cable needle in front of the piece, slip 1 st from the cable needle (= the furthest one to the right), K1 from left needle, psso, repeat for all sts on cable needle. Front and back piece: Knitted back and forth on circular needle from mid front. Loosely cast on 124-139-154-179 sts (incl 1 edge st each side mid front) on circular needle size 3.5 mm with Brown mix Karisma Superwash. Continue as follows (1st row = the RS). 1 edge st, *K2, P3*, repeat from *-*, finish with K2 and 1 edge st. Knit 5 rows this way. On the next row dec all P3 to P2 = 100-112-124-144 sts. Change to circular needles size 4.5 mm and knit 2 rows of garter sts. Continue in stocking sts. Remember the knitting tension. When the piece measures 18-20-22-24 cm knit the next row as follows (from the RS): K 22-24-27-32 sts (= right front), cast off 6-8-8-8 sts for armhole, K 44-48-54-64 sts (= back piece), cast off 6-8-8-8 sts for armhole, K 22-24-27-32 sts (= left front). Put the piece aside and knit the sleeves. Sleeves: Cast on 42-42-47-52 sts (incl 1 edge st each side) on needle size 3.5 mm with brown mix Karisma Superwash. Knit back and forth as follows (1st row = RS): 1 edge st, *K2, P3*, repeat from *-*, and finish with an edge st. After 5 rows dec all P3 to P2 = 34-34-38-42 sts. Change to needle size 4.5 mm and knit 2 rows of garter sts. Continue in stocking sts. At the same time when the piece measures 3 cm inc 1 st each side a total of 4-6-6-6 times on every 11-8-9-11 rows = 42-46-50-54 sts. When the piece measures 18-20-23-27 cm cast off 4-5-5-5 sts each side = 36-36-40-46 sts. Put the piece aside and knit the other sleeve. Yoke: Put the sleeves on the same circular needle as the front and back piece where you cast off for the armholes = 156-168-188-216 sts. Insert a marking thread in all the transitions between sleeve and body pieces = 4 MT. Continue in stocking sts back and forth on needle and at the same time dec for raglan. Raglan dec: Please read all of the following section before continuing. There are 8 dec per row and 2 sts in between each dec (i.e. 1 st each side of the MT). These 2 sts = raglan sts and are knitted in stocking sts throughout. Dec on every 4th row – see dec. tips above! Dec as follows on the sleeves: 3 sts 1-2-2-2 times and 2 sts 5-4-5-6 times. Dec as follows on the front and back piece: 3 sts 0-2-3-4 times and then 2 sts 6-4-4-4 times. Neckline: At the same time when piece measures 25-28-30-33 cm, cast off 5-5-5-7 sts in each side towards mid front. Continue to cast off towards the neck every other row: 1 st 4 times. NB! Discontinue the dec for raglan on front pieces when they meet the dec for neckline. The above numbers for raglan dec apply to the back piece (i.e. there will be fewer raglan dec on the front pieces). After all dec for raglan and neckline have been completed = approx 38 to 47sts left and piece measures approx 29-32-35-38 cm up to the shoulder. Put remaining sts on a thread. Pocket: Cast on 12-12-16-16 sts on needles size 3.5 mm with brown mix Karisma Superwash. Knit 2 rows of garter sts over all sts and then continue in Rib with 1 st of garter sts each side (seen from the RS). Cast off when the pocket measure 6-6-7-8 cm. Knit another pocket. Assembly: Left front band: Pick up approx 56-76 sts (divisible with 4) on needle size 3.5 mm and brown mix Karisma Superwash along the left front piece. Knit 2 rows of garter sts (1st row = WS). Continue in Rib with 1 st in garter sts and 2 K sts at the top and the bottom (seen from the RS). When the band measures approx 2 cm cast off with K over K and P over P. Right front band: Knit as left front band but after 1 cm cast off for 4-4-5-5 buttonholes – the bottom one should be approx 1 cm from the bottom edge and the top one should be approx 5-6 cm from the top edge (remember there’ll be a buttonhole on neckline as well). 1 buttonhole = cast of 1 st and cast on a new st at the same place on the returning row. NB! It looks nicest to cast off in purl sts (seen from the RS) as follows: P2 tog. Neck: Put the sts from the neck on a circular needle size 3.5 mm and pick up an additional 16 to 20 sts on each front piece (over the front bands too) = 70 to 86 sts (divisible with 4). Knit 2 rows of garter sts (1st row = WS). Continue in Rib with 1 st of garter sts and K2 sts each side mid front (seen from the RS). At the same time after 1 cm cast off for 1 buttonhole above the other buttonholes at the band. When the neck edge measures 2 cm cast off. Sew the pockets to the front pieces approx 5-6-7-8 cm from the edge and 5-6-6-7 cm from the mid front. Sew the sleeve seams inside 1 edge st and sew the openings underneath the arm. Sew in the buttons. BLANKET – see pattern no 11-25 |
|
|
|
|
Have you made this or any other of our designs? Tag your pictures in social media with #dropsdesign so we can see them! Do you need help with this pattern?You'll find tutorial videos, a Comments/Questions area and more by visiting the pattern on garnstudio.com. © 1982-2024 DROPS Design A/S. We reserve all rights. This document, including all its sub-sections, has copyrights. Read more about what you can do with our patterns at the bottom of each pattern on our site. |


With over 40 years in knitting and crochet design, DROPS Design offers one of the most extensive collections of free patterns on the internet - translated to 17 languages. As of today we count 304 catalogues and 11422 patterns - 11422 of which are translated into English (UK/cm).
We work hard to bring you the best knitting and crochet have to offer, inspiration and advice as well as great quality yarns at incredible prices! Would you like to use our patterns for other than personal use? You can read what you are allowed to do in the Copyright text at the bottom of all our patterns. Happy crafting!
Comments / Questions (26)
Hello, is there anywhere I can find a clearer picture of the Berlin jacket, please. Thank you. Marilyn
07.09.2023 - 06:20Hallo Ik begrijp niet hoe het minderen van de raglanmouwen precies in zijn werk gaat. Er staat nl. dat je op de goede kant moet minderen en ook dat het in elke vierde naald moet. Dat lijkt mij met elkaar in tegenspraak omdat de goede kant altijd de oneven naalden betreft. Hoe los ik dat op?
04.01.2021 - 21:04DROPS Design answered:
Dag Ria,
Wanneer je begint met minderen, minder je aan de goede kant en dan minder je 4 naalden later weer (dus weer aan de goede kant. Het maakt niet uit of je op een even of oneven naald zit, als je maar om de 4 naalden zit en aan de goede kant mindert.
09.01.2021 - 16:55Hoe maak je een knoopsgat in de bies bv. vest [breien] zonder te knippen in de steken?
02.11.2020 - 12:59DROPS Design answered:
Dag Lenie,
Je kan 1 omslag maken en de volgende 2 steken samen breien. Op de volgende naald ontstaat dan een gaatje, wanneer je de steken breit zoals ze zich voordoen. In deze video wordt dat uitgelegd.
03.11.2020 - 13:18Hallo, Ich möchte Sie bitten, die Mengenangabe des benötigten Garns zu überprüfen. Ich habe das Jäckchen in Größe 62/68 gestrickt, genau nach den Vorgaben, auch die Maschenprobe stimmt. Allerdings reicht die Wolle nicht mehr für das Halsbündchen. Auch für die größeren Größen sind nur 150g angegeben. Ansonsten eine schöne Anleitung! Freundliche Grüße
03.05.2020 - 23:23Tamara Von Mappe wrote:
Hola, no entiendo el raglán, he armado y desarmado sin lograr el resultado, sería posible un pequeño video, con la explicación de disminuir 2/3 puntos, antes y después del maracapunto. He tejido muchos de sus patrones, pero este me ha ganado. Muchas gracias de antemano
24.08.2017 - 00:34DROPS Design answered:
Hola Tamara. Las disminuciones aquí se trabajan en forma de imitación de la trenza, es decir, colocar 2/3 puntos en una aguja auxiliar y dejar detrás de la labor, ahora trabajar juntos de derecho el 1er punto de la aguja izquierda y el primer punto de la aguja auxiliar, trabajar de la misma manera todos los puntos de la aguja auxiliar. Mandaré tu sugerencia sobre el video al departamento de diseño.
29.08.2017 - 19:05Quant aux diminutions pour les manches et le dos/devant, je ne comprends pas à quoi "manches", "dos" et "devant" correspondent et comment intégrer ces diminutions au raglan, le tour en obtenant 8 diminutions par rang (tous les rangs endroit ou bien seulement un rang endroit sur deux "diminuer tous les 4 rangs" ??...). Merci !
12.08.2015 - 09:36Manoa answered:
Désolée, fausse manip ce matin : grand merci de vos explications... :)
12.08.2015 - 09:39Quant aux diminutions pour les manches et le dos/devant, je ne comprends pas à quoi "manches", "dos" et "devant" correspondent et comment intégrer ces diminutions au raglan, le tour en obtenant 8 diminutions par rang (tous les rangs endroit ou bien seulement un rang endroit sur deux "diminuer tous les 4 rangs" ??...). Merci !
11.08.2015 - 22:36DROPS Design answered:
Bonjour Manoa, les diminutions du raglan ne se font pas à la même fréquence sur le dos/les devants et sur les manches, on va diminuer: sur les manches: 1-2 fois (cf taille) 3 m et 5-6 fois 2 m (on diminue uniquement les m des manches: après 2 m jersey au début de la manche et avant les 2 m jersey à la fin de la manche) et pour les devants et le dos: 0-4 fois 3 m et 6-4 fois 2 m: à la fin du 1er devant avant les 2 m jersey du raglan, pour le dos: après les 2 m jersey au début du dos et avant les 2 m jersey à la fin du dos, et pour le 2ème devant après les 2 m jersey. Bon tricot!
12.08.2015 - 08:51Bonsoir, Je vous sollicite à nouveau pour le raglan : je ne comprends pas les explications :comment faire torsades et raglan en même temps, s'il faut 8 diminutions par rang? merci !
11.08.2015 - 22:35DROPS Design answered:
Bonjour Manoa, on n'a pas de torsades sur ce modèle, on diminue pour le raglan avant/après les 2 m jersey de la ligne du raglan: avant 2 m sur le devant droit, après et avant les 2 m jersey au début et à la fin de la manche et sur le dos, et après les 2 m jersey sur le devant gauche. Bon tricot!
12.08.2015 - 09:09Bonjour, Je viens de débuter le gilet et m'interroge sur le premier point à utiliser : 1m lis *2m end, 3m env*, etc. Après les 5 rangs sur ce modèle (appliqué sur les rangs end comme sur les rangs env), j'alterne donc systématiquement mailles envers et endroit, si bien ca ne ressemble pas du tout aux côtes que j'ai l'impression de voir sur la photo du gilet marron foncé. Me suis-je trompée ? Qu'ai-je mal compris ? Merci de vos explications, bonne journée.
05.08.2015 - 22:01DROPS Design answered:
Bonjour Manoa, on tricote en bas de la veste des côtes 2 m env/3 m end (vu sur l'endroit, sur l'envers, les côtes seront 2 m end/3 m env) pendant 5 rangs comme sur la photo. Bon tricot!
06.08.2015 - 09:40Ich vermisse die Angaben für die Kaputze (Mütze) LG Gisela
28.05.2015 - 13:42DROPS Design answered:
Das Bild ist etwas unglücklich - die Anleitung gilt für die Jacke im Hintergrund. Für die Jacke mit Kapuze, die Sie suchen, gucken Sie unter Baby 11-27. Dann werden Sie sehen, dass dort dasselbe Bild verwendet wurde. Das liegt daran, dass die Anleitung schon älter ist. Viel Spaß beim Stricken!
29.05.2015 - 08:52