DROPS Merino Extra Fine
100% Wool
from 3.75 € /50g
Get the yarn to make this pattern from 41.25€.

The yarn cost is calculated from the pattern’s smallest size and the yarn’s cheapest product type. Looking for an even better price? You might find it on the DROPS Deals!

DROPS Super Sale

Shining Star

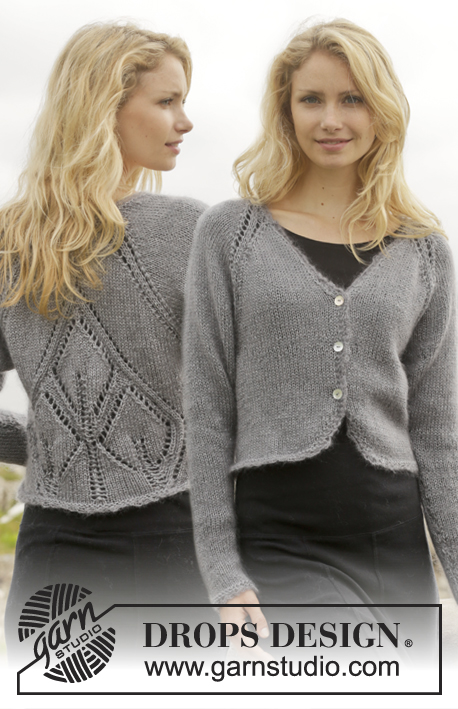
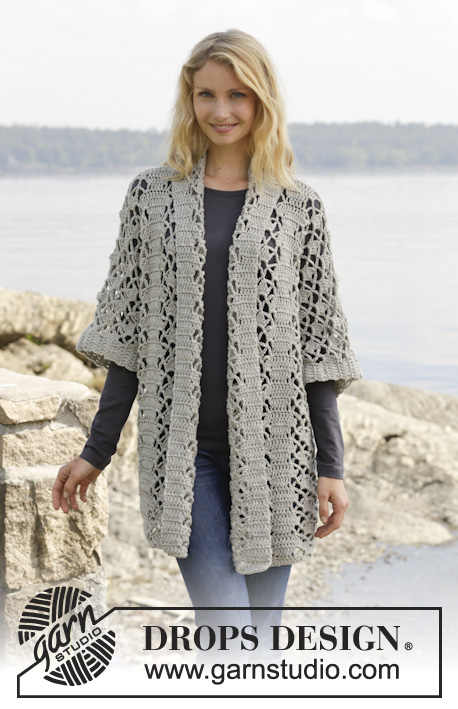
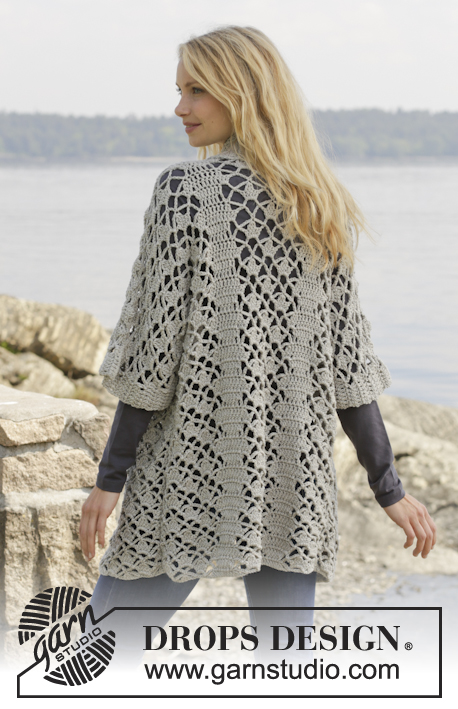
Crochet DROPS jacket with lace pattern and shawl collar in ”Merino Extra Fine”. Size: S - XXXL.

DROPS 157-18
DROPS design: Pattern no me-069
Yarn group B
-----------------------------------------------------------
Size: S - M - L - XL - XXL - XXXL
Materials:
DROPS MERINO EXTRA FINE from Garnstudio
550-650-700-750-800-900 g colour no 08, light beige

DROPS CROCHET HOOK SIZE 5 mm – or size needed to get 14 tr = width 10 cm, or to get A.2 = width 7.5 cm.

-------------------------------------------------------

Alternative Yarn – See how to change yarns here
Yarn Groups A to F – Use the same pattern and change the yarn here
Yarn usage using an alternative yarn – Use our yarn converter here

-------------------------------------------------------

DROPS Merino Extra Fine
100% Wool
from 3.75 € /50g
Get the yarn to make this pattern from 41.25€.

The yarn cost is calculated from the pattern’s smallest size and the yarn’s cheapest product type. Looking for an even better price? You might find it on the DROPS Deals!

Pattern instructions

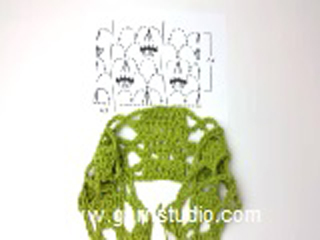
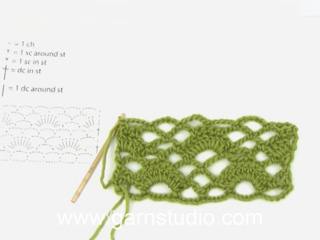
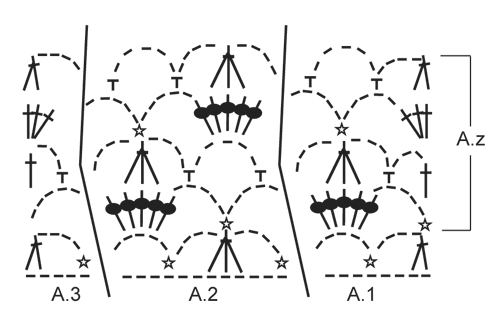
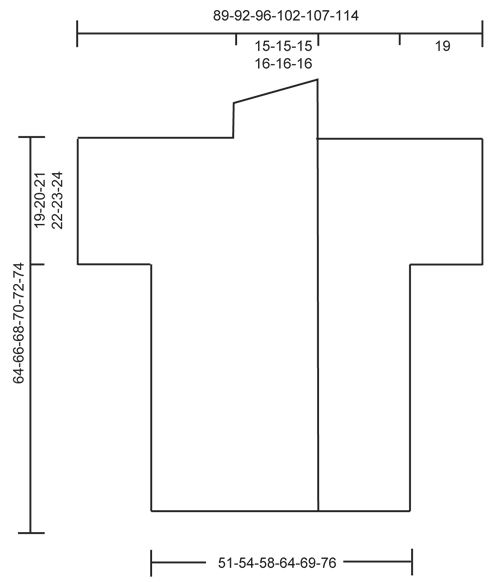
CROCHET INFO:
Replace first tr at beg of every tr row with 3 ch.

PATTERN:
See diagrams A.1-A.3.
----------------------------------------------------------

BACK PIECE:
Worked back and forth. Work 83-87-93-101-111-121 ch on hook size 5 mm with Merino Extra Fine.
Then work as follows from RS: Work A.1 – see explanation above, over the first 8 ch, NOTE: Replace 1st tr with 3 ch – see CROCHET INFO above, A.2 over the next 12-12-12-12-24-24 ch, A.3 over the next 5 ch, 1 tr in each of the next 4-6-9-13-6-11 ch, A.1, A.2, A.3, 1 tr in each of the next 4-6-9-13-6-11 ch, A.1, A.2 over the next 12-12-12-12-24-24 ch and A.3.
Then repeat A.z vertically until finished measurements.

NOTE: On 1st row in A.z (= from WS) work as follows: Work A.3, A.2 1-1-1-1-2-2 times in width, A.1, 3 ch (replace 1 tr), 1 tr in each of the next 2-4-7-11-4-9 tr, 3 ch (replace 1 tr), 1 dc in next st,
A.3, A.2, A.1, 3 ch (replace 1 tr), 1 tr in each of the next 2-4-7-11-4-9 tr, 3 ch (replace 1 tr), 1 dc in next st, A.3, A.2 1-1-1-1-2-2 times in width and A.1. REMEMBER THE CROCHET TENSION!

When piece measures approx. 45-46-47-48-49-50 cm, adjust to finish with 2nd row in A.z - cut the yarn. Then work sleeves as follows: Work 29 loose ch, beg from WS and continue A.3, A.2 and A.1 and tr over back piece as before and finish with 31 loose ch, turn piece. Now work 1st row in A.1-A.3 over ch from RS, AT THE SAME TIME continue with pattern over back piece as before (i.e. work 4th row in A.z over these sts) as follows:

Work 1 tr in each of the first 6 ch, A.1 over the next 8 ch, A.2 2 times in width (i.e. work last A.2 over the last 5 ch, then work the rest of A.2 over A.1), work A.2 1-1-1-1-2-2 times in width as before, A.3, 1 tr in each of the next 4-6-9-13-6-11 tr, A.1, A.2, A.3, 1 tr in each of the next 4-6-9-13-6-11 tr, A.1, A.2 1-1-1-1-2-2 times in width, then work A.2 2 times in width (i.e. work the first A.2 over A.3 and the next 6 ch), A.3 over the next 5 ch and 1 tr in each of the last 6 ch. Continue this pattern until piece measures approx. 62-64-66-68-70-72 cm - adjust to finish after a row from WS. Then finish each shoulder/sleeve separately as follows:

RIGHT SHOULDER/SLEEVE:
Work 6 tr, A.1 1 time and A.2 3-3-3-3-4-4 times, A.3, 1 tr in each of the next 4-6-9-13-6-11 tr. Turn and work pattern as before. Continue like this until piece measures 64-66-68-70-72-74 cm in total, adjust to finish with a whole repetition of A.z. Fasten off.

LEFT SHOULDER/SLEEVE:
Work the left shoulder/sleeve the same way but reversed, work A.1 instead of A.3 at beg of row.

RIGHT FRONT PIECE:
Worked back and forth. Work 63-65-70-74-81-86 ch (incl 3 ch to turn with) on hook size 5 mm with Merino Extra Fine. Work 1 tr in 4th ch from hook, 1 tr in each of the next 5-5-7-7-9-9 ch (= band), A.1 over the next 8 ch, A.2 over the next 12 ch, A.3 over the next 5 ch, 1 tr in each of the next 4-6-9-13-6-11 ch, A.1 over the next 8 ch, A.2 over the next 12-12-12-12-24-24 ch, A.3 over the last 5 ch. Then repeat A.z vertically until finished measurements.

NOTE: On 1st row in A.z (= from WS) work as follows: Work A.3, A.2 1-1-1-1-2-2 times in width, A.1, 3 ch (replace 1 tr),1 dc in next st, 1 tr in each of the next 2-4-7-11-4-9 tr, 3 ch (replace 1 tr), A.3, A.2, A.1, 3 ch (replace 1 tr), 1 dc in next st, 1 tr in each of the next 5-5-7-7-9-9 tr.

When piece measures approx. 45-46-47-48-49-50 cm, adjust to finish with 2nd row in A.z. Cut the yarn. Then work 29 loose ch for sleeve and continue as on back piece. When piece measures 64-66-68-70-72-74 cm, adjust to finish with a whole repetition of A.z (i.e. last row is from RS) - cut the yarn. Then work shawl collar.

SHAWL COLLAR:
Work shawl collar back and forth, beg from RS as follows: Work 1 tr in each of the first 6-6-8-8-10-10 tr, 1 tr in first tr on A.1, * 3 tr in next ch-space *, repeat from *-* 2 more times, 1 tr in next tr, * 3 tr in next ch-space *, repeat from *-* 2 more times, 1 tr in last tr in A.3, 0-0-0-1-1-1 tr in next tr = 27-27-29-30-32-32 tr.
Then work short rows over band sts as follows:
ROW 1 (WS): 5 dc, 5 htr, 17-17-19-20-22-22 tr
ROW 2 (RS): Work 1 tr in each of the 27-27-29-30-32-32 sts.
Repeat these 2 rows until piece measures approx. 10 cm on the most narrow part – adjust to finish with 2nd row (RS).
Fasten off.

LEFT FRONT PIECE:
Work as right but reversed. Work according to diagram A.3 instead of A.1 at beg of row. When piece measures 45-46-47-48-49-50 cm, adjust to finish with 2nd row in A.z, work as before over front piece from WS, then work 31 loose ch for sleeve. When piece measures 64-66-68-70-72-74 cm, adjust to finish with a whole repetition of A.z (i.e. last row is from RS), work shawl collar. NOTE: There is no need to cut the yarn.

ASSEMBLY:
Place front pieces on top of back piece and work the shoulders as follows: 1 dc through both layers, * 3 ch, 1 dc in next ch-space *, repeat from *-* along the entire shoulder/sleeve and finish with 1 dc. Work the sides tog as follows: 1 dc, * 3 ch, 1 dc in ch-space on next row *, repeat from *-* along the entire side and finish with 1 dc. Work tog under sleeves as follows: * 1 dc in ch in next ch-space, 3 ch *, repeat from *-* and finish with 1 dc. Work collor tog mid back as follows: 1 dc *1 ch, 1 dc in st*, repeat from *-*. Sew the collor to the neck.

This pattern has been corrected.

Updated online: 24.09.2014
ASSEMBLY:...Work collor tog mid back as follows: 1 dc*1 ch, 1 dc in st*, repeat from *-*. Sew the collor to the neck.
Updated online: 22.01.2016
It is added: 1 dc in next st, two places under NOTE (under BACK PIECE + RIGHT FRONT PIECE).

Diagram

symbols = 1 ch
symbols = 1 sl st in st
symbols = 1 sl st around ch-space
symbols = 1 tr around ch-space
symbols = 1 tr in st
symbols = work 1 tr but wait with last pull through, work 1 tr in next st but now pull last YO through all 3 sts on hook
symbols = work 1 tr but wait with last pull through, work 1 tr in next st, but wait the last pull through, work 1 tr in next st but now pull last YO through all 4 sts on hook
diagram
diagram
Do you have a question? See a list of frequently asked questions (FAQ)

Knitting tension is what determines the final measurements of your work, and is usually measured per 10 x 10 cm. It is provided like so: number of stitches in width x number of rows in height - eg: 19 stitches x 26 rows = 10 x 10 cm.

The knitting tension is very individual; some people knit/crochet loosely while others work tightly. You adjust the knitting tension with the needle size, which is why the suggested needle size is only meant as a guide! You need to adjust this (up or down) to ensure that YOUR knitting tension matches the knitting tension provided in the pattern. If you work with a different knitting tension than provided you will have a different yarn consumption, and your work will have different measurements than what the pattern suggests.

The knitting tension also determines which yarns can replace each other. As long as you achieve the same knitting tension you can replace one yarn with another.

See DROPS lesson: How to measure your tension/gauge

See DROPS video: How to make a gauge tension swatch

The required amount of yarn is provided in grams, eg: 450 g. To calculate how many balls you’ll need you first need to know how many grams are in 1 ball (25g, 50g or 100g). This information is available if you click on the individual yarn quality on our pages. Divide the amount required with the amount of each ball. For example, if each ball is 50g (the most common amount), the calculation will be as follows: 450 / 50 = 9 balls.

The important thing when changing from one yarn to another is that the knitting/crochet tension remains the same. This is so that the measurements of the finished piece will be the same as on the sketch provided. It is easier to achieve the same knitting tension using yarns from the same yarn group. It is also possible to work with multiple strands of a thinner yarn to achieve the knitting tension of a thicker one. Please try our yarn converter. We recommend you to always work a test swatch.

Please NOTE: when changing yarn the garment might have a different look and feel to the garment in the photo, due to individual properties and qualities of each yarn.

See DROPS lesson: Can I use a different yarn than the one mentioned in the pattern?

All our yarns are categorised into yarn groups (from A to F) according to thickness and knitting tension – group A contains the thinnest yarns and group F the thickest. This makes it easier for you to find alternative yarns to our patterns, should you wish to switch yarn. All yarns within the same group have a similar knitting tension and can easily replace each other. However, different yarn qualities have different structures and properties which will give the finished work a unique look and feel.

Click here for an overview of the yarns in each yarn group

At the top of all our patterns you’ll find a link to our yarn calculator, which is a helpful tool should you wish to use a different yarn than suggested. By filling in the yarn quality you wish to replace, the amount (in your size) and number of strands, the calculator will present good alternative yarns with the same knitting tension. Additionally it will tell you how much you’ll require in the new qualities and whether you’ll need to work with multiple strands. Most skeins are 50g (some are 25g or 100g).

If the pattern is worked with multiple colours, every colour will have to be calculated separately. Similarly, if the pattern is worked with several strands of different yarns (for example 1 strand Alpaca and 1 strand Kid-Silk) you will have to find alternatives for each, individually.

Click here to see our yarn calculator

Since different yarns have different qualities and textures we have chosen to keep the original yarn in our patterns. However, you can easily find options among our available qualities by using our yarn calculator, or simply pick a yarn from the same yarn group.

It is possible that some retailers still have discontinued yarns in stock, or that someone has a few skeins at home that they would like to find patterns for.

The yarn calculator will provide both alternative yarn as well as required amount in the new quality.

If you think it's hard to decide what size to make, it can be a good idea to measure a garment you own already and like the size of. Then you can pick the size by comparing those measures with the ones available in the pattern's size chart.

You'll find the size chart at the bottom of the pattern.

See DROPS lesson: How to read size chart

The needle size provided in the pattern serves only as a guide, the important thing is to follow the knitting tension. And since knitting tension is very individual, you will have to adjust the needle size to ensure that YOUR tension is the same as in the pattern – maybe you’ll have to adjust 1, or even 2 needle sizes, up or down to achieve the correct tension. For this, we recommend that you work test swatches.

Should you work with a different knitting tension than the one provided, the measurements of the finished garment might deviate from the measurement sketch.

See DROPS lesson: How to measure your tension/gauge

See DROPS video: How to make a tension/gauge swatch

Working a garment top-down provides more flexibility and room for personal adjustment. For example it is easier to try the garment on while working, as well as making adjustments to length of yoke and shoulder caps.

The instructions are carefully explaining every step, in the correct order. Diagrams are adjusted to the knitting direction and are worked as usual.

The diagram depicts all rows/rounds, and every stitch seen from the right side. It is read from bottom to top, from right to left. 1 square = 1 stitch.

When working back and forth, every other row is worked from the right side and every other row is worked from the wrong side. When working from the wrong side, the diagram will have to be worked reversed: from left to right, knit stitches are purled, purl stitches are knit etc.

When working in the round every round is worked from the right side and the diagram are worked from right to left on all rounds.

See DROPS lesson: How to read knitting diagrams

The diagram depicts all rows/rounds, and every stitch seen from the right side. It is worked from bottom to top, from right to left.

When working back and forth every other row is worked from the right side: from right to left and every other row is worked from the wrong side: from left to right.

When working in the round, every row in the diagram are worked from the right side, from right to left.

When working a circular diagram you start in the middle and work your way outwards, counter clockwise, row by row.

The rows usually start with a given number of chain stitches (equivalent to the height of the following stitch), this will either be depicted in the diagram or explained in the pattern.

See DROPS lesson: How to read crochet diagrams

Instructions for working several diagrams after each other on the same row/round, will often be written like so: “work A.1, A.2, A.3 a total of 0-0-2-3-4 times". This means you work A.1 once, then A.2 is worked once, and A.3 is repeated (in width) the number of times provided for your size – in this case like so: S = 0 times, M = 0 times, L=2 times, XL= 3 times and XXL = 4 times.

The diagrams are worked as usual: begin with the first row in A.1, then work the first row in A.2 etc.

See DROPS lesson: How to read knitting diagrams

See DROPS lesson: How to read crochet diagrams

The total width of the garment (from wrist-to-wrist) will be larger in the larger sizes, despite the actual sleeves being shorter. The larger sizes have longer sleeve caps and wider shoulders, so there will be a good fit in all sizes.

The measurement sketch/schematic drawing provides information regarding the full length of the garment. If it’s a jumper or a jacket the length is measured from the highest point on the shoulder closest to the neckline, and straight down to the bottom of the garment. It is NOT measured from the tip of shoulder. Similarly, the length of yoke is measured from the highest point on the shoulder and down to where yoke is split into body and sleeves.

On a jacket measures are never taken along bands, unless specifically stated. Always measure inside band stitches when measuring the length.

See DROPS lesson: How to read a schematic drawing

Diagrams are often repeated on the round or in height. 1 repeat is the diagram the way it appears in the pattern. If it says to work 5 repeats of A.1 in the round, then you work A.1 a total of 5 times after/next to each other in the round. If it says to work 2 repeats of A.1 vertically/in height you work the entire diagram once, then begin again at the start and work the entire diagram one more time.

Chain stitches are slightly narrower than other stitches and to avoid working the cast-on edge too tight, we simply chain more stitches to begin with. The stitch count will be adjusted on the following row to fit the pattern and measurement sketch.

The rib edge is more elastic and will contract slightly compared to, for example, stocking stitch. By increasing before the rib edge, you avoid a visible difference in width between the rib edge and the rest of the body.

It’s very easy to cast off too tightly, and by making yarn overs while casting off (and simultaneously casting these off) you avoid a too tight cast off edge.

See DROPS video: How to bind off with yarn overs (yo)

To achieve an even increase (or decrease) you can increase on, for example: every 3rd and 4th row alternately, like so: work 2 rows and increase on the 3rd row, work 3 rows and increase on the 4th. Repeat this until the increase is complete.

See DROPS lesson: Increase or decrease 1 st on every 3rd and 4th row alternately

Should you prefer to work in the round instead of back and forth, you may of course adjust the pattern. You’ll need to add steeks mid-front (usually 5 stitches), and follow the instructions. When you would normally turn and work from the wrong side, simply work across the steek and continue in the round. At the end you’ll cut the piece open, pick up stitches to work bands, and cover the cut edges.

See DROPS video: How to knit steeks and cut open

Should you prefer to work back and forth instead of in the round, you may of course adjust the pattern so you work the pieces separately and then assemble them at the end. Divide the stitches for the body in 2, add 1 edge stitch in each side (for sewing) and work the front and back pieces separately.

See DROPS lesson: Can I adapt a pattern for circular needles into straight needles?

Pattern repeats can vary slightly in the different sizes, in order to get the correct proportions. If you’re not working the exact same size as the garment in the photo, yours might deviate slightly. This has been carefully developed and adjusted so that the complete impression of the garment is the same in all sizes.

Make sure to follow instructions and diagrams for your size!

If you have found a pattern you like which is available in women’s size it’s not very difficult to convert it to men’s size. The biggest difference will be the length of sleeves and body. Start working on the women size that you think would fit across the chest. The additional length will be worked right before you cast off for the armhole/sleeve cap. If the pattern is worked top-down you can add the length right after the armhole or before the first decrease on sleeve.

Regarding additional yarn amount, this will depend on how much length you add, but it is better with a skein too many than too few.

All yarns will have excess fibres (from production) that might come off as lint or shedding. Brushed yarns (ie hairier yarns) have more of these loose, excess fibres, causing more shedding.

Shedding also depends on what is worn under or over the garment, and whether this pulls at the yarn fibres. It’s therefore not possible to guarantee that there will be no shedding

Below are some tips on how to get the best result when working with hairier yarns:

1. When the garment is finished (before you wash it) shake it vigorously so the looser hairs come off. NOTE: do NOT use a lint roller, brush or any method that pulls at the yarn.

2. Place the garment in a plastic bag and put it in your freezer - the temperature will cause the fibres to become less attached to each other, and excess fibres will come off easier.

3. Leave in the freezer for a few hours before taking it out and shaking it again.

4. Wash the garment according to the instructions on the yarn label.

Pilling is a natural process that happens to even the most exclusive of fibers. It's a natural sign of wear and tear that is hard to avoid, and that is most visible in high friction areas of your garment like a sweater's arms and cuffs.

You can make your garment look as new by removing the pilling, using a fabric comb or a pill/lint remover.

Still can't find the answer you need? Then scroll down and leave your question so one of our experts can try to help you. This will be done normally within 5 to 10 working days.
In the meantime, you can read the questions and answers that others have left to this pattern or join the DROPS Workshop on Facebook to get help from fellow knitters/crocheters!

You might also like...

Post a comment to pattern DROPS 157-18

We would love to hear what you have to say about this pattern!

If you want to leave a question, please make sure you select the correct category in the form below, to speed up the answering process. Required fields are marked *.

Comments / Questions (199)

country flag Maida wrote:

Und zu der 2.R von A.z habe ich auch eine Frage. Im Video wird A1, A2, A3 gehäkelt. Dann im Mittelteil werden Stb gemacht. Woher bitte soll ich wissen wie und wie viele wenn es nirgends in der Anleitung steht was genau zwischen A3 und A1 zu machen ist?

14.02.2018 - 18:05

DROPS Design answered:

Liebe Maida, im Video gibt es 4 Stb, in der Anleitung häkeln Sie je nach der Größe 2-4-7-11-4-9 Stb 2 x insgesamt zwischen 2 Rapporte A.1-A.3. Viel Spaß beim häkeln!

15.02.2018 - 08:58

country flag Maida wrote:

Es geht nochmal um die 1.R. von A.z. Laut Video wird folgendes gemacht: A3, A2, A1, 3LM, 1 M überspringen, je 1 Stb in die nächsten 2 M, 3LM, FM (bzw KM) in die 2 zusammenabgemaschten Stb der Vorrunde? In der Anleitung steht es anders da, wovei es in der Anleitung mit der FM nach den 3 LM weniger Sinn ergibt.

14.02.2018 - 18:03

DROPS Design answered:

Liebe Maida, Anleitung wird korrigiert, nach A.1 und vor den 2-9 Stb (siehe Größe) am Anfang der Reihe häkeln Sie nur 1 Lm und keine fM vor den Stb. Bei der 1. Reihe wird dann vor A.3: 3 LM, 1 fM in die nächste Masche gehäkelt, dann 1 Km. Viel Spaß beim häkeln!

15.02.2018 - 08:56

country flag Maida wrote:

Hallo! ich versuche es nun mit dieser Anleitung und habe gleich ein paar Fragen. Im Anleitungsvideo für die Diagramme A1,A2,A3 werden für den Stern FM statt KM gemacht. Was ist nun richtig? Ich habe die erste Rückreihe (1 Reihe von A.z) nun beendet und will die zweite Reihe von A.z machen. Wiederhole ich hier immer wieder A1 bis A3 oder sind dazwischen noch andere Sachen zu beachten wie in den ersten beiden Reihen?

14.02.2018 - 10:53

DROPS Design answered:

Liebe Maida, es sollte 1 Kett-M sein, dh wie im Diagram (und nicht wie im Video). Beim A.z häkeln Sie wie zuvor: A.1, A.2 wiederholen und mit A.3 enden. Viel Spaß beim häkeln!

14.02.2018 - 11:44

country flag Monterrin Claudine wrote:

Bonjour, novice pour crocheter je me suis lancée dans ce modèle très joli (157-18). Dos : monter 29ml pour les manches je me raccroche au dos et continue sur celui-ci avec le rg4az, et à la fin je monte 31ml.Au retour sur ces 31ml je fais juste a1 et a3 du 1er rg ou de az. A la fin je ne vois comment faire avec mes 29 ml restantes

14.01.2018 - 13:53

DROPS Design answered:

Bonjour Mme Monterrin, à la fin du rang, continuez le point fantaisie comme avant sur ces 29 ml = on crochète le 1er rang de A.1-A.3 sur les 31 ml et le 4ème rang de A.z (= A.1 pour commencer le rang, on répète A.2 jusqu'à ce qu'il reste 5 des 29 ml et on termine par A.3. Bon crochet!

15.01.2018 - 09:50

country flag Mª Angeles Barceló Guido wrote:

Tengo terminadas las tres piezas pero no veo claro como unirlas. En los tramos de PA también se hace la unión con los 3 ptos de cadeneta? O todos con pb? Y el cuello chal se deja suelto o se une de alguna manera?

04.11.2017 - 19:04

DROPS Design answered:

Hola Mª Angeles. Tienes que colocar los dos piezas del delantero contra la pieza de la espalda. Hacer las costuras de los hombros, después coser bajo las mangas y los lados. La forma de hacer las costuras está explicada en el apartado TERMINACIÓN del patrón. El cuello chal se une en el centro de la espalda de la misma manera.

05.11.2017 - 11:51

country flag Ilja wrote:

Hallo,heb een vraag over de mouwen ,begin ik met de 29 lossen meteen met de zes stokjes voor het boordje ,en bij de 31 lossen ook? Mijn tweede vraag is: wanneer start ik met de beschrijving in het patroon na TEGELIJKERTIJD en dan (dus haak de 4e toer over deze st) als volgt: bij voorbaat dank

31.10.2017 - 08:22

DROPS Design answered:

Hoi Ilja, Na het haken van de 29 of 31 lossen begin je met A.3 of A.1, dus stokjes of lossen (afhankelijk van aan welke kant je bent), waarbij je de regel aanhoudt dat je het eerste stokje vervangt door 3 lossen, dus die komen bovenop de ketting met lossen. Tweede vraag: Haak nu de 1e toer in A.1-A.3 over de l aan de goede kant en ga TEGELIJKERTIJD verder... Vanaf de uit leg 'Haak nu...' begin je ook met de uitleg bij 'TEGELIJKERTIJD'. Hopelijk is het zo duidelijk.

02.11.2017 - 15:37

country flag Hanne Williams wrote:

Jeg kan ikke forstå , at der bruges nål nr 5 til så tyndt et garn. Er det meningen man skal hækle med dobbelt garn? Det står der ikke noget om i opskriften. Synes det ser meget småt ud når man slår op, for mit vedkommende i str XXL

15.09.2017 - 09:16

Michaele Jordan wrote:

I cannot figure out how the pieces fit together. I started with the 'Back Piece' and worked it to the length given in the pattern, but it is nowhere near long enough to extend from neck to hem at hip, as is clearly shown in the picture. The pattern says there are five pieces, but the chart only shows two. And if I turn them to line up, the pattern is no longer going the right direction.

20.08.2017 - 19:20

DROPS Design answered:

Dear Michaele, first work the back piece from the hips to the armhole, then work the sleeves up to the neck, then work each shoulder/sleeves separately, then work the front piece, the right side and the left side each separately.

23.08.2017 - 18:30

country flag Lone Maltesen wrote:

Hejsa. Jeg har et problem med ærmerne på denne opskrift. Når jeg slår lm op til ærmerne. Så vidt jeg kan tælle mig til går mønsteret over 25 masker så hvor får I henholdsvis de 28 og 31 m fra og hvad skal jeg bruge de resterende m til ? Vh Lone Maltesen

24.07.2017 - 09:56

DROPS Design answered:

Hej Lone, Du hækler 29 løse lm i den ene side og 31 i den anden side, så du kan vende arbejdet, du hækler mønsteret som har gjort hele tiden over rygstykket og følger du A.1-A.3 over ærmerne, så skal det passe når du kommer frem til rygstykket. God fornøjelse!

09.08.2017 - 15:34

country flag Marieke Van Ree wrote:

Ik heb alle delen gehaakt en nu moet ik ze aan elkaar maken. Leg je de panden met de goede kanten naar binnen en haak je ze dan vast of haak je de naad aan de buitenkant?

01.07.2017 - 21:22

DROPS Design answered:

Hoi Marieke, Je legt de delen met de verkeerde kanten op elkaar en je haakt dus aan de goede kant van het werk de delen aan elkaar.

04.07.2017 - 15:50