
Popular categories
Looking for a yarn?


Comments / Questions (9)
![]() Silje wrote:
Silje wrote:
Hei Garnstudio! Jeg vil bare sende dere en oppfordring til å være mer bevisst når det tas bilder til mønstrene. Jeg er på jakt etter ulike typer hæler på sokkene, men det er vanskelig å fange opp ut fra bildene på en rekke oppskrifter. Vil anbefale at dere har ulike strikketeknikker og -muligheter i minne når dere tar bilder.
29.11.2021 - 15:24
![]() Herta Emilie wrote:
Herta Emilie wrote:
I finished this lovely socks today. Me and my friend Ritha are very happy about this nice patter. Thank you for all.
04.03.2019 - 01:14
![]() Sinne Kold wrote:
Sinne Kold wrote:
Jeg tror der er en lille fejl i opskriften. Der står at efter indtagninger i hver side (efter hæl) tager man ind til man har 41 masker i str 35/37, men når man så kommer til tå skal der være 21 masker og 22 masker- hvilket giver 43 masker.
14.01.2019 - 20:09DROPS Design answered:
Hei Sinne. Det har du helt rett i, her var det en feil. Denne er nå rettet og du skal ha 19 masker oppå foten og 22 masker under foten i størrelse 35/37. God fornøyelse.
23.01.2019 - 13:19
![]() Naomi wrote:
Naomi wrote:
Volgens mij is er iets misgegaan bij de vertaling in het telpatroon ("zet 2 st op het voorpand van brei")
17.11.2016 - 22:50DROPS Design answered:
Hoi Naomi. Je hebt gelijk. Ik zal het meteen aanpassen. Bedankt!
21.11.2016 - 14:59
![]() Carmen wrote:
Carmen wrote:
¿Aguja de doble punta es lo mismo que aguja circular?
20.01.2016 - 21:37DROPS Design answered:
Hola Carmen. Aguja de doble punta (o también se llaman ag para hacer calcetines) no es lo mismo que ag circular. Se usan para hacer trabajos en redondo con pocos puntos (donde no se puede usar la ag circular corta).
24.01.2016 - 10:12
![]() Simone wrote:
Simone wrote:
På hælfellingen, det er vel meningen at det på vrangen skal strikkes 2 vr sm før man snur arbeidet? Blir hull i hælen om man skal felle likt på begge sider.
15.11.2015 - 13:14Helen wrote:
I would like to knit these lovely socks for my 11 year old daughter. I wonder is there instructions of these socks for a child. If not, how many sts I should decrease to narrow them to fit a child. Her foot size is 35/37 but I think these might be to loose for her. Thank you.
14.10.2015 - 13:36DROPS Design answered:
Dear Helen, these socks are given in size 35/37 (1st size) - see also at the right side of picture foot length (22 cm in first Size). Happy knitting!
14.10.2015 - 16:22
![]() Sacha Glasgow-Smith wrote:
Sacha Glasgow-Smith wrote:
Hello I am stuck on the first decrease once I have switched onto 4mm needles - I don't understand how I do the 20 stocking stitches at the same time as decreasing. Please can you help? Thank you
10.12.2014 - 20:38DROPS Design answered:
Dear Mrs Glasgow-Smith, on 1st round on needles 4 mm, you work first 20 st in stocking st at the same time dec evenly 4-1 sts (see size), ie you will now get 16-19 st st over these 20 sts, then work P2, K4, P2 tog, K4, P2, and then above the next 22 sts, work in st st dec evenly 6-3 sts (= 16-19 sts remain over the 22 sts) = you should get 45-51 sts. Happy knitting!
11.12.2014 - 09:54
![]() Marij wrote:
Marij wrote:
Bij maat 35/37 staat bij het breien van het been dat er doorgegaan moet worden met 'breien en minderen'. Dit klopt niet, want er moet juist niet langer geminderd worden bij deze maat.
08.12.2013 - 14:41DROPS Design answered:
Hoi Marij. Ik heb het originele patroon bekeken en je hebt helemaal gelijk! Het is aangepast. Bedankt voor het melden.
11.12.2013 - 15:04
|
|||||||||||||
Fireside Snuggle |
|||||||||||||
|
|
|||||||||||||
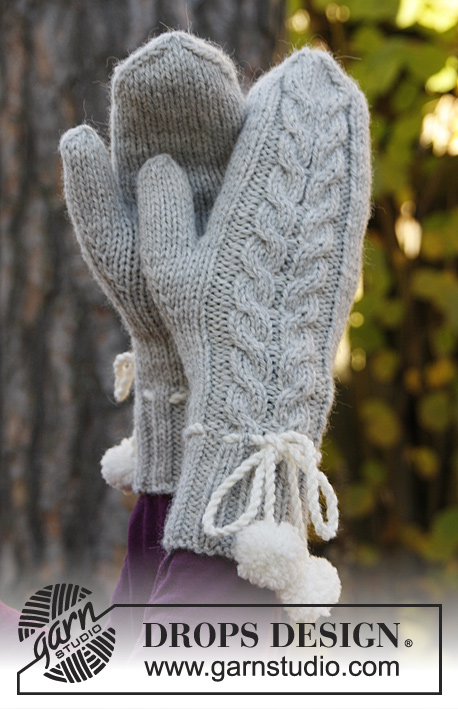
DROPS Christmas: Knitted DROPS socks with cable in "Nepal".
DROPS Extra 0-992 |
|||||||||||||
|
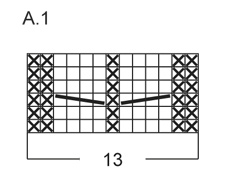
PATTERN: See diagram A.1. DECREASE TIP: Dec 1 st as follows 2 sts before marker: Slip 1 st as if to K, K 1, psso. After marker: K 2 tog. HEEL DECREASE: Work heel decrease in stockinette st: Row 1 (= RS): Work until 5-6-6 sts remain, slip next st as if to K, K 1, psso, turn piece. Row 2 (= WS): Work until 5-6-6 sts remain, slip next st as if to P, P 1, psso, turn piece. Row 3 (= RS): Work until 4-5-5 sts remain, slip next st as if to K, K 1, psso, turn piece. Row 4 (= WS): Work until 4-5-5 sts remain, slip next st as if to P, P 1, psso, turn piece. Continue dec like this with 1 less st before every dec until 10-10-12 sts remain on needle. ------------------------------------------------------- SOCK: Worked in the round on double pointed needles, top down. Cast on 56-56-64 sts on double pointed needles size 3.5 mm / US 4 with Nepal. K 1 round, insert 1 marker in 1st st at beg of round = mid back, work rib = P 2/K 2. When rib measures 4-5-5 cm / 1½"-2"-2", switch to double pointed needles size 4 mm / US 6 and work next round as follows: 20-20-24 sts in stockinette st while AT THE SAME TIME dec 4-1-2 sts evenly, P 2, K 4, P 2 tog, K 4, P 2, 22-22-26 sts in stockinette st AT THE SAME TIME dec 6-3-4 sts evenly = 45-51-57 sts on needle. Work next round as follows: * K 2 tog, 1 YO *, repeat from *-* the entire round and finish with K 1. Work next round as follows (K YOs): Work 16-19-22 sts in stockinette st, A.1 (= 13 sts) - see explanation above and 16-19-22 sts in stockinette st. Continue pattern like this AT THE SAME TIME dec in the different sizes as follows: Size 5/6½ (35/37): Continue to work without dec. Size 7½/9 (38/40): When piece measures 9 and 16 cm / 3½" and 6¼", dec 1 st on each side of st with marker - see DECREASE TIP. Size 9½/10½ (41/43): When piece measures 8, 13 and 18 cm / 3", 5" and 7", dec 1 st on each side of st with marker - see DECREASE TIP = 45-47-51 sts. All sizes: Work until piece measures 24-25-26 cm / 9½"-9¾"-10¼". Now keep the first 9-10-11 sts on needle, slip the next 27-27-29 sts on 1 stitch holder (= mid on top of foot) and keep the last 9-10-11 sts on needle = 18-20-22 sts for heel. Work in stockinette st on heel sts for 5-5½-6 cm / 2"-2¼"-2½". Insert 1 marker and measure the piece from here. Now dec for heel - see HEEL DECREASE above. After heel dec, pick up 10-11-11 sts along each side of heel and slip the 27-27-29 sts from stitch holder back on needle = 57-59-63 sts. Insert a marker on each side of the 27-27-29 sts from stitch holder. Then work in stockinette st in the round and pattern A.1 as before while AT THE SAME TIME dec in each side on every other round a total of 8-8-8 times as follows: K tog the last 2 sts before first marker on top of foot twisted (i.e. work in the back loop of st instead of front) and K tog the first 2 sts after last marker on top of foot = 41-43-47 sts. Work until piece measures 18-20-22 cm / 7"-8"-8¾" from marker on heel (= approx. 4-4-5 cm / 1½"-1½"-2" remain). Insert 1 marker in each side so that there are 19-21-23 sts on top of foot and 22-22-24 sts under foot. Continue diagram A.1 and in stockinette st and now dec for toes on each side of both markers:. Dec as follows (beg 3 sts before marker) at each marker: K 2 tog, K 2 (marker is between these 2 sts), slip 1 st as if to K, K 1, psso. Dec like this in each side on every other round a total of 5-5-6 times and then on every round a total of 3-3-3 times = 9-11-11 sts remain on needles. Cut the yarn and pull it through the remaining sts, tighten tog and fasten. Knit another sock the same way. TIES: Cut 2 lengths of 3 metres each with off white. Twine the strands tog until they resist, fold the string double so that it twines again. Make a knot at each end. Thread the tie up and down through the eyelet holes on the sock. Make 2 pompoms with an approx. diameter of 2 cm / ¾" in off white. Fasten a pompom in each end of the tie. Repeat on the other sock. |
|||||||||||||
Diagram explanations |
|||||||||||||
|
|||||||||||||
 |
|||||||||||||
Have you finished this pattern?Tag your pictures with #dropspattern or submit them to the #dropsfan gallery. Do you need help with this pattern?You'll find 20 tutorial videos, a Comments/Questions area and more by visiting the pattern on garnstudio.com. © 1982-2026 DROPS Design A/S. We reserve all rights. This document, including all its sub-sections, has copyrights. Read more about what you can do with our patterns at the bottom of each pattern on our site. |
|||||||||||||


With over 40 years in knitting and crochet design, DROPS Design offers one of the most extensive collections of free patterns on the internet - translated to 17 languages. As of today we count 324 catalogs and 12290 patterns - 12280 of which are translated into English (US/in).
We work hard to bring you the best knitting and crochet have to offer, inspiration and advice as well as great quality yarns at incredible prices! Would you like to use our patterns for other than personal use? You can read what you are allowed to do in the Copyright text at the bottom of all our patterns. Happy crafting!
Post a comment to pattern DROPS Extra 0-992
We would love to hear what you have to say about this pattern!
If you want to leave a question, please make sure you select the correct category in the form below, to speed up the answering process. Required fields are marked *.