
Popular categories
Looking for a yarn?


Comments / Questions (22)
![]() Bianka Buchholz wrote:
Bianka Buchholz wrote:
Ich habe eine Frage zu den Maschenzunahmen. In der Anleitung steht: in jeder 2. bzw. 4. Reihe. Sind damit nur die Hinreihen gemeint?
07.01.2025 - 18:47DROPS Design answered:
Liebe Frau Buchholz, wenn man in jeder 2. Reihe zunimmt, wird man in jeder Hinreihe zunehmen = 1 Hinreihe mit Zunahmen, 1 Rückreihe ohne. Wenn man in jeder 4. Reihe zunimmt, wird man in jeder 2. Hinreihe zunehmen = 1 Hinreihe mit Zunahmen, 3 Reihen (= 1 Rückreihe, 1 Hinreihe, 1 Rückreihe) ohne. Viel Spaß beim Stricken!
08.01.2025 - 07:11
![]() Geri wrote:
Geri wrote:
Re bonjour Merci pour votre reponse mais je parlais des mitaines et pas du bonnet ( desolee j ai oublie de la preciser). Peut on donc tricoter les mitaines en aiguilles circulaires et si c est le cas de quelles longueur pour eviter de le faire en magic loop Merci d avance de votre aide Geri
05.11.2024 - 13:16DROPS Design answered:
Bonjour Mme Geri, les mitaines se tricotent en rond mais sur les aiguilles doubles pointes, si vous voulez utiliser une aiguille circulaire, vous devrez procéder en magic loop (cf lien précédent) avec une aiguille d'au moins 80 cm. Bon tricot!
05.11.2024 - 16:25
![]() Geri wrote:
Geri wrote:
Bonjour, Est il possible de tricoter ce modele avec des aiguilles circulaires ? Et si c est le cas quelle longueur suggérez vous. J ai essayé avec des aiguilles circulaires de 40 cm et c est impossible... Merci de votre aide Cordialement Geri
05.11.2024 - 10:20DROPS Design answered:
Bonjour Mme Geri, le bonnet se tricote en allers et retours, mais on peut fort probablement le tricoter en rond, il faudra juste adapter le point mousse (cf vidéo). Lorsque vous voulez utiliser une aiguille circulaire sur un ouvrage plus court que la longueur du câble, vous pouvez tricoter avec la technique du magic loop. Bon tricot!
05.11.2024 - 12:39
![]() Geeske wrote:
Geeske wrote:
Goedendag, ik heb een vraag over de duimspie: Wat wordt bedoeld met de volgende tot de laatste? Alvast bedankt voor uw reactie. Met vriendelijke groet, Geeske
30.09.2024 - 21:55DROPS Design answered:
Dag Geeske,
Er stond een vertaalfout in het patroon. Het moet de een na laatste steek zijn (in plaats van de volgende tot laatste steek). Als het goed is, is het nu aangepast in het online patroon.
19.10.2024 - 11:32
![]() Kirsten Boer wrote:
Kirsten Boer wrote:
Bij het breien van de duim staat in het Nederlandse patroon "brei aan beide kanten van de volgende tot de laatste steek". Ik denk dat het een slechte vertaling is uit het Engels (next to last) oftewel eennalaatste. Op die manier klopt het patroon weer. Eerder werd er door Drops op een vraag hierover (gesteld door Sandra op 22 januari 2023) een fout antwoord gegeven. Het is goed om een en ander te herstellen in het patroon en in het antwoord aan Sandra
26.01.2024 - 22:06
![]() Marie-Claire wrote:
Marie-Claire wrote:
Bonjour, j’ai commencé ces mitaines et finalement j’aimerais aussi faire des moitiés de doigts, est-ce que je peux continuer un m’inspirant du modèle drops 86-4. Merci encore et bonne journée.
22.11.2023 - 14:54DROPS Design answered:
Bonjour Marie-Claire, le nombre de mailles de chacune de ces mitaines est différent, il vous sera donc difficile de suivre les explications du 86-4, il vaudrait mieux vous baser sur un modèle de mitaines ou même de gants jersey (de même tension qu'ici) avec le même nombre de mailles pour la main. Bon tricot!
22.11.2023 - 16:18
![]() Marie-Claire wrote:
Marie-Claire wrote:
Bonjour, je suis à faire les mitaines et on dit monter 3 mailles au dessus du pouce. J’ai mis 15 mailles en attentes pour le pouce, tricoté les 42 m restantes et c’est là que je monte 3m ? …et comment je les monte? Merci beaucoup de m’éclairer.
06.11.2023 - 00:59DROPS Design answered:
Bonjour Marie-Claire, tout à fait, dans cette vidéo, on montre (time code 3:10 environ) comment monter les mailles au-dessus des mailles en attente (montez bien le nombre indiqué dans les explications ici, même s'il est différent de celui de la vidéo). Bon tricot!
06.11.2023 - 09:15
![]() Sandra wrote:
Sandra wrote:
"Als het werk 14 cm meet, begin dan voor het meerderen van de duimspie. Meerder 1 steek op elke kant van de volgende tot de laatste steek op de naald (dus aan de binnenkant van de hand)" Het is mij niet duidelijk waar die steek juist gemeerderd moet worden. Graag wat meer uitleg.
22.01.2023 - 15:00DROPS Design answered:
Dag Sandra,
Je meerdert 1 steek na de eerste steek en 1 steek voor de laatste steek.
22.01.2023 - 17:21
![]() Benedetta wrote:
Benedetta wrote:
Buongiorno, è possibile lavorare il berretto in tondo su ferri circolari per evitare la cucitura?
04.08.2022 - 07:33DROPS Design answered:
Buongiorno Benedetta, se preferisce può lavorare il modello in tondo. Buon lavoro!
04.08.2022 - 12:21
![]() Bianka wrote:
Bianka wrote:
Könnte ich bei der Mütze ein doppeltes Bündchen stricken oder würde sich der Fall dann zu sehr ändern? Danke Bianka
17.01.2021 - 11:02DROPS Design answered:
Liebe Bianka, wahrscheinlich können Sie ein doppeltes Bündchen hier stricken. Viel Spaß beim stricken!
18.01.2021 - 09:46
|
|
Winter Serenity |
|
 |
 |
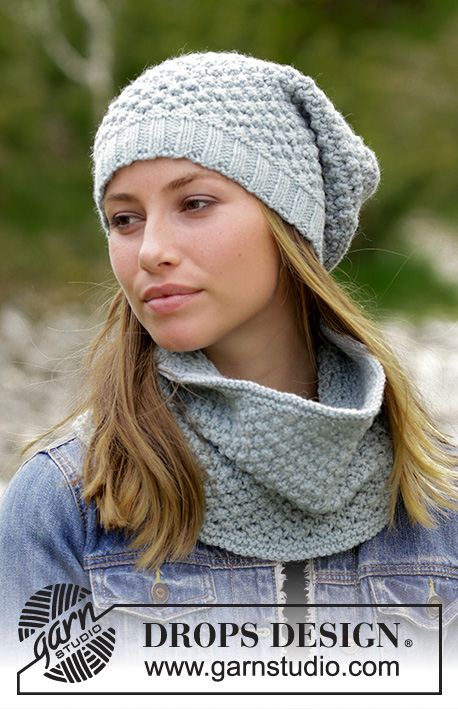
The set consists of: Knitted hat with garter stitch and wrist warmers. The set is worked in DROPS Alpaca.
DROPS 180-35 |
|
|
INFORMATION FOR THE PATTERN: RIDGE/GARTER STITCH (worked back and forth – for hat): 1 ridge = Knit 2 rows. INCREASE TIP (for wrist warmers and hat): All increases are made from the right side! Increase 1 stitch by making 1 yarn over, on the next round/row knit the yarn overs twisted to prevent holes. DECREASE TIP (for hat): All decreases are made from the right side! Decrease 1 stitch after the marker thread as follows: Knit 2 together. ---------------------------------------------------------- HAT: The piece is worked back and forth on the needle and is sewn together mid back to finish. Loosely cast on 122-142 stitches (including 1 edge stitch in each side) with needle size 2.5 mm and Alpaca. Purl 1 row from the wrong side, then work rib (= knit 2/ purl 2) with 1 edge stitch in GARTER STITCH – see description above, in each side. When the piece measures 6 cm, change to needle size 3 mm and insert 5 marker threads in the piece from the right side as follows: Insert 1 marker thread after 1 stitch, the next 4 are inserted with 24-28 stitches between them, after the last marker thread, there are 25-29 stitches. Now continue working in garter stitch. On the next row from the right side, increase 1 stitch after all the marker threads (= 5 stitches increased) – read INCREASE TIP! REMEMBER THE KNITTING TENSION! Increase in this way every 2nd row 3 more times and then every 4th row a total of 7 times = 177-197 stitches. When the piece measures 11-12 cm from the rib decrease 1 stitch after each marker thread on the next row from the right side (= 5 stitches decreased) – read DECREASE TIP! Decrease in this way every 2nd row a total of 17-19 times = 92-102 stitches. Work all stitches together 2 and 2 on each row from the right side a total of 3 times = 12-13 stitches. The hat measures approx. 25-26 cm. Pull 1 thread through the remaining stitches and pull tight. Sew the hat together mid back inside 1 edge stitch. ---------------------------------------------------------- RIGHT WRIST WARMER: The piece is worked in the round with double pointed needles. Cast on 65-70 stitches with double pointed needles size 2.5 mm and Alpaca. Knit 1 round. Then work rib (= knit 2/ purl 3). After 4 rounds rib, decrease all purl 3 to purl 2 by purling together the 2 first stitches in every purl section = 52-56 stitches. Continue rib with knit 2/purl 2 until the piece measures 5-6 cm. Knit 1 round where you decrease 7-11 stitches evenly on round = 45 stitches. Change to double pointed needles size 3 mm and work stocking stitch. REMEMBER THE KNITTING TENSION! When the piece measures 14 cm start increasing to thumb gusset. Increase 1 stitch on each side of the next to last stitch on the round (i.e. on the inside of the hand) – READ INCREASE TIP! Increase in this way on each side of the increased stitches every 3rd round a total of 6-7 times = 13-15 thumb stitches and 57-59 stitches in total. When the piece measures 19-20 cm place the thumb stitches + 1 stitch on each side of these on 1 thread (= 15-17 stitches on the thread). Cast on 3 new stitches behind the thumb on the next round = 45 stitches on the needle. When the piece measures 23-24 cm, increase 11-15 stitches evenly on the next round = 56-60 stitches. Change to double pointed needles size 2.5 mm. Work 8 rounds rib in the round (= knit 1/ purl 1). Cast off with knit over knit and purl over purl. The wrist warmer measures approx. 25-26 cm. THUMB: The piece is worked in the round. Place the stitches from the thread back on double pointed needles size 3 mm and, in addition, knit up 5-7 stitches in the edge at the back of the thumb stitches = 20-24 stitches on the needle. Work 3 rounds stocking stitch. Change to double pointed needles size 2.5 mm and work 6 rounds rib (= knit 1/ purl 1). Cast off with knit over knit and purl over purl. LEFT WRIST WARMER: Work as for right, but increase for thumb on each side of the second stitch on the round (instead of the next to last). |
|
|
Have you made this or any other of our designs? Tag your pictures in social media with #dropsdesign so we can see them! Do you need help with this pattern?You'll find 25 tutorial videos, a Comments/Questions area and more by visiting the pattern on garnstudio.com. © 1982-2025 DROPS Design A/S. We reserve all rights. This document, including all its sub-sections, has copyrights. Read more about what you can do with our patterns at the bottom of each pattern on our site. Have you finished this pattern? |
|


With over 40 years in knitting and crochet design, DROPS Design offers one of the most extensive collections of free patterns on the internet - translated to 17 languages. As of today we count 309 catalogues and 11683 patterns translated into English (UK/cm). 11683
We work hard to bring you the best knitting and crochet have to offer, inspiration and advice as well as great quality yarns at incredible prices! Would you like to use our patterns for other than personal use? You can read what you are allowed to do in the Copyright text at the bottom of all our patterns. Happy crafting!
Post a comment to pattern DROPS 180-35
We would love to hear what you have to say about this pattern!
If you want to leave a question, please make sure you select the correct category in the form below, to speed up the answering process. Required fields are marked *.