
Popular categories
Looking for a yarn?


Comments / Questions (34)
![]() Sonya wrote:
Sonya wrote:
Je ne trouve pas l'expication du modèle. Merci de votre réponse
10.12.2025 - 23:12DROPS Design answered:
Bonjour Sonya, retrouvez les explication en français de ce modèle en cliquant ici. Bon tricot!
11.12.2025 - 09:29
![]() Angelika Escher wrote:
Angelika Escher wrote:
Liebes Team, Ich habe das Modell in der Größe M mit dem angegebenen Garn Drops Snow nachgearbeitet, doch leider stimmt die angegebene Garnmenge nicht. Angegeben sind bei Größe M 500 g und ich habe sicherheitshalber 550 g bestellt und es reicht trotzdem nicht. Ich habe mich komplett an die Anleitung gehalten. Jetzt muss ich nochmal 1-2 Knäuel nachkaufen und hoffe, dass ich die richtige Partie noch bekomme. Die Jacke soll ein Geschenk werden. Beste Grüße Angelika
01.12.2025 - 19:40
![]() Luize wrote:
Luize wrote:
I do not understand which is the front? I understand the back but which is the front? As it seems is opened in the front hence how is only one part of the front?
15.11.2025 - 18:16
![]() GIRARDOT wrote:
GIRARDOT wrote:
Bonjour, il n'y a pas le diagramme???
13.01.2025 - 22:49DROPS Design answered:
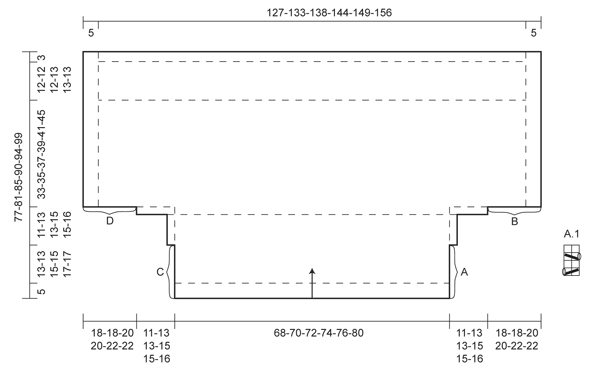
Bonjour Mme Girardot, vous trouverez le diagramme A.1 à côté du schéma des mesures, à droite - c'est un petit diagramme de 2 mailles x 4 rangs. Bon tricot!
14.01.2025 - 10:42
![]() Claudine wrote:
Claudine wrote:
Bonjour DOS : = 140-146-152-158-164-172 m. Continuer en jersey sur les m centrales mais tricoter les 6 m de chaque côté au point mousse jusqu'à la fin. Je suppose que ces 6mailles ne se font pas de chaque côté des mailles centrales mais au début et à la fin de chaque rang Heureusement que j ai regardé le modèle de plus près Pouvez-vous confirmer Cordialement
18.10.2023 - 17:49DROPS Design answered:
Bonjour Claudine, tricotez maintenant en jersey avec les 6 mailles de chaque côté au point mousse, autrement dit, commencez et terminez chaque rang par 6 mailles point mousse et tricotez les autres mailles en jersey. Bon tricot!
19.10.2023 - 08:03
![]() Claudine wrote:
Claudine wrote:
Bonjour En ce qui concerne le DEVANT, à 30cm, il faut augmenter de 11 mailles pour la taille L de chaque côté Je suppose que ces mailles doivent être tricotées au point mousse plus les 4 suivantes C est bien cela ? Merci pour votre retour
16.10.2023 - 20:16DROPS Design answered:
Bonjour Claudine, effectivement, ces 11 nouvelles mailles de chaque côté se tricotent au point mousse, pour avoir ainsi une bordure de 15 mailles point mousse de chaque côté. Bon tricot!
17.10.2023 - 09:35
![]() ELKE ROCKENFELLER wrote:
ELKE ROCKENFELLER wrote:
Hallo Helferlein Leider verstehe ich die Anleitung A1 nicht, so wie es gezeichnet ist, würden die Maschen ja immer weniger?! LG Elke
29.01.2022 - 21:29DROPS Design answered:
Liebe Elke, schauen Sie dieses Video, ab 06:26 zeigt man mit ein Diagram "A.4" wie man das gleiche Muster wie A.1 in diesem Modell strikt. Viel Spaß beim stricken!
31.01.2022 - 10:31
![]() Marcia Ebert wrote:
Marcia Ebert wrote:
I see no diagram A-1 in the pattern. Are there supposed to be other diagrams? What is the stitch pattern for he diagram?
30.01.2020 - 20:35DROPS Design answered:
Dear Mrs Ebert, you will find A.1 diagram on the right side of measurement chart, it's a small diagram over 2 stitches and 4 rows. Happy knitting!
31.01.2020 - 07:18
![]() Fabiana wrote:
Fabiana wrote:
Scusate non riesco a trovare il diagramma A1 per il punto. Mi potete aiutare ? Grazie mille
05.01.2020 - 18:20DROPS Design answered:
Buonasera Fabiana, il diagramma A.1 è in piccolo, alla destra dello schema delle misure. Buon lavoro!
05.01.2020 - 18:23
![]() Helga Amorim wrote:
Helga Amorim wrote:
Não consigo compreender as explicações e a correspondência com o esquema.
20.08.2018 - 00:58
|
||||||||||||||||
Betsy#betsycardigan |
||||||||||||||||
 |
 |
|||||||||||||||
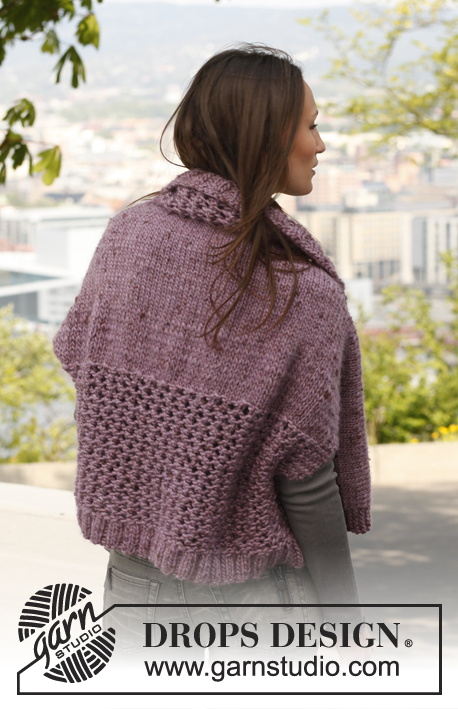
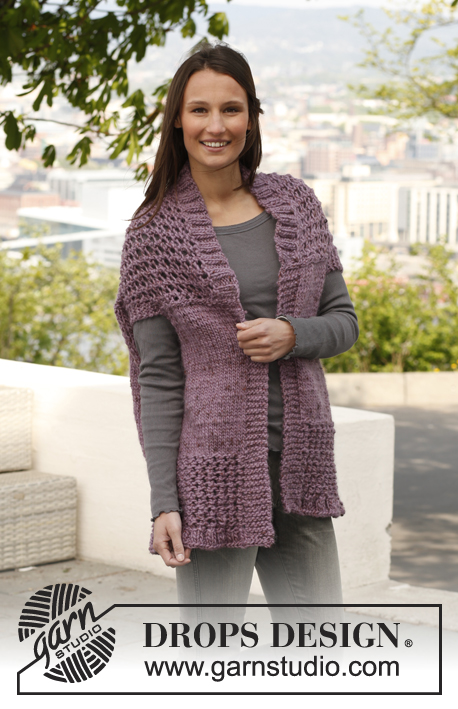
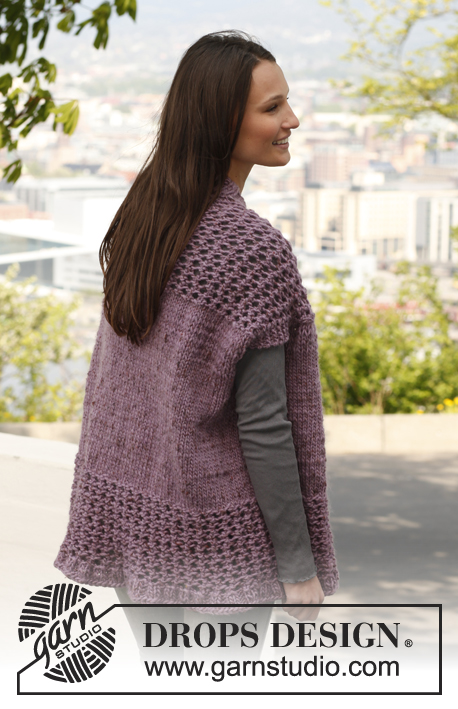
Knitted DROPS jacket with lace pattern in ”Snow”. Size: S - XXXL.
DROPS 141-28 |
||||||||||||||||
|
GARTER ST (back and forth on needle): K all rows. 1 ridge = 2 rows K. PATTERN: See diagram A.1, diagram shows 1 pattern repetition seen from RS. INCREASE TIP: Inc 1 st by making 1 YO. On next row work YO twisted (i.e. work in back loop of st instead of front) to avoid holes. -------------------------------------------------------- JACKET: Worked back and forth on needle in one. Start at the top of front piece and cast on for back piece afterwards. FRONT PIECE: Cast on 84-84-88-88-92-96 sts on circular needle size 8 mm with Snow. On 1st row (= RS) work rib as follows: 1 edge st in GARTER ST - see explanation above, * K 2, P 2 *, repeat from *-*, finish with K 2 and 1 edge st in garter st. Continue rib with 1 edge st in garter st in each side for 5 cm. On last row from WS, K while AT THE SAME TIME dec 16-14-16-14-16-16 sts evenly on row = 68-70-72-74-76-80 sts. On next row from RS work as follows: 1 edge st in garter st, work A.1 and finish with 1 edge st in garter st. REMEMBER THE KNITTING TENSION! Continue with pattern with 1 edge st in garter st in each side until piece measures 18-18-20-20-22-22 cm (last row = WS). At the end of the next 2 rows cast on 3 sts in each side = 74-76-78-80-82-86 sts - while AT THE SAME TIME continuing pattern over the middle 66-68-70-72-74-78 sts and work the outermost 4 sts (3 new sts + 1 edge st from earlier = sleeve edges) each side in garter st. When piece measures 26-28-30-32-33-35 cm, work last row from WS as follows: K over all sts - while AT THE SAME TIME inc 8 sts in all sizes - READ INCREASE TIP - evenly over the middle sts, (not over the outermost 4 sts in garter st) = 82-84-86-88-90-94 sts. At the end of the next 2 rows, cast on 9-11-11-13-13-15 sts in each side = 100-106-108-114-116-124 sts - AT THE SAME TIME work in stocking st over the middle sts. Continue in stocking st over the middle sts - but work the outermost 13-15-15-17-17-19 sts (= sleeve edge) in each side in garter st. Continue to work like this until piece measures 29-31-33-35-37-38 cm (last row = WS). At the end of the next 2 rows, cast on 20-20-22-22-24-24 sts in each side = 140-146-152-158-164-172 sts - AT THE SAME TIME work in stocking st over the middle sts. BACK PIECE: = 140-146-152-158-164-172 sts. Continue in stocking st over the middle sts but work the 6 sts in each side in garter st until finished measurements. When piece measures 62-66-70-74-78-83 cm, K over all sts on last row from WS - AT THE SAME TIME dec 20-20-20-20-20-22 sts evenly over the middle sts (not over the 6 sts in garter st in each side) = 120-126-132-138-144-150 sts remain. Then work A.1 - but continue the outermost 6 sts in garter st until finished measurements - until piece measures 74-78-82-87-91-96 cm. On last row from WS, K over all sts - while AT THE SAME TIME inc 22-24-26-28-30-32 sts evenly over the middle sts (not over the 6 sts in garter st in each side) = 142-150-158-166-174-182 sts. Then work rib on next row from RS as follows: 6 sts in garter st, * K 2, P 2 *, repeat from *-* until 8 sts remain, finish with K 2 and 6 sts in garter st. Continue rib with 6 sts in garter st in each side until piece measures 77-81-85-90-94-99 cm, loosely cast off all sts with K over K and P over P. ASSEMBLY: Sew edge A against edge B - see chart - in front loop of outermost st = side seam, the remaining opening is left armhole. Sew tog short sides on sleeve edge. Repeat the same way with edge C and edge D in the other side (= right side seam and armhole). |
||||||||||||||||
Diagram explanations |
||||||||||||||||
|
||||||||||||||||
 |
||||||||||||||||
Have you finished this pattern?Tag your pictures with #dropspattern #betsycardigan or submit them to the #dropsfan gallery. Do you need help with this pattern?You'll find 6 tutorial videos, a Comments/Questions area and more by visiting the pattern on garnstudio.com. © 1982-2026 DROPS Design A/S. We reserve all rights. This document, including all its sub-sections, has copyrights. Read more about what you can do with our patterns at the bottom of each pattern on our site. |
||||||||||||||||


With over 40 years in knitting and crochet design, DROPS Design offers one of the most extensive collections of free patterns on the internet - translated to 17 languages. As of today we count 324 catalogues and 12252 patterns translated into English (UK/cm). 12252
We work hard to bring you the best knitting and crochet have to offer, inspiration and advice as well as great quality yarns at incredible prices! Would you like to use our patterns for other than personal use? You can read what you are allowed to do in the Copyright text at the bottom of all our patterns. Happy crafting!
Post a comment to pattern DROPS 141-28
We would love to hear what you have to say about this pattern!
If you want to leave a question, please make sure you select the correct category in the form below, to speed up the answering process. Required fields are marked *.