
Popular categories
Looking for a yarn?


|
|
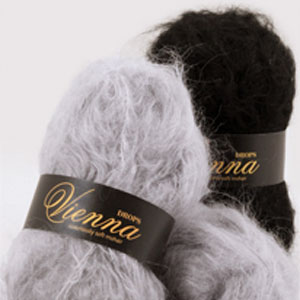
Gray Clouds |
|
|
|
|
DROPS Cardigan in Vienna
DROPS 82-25 |
|
|
Knitting Tension: 6 stitches x 7 rows using 15mm needle in stocking stitch = 10x10cm Decreasing: All decreases are done from the right side of the cardigan within garter sts. For neckline decrease as follows: after garter st: slip st as if to knit it, knit 1, psso, before garter st: knit 2 together. Back: Cast on 30-32-35-37-40 sts using 2 threads of Vienna and 15mm needle, remove one thread and knit 2 rows garter stitch. Continue in stocking, but knit the first and last 2 sts garter (for split). When back measures 12 cm, discontinue the split and cast on 1 new st each side (edge st) = 32-34-37-39-42 sts. Continue in stocking stitch and 3 garter sts each side until there are 4 rows garter over the split. Hereafter, continue in stocking stitch over all sts and decrease 1 st each side when back measures 20 cm = 30-32-35-37-40 sts. When back measures 56-57-58-59-60 cm, decrease for armhole each side on every other row as follows: 3 sts 1 time, 2 sts 0-0-1-1-2 times and 1 st 1-2-1-1-2 times = 22-22-23-25-26 sts. When back measures 74-76-78-80-82 cm cast off middle 4-4-5-5-6 sts and knit each shoulder separately. Shape the neckline by decreasing 1 st on both neck edges = 8-8-8-9-9 sts left on each shoulder. Cast off when back measures 76-78-80-82-84 cm. Left Front: Cast on 19-20-21-22-24 sts (incl 4 front band sts) using 2 threads of Vienna and 15mm needle, remove 1 thread and knit 2 rows garter stitch. Tip: lift 1st st mid front off at beg of row and knit it in garter at the end to make the edge even. Continue in stocking stitch, but knit 4 front band sts and 2 sts at the side (for split) garter. When front measures 12 cm, discontinue the split and cast on 1 new st at the side (edge st) = 20-21-22-23-25 sts. Continue in stocking stitch and 3 garter sts at the side until there are 4 rows garter over the split. Continue in stocking stitch over all sts and decrease 1 st at side when front measures 35 cm = 19-20-21-22-24 sts. Read all of the rest before knitting it! Collar: When front measures 43 cm, cast on 10 new sts mid front. Continue lifting 1st st off, knit the following 13 sts garter and the rest in stocking stitch. Neckline: At the same time, when front measures 45 cm decrease for neckline within the 14 garter sts (see Decreasing), 1 st every other row 7-7-7-7-8 times. Armhole: At the same time as decreases are made for the neckline, decrease for armhole as on the back. When all decreases for neckline and armhole are made, there are 18-18-18-19-19 sts left. When front measures 76-78-80-82-84 cm, cast off 8-8-8-9-9 sts for shoulder = 10 collar sts left on needle. Collar: Continue knitting the 10 collar sts in garter as follows: *1st row: garter over all sts, 2nd row: garter over all sts, 3rd row: garter over only the 7 front sts, 4th row: garter over only the 7 front sts*, repeat from *to* until the collar measures 5-5-6-6-6.5 cm on the inner side (to be stitched to back neckline) – it will measure 10-10-12-12-13 on the outer side. Right Front: Cast on and knit as left front, but mirrored. Sleeves: Cast on 16-17-18-19-20 sts (incl 1edge st each side) using 2 threads of Vienna and 15mm needle. Remove 1 thread, knit 6 rows garter stitch and continue in stocking stitch. When sleeve measures 12 cm., increase 1 st each side every 11-10-9.5-7.5-7 cm a total of 4-4-4-5-5 times = 24-25-26-29-30 sts. When the sleeve measures 47-45-44-44-43 cm, decrease (loosely) for armhole each side on every other row as follows: 3 sts 1 time, and then 1 st until sleeve measures 54 cm. Cast off 3 sts each side, knit one row and cast off remaining sts. Sleeve measures approx 56 cm. To make up: Join shoulders. Stitch together collar centre back and attach collar to back neckline. Set in sleeves and join side and arm seems. Belt: Cast on 7 sts using 2 threads of Vienna and 15mm needle and knit 120-140 cm garter stitch. Cast off. The whole belt is knitted with 2 threads! |
|

|
|
|
Have you made this or any other of our designs? Tag your pictures in social media with #dropsdesign so we can see them! Do you need help with this pattern?You'll find tutorial videos, a Comments/Questions area and more by visiting the pattern on garnstudio.com. © 1982-2024 DROPS Design A/S. We reserve all rights. This document, including all its sub-sections, has copyrights. Read more about what you can do with our patterns at the bottom of each pattern on our site. |


With over 40 years in knitting and crochet design, DROPS Design offers one of the most extensive collections of free patterns on the internet - translated to 17 languages. As of today we count 304 catalogues and 11422 patterns - 11422 of which are translated into English (UK/cm).
We work hard to bring you the best knitting and crochet have to offer, inspiration and advice as well as great quality yarns at incredible prices! Would you like to use our patterns for other than personal use? You can read what you are allowed to do in the Copyright text at the bottom of all our patterns. Happy crafting!
Comments / Questions (21)
Hi, is there an English translation for this pattern please?
05.09.2023 - 16:34DROPS Design answered:
Dear Mrs Holt, sure, just click on the scroll down menu below the picture to edit language. Happy knitting!
06.09.2023 - 08:43Je voudrais réaliser ce gilet Gray Clouds, mais la laine Drops Vienna n'existe plus, je voudrais un rendu similaire, donc je pense à la laine Drops KidSilk ou Brushed alpaca silk. Pouvez-vous m'indiquer le nombre de pelotes nécessaires en tricotant avec 2 fils pour une taille M et me préciser si je dois modifier les explications fournies ci-dessus. Je vous remercie par avance.
07.10.2022 - 21:36DROPS Design answered:
Bonjour Katia, utilisez notre convertisseur pour trouver les alternatives suggérées (dont 2 fils Brushed Alpaca Silk ou 3 fils Kid-Silk) et les nouvelles quantités en fonction de votre taille. Boon tricot!
10.10.2022 - 08:20Da jeg ikke kunne få Vienne, har jeg købt iflg. anvisning Kid Silk. Strikkes med 3 tråde. Har iflg opskrift slået 32 m på pinde 15 op. Det bliver alt for småt. 17 m x12 p = 10x10. Kan jeg bruge Kid -Silk ? Hvis ikke , findes der en anden opskrift. Lig denne. Håber meget på hjælp. Med venlig hilsen Mona Burkal
04.05.2021 - 14:36Hej, varför ska jag ha två trådar när jag lägger upp maskor då blir det ju dubbelt antal maskor eller??? Nybörjare undrar! Mvh Christina
06.02.2021 - 15:48DROPS Design answered:
Hei Christina. Garnet DROPS Vienna er et ganske lett garn, slik at for å få en tyngde nederst på plagget (så det ikke ruller seg lett oppover) legges det opp med 2 tråder. mvh DROPS design
08.02.2021 - 13:44I understand the Vienna yarn is discontinued. What is the alternate yarn I can use?
13.06.2020 - 20:09DROPS Design answered:
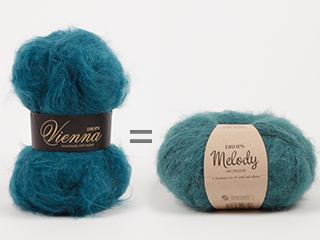
Dear Jenny, Vienna belonged to yarn group D, so you may use Melody or work with 2 strands of Brushed Alpaca Silk or various strands of Drops Kid Silk. Happy knitting!
14.06.2020 - 22:50Hei , again I have allready tryed to Get an other alternativ, the answer I got was that it had gone out in the collection. IT was because of that I ask of on other alternativ. Thanks for hjelp to fine that.
08.05.2020 - 14:07DROPS Design answered:
Dear Liselotte, try our yarn converter (click here) and add the informations given in the previous answer to get some alternatives. Read more about alternatives here. Happy knitting!
08.05.2020 - 15:43Hei! Lurer på hvilket alternativ kan man ta istedet for Drops Vienna, 200 gr, som man skal bruke til 82_25 Hvis størrelse small passer tilbryststørrelsen 92 cm Vil gjerne ha et garn som kun er naturmaterialer, og ikke med nylon, eller polyester.
07.05.2020 - 14:25DROPS Design answered:
Hej Liselotte, hvis du prøver vores garnkalkulator, så får du 4 resultater op. Du skriver; garn: DROPS vienna, antall gram: 200, 1 tråd og klikker på Finn alternativer. God fornøjelse!
08.05.2020 - 13:27Thank you for all the help so far. As you can tell from my Qs, I'm working my way through the pattern. Re the 3rd & 4th row of the collar - what do I do with the other 3 stitches that I don't knit in garter?
05.08.2019 - 20:54DROPS Design answered:
Hello S Cullen. On row 3 and 4 you don’t work all 10 sts, but only 7. On row 3, you work the first 7 sts and leave the other 3 sts on the left needle without working them, turn and work back on the 7 sts (row 4). Happy knitting!
05.08.2019 - 21:28Hi, I'm new to knitting, so I don't understand: 'lift 1st st mid front off at beg of row and knit it in garter at the end to make the edge even'. Can you please explain a bit more or is there a video of how to do this? Thanks!
01.08.2019 - 21:49DROPS Design answered:
Dear S Cullen, you don't work the first stitch, but simply pass the stitch on the right needle, and knit the last stitch on needle in garter stitch. When you turn the piece, do the same. Happy knitting!
02.08.2019 - 15:48Hi, the pattern says :'Continue in stocking, but knit the first and last 2 sts garter (for split).' But I don't know what split is being referred to? Why is a split needed / what is it for please? How is the split formed? Thank you
27.07.2019 - 20:39DROPS Design answered:
Dear Ms. Cullen, split is at the bottom of both sides and allow the garment to open a bit at the hips. See chart - there is small link at every side, it shows where split start. Split isnt special formed and if you dont want to make it, just continue as before till the end of work (without garter sts). Happy knitting!
27.07.2019 - 20:53