
Popular categories
Looking for a yarn?


Comments / Questions (71)
![]() Linh wrote:
Linh wrote:
Attention, la laine rouge déteint beaucoup. Meme en juste trempant la combinaison, le contour blanc est devenu rose. C'est vraiment dommage.
22.10.2012 - 19:56DROPS Design answered:
Bonjour Linh, il est très important de toujours bien suivre les instructions de lavage ! Cf Produits/Conseils pour l'entretien: pas trop de lessive, attention à celles qui sont trop fortes et/ou avec des agents blanchissants, toujours rincer jusqu'à ce que l'eau soit claire,ne jamais faire sécher un vêtement trop mouillé, toujours enlever le maximum d'eau en pressant dans une serviette par ex. Suivez bien les instructions d'entretien et le rouge ne déteindra plus sur le blanc.
22.10.2012 - 21:20
![]() Friebelino wrote:
Friebelino wrote:
Hallöchen, möchte von diesem Modell gerne das Foto als Vorlage benutzen, wie komme ich daran???
18.10.2012 - 16:20DROPS Design answered:
Hallo Friebelino, Sie können das Foto und die Anleitung ausdrucken.
22.10.2012 - 09:07
![]() A-L Hyvönen wrote:
A-L Hyvönen wrote:
Hur stickar jag ärmar.
21.09.2012 - 17:42DROPS Design answered:
Förklaring på hur du stickar ärmar finns på bak och framstycket. /DROPS Design
26.09.2012 - 11:02
![]() Maggy wrote:
Maggy wrote:
Hallo, habt ihr den Strampler mit 2 Fäden gestrickt oder kann ich ihn auch mit 1 Faden stricken ? wird das nicht zu dick mit 2 Fäden ?
07.03.2012 - 13:07DROPS Design answered:
Ja, der Strampler ist mit 2 Fäden auf Garngruppe A gestrich. Sie können auch mit 1 Faden aus der Garngruppe C stricken.
07.03.2012 - 14:32
![]() Ulrike wrote:
Ulrike wrote:
Was für ein süßer Hingucker! Ich hab diesen Anzug für meinen kleinen Sohn zur Geburt gestrickt. Pünktlich zu Weihnachten konnte er ihn anziehen. Die Verwandtschaft fand's natürlich toll! Und richtig kuschelig warm für Tragetuch und Kinderwagen ist der Woll-Overall auch noch - perfekt! Vielen Dank an die designer :-)
30.12.2011 - 18:09
![]() JeleSuext wrote:
JeleSuext wrote:
Hello I want to say hello everyone. I'm start here - parenting books parenting books obraczki slubne
17.11.2011 - 10:00
![]() Ulrike wrote:
Ulrike wrote:
Die Frage hat sich schon erledigt, ich habe falsche gelesen!
08.11.2011 - 18:39
![]() Ulrike wrote:
Ulrike wrote:
Hilfe, ich komme mit den Ärmeln nicht ganz klar. Wenn ich die 13 Zunahmen (kleinste Größe) über 26 Reihen ausführe, werden die Ärmel-Öffnungen leicht schräg (9 mal 1 Masche zugenommen). Ist das so gewollt? Oder müssen die 13 Zunahmen über 13 Reihen gemacht werden, was ich schwierig fände (Zunahmen am Anfang UND Ende einer Reihe). Vielen Dank für Ihre Hilfe.
08.11.2011 - 18:19
![]() DROPS Design wrote:
DROPS Design wrote:
Ermene er strikke på (strikkes ikke for seg selv).
11.05.2011 - 12:07
![]() Helene wrote:
Helene wrote:
Jeg finner ikke oppskrift på ermene? Jeg har fått lagt opp til skuldre, og felt av til hals... Men hvor mange masker skal jeg ta opp til ermer, hvor ofte skal jeg felle?
10.05.2011 - 21:10
|
|
My First Christmas |
|
|
|
|
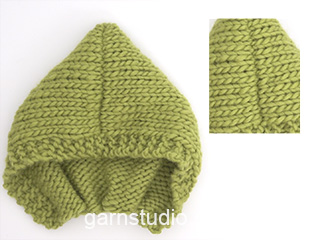
Santa onesie with hood for baby and children in 2 threads DROPS Alpaca
DROPS Baby 19-16 |
|
|
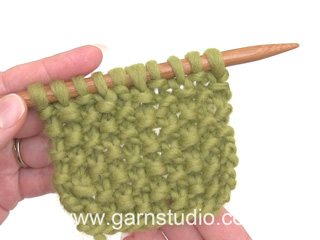
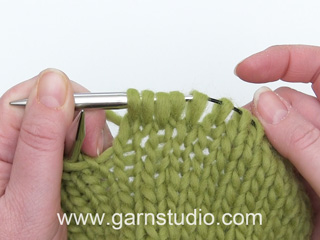
SEED ST: Row 1: * K1, P1 *, repeat from *-*. Row 2: K over P and P over K. Repeat row 2. GARTER ST (back and forth on needle): K all rows. BUTTONHOLES: Make buttonholes on right front band. 1 BUTTONHOLE = K tog 3rd and 4th st from mid front and make 1 YO. Make buttonholes when piece measures a total of: SIZE 1/3 MONTHS: 23, 30, 37, 44, 51 cm / 9", 11¾", 14½", 17¼", 20". SIZE 6/9 MONTHS: 28, 36, 44, 52, 60 cm / 11", 14¼", 17¼", 20½", 23⅝". SIZE 12/18 MONTHS: 31, 38, 46, 53, 61, 68 cm / 12¼", 15", 18", 21", 24", 26¾". SIZE 2 YEARS: 34, 42, 50, 58, 66, 74 cm / 13⅜", 16½", 19¾", 22¾", 26", 29⅛". SIZE 3/4 YEARS: 39, 48, 56, 65, 73, 82 cm / 15¼", 19", 22", 25½", 28¾", 32¼" ---------------------------------------------------------- ---------------------------------------------------------- LEG: Worked in the round on double pointed needles. LOOSELY cast on 34-36-40 (44-48) sts on double pointed needles size 4.5 mm / US 7 with 2 threads white. K 1 round and continue in SEED ST – see above. When piece measures 12 cm / 4¾" change to double pointed needles size 5 mm / US 8 and 2 threads red and continue in stockinette st. Insert a marker at beg of round = inside of leg. REMEMBER THE GAUGE! When piece measures 14 cm / 5½" inc 1 st each side of marker, and repeat the inc on every 2-2-3 (4-5) round a total of 7-8-9 (9-10) times = 48-52-58 (62-68) sts. When piece measures 21-24-27 (32-37) cm / 8¼"-9½"-10⅝" (12½"-14½") bind off 4 sts at the inside of leg (= 2 sts each side of marker) = 44-48-54 (58-64) sts. Put piece aside and knit the other leg in the same way. BODY: Slip both legs on the same circular needle size 5 mm / US 8 with the inside of legs towards each other = 88-96-108 (116-128) sts. Now continue back and forth on circular needle from mid front as follows (first row = RS): Cast on 3 new sts on needle, K all sts on row and cast on 3 new sts at the end of row = 94-102-114 (122-134) sts. Insert a marker 25-27-30 (32-35) sts in from each side (= 44-48-54 (58-64) sts between markers on back piece). Continue in stockinette st with 5 sts each side towards mid front in garter st (= front bands). AT THE SAME TIME when piece measures 23-28-31 (34-39) cm / 9"-11"-12¼" (13⅜"-15¼") make buttonholes on right front band – SEE ABOVE! When piece measures 45-53-61 (66-73) cm / 17¾"-21"-24" (26"-28¾") divide the piece by the 2 markers and complete front and back pieces separately. BACK PIECE: = 44-48-54 (58-64) sts. Continue in stockinette st, AT THE SAME TIME cast on new sts at the end of every row each side for sleeves: 3 sts 2-1-3 (1-2) times, 5 sts 1-2-1 (2-2) times, 7 sts 1-1-1 (2-2) times and then 9-10-12 (14-16) sts 1 time = 98-108-120 (140-156) sts on needle. When piece measures 55-64-73 (79-87) cm / 21⅝"-25¼"-28¾" (31"-34¼") bind off the middle 16-18-18 (20-20) sts for neck and complete each shoulder/sleeve separately. Work 2 rows stockinette st on the remaining 41-45-51 (60-68) sts and bind off LOOSELY. LEFT FRONT PIECE: = 25-27-30 (32-35) sts. Continue in stockinette st with the 5 front band sts in garter st as before, AT THE SAME TIME cast on new sts at the end of every row towards the side for sleeve as described for back piece = 52-57-63 (73-81) sts. When piece measures 52-61-69 (75-83) cm / 20½"-24"-27⅛" (29½"-32¾") bind off 5-6-6 (7-7) sts towards mid front for neck and bind off to shape the neckline at the beg of every row from mid front: 2 sts 2 times and 1 st 2 times = 41-45-51 (60-68) sts left on needle for shoulder/sleeve. Continue until piece measures 56-65-74 (80-88) cm / 22"-25½"-29⅛" (31½"-34⅝") and bind off LOOSELY. RIGHT FRONT PIECE: Like left front piece, but mirrored – remember buttonholes on front band. ASSEMBLY: Sew upper arm seams, edge to edge in outer loops of sts. Place right front band over left front band and sew tog at the bottom of body piece. Sew under arm seams, edge to edge in outer loops of sts. Sew on buttons. CUFF: Pick up 32-36-36 (40-40) sts on double pointed needles size 4.5 mm / US 7 with 2 threads white round sleeve edge. Work seed st in the round until cuff measures 5 cm / 2" and bind off LOOSELY with K over P and P over K. Repeat round the other sleeve edge. Fold sleeve and leg edges towards RS. HOOD: Pick up approx 40 to 50 sts from RS round neck on circular needle size 5 mm / US 8 with 2 threads red – beg after the 5 front band sts on right front piece and finish before the 5 front band sts on left front piece. Work stockinette st back and forth on needle, AT THE SAME TIME on second row (= from RS) inc evenly to 66-70-74 (78-82) sts. Continue until hood measures 21-23-25 (27-28) cm / 8¼"-9"-9¾" (10⅝"-11") and bind off. Sew hood tog at the top in outer loops of sts. Now work border round the opening of hood as follows: Pick up approx 81-89-97 (105-109) sts from RS along the opening of hood on needle size 4.5 mm / US 7 with 2 threads white. Work seed st back and forth on needle until border measures 6 cm / 2⅜" and bind off LOOSELY with K over P and P over K. Fold border double towards RS and sew border to the 5 garter sts each side. Make a white pompom with a diameter of approx 4-5 cm / 1½"-2" and attach to the top of hood. |
|

|
|
|
Have you made this or any other of our designs? Tag your pictures in social media with #dropsdesign so we can see them! Do you need help with this pattern?You'll find 22 tutorial videos, a Comments/Questions area and more by visiting the pattern on garnstudio.com. © 1982-2025 DROPS Design A/S. We reserve all rights. This document, including all its sub-sections, has copyrights. Read more about what you can do with our patterns at the bottom of each pattern on our site. Have you finished this pattern? |


With over 40 years in knitting and crochet design, DROPS Design offers one of the most extensive collections of free patterns on the internet - translated to 17 languages. As of today we count 313 catalogs and 11738 patterns - 11729 of which are translated into English (US/in).
We work hard to bring you the best knitting and crochet have to offer, inspiration and advice as well as great quality yarns at incredible prices! Would you like to use our patterns for other than personal use? You can read what you are allowed to do in the Copyright text at the bottom of all our patterns. Happy crafting!
Post a comment to pattern DROPS Baby 19-16
We would love to hear what you have to say about this pattern!
If you want to leave a question, please make sure you select the correct category in the form below, to speed up the answering process. Required fields are marked *.