DROPS Kid
DROPS Kid
42% Alpaca, 35% Mohair, 18% Wool, 5% Nylon
Discontinued
find alternatives
DROPS SS24

DROPS 11-17

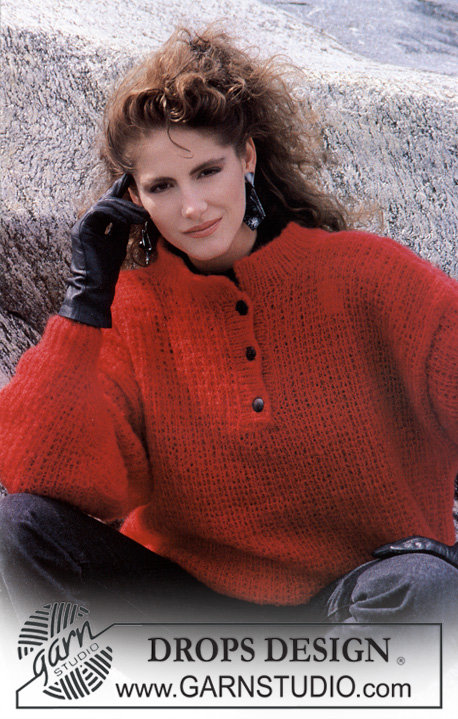
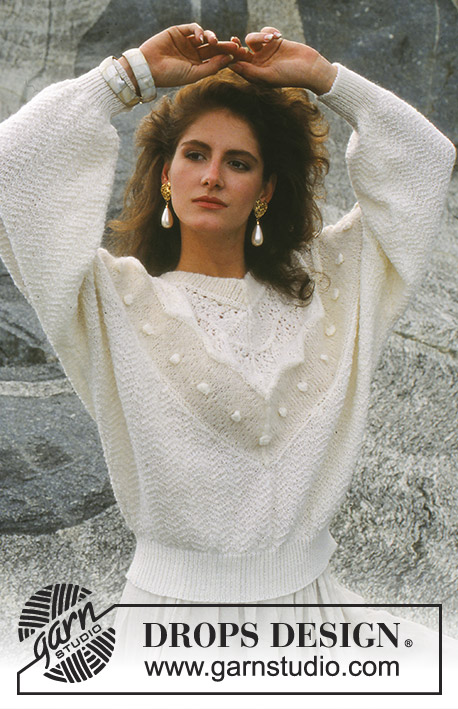
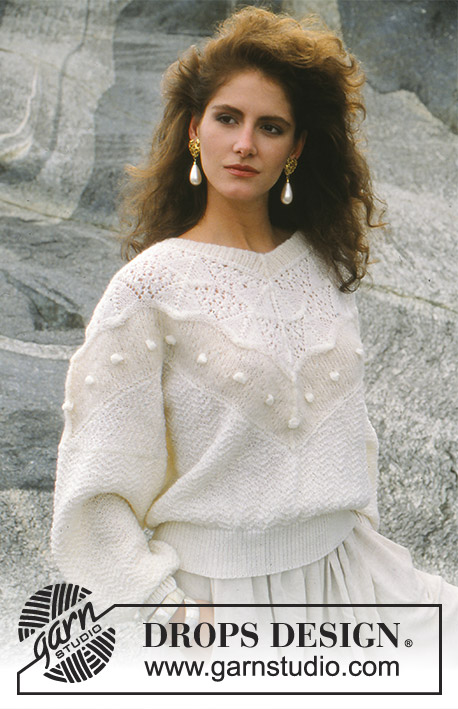
Knitted sweater with patterned V-neck in DROPS Alpaca and DROPS Vivaldi or use DROPS Flora and DROPS Brushed Alpaca Silk Size: S- L

DROPS 11-17
Size: Small – (Medium-Large)

Finished measurements:
Chest measurements: 102 (110-114) cm = 40" (43⅜"-45")
Full length: 56 (58-60) cm = 22" (22¾"-23⅝")
All measurements in charts are in cm.

Materials: DROPS Alpaca from Garnstudio
300 (350-400) g color no 100, off-white
and use: DROPS Vivaldi from Garnstudio
50 (100-100) g color no 01, off-white

Or use:

DROPS Flora from Garnstudio
300 (300-350) g color no 01,off white
and use: DROPS Brushed Alpaca Silk from Garnstudio
25 (50-50) g color no 01, off white

DROPS circular needle and double pointed needles size 2.5 and 3.5 MM = US 1,5 and US 4.
Cable needle.
Knitting gauge:
21 sts x 42 rows on needles size 3.5 MM = US 4 in Alpaca/Flora = 10 x 10 cm = 4" x 4".
15 sts x 28 rows in stockinette sts in Vivaldi/Brushed Alpaca Silk = 10 x 10 cm = 4" x 4".
22 sts in A.2 = approx 9.5 cm = 3⅝".

-------------------------------------------------------

Alternative Yarn – See how to change yarns here
Yarn Groups A to F – Use the same pattern and change the yarn here
Yarn usage using an alternative yarn – Use our yarn converter here

-------------------------------------------------------

DROPS Kid
DROPS Kid
42% Alpaca, 35% Mohair, 18% Wool, 5% Nylon
Discontinued
find alternatives

Pattern instructions

NOTE: This pattern is written in American English. All measurements in charts are in cm. For conversion from inches to cm - click here. There are different terms for crocheting in American and British English. If this pattern includes crochet, click for "crochet terms" here. For this pattern in British English, please click here.
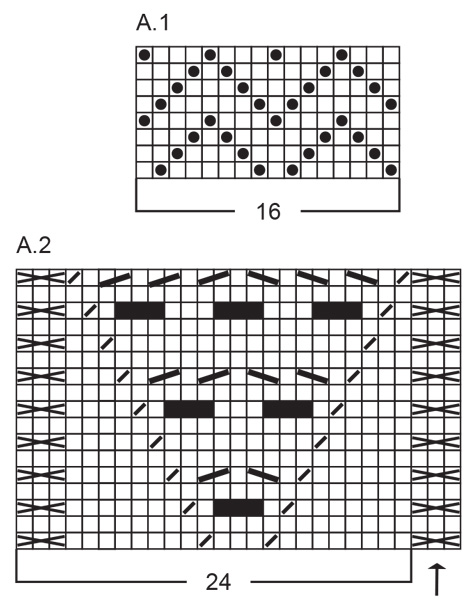
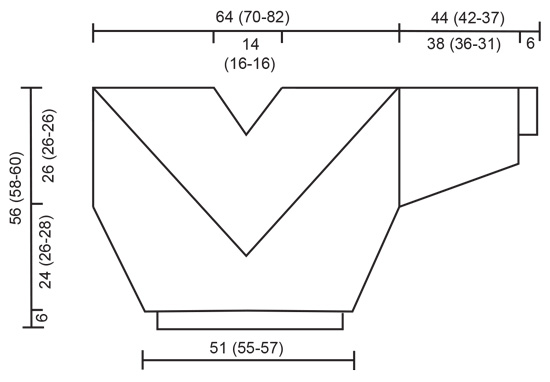
Row of bubbles: Round the neck. Beg mid back with 1 bubble and place 5 (5-7) bubbles on each side of V-neck.

Bubble: Knit 5 sts with Alpaca/Flora in 1 st in Vivaldi/Brushed Alpaca Silk. Work 5 rows back and forth over these 5 sts. Now knit tog sts as follows: Lift 2nd st over 1st st, lift 3rd st over 1st st, lift 4th st over 1st st, lift 5th st over 1st st = 1 st left. Continue in Vivladi/Brushed Alpaca Silk until next bubble.

Pattern: See diagrams A.1 and A.2. Diagrams show all rows seen from the right side.

Rib: *K1, P1*, repeat from *_*.

Decreasing instructions (apply to yoke/V-neck): Dec as follows at the bottom of V-neck back and front and at top of each shoulder (= 4 dec per round): Knit until the 3 middle sts, put the middle st on cable needle in front of work, knit tog the 1st and 3rd st and pass over the st on cable needle. Repeat the dec (4 dec per round) on every other round as instructed in pattern.

Front piece:
Cast on 108 (114-120) sts on needle size 2.5 MM = US 1.5 with Alpaca/Flora and work 6 cm = 2⅜" Rib. Change to needle size 3.5 MM = US 4 and work A.1. At the same time inc 1 st each side 9 (12-22) times as follows: Size S on every 10th row, Size M on every 8th and 9th row alternately, Size L on every 5th row.
At the same time when piece measures 23 (22-19) cm = 9" (8¾"-7½") bind off the 2 middle sts and finish each side separately. Dec to shape the V-neck as follows: dec 1 st on every other row 66 (72-85) times.
At the same time when piece measures 30 (32-34) cm = 11¾" (12½"-13⅜") inc each side on every other row: 2 sts 2 times. Bind off after the last dec for V-neck. Piece measures approx 56 (58-60) cm = 22" (22¾"-23⅝").

Back piece: Cast on and knit as front piece.

Sleeves: Cast on 48 (48-50) sts on needle size 2.5 MM = US 1.5 with Alpaca/Flora and work 6 cm = 2⅜" Rib. Change to needle size 3.5 MM = US 4 and work A.1, at the same time inc 16 (16-14) sts evenly on first row = 64 (64-64) sts. Inc 1 st each side a total of 22 (22-22) times as follows: Size S on every 7th row, Size M on every 6th and 7th row alternately, Size L on every 5th and 6th row alternately. Bind off when sleeve measures 44 (42-37) cm = 17¼" (16½"-14½").

Assembly: Sew the shoulder seams.

Neckline: See Decreasing Instructions above! Pick up 282 (296-350) sts round the V-neck on circular needle size 3.5 MM = US 4 with Vivaldi/Brushed Alpaca Silk. Change to Alpaca/Flora and continue as follows: P 1 round, K 1 round in Vivaldi/Brushed Alpaca Silk, K 1 round in Alpaca/Flora, K 3 (4-3) cm = (1½"-1⅛") in Vivaldi/Brushed Alpaca Silk, 1 row of bubbles (see above), K 3 (4-3.5) cm = (1½"-1¼") in Vivaldi/Brushed Alpaca Silk, K 1 round in Alpaca/Flora , K 1 round in Vivaldi/Brushed Alpaca Silk, K 1 round in Alpaca/Flora, P 1 round in Vivaldi/Brushed Alpaca Silk, at the same time inc no of sts evenly to 264 (264-352).
Now knit 3 rounds in Alpaca/Flora without dec. Continue with A.2 in Alpaca/Flora – beg mid back (see arrow in diagram) and continue the dec – for size S and M: work A.2 1 time vertically. Size L: Work A.2 1 time vertically, P 3 rounds, work A.2 1 time vertically. For all 3 sizes: P 3 rounds and K 1 round in Vivaldi/Brushed Alpaca Silk. There are now approx 184 (184-192) sts on needle. Change to needle size 2.5 MM = US 1.5 and dec evenly on the first round to 140 (140-146) sts. Knit 4 (4-3) cm = (1½"-1⅛") Rib and bind off loosely.
Sew sleeve seams and set in sleeves.

Diagram

All measurements in charts are in cm.

symbols = knit from right side
symbols = purl from right side
symbols = make 1 yarn over
symbols = slip 1 st as if to knit, knit 2 together, pass slipped stitch over
symbols = make 1 yarn over, slip 1 st as if to knit, knit 2 together, pass slipped stitch over, 1 yarn over
symbols = knit 2 together, 1 yarn over
symbols = 1 yarn over slip 1 st as if to knit, knit 1, pass slipped stitch over
symbols = mid-back
diagram
diagram
Do you have a question? See a list of frequently asked questions (FAQ)

Knitting tension is what determines the final measurements of your work, and is usually measured per 10 x 10 cm. It is provided like so: number of stitches in width x number of rows in height - eg: 19 stitches x 26 rows = 10 x 10 cm.

The knitting tension is very individual; some people knit/crochet loosely while others work tightly. You adjust the knitting tension with the needle size, which is why the suggested needle size only serve as a guide! You need to adjust this (up or down) to ensure that YOUR knitting tension matches the knitting tension provided in the pattern. If you work with a different knitting tension than provided you will have a different yarn consumption, and your work will have different measurements than what the pattern suggests.

The knitting tension also determines which yarns can replace each other. As long as you achieve the same knitting tension you can replace one yarn with another.

See DROPS lesson: How to measure your tension/gauge

See DROPS video: How to make a gauge tension swatch

The required amount of yarn is provided in grams, eg: 450 g. To calculate how many balls you’ll need you first need to know how many grams are in 1 ball (25g, 50g or 100g). This information is available if you click on the individual yarn quality on our pages. Divide the amount required with the amount of each ball. For example, if each ball is 50g (the most common amount), the calculation will be as follows: 450 / 50 = 9 balls.

The important thing when changing from one yarn to another is that the knitting/crochet tension remains the same. This is so that the measurements of the finished piece will be the same as on the sketch provided. It is easier to achieve the same knitting tension using yarns from the same yarn group. It is also possible to work with multiple strands of a thinner yarn to achieve the knitting tension of a thicker one. Please try our yarn converter. We recommend you to always work a test swatch.

Please NOTE: when changing yarn the garment might have a different look and feel to the garment in the photo, due to individual properties and qualities of each yarn.

See DROPS lesson: Can I use a different yarn than the one mentioned in the pattern?

All our yarns are categorised into yarn groups (from A to F) according to thickness and knitting tension – group A contains the thinnest yarns and group F the thickest. This makes it easier for you to find alternative yarns to our patterns, should you wish to switch yarn. All yarns within the same group have a similar knitting tension and can easily replace each other. However, different yarn qualities have different structures and properties which will give the finished work a unique look and feel.

Click here for an overview of the yarns in each yarn group

At the top of all our patterns you’ll find a link to our yarn converter, which is a helpful tool should you wish to use a different yarn than suggested. By filling in the yarn quality you wish to replace, the amount (in your size) and number of strands, the converter will present good alternative yarns with the same knitting tension. Additionally it will tell you how much you’ll require in the new qualities and whether you’ll need to work with multiple strands. Most skeins are 50g (some are 25g or 100g).

If the pattern is worked with multiple colours, every colour will have to be converted separately. Similarly, if the pattern is worked with several strands of different yarns (for example 1 strand Alpaca and 1 strand Kid-Silk) you will have to find alternatives for each, individually.

Click here to see our yarn converter

Since different yarns have different qualities and textures we have chosen to keep the original yarn in our patterns. However, you can easily find options among our available qualities by using our yarn converter, or simply pick a yarn from the same yarn group.

It is possible that some retailers still have discontinued yarns in stock, or that someone has a few skeins at home that they would like to find patterns for.

The yarn converter will provide both alternative yarn as well as required amount in the new quality.

If you think it's hard to decide what size to make, it can be a good idea to measure a garment you own already and like the size of. Then you can pick the size by comparing those measures with the ones available in the pattern's size chart.

You'll find the size chart at the bottom of the pattern.

See DROPS lesson: How to read size chart

The needle size provided in the pattern serves only as a guide, the important thing is to follow the knitting tension. And since knitting tension is very individual, you will have to adjust the needle size to ensure that YOUR tension is the same as in the pattern – maybe you’ll have to adjust 1, or even 2 needle sizes, up or down to achieve the correct tension. For this, we recommend that you work test swatches.

Should you work with a different knitting tension than the one provided, the measurements of the finished garment might deviate from the measurement sketch.

See DROPS lesson: How to measure your tension/gauge

See DROPS video: How to make a gauge tension swatch

Working a garment top-down provides more flexibility and room for personal adjustment. For example it is easier to try the garment on while working, as well as making adjustments to length of yoke and shoulder caps.

The instructions are carefully explaining every step, in the correct order. Diagrams are adjusted to the knitting direction and are worked as usual.

The diagram depicts all rows/rounds, and every stitch seen from the right side. It is read from bottom to top, from right to left. 1 square = 1 stitch.

When working back and forth, every other row is worked from the right side and every other row is worked from the wrong side. When working from the wrong side, the diagram will have to be worked reversed: from left to right, knit stitches are purled, purl stitches are knit etc.

When working in the round every round is worked from the right side and the diagram are worked from right to left on all rounds.

See DROPS lesson: How to read knitting diagrams

The diagram depicts all rows/rounds, and every stitch seen from the right side. It is worked from bottom to top, from right to left.

When working back and forth every other row is worked from the right side: from right to left and every other row is worked from the wrong side: from left to right.

When working in the round, every row in the diagram are worked from the right side, from right to left.

When working a circular diagram you start in the middle and work your way outwards, counter clockwise, row by row.

The rows usually start with a given number of chain stitches (equivalent to the height of the following stitch), this will either be depicted in the diagram or explained in the pattern.

See DROPS lesson: How to read crochet diagrams

Instructions for working several diagrams after each other on the same row/round, will often be written like so: “work A.1, A.2, A.3 a total of 0-0-2-3-4 times". This means you work A.1 once, then A.2 is worked once, and A.3 is repeated (in width) the number of times provided for your size – in this case like so: S = 0 times, M = 0 times, L=2 times, XL= 3 times and XXL = 4 times.

The diagrams are worked as usual: begin with the first row in A.1, then work the first row in A.2 etc.

See DROPS lesson: How to read knitting diagrams

See DROPS lesson: How to read crochet diagrams

The total width of the garment (from wrist-to-wrist) will be larger in the larger sizes, despite the actual sleeves being shorter. The larger sizes have longer sleeve caps and wider shoulders, so there will be a good fit in all sizes.

The measurement sketch/schematic drawing provides information regarding the full length of the garment. If it’s a jumper or a jacket the length is measured from the highest point on the shoulder (usually closest to the neckline), and straight down to the bottom of the garment. It is NOT measured from the tip of shoulder. Similarly, the length of yoke is measured from the highest point on the shoulder and down to where yoke is split into body and sleeves.

See DROPS lesson: How to read a schematic drawing

Diagrams are often repeated on the round or in height. 1 repeat is the diagram the way it appears in the pattern. If it says to work 5 repeats of A.1 in the round, then you work A.1 a total of 5 times after/next to each other in the round. If it says to work 2 repeats of A.1 vertically/in height you work the entire diagram once, then begin again at the start and work the entire diagram one more time.

Chain stitches are slightly narrower than other stitches and to avoid working the cast-on edge too tight, we simply chain more stitches to begin with. The stitch count will be adjusted on the following row to fit the pattern and measurement sketch.

The rib edge is more elastic and will contract slightly compared to, for example, stocking stitch. By increasing before the rib edge, you avoid a visible difference in width between the rib edge and the rest of the body.

It’s very easy to cast off too tightly, and by making yarn overs while casting off (and simultaneously casting these off) you avoid a too tight cast off edge.

See DROPS video: How to bind off with yarn overs (yo)

To achieve an even increase (or decrease) you can increase on, for example: every 3rd and 4th row alternately, like so: work 2 rows and increase on the 3rd row, work 3 rows and increase on the 4th. Repeat this until the increase is complete.

See DROPS lesson: Increase or decrease 1 st on every 3rd and 4th row alternately

Should you prefer to work in the round instead of back and forth, you may of course adjust the pattern. You’ll need to add steeks mid-front (usually 5 stitches), and follow the instructions. When you would normally turn and work from the wrong side, simply work across the steek and continue in the round. At the end you’ll cut the piece open, pick up stitches to work bands, and cover the cut edges.

See DROPS video: How to knit steeks and cut open

Should you prefer to work back and forth instead of in the round, you may of course adjust the pattern so you work the pieces separately and then assemble them at the end. Divide the stitches for the body in 2, add 1 edge stitch in each side (for sewing) and work the front and back pieces separately.

See DROPS lesson: Can I adapt a pattern for circular needles into straight needles?

Pattern repeats can vary slightly in the different sizes, in order to get the correct proportions. If you’re not working the exact same size as the garment in the photo, yours might deviate slightly. This has been carefully developed and adjusted so that the complete impression of the garment is the same in all sizes.

Make sure to follow instructions and diagrams for your size!

If you have found a pattern you like which is available in women’s size it’s not very difficult to convert it to men’s size. The biggest difference will be the length of sleeves and body. Start working on the women size that you think would fit across the chest. The additional length will be worked right before you cast off for the armhole/sleeve cap. If the pattern is worked top-down you can add the length right after the armhole or before the first decrease on sleeve.

Regarding additional yarn amount, this will depend on how much length you add, but it is better with a skein too many than too few.

All yarns will have excess fibres (from production) that might come off as lint or shedding. Brushed yarns (ie hairier yarns) have more of these loose, excess fibres, causing more shedding.

Shedding also depends on what is worn under or over the garment, and whether this pulls at the yarn fibres. It’s therefore not possible to guarantee that there will be no shedding

Below are some tips on how to get the best result when working with hairier yarns:

1. When the garment is finished (before you wash it) shake it vigorously so the looser hairs come off. NOTE: do NOT use a lint roller, brush or any method that pulls at the yarn.

2. Place the garment in a plastic bag and put it in your freezer - the temperature will cause the fibres to become less attached to each other, and excess fibres will come off easier.

3. Leave in the freezer for a few hours before taking it out and shaking it again.

4. Wash the garment according to the instructions on the yarn label.

Pilling is a natural process that happens to even the most exclusive of fibers. It's a natural sign of wear and tear that is hard to avoid, and that is most visible in high friction areas of your garment like a sweater's arms and cuffs.

You can make your garment look as new by removing the pilling, using a fabric comb or a pill/lint remover.

Still can't find the answer you need? Then scroll down and leave your question so one of our experts can try to help you. This will be done normally within 5 to 10 working days.
In the meantime, you can read the questions and answers that others have left to this pattern or join the DROPS Workshop on Facebook to get help from fellow knitters/crocheters!

You might also like...

Post a comment to pattern DROPS 11-17

We would love to hear what you have to say about this pattern!

If you want to leave a question, please make sure you select the correct category in the form below, to speed up the answering process. Required fields are marked *.

Comments / Questions (19)

country flag Sophie Cimon wrote:

Je n’arrive pas à comprendre la section des diminutions. Il faut diminuer d’une maille à là fois ? Doit-on suivre la section V-neck en même temps que diminuer d’une maille selon les indications de la section du devant ?

07.09.2020 - 16:12

DROPS Design answered:

Bonjour Mme Cimon, les diminutions du col se font comme indiqué sous DIMINUTIONS (empiècement/encolure V) dès le début (= dès le mailles relevées autour du col), et jusqu'à la fin; n'oubliez pas les diminutions à intervalles réguliers dans le tour envers en Brushed Alpaca Silk . Bon tricot!

08.09.2020 - 09:01

country flag Sophie Cimon wrote:

J’essaie de tricoter le diagramme A1, sur l’envers on doit tricoter de gauche à droite sur le diagramme? Parce que le motifs n’apparaît pas, on dirait que les motifs sont en décalage. Les 16mailles du motifs ne se divise pas sur l’ensemble du tricot

27.08.2020 - 19:26

DROPS Design answered:

Bonjour Mme Cimon, sur l'endroit, tricotez le diagramme de droite à gauche, vous allez le répéter plusieurs fois en largeur, et la dernière fois, vous le répétez sur les dernières mailles, notez la dernière maille tricotée sur l'endroit, ce sera la première maille à tricoter sur l'envers, et vous lirez ensuite le diagramme de gauche à droite sur l'envers en commençant par cette maille, puis vous recommencerez le diagramme de gauche à droite sur les motifs entiers. Bon tricot!

28.08.2020 - 08:12

country flag Françoise BOEHM wrote:

Merci beaucoup pour votre réponse. J'y suis arrivée mais sur 24 mailles et non pas 27. Merci encore.

15.06.2020 - 18:34

DROPS Design answered:

Bonjour Mme Boehm, vous avez raison, le motif se tricote sur 24 et non 27 m -la correction va être faite - bonne continuation!

16.06.2020 - 16:05

country flag Françoise BOEHM wrote:

Bonjour, Est-ce que le diagramme A2 est correct ? En l'exécutant, je n'arrive pas au même nombre de mailles sur les rangs envers que sur les rangs endroit. Au début et à la fin du diag., sur l'endroit, il me reste 1 maille sur 3... que je ne retrouve pas sur l'envers puisqu'avec les 2 jetés je ne récupère que 2 mailles et non pas 4. Pourriez-vous m'expliquer ? Merci. Françoise

15.06.2020 - 16:17

DROPS Design answered:

Bonjour Mme Boehm, A.2 se tricote sur 27 m, tous les 2 rangs (comme au rang 1 seulement), vous diminuez 2 m (3 dernières m de A.2) et faites 2 jetés = vous avez toujours 27 m. Toutes les diminutions des autres rangs sont compensées par 1 jeté (cf 5ème, 6ème et 7ème symbole). Le nombre de mailles sera ainsi toujours 27. Bon tricot!

15.06.2020 - 16:31

country flag Marte wrote:

Hei! Jeg sliter veldig med å forstå deler av oppskriften! Det står «Det økes i hver side 1 m x 22 på hver 5. pinne.» Senere i oppskriften står «videre felles til halsen 1 m x 85 på hver 2. pinne.» Hva betyr x 22 og x 85? Med vennlig hilsen strikker i stuss 😊

15.05.2020 - 21:01

DROPS Design answered:

Hej Marte Det är hur många ganger det ska økes/felles. Detta har nu lagts till i texten. Mvh DROPS Design

18.05.2020 - 13:05

country flag Christine Ronsdorf wrote:

Der Pullover ist nun fertig gestrickt - aber leider viel zu groß geworden. Nun möchte ich ihn nochmals mit einem etwas dickeren Garn stricken. Drops Flora und Brushed Alpaca Silk waren zu dünn. Ich möchte es mit Drops Lima stricken. Wieviel Garn benötige ich davon wenn ich beim 1. Versuch mit 7 Knäul Flora einen Pullover Gr. 42 bekommen habe . Ich möchte ihn in Größe 36 stricken.

05.05.2020 - 17:30

DROPS Design answered:

Liebe Frau Ronsdorf, stimmte Ihre Maschenprobe in der Breite sowie in der Höhe mit Flora (anstatt Camelia) und Brushed Alpaca Silk (anstatt Kid)? Mit Lima würde die Maschenproge ganz unterschiedlich und leiderkönnen wir jeder Anleitung nach jedem individuellen Frage anpassen und einzelne Modelle auf individuellen Wunsch hin umrechnen. Wenn sie Hilfe damit brauchen, wenden Sie sich bitte an Ihrem DROPS Laden, dort hilft man Ihnen gerne weiter. Viel Spaß beim stricken!

06.05.2020 - 09:58

country flag Christine Ronsdorf wrote:

Ich stricke mit flora und kid. die M anzahl ist verändert. bei 51 cm Höhe hab ich das V- + R Teil abgekettet. wenn ich wie Anleitung eine Spritze stricke komm ich auf 70 cm höhe - ist das nicht zu viel? Bei dem Lochmuster im V Ausschnitt werden in jeder 2. Reihe insg. 8 Maschen abgenommen. Diese M fehlen dann im Diagramm A2. Hier komm ich mit der Anleitung nicht klar. Für Hilfe bin ich Ihnen sehr dankbar.

01.05.2020 - 09:54

DROPS Design answered:

Liebe Frau Ronsdorf, wenn Sie abnehmen, werden die Maschen, die nicht mehr inA.2 gestrickt werden können, einfach glatt rechts gestrickt. Beachten Sie nur, daß es in A.2 genauso viel Umschläge und Abnahmen sind damit die Maschenanzahl korrekt bleibt. Viel Spaß beim stricken!

04.05.2020 - 10:23

country flag Bourgeoisat Jocelyne wrote:

Est-ce que l'on commence par le devant sur une aiguille à doubles pointes ou sur une aiguille normale ou sur une aiguille circulaire ? ou Est-ce que l'on utilise l'aiguille circulaire seulement pour rassembler les devant, dos et manches ? Merci pour votre réponse

17.06.2019 - 15:56

DROPS Design answered:

Bonjour Mme Bourgeoisat, on utilise l'aiguille circulaire pour tricoter en allers et retours: le devant, le dos, et les manches, puis, on va tricoter la partie "Col" (quand on relève les mailles) en rond sur l'aiguille circulaire. Bon tricot!

17.06.2019 - 16:01

country flag Arlette wrote:

Hoe meerder ik bij dit patroon? Het patroon klopt niet meer aan de zijkanten als ik er maar 1 meerder. Ik zou dan na de 10e naald 4 steken moeten meerderen aan elke kant. Maar dit gaat ook niet, want ik ga geen averechtse en rechte steken opzetten....

22.10.2017 - 13:25

DROPS Design answered:

Hallo Arlette, De gemeerderde steken aan de zijkant, die niet in patroon passen, kun je in tricotsteek breien.

03.11.2017 - 12:39