
Popular categories
Looking for a yarn?


|
|||||||||||||
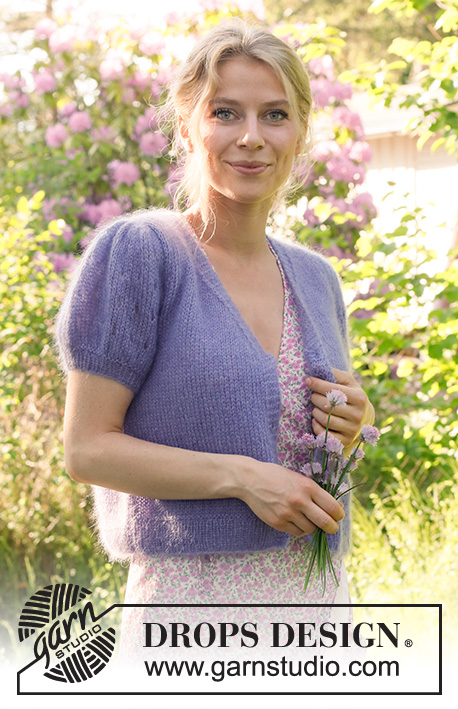
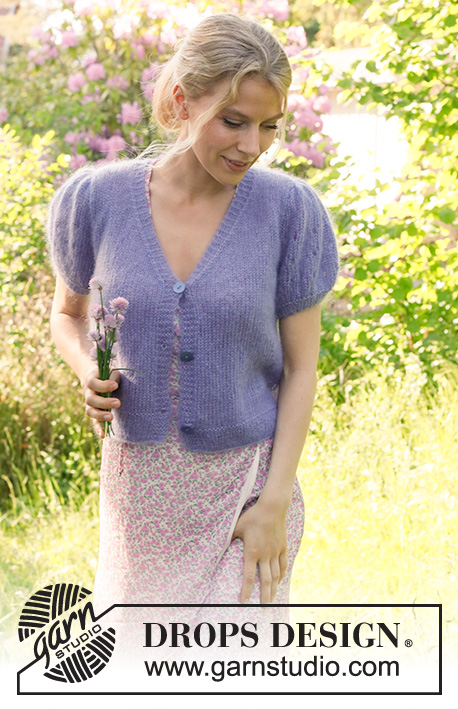
Violet Meadow Cardigan |
|||||||||||||
 |
 |
||||||||||||
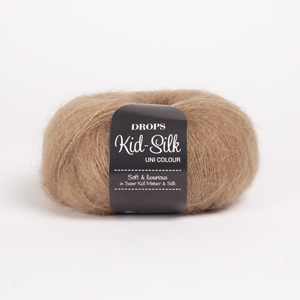
Knitted jacket in 2 strands DROPS Kid-Silk. The piece is worked bottom up with V-neck and puffed sleeves. Sizes S - XXXL.
DROPS 230-56 |
|||||||||||||
|
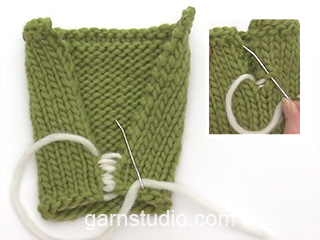
------------------------------------------------------- EXPLANATIONS FOR THE PATTERN: ------------------------------------------------------- RIDGE/GARTER STITCH (worked back and forth): Knit all rows. 1 ridge = knit 2 rows. PATTERN: See diagram A.1. The diagram shows all rows in the pattern from the right side. BUTTONHOLES: Work the buttonholes on the right band. 1 BUTTONHOLE = Knit together the third and fourth stitch from the edge and make 1 yarn over. On the next row knit the yarn over to leave a hole. Work the buttonholes when the piece measures: S: 6, 17 and 28 cm M: 6, 17 and 29 cm L: 6, 18 and 30 cm XL: 6, 14, 22 and 31 cm XXL: 6, 14, 23 and 32 cm XXXL: 6, 8, 24 and 33 cm DECREASE TIP (V-neck) All decreases are worked from the right side: LEFT FRONT PIECE: Work until there are 7 stitches left, knit 2 together, 5 band stitches in garter stitch. RIGHT FRONT PIECE: Work 5 band stitches in garter stitch, slip 1 stitch as if to knit, knit 1 and pass the slipped stitch over the knitted stitch. ------------------------------------------------------- START THE PIECE HERE: ------------------------------------------------------- JACKET – SHORT OVERVIEW OF THE PIECE: The jacket is worked in sections back and forth and bottom up, then sewn together. BACK PIECE: Cast on 93-103-113-125-135-149 stitches with circular needle size 4 mm and 2 strands DROPS Kid-Silk. Purl 1 row from the wrong side. The next row is worked as follows from the right side: 1 edge stitch in GARTER STITCH – read description above, * knit 1, purl 1 *, work from *-* until there are 2 stitches left, knit 1 and 1 edge stitch in garter stitch. Continue this rib for 4 cm. Knit 1 row from the right side where you decrease 16-20-22-26-26-30 stitches evenly spaced = 77-83-91-99-109-119 stitches. Knit 1 row from the wrong side. Change to circular needle size 5 mm. Continue with stocking stitch and 1 edge stitch in garter stitch on each side. REMEMBER THE KNITTING TENSION! When the piece measures 31-32-33-34-35-36 cm, cast off for the armholes at the beginning of each row as follows: 3 stitches 1 time, 2 stitches 2-3-4-5-7-9 times and 1 stitch 2-2-3-4-4-4 times on each side = 59-61-63-65-67-69 stitches. When the piece measures 46-48-50-52-54-56 cm, work 2 ridges over the middle 33-35-37-37-39-41 stitches. On the next row cast off the middle 21-23-25-25-27-29 stitches for the neck and finish each shoulder separately. Then cast off 1 stitch on the next row from the neck = 18-18-18-19-19-19 stitches on the shoulder. Continue with 5 garter stitches towards the neck and the other stitches as before. Cast off when the piece measures 50-52-54-56-58-60 cm. LEFT FRONT PIECE: Cast on 52-56-62-68-72-80 stitches with circular needle size 4 mm and 2 strands Kid-Silk. Purl 1 row from the wrong side. The next row is worked as follows from the right side: 1 edge stitch in garter stitch, * purl 1, knit 1 * work from *-* until there are 5 stitches left, 5 band stitches in garter stitch. Continue this rib for 4 cm. Knit 1 row from the right side where you decrease 9-10-12-14-13-16 stitches evenly spaced (do not decrease over the band) = 43-46-50-54-59-64 stitches. Knit 1 row from the wrong side. Change to circular needle size 5 mm. Work the next row from the right side as follows: 1 edge stitch in garter stitch, work stocking stitch until there are 5 stitches left, 5 band stitches in garter stitch. You will now decrease for the neck and armhole at the same time; read the next section before continuing: V-NECK: When the piece measures 29-30-31-32-33-34 cm, decrease 1 stitch for the neck inside the 5 band stitches mid-front – read DECREASE TIP. Repeat this decrease every 1 cm a total of 16-17-18-18-19-20 times. ARMHOLE: When the piece measures 31-32-33-34-35-36 cm, cast off for the armhole in the same way as on the back piece. When all the decreases are finished there are 18-18-18-19-19-19 stitches on the shoulder. Cast off when the piece measures 50-52-54-56-58-60 cm. RIGHT FRONT PIECE: Cast on 52-56-62-68-72-80 stitches with circular needle size 4 mm and 2 strands Kid-Silk. Purl 1 row from the wrong side. The next row is worked as follows from the right side: 5 band stitches in garter stitch, * knit 1, purl 1 * work from *-* until there is 1 stitch left, 1 edge stitch in garter stitch. Continue this rib for 4 cm. Knit 1 row from the right side where you decrease 9-10-12-14-13-16 stitches evenly spaced (do not decrease over the band) = 43-46-50-54-59-64 stitches. Knit 1 row from the wrong side. Change to circular needle size 5 mm. Work the next row from the right side as follows: 5 band stitches in garter stitch, work stocking stitch until there is 1 stitch left, 1 edge stitch in garter stitch. Continue this pattern. When the piece measures 6 cm, start working the BUTTONHOLES – read description above. You will now decrease for the neck and armhole at the same time; read the next section before continuing: V-NECK: When the piece measures 29-30-31-32-33-34 cm, decrease 1 stitch for the neck inside the 5 band stitches mid-front. Repeat this decrease every 1 cm a total of 16-17-18-18-19-20 times. ARMHOLE: When the piece measures 31-32-33-34-35-36 cm, cast off for the armhole in the same way as on the back piece. When all the decreases are finished there are 18-18-18-19-19-19 stitches on the shoulder. Cast off when the piece measures 50-52-54-56-58-60 cm. SHORT PUFFED SLEEVES: Cast on 48-50-52-54-56-58 stitches with circular needle size 4 mm and 2 strands Kid-Silk. Purl 1 row from the wrong side. The next row is worked as follows from the right side: 1 edge stitch in garter stitch, * knit 1, purl 1 *, work from *-* until there is 1 stitch left, 1 edge stitch in garter stitch. Continue this rib for 3 cm. Knit 1 row from the right side and increase 13 stitches evenly spaced = 61-63-65-67-69-71 stitches. Knit 1 row from the wrong side. Change to circular needle size 5 mm. On the next row from the right side work as follows: Knit 12-13-11-12-10-11, work the next 36-36-42-42-48-48 stitches and increase 12-12-14-14-16-16 stitches over these stitches by making 1 yarn over after every 3rd stitch, knit the last 13-14-12-13-11-12 stitches = 73-75-79-81-85-87 stitches. On the next row, purl the yarn overs twisted. Work pattern on the next row from the right side as follows: 1 edge stitch in garter stitch, 3-0-2-3-5-2 stitches in stocking stitch, work A.1 8-9-9-9-9-10 times, 4-1-3-4-6-3 stitches in stocking stitch and 1 edge stitch in garter stitch. Continue this pattern and A.1 onwards. When the piece measures 9 cm cast off 4 stitches at the beginning of the next 2 rows. When the piece measures 10 cm decrease 2 stitches on each side by knitting together the first 3 stitches and the last 3 stitches on the row (the stitches which now do not fit into the pattern are worked in stocking stitch). Repeat this decrease every 8th-8th-6th-6th-6th-6th row a total of 3-3-4-4-4-4 times = 53-55-55-57-61-63 stitches. When the piece measures 20-20-21-22-24-25 cm knit 1 row and decrease 2-4-1-3-1-3 stitches evenly spaced on this row = 51-51-54-54-60-60 stitches. On the next row purl all stitches together 3 and 3 = 17-17-18-18-20-20 stitches. Cast off. The sleeve measures approx. 21-21-22-23-25-26 cm. ASSEMBLY: Sew the shoulder seams. Sew in the sleeves. Sew the sleeve and side seams inside the 1 edge stitch. Sew the buttons onto the left band. |
|||||||||||||
Diagram explanations |
|||||||||||||
|
|||||||||||||

|
|||||||||||||
|
Have you made this or any other of our designs? Tag your pictures in social media with #dropsdesign so we can see them! Do you need help with this pattern?You'll find tutorial videos, a Comments/Questions area and more by visiting the pattern on garnstudio.com. © 1982-2024 DROPS Design A/S. We reserve all rights. This document, including all its sub-sections, has copyrights. Read more about what you can do with our patterns at the bottom of each pattern on our site. |
|||||||||||||


With over 40 years in knitting and crochet design, DROPS Design offers one of the most extensive collections of free patterns on the internet - translated to 17 languages. As of today we count 304 catalogues and 11422 patterns - 11422 of which are translated into English (UK/cm).
We work hard to bring you the best knitting and crochet have to offer, inspiration and advice as well as great quality yarns at incredible prices! Would you like to use our patterns for other than personal use? You can read what you are allowed to do in the Copyright text at the bottom of all our patterns. Happy crafting!
Comments / Questions (20)
Als de mouw 9cm meet wordt er afgekant voor de mouwkop. En als het werk 21cm meet wordt alles afgekant. Met andere woorden, de mouwkop heeft een hoogte van 12cm? Hoe moet ik die dan passen in de mouwopening van 20cm?
04.06.2024 - 18:55Er der ikke fejl i mønsterforklaringen- der er to tegn for slå om for ekstra maske men ikke forklaring af indtag. Mangler beskrivelsen af halskanten ikke også? Hvor mange masker skal tages op for half kant? På forhånd tak.
15.01.2024 - 09:35DROPS Design answered:
Hej Camo, så er diagramteksten rettet - tak for info :)
16.01.2024 - 14:23I would like to see a picture of the back. I don't understand what it's supposed to look like at the neck.
16.09.2023 - 23:11DROPS Design answered:
Dear Daphne, we don't have any pictures of the back; all of the available photos have been posted online. The neck edge on the back is the last section of the back: an edge worked in garter stitch and it should have a round shape and go right around the neck at the back. Happy knitting!
17.09.2023 - 23:29The V neck shaping says ‘decrease 1 stitch for the neck inside the 5 band stitches mid front’. Does this mean decrease at stitches 6&7? What does mid front mean?
14.06.2023 - 21:39DROPS Design answered:
Hi Joan, The increases are after the first band and before the last band, so th 6th stitch at the beginning of the row and the 6th-to-last stitch at the end of the row. Happy knitting!
15.06.2023 - 08:34Hi there, Please advise, when it says ‘ When the piece measures 31-32-33-34-35-36 cm, cast off for the armholes at the beginning of each row as follows: 3 stitches 1 time, 2 stitches 2-3-4-5-7-9 times and 1 stitch 2-2-3-4-4-4 times on each side = 59-61-63-65-67-69 stitches.’ The ‘CO 3 stitches 1 time’ is this only at the beginning of 1 row, ie one side? Thank you,
23.04.2023 - 21:46DROPS Design answered:
Hi davina, No, the cast off stitches are symmetrical, so at the beginning of every row, and each number of stitches is repeated on both the right and wrong side before starting the next number of stitches. In other words you cast off 3 stitches one time on each side, then 2 stitches the correct number of times on each side. Happy knitting!
24.04.2023 - 06:49Hola! Cuando la labor mida 9 cm cerrar 4 puntos al inicio de las siguientes 2 filas. Cuando la labor mida 10 cm disminuir 2 puntos a cada lado trabajando juntos de derecho los primeros 3 puntos y los últimos 3 puntos en la fila. 1. No entiendo como cerrar los cuatro puntos, cierro 4 en el derecho y 4 en el revés ? O 4 al inicio de cada derecho? En total son 8 puntos cerrados? 2. Tampoco entiendo lo de “2 puntos a cada lado… Gracias!
20.04.2023 - 02:15DROPS Design answered:
Hola Raquel, sí, son 4 puntos por el lado derecho y 4 pts por el lado revés, así que en total 8x2 = 16 puntos (1 fila es tanto por el lado derecho como por el lado revés). 2 pts a cada lado quiere decir 2 pts al inicio y al final de la fila, así que los primeros 3 pts y los últimos 3 pts de cada fila se trabajan juntos de derecho, disminuyendo 2 pts a cada lado.
23.04.2023 - 19:59C'est un joli modèle - je voudrais le tricoter avec des aiguilles droites - pouvez-vous m'envoyer explications - Merci beaucoup -
03.09.2022 - 11:53DROPS Design answered:
Bonjour Mme Roman, ce modèle se tricote en différentes parties assemblées entre elles à la fin, chaque pièce se tricote en allers et retours sur aiguille circulaire pour avoir suffisamment de place pour y loger toutes les mailles, vous pouvez ainsi simplement utiliser des aiguilles droites. Découvrez ici comment adapter un modèle sur aiguilles droites. Bon tricot!
05.09.2022 - 08:52Please would you convert your sizes for the Violet Meadow Cardigan into inches as I cannot find these measurements anywhere and forward to my email address, thank you.
24.06.2022 - 14:59DROPS Design answered:
Dear Susan, the measurements are located in the measurements schematic under the pattern; choose the number according to your size. You can see how to read this schematic here: https://www.garnstudio.com/lesson.php?id=24&cid=19 These measurements are in cm, you can convert them to inches here:https://www.garnstudio.com/conversions.php?cid=19 Happy knitting!
26.06.2022 - 13:19Esta muy lindo este modelo lo estoy elaborando para mi nieta solo no entiendo lo de la hebra entre dos puntos es una lazada por favor me ayuda muchas gracias
25.05.2022 - 13:01DROPS Design answered:
Hola Bertha, si, la hebra entre dos puntos es una lazada. Trabajas 1 derecho, lazada, 1 derecho.
25.05.2022 - 20:20Beste, ik zou graag het model 230-56 breien .Maat M . er staat 150 gram .Is dat voldoende om het pull met 2 draden te breien met naald 5?
21.05.2022 - 18:29DROPS Design answered:
Dag Christine,
Ja hoor, dat is genoeg. Kid Silk is heel dun en licht garen, waardoor je niet veel gram nodig hebt. Een bol weegt 25 gram, dus je hebt dan 5 bollen nodig.
23.05.2022 - 17:06