How to read knitting diagrams

A knitting diagram consists of squares. 1 square = 1 stitch - the symbol definition provide information on how the stitch is worked. The diagram shows all stitches seen from the right side (unless otherwise specified).

A diagram looks like this:
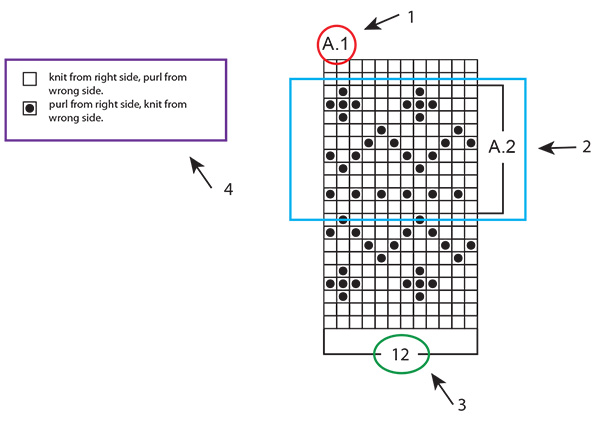
  1. A.1 is the name of the diagram, and refer to the entire diagram.
  2. A.2 is only the part of the diagram within the square brackets.
  3. This number refers to the number of stitches on the 1st row of the diagram.
  4. This is the symbol definition: it explains how each stitch is worked, or in what color (in multicolored patterns).

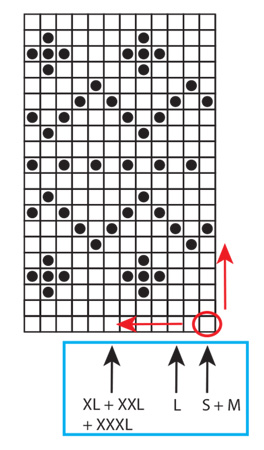
You read a knitting diagram completely opposite to how you would normally read: from right to left, from bottom to top. In other words: you start with the symbol in the bottom right corner, and work your way leftwards and upwards (see RED in diagram below). If you are supposed to start at a different point/with a different stitch, will this be specified - for example: the different sizes can start at different places in the same diagram (see BLUE box below).
If you are supposed to work several repeats of a diagram (ie: work the same diagram several times in width) you’ll work until the end of the diagram row, and start again with the first stitch for the next repeat.

Back and forth:

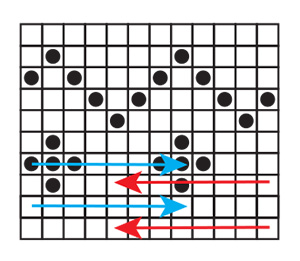
When working back and forth, every other row will be worked from the right side and every other row will be worked from the wrong side. Since the diagram shows all stitches seen from the right side, you’ll have to work it in opposite way when working from the wrong side (see BLUE arrows in diagram below): you read the row from left to right, knit stitches are purled, and purl stitches are knit etc (this will often be specified in symbol definition: “knit from right side, purl from wrong side”).
In the round:

When working in the round all rounds are worked from the right side, and the diagram is read solely from right to left. When starting a new round, simply start working the first symbol on the next row in diagram.
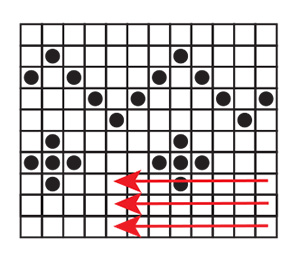
Several different diagrams worked consecutively on the row/round:

If you’re working several different diagrams after each other on the same row/round, work as follows: Work 1st row in diagram 1, continue with 1st row in diagram 2, then 1st row in diagram 3 etc. REMEMBER: if you’re working back and forth, the diagram will have to be worked in the opposite order from the wrong side - ie: start with diagram 3, then diagram 2 and lastly diagram 1. They are also worked in opposite way as usual.
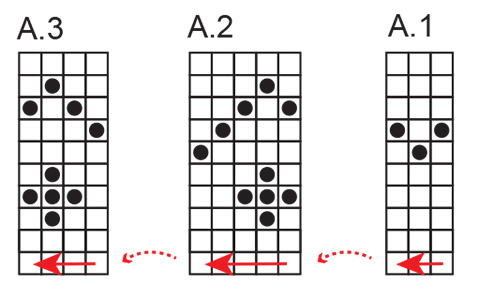
In the pattern this can be written as follows: “work A.1, A.2, A.3 a total of 1-1-2-3-4 times”. This means that you first work A.1, then A.2 and finally you repeat A.3 a total of 1-1-2-3-4 times (depending on your size). It is ONLY A.3 that is repeated, A.1 and A.2 are worked 1 time each.

When stitch count doesn’t match whole repeats of diagram:

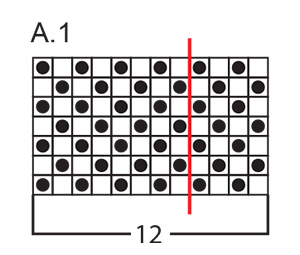
Sometimes the stitch count is not divisible with full/whole repeats of the diagram in width. For example: A.1 covers 12 stitches and is to be repeated over 40 stitches. In this case you will work 3 full repeats of A.1 (=36 stitches), and then work the first 4 stitches in the diagram over the remaining stitches (see RED line below). This is usually the case where the diagram is a repetitive pattern, so that regardless of working full repeats, the pattern will still be consistent.
Comments (610)

Roylene Neal wrote:

On pattern Kaia in the section Back And Front Piece it gives the decreases in cm every 10-6-15-7-17cm/4"-2 3/8"-6"-2 3/4"-6" a total of 2-4-2-4-2 times(=4 dec per round). My question is if I'm making a size 8-10 how are my decreases worked? I guess I just need clarification.

11.05.2019 - 06:22:

DROPS Design answered:

Dear Mrs Neal, in 13.05.2019 - 11:11:

Mo wrote:

Liebes Drops Team, obwohl ich seit Jahren mit höchsten Vergnügen komplizierte Muster Ajour, Aran und Zopf, stricke, ist es mir bis heute nicht gelungen zu verstehen, wie man die einzelnen Stickschriften für die Lacetücher zusammenfügt. Könntet Ihr mit einem schwierigeren Muster/Modell ein Tutorial machen? Ich habe bisher nirgends eine verständliche Anleitung gefunden und möchte doch so gerne so ein Lacewunder stricken. Ganz herzlichen Dank und viele Grüße Mo

14.04.2019 - 17:03:

DROPS Design answered:

Liebe Mo, könnten Sie am besten Ihre Frage unter den Modellen stellen? Es würde viel einfacher Ihnen zu beanworten, hier sind generalle Informationnen. Viel Spaß beim stricken!

23.04.2019 - 16:24:

Michele wrote:

Drops 154/8: work 51 sts/did 35 sts then it reads { K 1, A.2A, A.2 B over the next 8-14-20 sts,) A.2 C, K 2, (turn here) I have 16 sts remaining for size s/m...after the k1, A2A, A2B I have 8 sts left...do I knit A2C, K2 (4sts) twice? Thank you!

31.03.2019 - 17:50:

DROPS Design answered:

Dear Michelle, when you will work over all stitches in short rows, you will have to work A.2 another time, but this A.2 (towards sleeve) will grow much less than the first A.2 (towards back piece) due to the short rows - see 2nd picture on this pattern. Happy knitting!

02.04.2019 - 11:08:

Gunilla wrote:

Hur stickar jag omslaget som jag gjort på rätvarvet, på avigvarvet? Vill få det så snyggt som möjligt.

23.03.2019 - 15:52:

DROPS Design answered:

Hei Gunilla. Jeg antar du strikker glattstrikk. Hvordan du strikker kastet kommer an på om du vil ha hull eller ikke. Hvis du ikke vil ha hull strikker du vridd vrang fra vrangsiden, men om du ønsker hull strikker du kastet vanlig vrang fra vrangsiden. God fornøyelse

25.03.2019 - 14:24:

Lene Bang wrote:

Jeg har med stor spænding kastet mig over "Svalbard" i Drops Air og det er super lækkert. Jeg har dog et problem med at forstå en forklaring i mønsteret. Der står "på denne pind strikkes de 2 første masker i A1/A2 i stedet for 1. Måske i A1/A2 og en kantmaske i retstrik i slutningen af pinden. Jeg har styr på kantmaske men jeg forstår simpelthen ikke resten af den forklaring 😐

16.03.2019 - 06:18:

DROPS Design answered:

Hej Lene, vil du skrive dit spørgsmål ind under kommentarer i selve opskriften, så skal vi se på det så hurtigt som muligt. Husk at markere det som et spørgsmål. Tak :)

03.05.2019 - 13:34:

Janet wrote:

Thank you for sending me to this site for knitting from a chart help. I think I will be able to do it now. Thank you so much!

14.03.2019 - 17:50:

Alice Johannesen wrote:

Jeg har problemer med at læse opskriften Drops 135/3. Jeg strikker str. L, men kan ikke få mønsterrapporterne til at passe med maskeantallet. Det er svært at læse, hvilket maskeantal, der hører til str. L.

12.03.2019 - 10:07:

DROPS Design answered:

Hej Alice, vil du skrive dit spørgsmål ind under kommentarer i selve opskriften, så skal vi se på det så hurtigt som muligt. Skriv gerne hvor du er i opskriften. Husk at markere det som et spørgsmål. Tak :)

03.05.2019 - 13:35:

Carole Ranger wrote:

Bonjour, j'ai commencé le patron Josephine 172-14 drops desing. J'aimerais qu'on m'explique comment on fait le A.1a et A.1b ainsi que le A.2a et A.2b. Je ne comprends pas du tout comment les faire même apres avoir demander à des tricoteuses d'expérience. Je fais la grandeur small, mais j'ai toujours plus de 132 m ddans mon premier rang de après les côtes. Merci beaucoup de me répondre. Carole Ranger

07.03.2019 - 23:54:

Carole Ranger answered:

Bonsoir, merci j'ai trouvée 😃

08.03.2019 - 04:36:

Gillian John wrote:

Trying to use pattern Drops Children 27-31 but do not understand the pattern at all. Please help.

19.02.2019 - 21:28:

DROPS Design answered:

Dear Mrs John, start reading diagram on the bottom corner on the right side and read from the right towards the left from RS: work 4 band sts, 6-7 sts in A.1 (see size), and repeat these 6-7 sts until 5 sts remain on needle, work now the first st in A.1, and finish with the 4 band sts. From WS, work the first st in A.1, then repeat A.1 reading now diagram from the left towards the right. Happy knitting!

21.02.2019 - 11:12:

Leave a comment or question to this lesson

Your email address will not be published. Required fields are marked *.