
Popular categories
Looking for a yarn?


|
||||||||||||||||||||||||||||||||||||||||
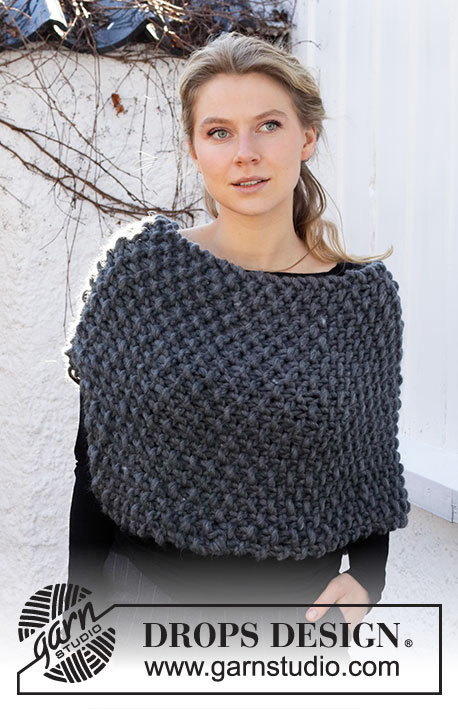
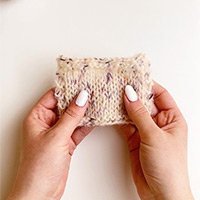
Winter Wisps Set |
||||||||||||||||||||||||||||||||||||||||
 |
 |
|||||||||||||||||||||||||||||||||||||||
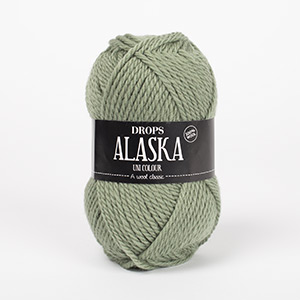
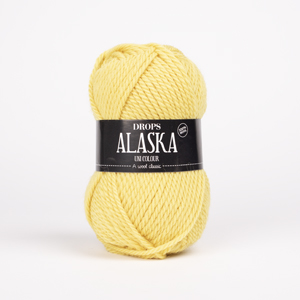
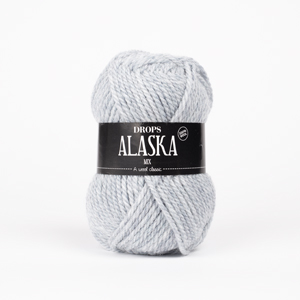
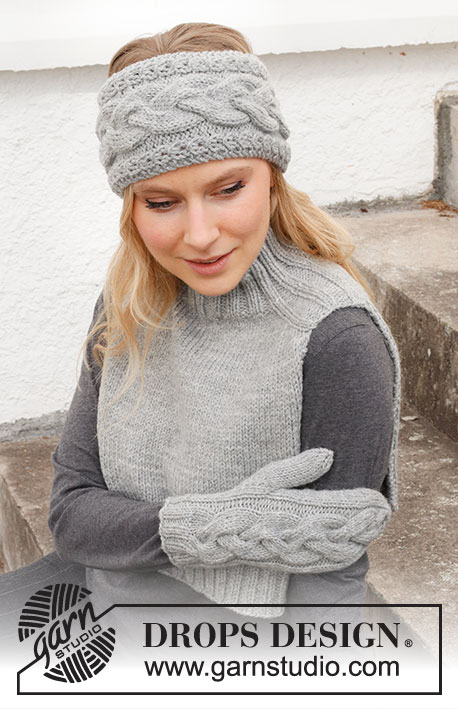
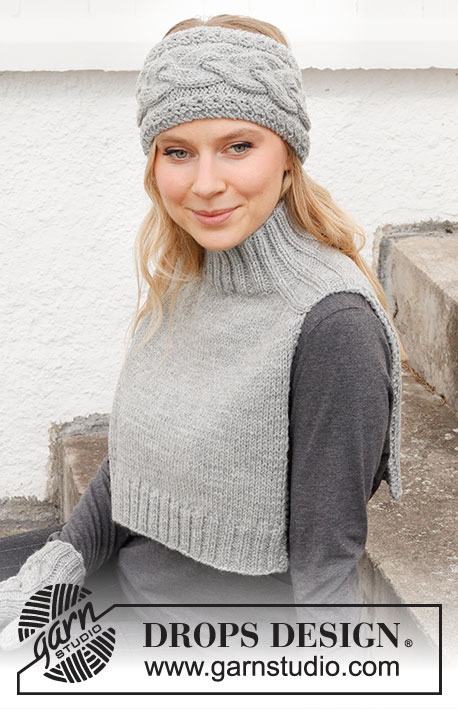
Knitted head band, neck warmer and mittens in DROPS Alaska. Piece is worked with cables and increase for saddle shoulders.
DROPS 214-49 |
||||||||||||||||||||||||||||||||||||||||
|
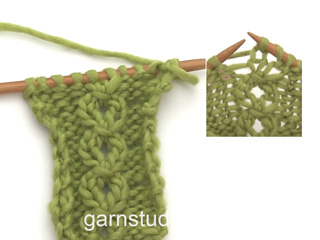
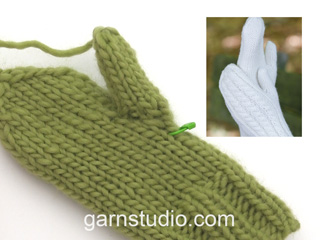
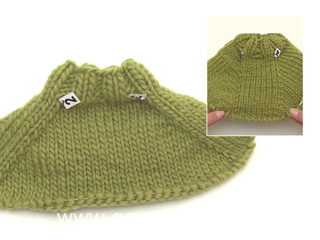
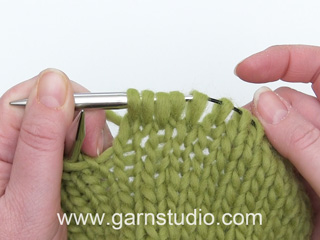
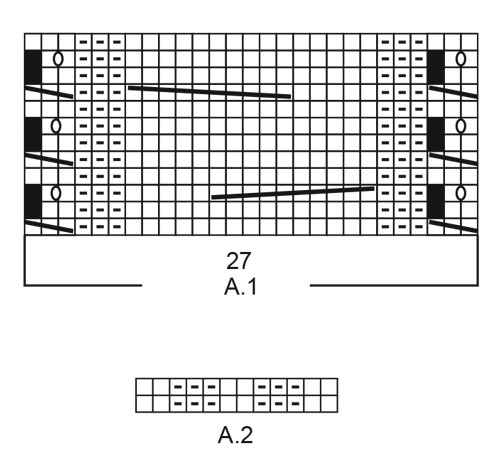
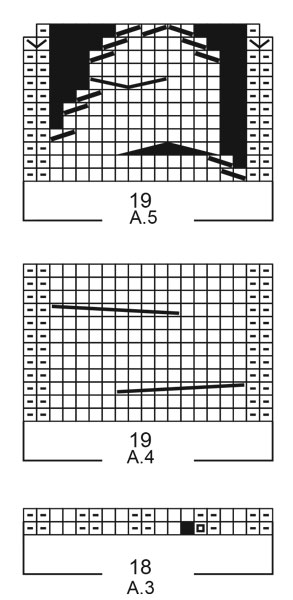
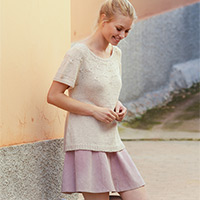
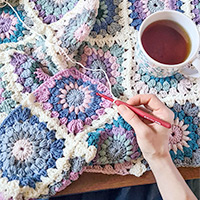
------------------------------------------------------- EXPLANATION FOR THE PATTERN: ------------------------------------------------------- GARTER STITCH (back and forth): Knit all rows. 1 ridge vertically = knit 2 rows. PATTERN: Head band: See diagram A.1. Neck warmer: See diagram A.2. Mittens: See diagrams A.3, A.4 and A.5. Diagrams show all rows in pattern seen from the right side. INCREASE TIP-1 (applies to neck warmer): BEFORE MARKER: The new stitch will be twisted, leaning towards the right. Use left needle to pick up strand between 2 stitches from the round below, pick up strand from behind and knit stitch in front loop. AFTER MARKER: The new stitch will be twisted, leaning towards the left. Use left needle to pick up strand between 2 stitches from the round below, pick up strand from the front and knit stitch in back loop. INCREASE TIP-2 (evenly): To calculate how to increase evenly, use the total number of stitches on row (e.g. 54 stitches), and minus stitches in garter stitch in each side (e.g. 4 stitches) and divide stitches by number of increases to be done (e.g. 12) = 4.1. In this example increase by making 1 yarn over after approx. every 4th stitch. On next row work yarn overs twisted to avoid holes. INCREASE TIP-3 (applies to mittens): Increase 1 stitch by making 1 yarn over. On next round knit yarn over twisted to avoid holes. DECREASE TIP: Decrease in stockinette stitch section on the under side of mitten as follows: Decrease as follows after marker: Slip 1 stitch knitwise, knit 1, pass slipped stitch over (= 1 stitch decreased), work until 2 stitches remain before next marker, knit 2 together (= 1 stitch decreased). ------------------------------------------------------- START THE PIECE HERE: ------------------------------------------------------- HEAD BAND - SHORT OVERVIEW OF THE PIECE: Work piece back and forth on circular needle and sew together when finished. HEAD BAND: Cast on 31 stitches on circular needle size 4.5 mm = US 7 with Alaska. Purl 1 row from wrong side. Then work pattern from right side as follows: 2 edge stitches in GARTER STITCH - see explanation above, A.1 over the next 27 stitches, 2 edge stitches in garter stitch. Continue back and forth like this. REMEMBER THE KNITTING GAUGE! Continue like this until piece measures 49 cm = 19¼", or desired length - adjust to finish after or 4th or 10th row in A.1. Bind off. Sew together head band inside cast-on and bind-off edge. ------------------------------------------------------- NECK WARMER - SHORT SUMMARY OF PIECE: Worked top down. First work in the round until increase for shoulder is done. Then finish front piece and back piece separately. NECK WARMER: Cast on 76-84 stitches on a short circular needle size 4.5 mm = US 7 with Alaska. Knit 1 round. Then work rib as follows: (Knit 2/purl 2) over the first 12-16 stitches, insert 1st marker here, work A.2 over the next 12 stitches (= shoulder stitches), insert 2nd marker here, purl 2, (knit 2/purl 2) over the next 24-28 stitches, insert 3rd marker here, work A.2 over the next 12 stitches (= shoulder stitches), insert 4th marker here, purl 2, (knit 2/purl 2) over the last 12-12 stitches. Continue in the round like this for 8 cm = 3⅛". Switch to circular needle size 5.5 mm = US 9. Insert a marker at beginning of round. Now measure piece from here. Now work pattern as follows: SADDLE SHOULDER INCREASE: Continue with A.2 over shoulder stitches in each side and work in stockinette stitch over the remaining stitches on round, at the same time on first round increase 4 stitches: Increase BEFORE 1st and 3rd marker, and AFTER 2nd and 4th marker- read INCREASE TIP-1. There are only increases on back piece and front piece and number of shoulder stitches remains the same. Increase like this on every round 14-16 times in total = 132-148 stitches. REMEMBER THE KNITTING GAUGE! Work next round as follows: Knit until shoulder stitches, bind off with knit over knit and purl over purl over the 12 shoulder stitches, knit over the next 54-62 stitches before slipping them on a stitch holder for front piece, bind off the next 12 shoulder stitches, knit over all the 54-62 stitches on back piece. BACK PIECE: Work in stockinette stitch back and forth with 2 edge stitches in GARTER STITCH - read explanation above, in each side. When neck warmer measures 27-29 cm = 10⅝"-11⅜" from marker inserted after the neck, increase 12-16 stitches evenly - read INCREASE TIP-2 = 66-78 stitches. Switch to circular needle size 4.5 mm = US 7. Now work rib from right side as follows: 2 stitches in garter stitch, (knit 2/purl 2) until 4 stitches remain, knit 2, 2 stitches in garter stitch. Continue rib like this for 5 cm = 2". Bind off with knit over knit and purl over purl (bind off stitches in garter stitch by knitting). Neck warmer measures approx. 32-34 cm = 12½"-13⅜" from marker. FRONT PIECE: Slip stitches from stitch holder back on circular needle 5.5 = US 9 and work as back piece. ------------------------------------------------------- MITTENS - SHORT OVERVIEW OF THE PIECE: Worked in the round on double pointed needles. LEFT MITTEN: Cast on 40-44 stitches on double pointed needles size 3.5 mm = US 4 with Alaska. Knit 1 round. Work rib (knit 2/purl 2) in the round for 4 cm = 1½". Work next round as follows: Knit 0-3 stitches. Insert a marker here. This is beginning of round. Work next round as follows: Knit 2-3, work A.3 over the next 18 stitches (= 1 stitch increased), knit 2-3, knit 2 together (= 1 stitch decreased), knit the last 16-18 stitches = 40-44 stitches. Work 1 round with knit over knit and A.3 over A.3. Work 1 more round the same way. Switch to double pointed needles size 4 mm = US 6. Then work pattern as follows: Knit 2-3, A.4 over A.3, knit the next 19-22 stitches on round. REMEMBER THE KNITTING GAUGE! When piece measures 8-8 cm = 3⅛"-3⅛", increase 1 stitch on each side of last stitch on round for thumb (= 2 stitches increased) - read INCREASE TIP-3. Increase like this on outside of the increased stitches every other round 5-6 times in total = 50-56 stitches. Now slip the 11-13 thumb stitches on 1 stitch holder. Work pattern in the round as before in the round on mitten and cast on 1 new stitch behind thumb on next round = 40-44 stitches. Continue like this until A.4 has been worked 4 times vertically. Mitten now measures approx. 23 cm = 9" from cast-on edge. Insert 1 marker at beginning of round and 1 marker after 23-25 stitches (= 23-25 stitches on top of mitten and 17-19 stitches on the under side of mitten). Now work A.5 over A.4, AT THE SAME TIME on next round decrease on the under side of mitten - read DECREASE TIP. Decrease like this every other round 5 and every round 2 times. When diagram has been worked vertically, there are 12-16 stitches on round. Work 1 round where all stitches are knitted together 2 by 2 = 6-8 stitches. Cut the yarn and pull it through the remaining stitches, tighten together and fasten. THUMB: Slip the 11-13 thumb stitches back on double pointed needles size 4 mm = US 6. Pick in addition up 4 stitches behind thumb = 15-17 stitches. Work in stockinette stitch until the thumb itself measures approx. 5-5½ cm = 2"-2⅛" (try on the mitten, approx. ½ cm = ⅛" remains until finished measurements). Knit 2 rounds AT THE SAME TIME knit all stitches together 2 by 2 on both rounds. Cut the yarn and pull it through the remaining stitches, tighten together and fasten. RIGHT MITTEN: Cast on and work as left mitten but increase for thumb on each side of the 24th-26th stitch (= 3rd-4th stitch with stockinette stitch after A.4). |
||||||||||||||||||||||||||||||||||||||||
Diagram explanations |
||||||||||||||||||||||||||||||||||||||||
|
||||||||||||||||||||||||||||||||||||||||
|
||||||||||||||||||||||||||||||||||||||||
|
||||||||||||||||||||||||||||||||||||||||
|
Have you made this or any other of our designs? Tag your pictures in social media with #dropsdesign so we can see them! Do you need help with this pattern?You'll find tutorial videos, a Comments/Questions area and more by visiting the pattern on garnstudio.com. © 1982-2024 DROPS Design A/S. We reserve all rights. This document, including all its sub-sections, has copyrights. Read more about what you can do with our patterns at the bottom of each pattern on our site. |
||||||||||||||||||||||||||||||||||||||||


With over 40 years in knitting and crochet design, DROPS Design offers one of the most extensive collections of free patterns on the internet - translated to 17 languages. As of today we count 304 catalogs and 11422 patterns - 11417 of which are translated into English (US/in).
We work hard to bring you the best knitting and crochet have to offer, inspiration and advice as well as great quality yarns at incredible prices! Would you like to use our patterns for other than personal use? You can read what you are allowed to do in the Copyright text at the bottom of all our patterns. Happy crafting!
Comments / Questions (30)
Det er noe som ikke stemmer i oppskrift for hals - men jeg vet ikke hvordan jeg skal endre for å få det riktig og ber dere gjøre en endring. Når jeg følger oppskrift så sitter jeg igjen med fire masker for meget altså strikket 80 men har lagt opp 84. Jeg får også to steder 4 rette .... Håoer på svar jeg holder på med tredje hals med frustrerende feil... svar meg på Mail snarest
09.02.2021 - 12:39DROPS Design answered:
Hei Liv, Det høres ut som du glemmer å strikke 2 vrang etter hver A.2 som jeg har uthevet her. Du skal strikke 16 masker med (2 rett, 2 vrang), 12 masker med A.2, 2 VRANG, 28 masker med (2 rett, 2 vrang), 12 masker med A.2, 2 VRANG og 12 masker med (2 rett, 2 vrang). God fornøyelse!
10.02.2021 - 11:26Hej Jeg vil gerne erstatte DROPS Alaske med DROPS Air. Skal jeg bruge samme pindestørrelse?
23.01.2021 - 18:05DROPS Design answered:
Hej Sofie, lav en lille strikkeprøve og sørg for at du får det antal masker som står under strikkefastheden i opskriften. Får du for mange masker på 10 cm, skifter du til tykkere pinde, får du for få masker på 10 cm skifter du til tyndere pinde. God fornøjelse!
26.01.2021 - 16:08Bonjour, Comment puis-je avoir les explications avec des aiguilles droites ? Ou y a t-il un modèle identique avec des explications avec des aiguilles droites. Merci.
11.01.2021 - 20:36DROPS Design answered:
Bonjour Sophie, vous trouverez dans cette leçon quelques informations sur les aiguilles circulaires et la façon d'ajuster sur des aiguilles droites. Bon tricot!
12.01.2021 - 09:06Ift. strikkefasthed er der for pandebånd og hals angivet 18 masker i bredden og 23 pinde i højden - men hvilken pind er det beregnet på? Er det pind 4,5 eller 5,5? Ligeledes ved handsker hvilken pind er strikkefastheden beregnet ud fra - er det pind 3,5 eller 4?
03.01.2021 - 14:26DROPS Design answered:
Hej, vi har brugt pind 5,5 til glatstrik og 18 masker i bredden, men stemmer det ikke for dig, så prøv med en tykkere eller tyndere pind. Det som er vigtigt er at du får den strikkefasthed som står i opskriften. God fornøjelse!
11.01.2021 - 13:53Pouvez-vous m’éclairer sur la façon de faire les diminutions (Diminuer ainsi 5 fois tous les 2 tours et 2 fois tous les tours. ) moufles. Dois je diminuer 5 mailles à la fois?
21.12.2020 - 17:46DROPS Design answered:
Bonjour Mme Deschatelets, vous diminuez comme indiqué sous DIMINUTIONS autrement dit, vous diminuez 2 mailles, 1 m après le marqueur + 1 m avant le marqueur. Vous répétez ces diminutions 5 fois au total tous les 2 tours (= 1 tour en diminuant 2 m, 1 tour sans diminuer) x 5 , puis diminuez à chacun des 2 tours suivants, - en même temps, diminuez comme dans A.5 côté dos de la main. Bon tricot!
22.12.2020 - 09:30Bonjour je ne comprend les explications dans moufles gauche quand ça dit: Tricoter le tour suivant ainsi: 0-3 mailles endroit. Qu'est ce que ça veut dire 0-3?
13.12.2020 - 06:03DROPS Design answered:
Bonjour Mme Marceau, dans la 1ère taille, vous ne décalez pas le début du tour, seulement dans la 2ème taille. Autrement dit, en S/M, sautez cette phrase et placez votre marqueur du début du tour avant la 1ère maille du tour. En taille L/XL , tricotez 3 mailles endroit et mettez votre marqueur de début du tour ici et continuez comme indiqué sur les 44 mailles. Bon tricot!
14.12.2020 - 10:26Når man strikker halsen står der at man skal slå 76 masker op, men inddeling bagefter hedder 12, 12,24,12,12 det giver kun 72? Hvad er rigtigt?
04.11.2020 - 17:27DROPS Design answered:
Hej Anne-Louise. Du missar 4 maskor, jag har markerat de i fet stil: Strik (2 ret / 2 vrang) over de første 12-16 masker, sæt 1.mærke her, strik A.2 over de næste 12 masker (= skuldermasker), sæt 2.mærke her, strik 2 vrang , (2 ret / 2 vrang) over de næste 24-28 masker, sæt 3.mærke her, strik A.2 over de næste 12 masker (= skuldermasker), sæt 4.mærke her, strik 2 vrang , (2 ret / 2 vrang) over de sidste 12-12 masker. Mvh DROPS Design
05.11.2020 - 08:27Een fout in de werkbeschrijving van de halswarmer, maat s/m: daar moeten niet 76, maar 72 steken voor worden opgezet: 24 per pand en 12 per schouder.
19.10.2020 - 21:50Kan dere sjekke inndelingen ? Får ikke maskeantallet til å gå opp
12.10.2020 - 12:44DROPS Design answered:
Hej Line. Vad stickar du och var menar du att det är fel? Mvh DROPS Design
15.10.2020 - 13:34Le plastron bien couvrant est parfait pour les grands froids
05.06.2020 - 09:10