
Popular categories
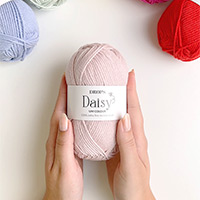
Looking for a yarn?


|
|||||||||||||||||||
Heim |
|||||||||||||||||||
 |
 |
||||||||||||||||||
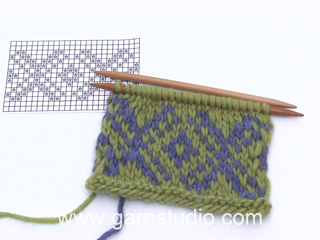
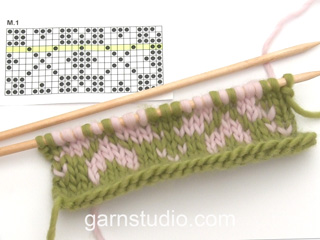
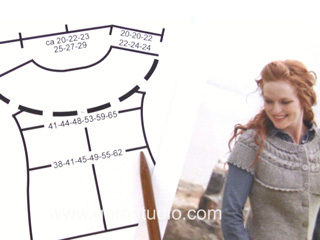
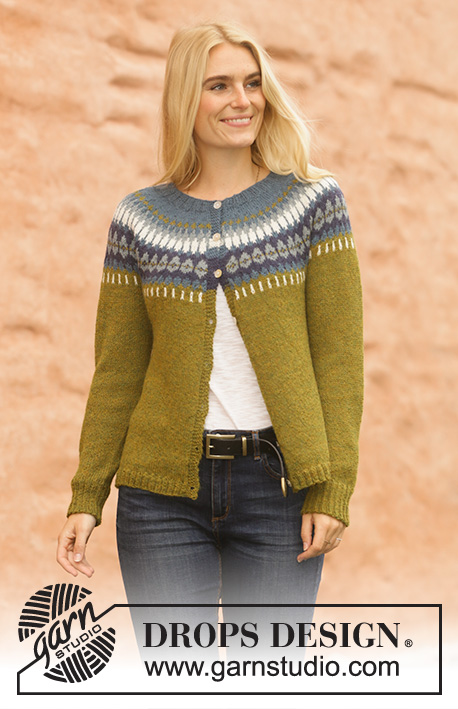
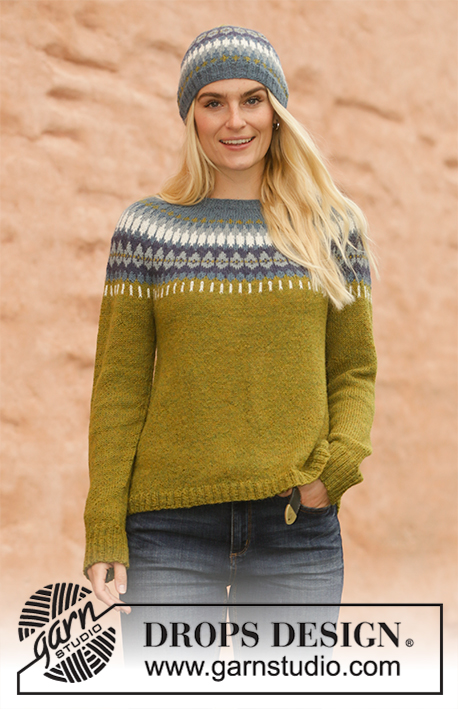
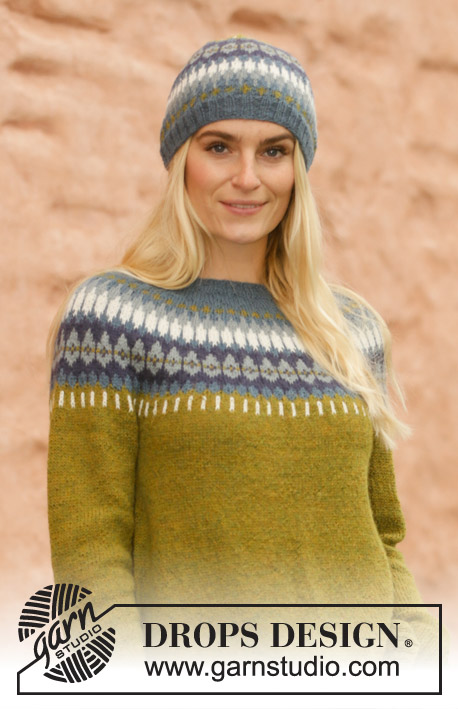
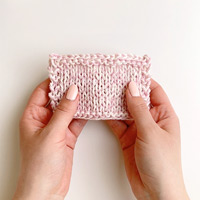
Knitted sweater in DROPS Alpaca. The piece is worked top down with round yoke and Nordic pattern on the yoke. Sizes S - XXXL. Knitted hat with Nordic pattern in DROPS Alpaca.
DROPS 207-1 |
|||||||||||||||||||
|
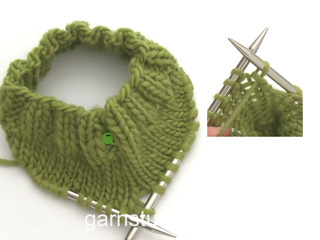
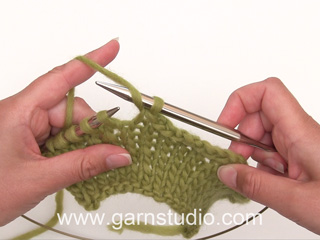
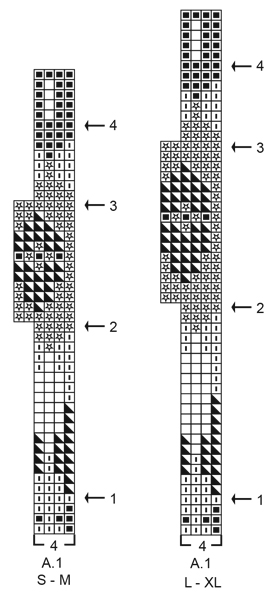
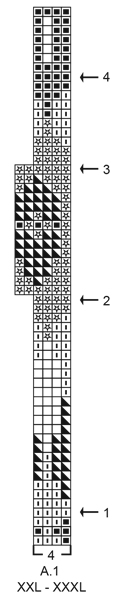
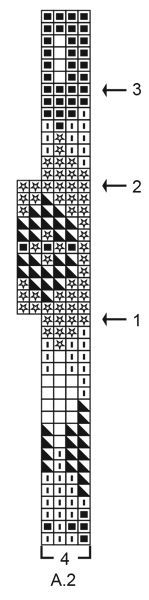
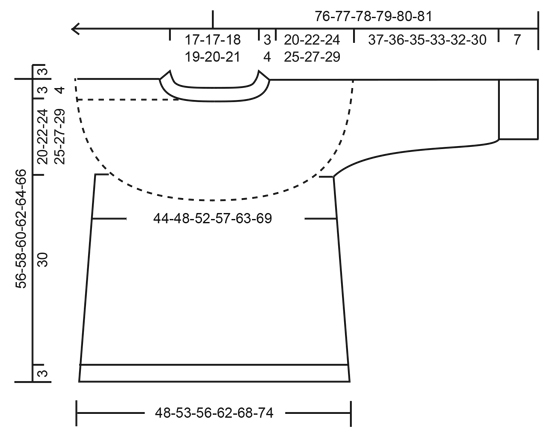
------------------------------------------------------- EXPLANATIONS FOR THE PATTERN: ------------------------------------------------------- INCREASE/DECREASE TIP (evenly spaced): To work out how to increase/decrease evenly, count the total number of stitches on needle (e.g. 104 stitches) and divide by the number of increases/decreases to be made (e.g. 34) = 3.1. In this example, increase by making 1 yarn over after approx. each 3rd stitch. On the next round knit the yarn overs twisted to avoid holes. When decreasing knit together approx. each 2nd and 3rd stitch. ELEVATION (back of neck): To make the sweater slightly higher at the back of the neck when working yoke you can work an elevation as described here. Skip this section if you do not want an elevation. Insert 1 marker at the beginning of the round (mid back). Start from the right side with medium petrol and knit 11-12-12-13-13-14 stitches, turn, tighten strand and purl 22-24-24-26-26-28 stitches back. Turn, tighten strand and knit 33-36-36-39-39-42 stitches, turn, tighten strand and purl 44-48-48-52-52-56 stitches back. Turn, tighten strand and knit 55-60-60-65-65-70 stitches, turn, tighten strand and purl 66-72-72-78-78-84 stitches. Turn, tighten the strand and knit 77-84-84-91-91-98 stitches, turn tighten the strand and purl 88-96-96-104-104-112 stitches. Turn tighten the strand and knit back to mid back. Then work YOKE as described in the text. PATTERN: Sweater: See diagram A.1. Choose diagram for your size. Hat: See diagram A.2. The whole pattern is worked in stockinette stitch. KNITTING TIP: To avoid the knitting gauge becoming tighter when working pattern it is important that the strands at the back are not tight. Use a size larger needle when working pattern if this is a problem. INCREASE TIP-1 (for sides of body): Work until there are 3 stitches left before the marker thread, make 1 yarn over, knit 6 (marker thread sits between these 6 stitches) make 1 yarn over (= 2 stitches increased at each marker thread; 4 stitches increased on round). On the next round knit the yarn overs twisted to avoid holes. Then work the new stitches in stockinette stitch. DECREASE TIP (for mid under sleeve): Work until there are 3 stitches left before the marker thread, knit 2 together, knit 2 (marker thread sits between these 2 stitches), slip 1 stitch as if to knit, knit 1 and pass the slipped stitch over the knitted stitch. CASTING-OFF TIP: To avoid the bind-off edge being tight you can bind off with a larger size needle, or make 1 yarn over after approx. each 8th stitch at the same time as binding off (yarn overs bind off as normal stitches). ------------------------------------------------------- START THE PIECE HERE: ------------------------------------------------------- SWEATER – SHORT OVERVIEW OF THE PIECE: The neck and yoke are worked in the round with circular needle, top down. The yoke is divided for body and sleeves. The body is continued in the round with circular needle. The sleeves are worked in the round with short circular needle/double pointed needles, top down. NECK: Cast on 104-108-112-116-120-124 stitches with short circular needle size 3 mm = US 2,5 and medium petrol. Knit 1 round and then work rib in the round (= knit 2 /purl 2) for 3-3-3-4-4-4 cm = 1⅛"-1⅛"-1⅛"-1½"-1½"-1½". When the rib is finished knit 1 round where you increase 34-36-38-40-42-44 stitches evenly spaced – read INCREASE/DECREASE TIP = 138-144-150-156-162-168 stitches. Knit 1 round (yarn overs knitted twisted). Change to circular needle size 3.5 mm = US 4. Insert 1 marker in the middle of the round (= mid front) – the yoke will be measured from this marker! Now you can work an ELEVATION in the back of the neck – read description above. If you do not want an elevation, go straight to YOKE. YOKE: Work stockinette stitch in the round with medium petrol. When the piece measures 1½-1½-2-2-2-2 cm = ½"-½"-¾"-¾"-¾"-¾" from the marker mid front, increase 34-36-40-46-48-52 stitches evenly spaced = 172-180-190-202-210-220 stitches. When the piece measures 2½-2½-3-3-3-3 cm = 1"-1"-1⅛"-1⅛"-1⅛"-1⅛" from the marker mid front, increase 28-36-38-42-46-48 stitches evenly spaced = 200-216-228-244-256-268 stitches. When the piece measures 3-3-4-4-4-4 cm = 1⅛"-1⅛"-1½"-1½"-1½"-1½" from the marker mid front, start working A.1 in the round (= 50-54-57-61-64-67 repeats of 4 stitches). Continue this pattern. Read KNITTING TIP and REMEMBER THE KNITTING GAUGE! AT THE SAME TIME on each round marked with an arrow in A.1, increase stitches evenly as described below: Arrow-1: Increase 36-36-40-44-44-52 stitches evenly spaced = 236-252-268-288-300-320 stitches (there is now room for 59-63-67-72-75-80 repeats of A.1 with 4 stitches). Arrow-2: Increase 40-42-50-54-60-64 stitches evenly spaced = 276-294-318-342-360-384 stitches (there is now room for 46-49-53-57-60-64 repeats of A.1 with 6 stitches). Arrow-3: Increase 20-26-30-34-44-48 stitches evenly spaced = 296-320-348-376-404-432 stitches (there is now room for 74-80-87-94-101-108 repeats of A.1 with 4 stitches). Arrow-4: Increase 12-20-24-24-28-32 stitches evenly spaced = 308-340-372-400-432-464 stitches (there is now room for 77-85-93-100-108-116 repeats of A.1 with 4 stitches). When A.1 has been completed continue with stockinette stitch and olive. AT THE SAME TIME on the first round after A.1, increase 2-6-6-10-6-14 stitches evenly spaced = 310-346-378-410-438-478 stitches. Work until the piece measures 20-22-24-25-27-29 cm = 8"-8¾"-9½"-9¾"-10⅝"-11⅜" from the marker on the neck. Divide the yoke for body and sleeves, working the next round with olive as follows: Work 46-51-54-60-66-73 stitches in stockinette stitch (= ½ back piece), place the next 62-70-80-84-86-92 stitches on 1 thread for sleeve, cast on 8-8-10-10-12-12 new stitches on the needle (= in side under sleeve), work 93-103-109-121-133-147 stitches in stockinette stitch (= front piece), place the next 62-70-80-84-86-92 stitches on 1 thread for sleeve, cast on 8-8-10-10-12-12 new stitches on the needle (= in side under sleeve) and work the remaining 47-52-55-61-67-74 stitches in stockinette stitch (= ½ back piece). Body and sleeves are finished separately. THE PIECE IS NOW MEASURED FROM HERE! BODY: = 202-222-238-262-290-318 stitches. Insert 1 marker thread on each side of the body in the middle of the 8-8-10-10-12-12 stitches cast on under the sleeve. Allow the threads to follow your work onwards; they will be used when increasing in the sides. Start the round at one of the marker threads and work stockinette stitch in the round with olive. When the piece measures 5 cm = 2" from the division in all sizes increase 1 stitch on each side of both marker threads – read INCREASE TIP (= 4 stitches increased). Increase like this every 5-5-5-4-4-4 cm = 2"-2"-2"-1½"-1½"-1½" a total of 5-5-5-6-6-6 times on each side = 222-242-258-286-314-342 stitches. Continue working until the piece measures 30 cm = 11¾" from the division (there is approx. 3 cm = 1⅛" to finished length; you can try the sweater on and continue working to desired length). Knit 1 round where you increase 74-82-86-98-106-114 stitches evenly spaced = 296-324-344-384-420-456 stitches (this is done so the rib is not tight). Change to circular needle size 3 mm = US 2,5 and work rib (= knit 2 / purl 2) for 3 cm = 1⅛". Bind off with knit over knit and purl over purl – read BINDING OFF TIP! The sweater measures approx. 56-58-60-62-64-66 cm = 22"-22¾"-23⅝"-24⅜"-25¼"-26" from the shoulder down. SLEEVE: Place the 62-70-80-84-86-92 stitches from the thread on the one side of the piece on short circular needle/double pointed needles size 3.5 mm = US 4 and knit up 1 stitch in each of the 8-8-10-10-12-12 stitches cast on under the sleeve = 70-78-90-94-98-104 stitches. Insert 1 marker thread in the middle of the 8-8-10-10-12-12 stitches and allow it to follow your work onwards; it will be used when decreasing mid under sleeve. Start the round at the marker thread and work stockinette stitch in the round with olive. When the piece measures 3 cm = 1⅛" from the division in all sizes decrease 2 stitches mid under sleeve – read DECREASE TIP. Decrease like this every 3½-2½-1½-1½-1½-1 cm = 1¼"-1"-½"-½"-½"-⅜" a total of 10-13-19-19-19-22 times = 50-52-52-56-60-60 stitches. Continue working until the sleeve measures 37-36-35-33-32-30 cm = 14½"-14¼"-13¾"-13"-12½"-11¾" from the division (there is approx. 7 cm = 2¾" to finished length; you can try the sweater on and continue working to desired length). NOTE: Shorter measurements in larger sizes due to wider neck and longer yoke. Knit 1 round where you increase 18-20-20-20-20-20 stitches evenly spaced = 68-72-72-76-80-80 stitches. Change to double pointed needles size 3 mm = US 2,5 and work rib (= knit 2 / purl 2) for 7 cm = 2¾". Bind off with knit over knit and purl over purl – remember BINDING OFF TIP. The sleeve measures approx. 44-43-42-40-39-37 cm = 17¼"-17"-16½"-15¾"-15¼"-14½" from the division. Work the other sleeve in the same way. ------------------------------------------------------- HAT – SHORT OVERVIEW OF THE PIECE: The piece is worked in the round with short circular needle, bottom up. Change to double pointed needles when necessary. HAT: Cast on 116-120-124 stitches with circular needle size 2.5 mm = US 1,5 and medium petrol. Knit 1 round. Then work rib in the round (= knit 2 / purl 2) for 3-4-4 cm = 1⅛"-1½"-1½". Change to circular needle size 3.5 mm = US 4 and knit 1 round where you increase 24 stitches evenly spaced in all sizes – read INCREASE/DECREASE TIP = 140-144-148 stitches. Work A.2 in the round (= 35-36-37 repeats of 4 stitches). Continue this pattern. REMEMBER THE KNITTING GAUGE! AT THE SAME TIME on each round marked with an arrow in A.2, decrease stitches evenly spaced as described below: Arrow-1: Decrease 8-6-4 stitches evenly spaced = 132-138-144 stitches. Continue the pattern (there is now room for 22-23-24 repeats of 6 stitches). Arrow-2: Decrease 24-26-28 stitches evenly spaced = 108-112-116 stitches. Continue the pattern (there is now room for 27-28-29 repeats of 4 stitches). Arrow-3: Decrease 24-24-24 stitches evenly spaced = 84-88-92 stitches. Continue the pattern (there is now room for 21-22-23 repeats of 4 stitches). When A.2 has been completed continue with olive as follows: Knit 3-3-4 rounds, * knit 1 round where all the stitches are knitted together 2 and 2, knit 5-5-6 rounds *, work from *-* 1 more time. Then knit 1 round where all the stitches are knitted together 2 and 2 = 11-11-12 stitches left. Cut the strand, pull it through the remaining stitches, tighten and fasten well. The hat measures approx. 23-24-25 cm = 9"-9½"-9¾" from the top down. |
|||||||||||||||||||
Diagram explanations |
|||||||||||||||||||
|
|||||||||||||||||||
|
|||||||||||||||||||
|
|||||||||||||||||||
|
|||||||||||||||||||
|
|||||||||||||||||||
|
Have you made this or any other of our designs? Tag your pictures in social media with #dropsdesign so we can see them! Do you need help with this pattern?You'll find tutorial videos, a Comments/Questions area and more by visiting the pattern on garnstudio.com. © 1982-2024 DROPS Design A/S. We reserve all rights. This document, including all its sub-sections, has copyrights. Read more about what you can do with our patterns at the bottom of each pattern on our site. |
|||||||||||||||||||


With over 40 years in knitting and crochet design, DROPS Design offers one of the most extensive collections of free patterns on the internet - translated to 17 languages. As of today we count 304 catalogs and 11422 patterns - 11417 of which are translated into English (US/in).
We work hard to bring you the best knitting and crochet have to offer, inspiration and advice as well as great quality yarns at incredible prices! Would you like to use our patterns for other than personal use? You can read what you are allowed to do in the Copyright text at the bottom of all our patterns. Happy crafting!
Comments / Questions (63)
Hej. Kan det være rigtigt at der umiddelbart inden rib på ærmet skal tages masker UD?? Jeg strikker blusen. Mvh Eva
11.10.2020 - 19:34DROPS Design answered:
Hei Eva. Ja, det stemmer. Da vil vrangborden få en naturlig fin overgang til resten av ermet, og ikke en trang vrangbord som det var mye av på 80-tallet. God Fornøyelse!
12.10.2020 - 14:57Bonjour Après la séparation dos/devant et manches, il faut commencer le tour suivant par le milieu d'une manche. Faut-il couper le fil et faire glisser les mailles jusqu'au milieu de la première manche ? Merci d'avance pour votre aide. Cordialement Fabienne Henry
07.10.2020 - 08:29DROPS Design answered:
Bonjour Mme Henry, comme vous le souhaitez, vous pouvez soit couper le fil et le joindre au milieu des nouvelles mailles montées, soit continuer le tour jusqu'au milieu des mailles montées et y décaler le marqueur du début des tours et continuer à partir de là. Bon tricot!
07.10.2020 - 08:43Finnes det mønster til nede på ermene? Ser på bilde til drops galleri at noen har strikket den med mønster nede, dette var veldig fint :)
29.07.2020 - 00:28DROPS Design answered:
Hej Susanne, nej, men du kan vælge et stykke i diagrammet og bruge nederst på ærmet. God fornøjelse!
29.07.2020 - 15:34Podemos comprar desde Argentina? O es solo para Ee. UU. Y España?
23.07.2020 - 23:22DROPS Design answered:
Hola Maria Del Carmen. Aquí tienes la lista de las tiendas DROPS con envíos internacionales: https://www.garnstudio.com/findastore.php?s=w&cid=23
02.08.2020 - 21:33Hejhej, jättefint mönster. Ville bara säga att under " Hela Settet - GARNÅTGÅNG", så har ni råkat kopiera enbart tröjans garnåtgång, och inte inkluderat antalet för mössan. Råkade märka det nu när jag skulle börja och saknade massa nystan...
09.05.2020 - 12:22Bonjour...quand vous parlez d'augmentation, il est demandé de faire un jeté, puis de tricoter ensuite ce jeté torse à l'endroit pour éviter les trous... mais n'est-ce pas plus simple de faire une augmentation autrement que par un jeté ? ( Puisque le jeté fait un trou..) Merci beaucoup de votre réponse... Cécile
30.04.2020 - 13:01DROPS Design answered:
Bonjour Mme Bousquet, les augmentations sont souvent faites avec des jetés, vous pouvez la plupart du temps les remplacer par un autre type d'augmentations, n'hésitez pas à essayer sur un échantillon (lavé/séché) afin d'en apprécier le rendu. Bon tricot!
30.04.2020 - 14:41Skal strikke denne genseren, Heim. Finner ikke mål på de ulike størrelsene i oppskriften! Dette gjelder genseren, mål på lue står to ganger. Under størrelse på genser står bare S-M- osv, ingen mål.
25.02.2020 - 14:03DROPS Design answered:
Hei Britt Unni, Det finnes en skisse helt i bunnen av oppskriften som gir deg mål for de forskjellige størrelsene på genseren. God fornøyelse!
26.02.2020 - 07:23Bonjour. J'ai effectué la 1ère série d'augmentations de A1. Comment faire pour que le motif reste aligné pour la suite ? Si on ajoute des mailles, on a forcément un décalage du motif. Je précise que j'ai utilisé la méthode que vous préconisez. Merci pour votre aide. Marion
23.02.2020 - 17:13DROPS Design answered:
Bonjour Marion, vous continuez à répéter les 4 mailles de A.1 de la même façon qu'avant, effectivement, ils ne vont pas s'aligner exactement comme dans le diagramme mais comme sur la photo. Bon tricot!
24.02.2020 - 10:08Hei😊 Her er sååå mange fine oppskrifter på gensere med rundfelling og raglan!😍 Fikk lyst å strikke Heim- genser....Men, hvorfor er omtrent alle oppskriftene strikket ovenfra og ned? Skulle ønske det var oppskrift nedenfra og opp. Bare et hjertesukk...
07.01.2020 - 19:48DROPS Design answered:
Hei Rita, Hvis du setter inn 'genser strikket nedenfra og opp' får du en liste av gensere strikket på denne måten. God fornøyelse!
09.01.2020 - 07:20Hey Dropspeople, attached my 2nd question reg. the HEIM jumper: once I have increased 36 stitches in row 4 of the pattern and want to continue with the pattern with colour dark grey green I don´t know with a pattern of 4 evenly distributed stitches how to hit the pattern again (the first olive pattern) ,so that it looks evenly. The problem is, that there are now much more stitches because of the increase. How do I solve that? thanks a lot for your help!! Corinna
16.12.2019 - 16:25DROPS Design answered:
Dear Corinna, you will find here how to increase stitches evenly - you increase when working A.1 and the increase rows (= with an arrow) are worked with only one colour. On the row after increase, just work the new stitches as shown in diagram (and work yarn over twisted to avoid holes). Happy knitting!
17.12.2019 - 09:16