The yarn cost is calculated from the pattern’s smallest size and the yarn’s cheapest product type. Looking for an even better price? You might find it on the DROPS Deals!
-------------------------------------------------------
Alternative Yarn – See how to change yarns here
Yarn Groups A to F – Use the same pattern and change the yarn here
Yarn usage using an alternative yarn – Use our yarn converter here
-------------------------------------------------------
The yarn cost is calculated from the pattern’s smallest size and the yarn’s cheapest product type. Looking for an even better price? You might find it on the DROPS Deals!
All measurements in charts are in cm.
= K from RS, P from WS | |
= P from RS, K from WS |
Each of our patterns has specific tutorial videos to help you.
These step-by-step tutorials might also help you:
Why is the knitting/crochet tension so important?
Knitting tension is what determines the final measurements of your work, and is usually measured per 10 x 10 cm. It is provided like so: number of stitches in width x number of rows in height - eg: 19 stitches x 26 rows = 10 x 10 cm.
The knitting tension is very individual; some people knit/crochet loosely while others work tightly. You adjust the knitting tension with the needle size, which is why the suggested needle size only serve as a guide! You need to adjust this (up or down) to ensure that YOUR knitting tension matches the knitting tension provided in the pattern. If you work with a different knitting tension than provided you will have a different yarn consumption, and your work will have different measurements than what the pattern suggests.
The knitting tension also determines which yarns can replace each other. As long as you achieve the same knitting tension you can replace one yarn with another.
See DROPS lesson: How to measure your tension/gauge
See DROPS video: How to make a gauge tension swatch
How do I know how many balls of yarn I need?
The required amount of yarn is provided in grams, eg: 450 g. To calculate how many balls you’ll need you first need to know how many grams are in 1 ball (25g, 50g or 100g). This information is available if you click on the individual yarn quality on our pages. Divide the amount required with the amount of each ball. For example, if each ball is 50g (the most common amount), the calculation will be as follows: 450 / 50 = 9 balls.
Can I use a different yarn than what the pattern suggests?
The important thing when changing from one yarn to another is that the knitting/crochet tension remains the same. This is so that the measurements of the finished piece will be the same as on the sketch provided. It is easier to achieve the same knitting tension using yarns from the same yarn group. It is also possible to work with multiple strands of a thinner yarn to achieve the knitting tension of a thicker one. Please try our yarn converter. We recommend you to always work a test swatch.
Please NOTE: when changing yarn the garment might have a different look and feel to the garment in the photo, due to individual properties and qualities of each yarn.
See DROPS lesson: Can I use a different yarn than the one mentioned in the pattern?
What are the yarn groups?
All our yarns are categorised into yarn groups (from A to F) according to thickness and knitting tension – group A contains the thinnest yarns and group F the thickest. This makes it easier for you to find alternative yarns to our patterns, should you wish to switch yarn. All yarns within the same group have a similar knitting tension and can easily replace each other. However, different yarn qualities have different structures and properties which will give the finished work a unique look and feel.
How do I use the yarn converter?
At the top of all our patterns you’ll find a link to our yarn converter, which is a helpful tool should you wish to use a different yarn than suggested. By filling in the yarn quality you wish to replace, the amount (in your size) and number of strands, the converter will present good alternative yarns with the same knitting tension. Additionally it will tell you how much you’ll require in the new qualities and whether you’ll need to work with multiple strands. Most skeins are 50g (some are 25g or 100g).
If the pattern is worked with multiple colours, every colour will have to be converted separately. Similarly, if the pattern is worked with several strands of different yarns (for example 1 strand Alpaca and 1 strand Kid-Silk) you will have to find alternatives for each, individually.
Why do you show discontinued yarns in the patterns?
Since different yarns have different qualities and textures we have chosen to keep the original yarn in our patterns. However, you can easily find options among our available qualities by using our yarn converter, or simply pick a yarn from the same yarn group.
It is possible that some retailers still have discontinued yarns in stock, or that someone has a few skeins at home that they would like to find patterns for.
The yarn converter will provide both alternative yarn as well as required amount in the new quality.
What size should I knit?
If you think it's hard to decide what size to make, it can be a good idea to measure a garment you own already and like the size of. Then you can pick the size by comparing those measures with the ones available in the pattern's size chart.
You'll find the size chart at the bottom of the pattern.
See DROPS lesson: How to read size chart
Why do I get the wrong knitting tension with the suggested needle size?
The needle size provided in the pattern serves only as a guide, the important thing is to follow the knitting tension. And since knitting tension is very individual, you will have to adjust the needle size to ensure that YOUR tension is the same as in the pattern – maybe you’ll have to adjust 1, or even 2 needle sizes, up or down to achieve the correct tension. For this, we recommend that you work test swatches.
Should you work with a different knitting tension than the one provided, the measurements of the finished garment might deviate from the measurement sketch.
See DROPS lesson: How to measure your tension/gauge
See DROPS video: How to make a gauge tension swatch
Why is the pattern worked top-down?
Working a garment top-down provides more flexibility and room for personal adjustment. For example it is easier to try the garment on while working, as well as making adjustments to length of yoke and shoulder caps.
The instructions are carefully explaining every step, in the correct order. Diagrams are adjusted to the knitting direction and are worked as usual.
How do I work according to a knitting diagram?
The diagram depicts all rows/rounds, and every stitch seen from the right side. It is read from bottom to top, from right to left. 1 square = 1 stitch.
When working back and forth, every other row is worked from the right side and every other row is worked from the wrong side. When working from the wrong side, the diagram will have to be worked reversed: from left to right, knit stitches are purled, purl stitches are knit etc.
When working in the round every round is worked from the right side and the diagram are worked from right to left on all rounds.
See DROPS lesson: How to read knitting diagrams
How do I work according to a crochet diagram?
The diagram depicts all rows/rounds, and every stitch seen from the right side. It is worked from bottom to top, from right to left.
When working back and forth every other row is worked from the right side: from right to left and every other row is worked from the wrong side: from left to right.
When working in the round, every row in the diagram are worked from the right side, from right to left.
When working a circular diagram you start in the middle and work your way outwards, counter clockwise, row by row.
The rows usually start with a given number of chain stitches (equivalent to the height of the following stitch), this will either be depicted in the diagram or explained in the pattern.
See DROPS lesson: How to read crochet diagrams
How do I work several diagrams simultaneously on the same row/round?
Instructions for working several diagrams after each other on the same row/round, will often be written like so: “work A.1, A.2, A.3 a total of 0-0-2-3-4 times". This means you work A.1 once, then A.2 is worked once, and A.3 is repeated (in width) the number of times provided for your size – in this case like so: S = 0 times, M = 0 times, L=2 times, XL= 3 times and XXL = 4 times.
The diagrams are worked as usual: begin with the first row in A.1, then work the first row in A.2 etc.
See DROPS lesson: How to read knitting diagrams
See DROPS lesson: How to read crochet diagrams
Why are the sleeves shorter in larger sizes?
The total width of the garment (from wrist-to-wrist) will be larger in the larger sizes, despite the actual sleeves being shorter. The larger sizes have longer sleeve caps and wider shoulders, so there will be a good fit in all sizes.
Where on the garment is the length measured?
The measurement sketch/schematic drawing provides information regarding the full length of the garment. If it’s a jumper or a jacket the length is measured from the highest point on the shoulder (usually closest to the neckline), and straight down to the bottom of the garment. It is NOT measured from the tip of shoulder. Similarly, the length of yoke is measured from the highest point on the shoulder and down to where yoke is split into body and sleeves.
See DROPS lesson: How to read a schematic drawing
What is a repeat?
Diagrams are often repeated on the round or in height. 1 repeat is the diagram the way it appears in the pattern. If it says to work 5 repeats of A.1 in the round, then you work A.1 a total of 5 times after/next to each other in the round. If it says to work 2 repeats of A.1 vertically/in height you work the entire diagram once, then begin again at the start and work the entire diagram one more time.
Why does the piece start with more chain stitches than it’s worked with?
Chain stitches are slightly narrower than other stitches and to avoid working the cast-on edge too tight, we simply chain more stitches to begin with. The stitch count will be adjusted on the following row to fit the pattern and measurement sketch.
Why increase before the rib edge when the piece is worked top-down?
The rib edge is more elastic and will contract slightly compared to, for example, stocking stitch. By increasing before the rib edge, you avoid a visible difference in width between the rib edge and the rest of the body.
Why increase in the cast-off edge?
It’s very easy to cast off too tightly, and by making yarn overs while casting off (and simultaneously casting these off) you avoid a too tight cast off edge.
See DROPS video: How to bind off with yarn overs (yo)
How do I increase/decrease on every 3rd and 4th row/round alternately?
To achieve an even increase (or decrease) you can increase on, for example: every 3rd and 4th row alternately, like so: work 2 rows and increase on the 3rd row, work 3 rows and increase on the 4th. Repeat this until the increase is complete.
See DROPS lesson: Increase or decrease 1 st on every 3rd and 4th row alternately
How can I work a jacket in the round instead of back and forth?
Should you prefer to work in the round instead of back and forth, you may of course adjust the pattern. You’ll need to add steeks mid-front (usually 5 stitches), and follow the instructions. When you would normally turn and work from the wrong side, simply work across the steek and continue in the round. At the end you’ll cut the piece open, pick up stitches to work bands, and cover the cut edges.
See DROPS video: How to knit steeks and cut open
Can I work a jumper back and forth instead of in the round?
Should you prefer to work back and forth instead of in the round, you may of course adjust the pattern so you work the pieces separately and then assemble them at the end. Divide the stitches for the body in 2, add 1 edge stitch in each side (for sewing) and work the front and back pieces separately.
See DROPS lesson: Can I adapt a pattern for circular needles into straight needles?
Why is the pattern slightly different than what I see in the photo?
Pattern repeats can vary slightly in the different sizes, in order to get the correct proportions. If you’re not working the exact same size as the garment in the photo, yours might deviate slightly. This has been carefully developed and adjusted so that the complete impression of the garment is the same in all sizes.
Make sure to follow instructions and diagrams for your size!
How do I make a women’s size garment into a men’s size one?
If you have found a pattern you like which is available in women’s size it’s not very difficult to convert it to men’s size. The biggest difference will be the length of sleeves and body. Start working on the women size that you think would fit across the chest. The additional length will be worked right before you cast off for the armhole/sleeve cap. If the pattern is worked top-down you can add the length right after the armhole or before the first decrease on sleeve.
Regarding additional yarn amount, this will depend on how much length you add, but it is better with a skein too many than too few.
How do I prevent a hairy garment from shedding?
All yarns will have excess fibres (from production) that might come off as lint or shedding. Brushed yarns (ie hairier yarns) have more of these loose, excess fibres, causing more shedding.
Shedding also depends on what is worn under or over the garment, and whether this pulls at the yarn fibres. It’s therefore not possible to guarantee that there will be no shedding
Below are some tips on how to get the best result when working with hairier yarns:
1. When the garment is finished (before you wash it) shake it vigorously so the looser hairs come off. NOTE: do NOT use a lint roller, brush or any method that pulls at the yarn.
2. Place the garment in a plastic bag and put it in your freezer - the temperature will cause the fibres to become less attached to each other, and excess fibres will come off easier.
3. Leave in the freezer for a few hours before taking it out and shaking it again.
4. Wash the garment according to the instructions on the yarn label.
Why does my garment pill?
Pilling is a natural process that happens to even the most exclusive of fibers. It's a natural sign of wear and tear that is hard to avoid, and that is most visible in high friction areas of your garment like a sweater's arms and cuffs.
You can make your garment look as new by removing the pilling, using a fabric comb or a pill/lint remover.
Aberdeen |
|||||||
|
|
||||||
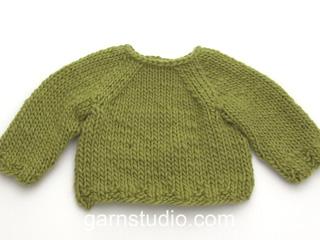
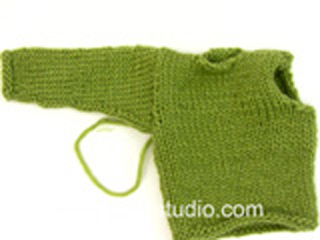
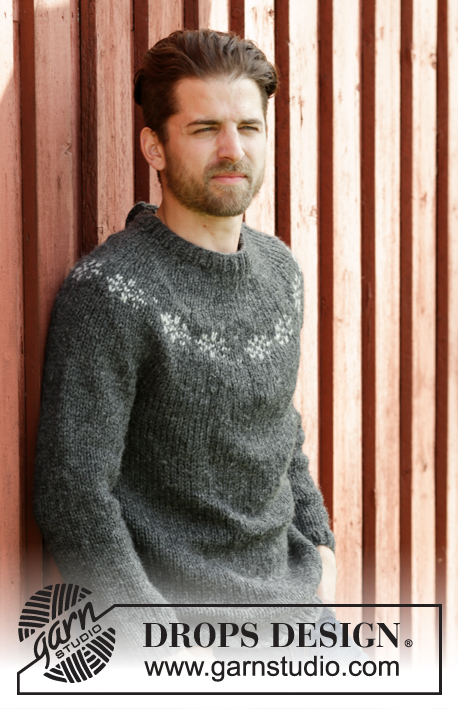
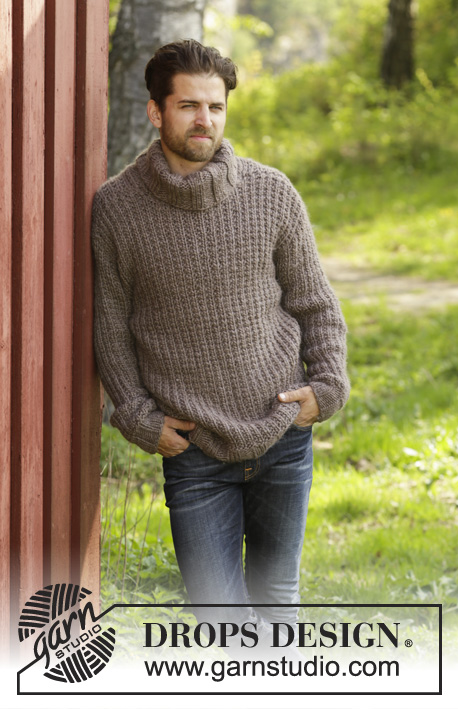
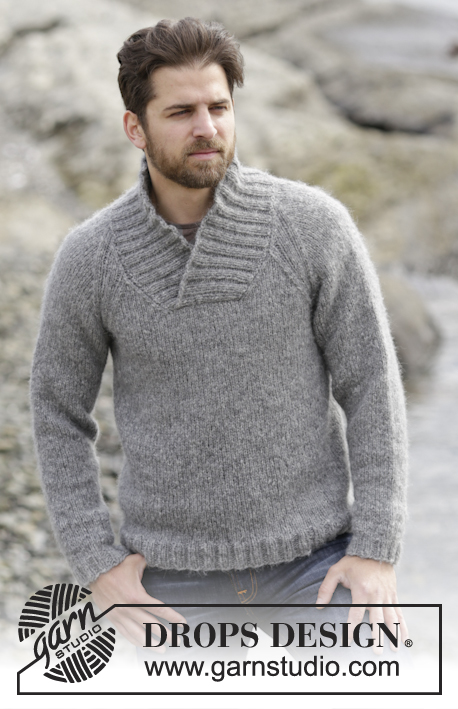
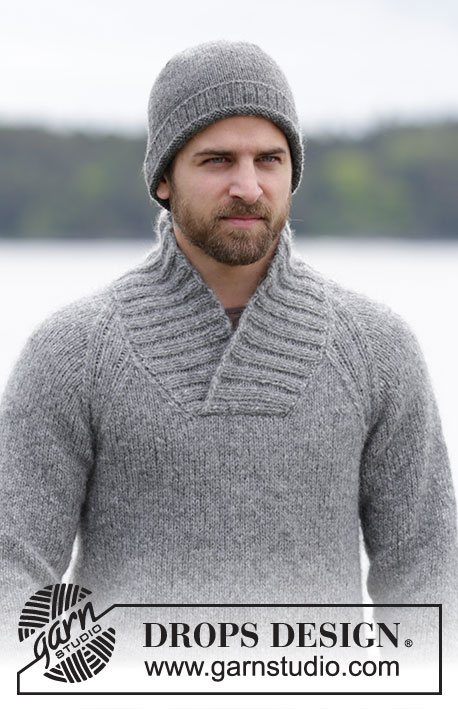
Men's knitted sweater in DROPS Air, with raglan and shawl collar. Size: S - XXXL.
DROPS Extra 0-1159 |
|||||||
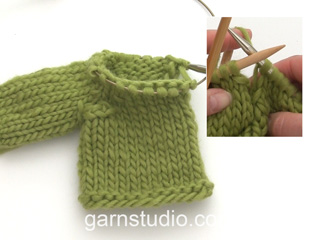
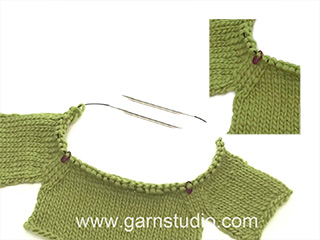
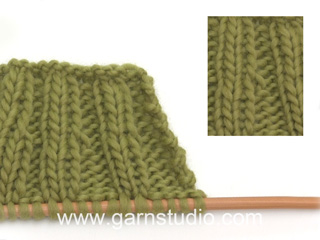
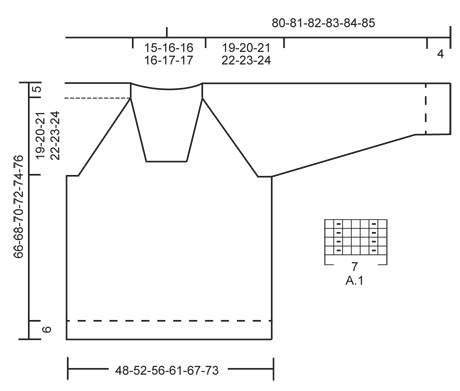
GARTER ST (back and forth): K all rows. 1 ridge = K2 rows. PATTERN: See diagram A.1. The diagram shows all rows/rounds in pattern seen from RS. RAGLAN: All dec are done from RS! Dec 1 st on each side of every A.1 (= 8 sts dec on row/round): Dec as follows before A.1: Work until 2 sts before A.1, K 2 tog = 1 st dec. Dec as follows after A.1: Slip 1 st as if to K, K 1, psso = 1 st dec. Dec 2 sts on each side of every A.1 as follows (= 16 sts dec on row): Dec as follows before A.1: Work until 3 sts remain before A.1, slip 1 st as if to K, K 2 tog, psso = 2 sts dec. Dec as follows after A.1: Slip 1 st as if to K, K 2 tog, psso = 2 sts dec. INCREASE TIP: Inc 1 st by making 1 YO, on next round K YO twisted (i.e. work in back loop of st instead front) to avoid holes. DECREASE TIP: Dec inside 1 edge st in garter st. All dec are done from RS! Dec as follows before 1 edge st: K 2 tog. Dec after 1 edge st as follows: Slip 1 st as if to K, K 1, psso. ---------------------------------------------------------- JUMPER: Jumper is worked in the round on circular needle up to neck. When binding off for neck, continue back and forth. Rounds start mid back. BODY: Cast on 176-188-204-224-244-268 sts on circular needle size 5 mm / US 8 with Air. Work rib = K 2/P 2 in the round for 6 cm / 2⅜". Then continue in stockinette st until finished measurements. On next round switch to circular needle size 6 mm / US 10 and dec 32-32-36-40-44-48 sts evenly = 144-156-168-184-200-220 sts. REMEMBER THE GAUGE! When piece measures 42-43-44-45-46-47 cm / 16½"-17"-17¼"-17¾"-18"-18½", bind off for armholes in each side as follows: Work 31-34-37-41-45-50 sts in stockinette st (= half back piece), bind off 10 sts under sleeve, work 62-68-74-82-90-100 sts in stockinette st (= front piece), bind off 10 sts and work the remaining 31-34-37-41-45-50 sts in stockinette(= half back piece). Put piece aside and knit the sleeves. SLEEVES: Worked in the round on double pointed needles/circular needle. Cast on 40-40-44-44-44-48 sts on double pointed needles size 5 mm / US 8. Work rib = K 2/P 2 for 4 cm / 1½". Then continue in stockinette st until finished measurements. On next round switch to double pointed/circular needle size 6 mm / US 10 and dec 5-3-5-3-3-7 sts evenly = 35-37-39-41-41-41 sts. When sleeve measures 8cm / 3" in all sizes, insert a marker at beg of round (= mid under sleeve). On next round inc 1 st in each side of marker - Read INCREASE TIP! Repeat inc every 6-6-6-6-5-5 round 8-7-3-3-14-7 more times, then every 5-5-5-5-4-4 round a total of 6-7-12-12-2-11 times = 65-67- 71-73-75-79 sts. Work the new stitches in stocking stitch. When piece measures 54-53-53-53-53-53 cm = 21¼"-21"-21"-21"-21"-21", bind off 10 sts mid under sleeve (= 5 sts on each side of marker) = 55-57-61-63-65-69 sts remain on sleeve. YOKE: Slip sleeves on to same circular needle as body where armholes were bound off = 234-250-270-290-310-338 sts. Now continue with stockinette st and pattern in every transition between front and back piece and sleeves from beg of round: Continue in stockinette st over the first 28-31-34-38-42-47 sts, A.1 (= 7 sts), stockinette st over the next 47-49-53-55-57-61 sts, A.1, 56-62-68-76-84-94 sts in stockinette, A.1, 47-49-53-55-57-61 sts in stockinette, A.1, 28-31-34-38-42-47 sts in stockinette. Continue like this, AT THE SAME TIME dec for RAGLAN - see explanation above, and dec for neck as follows: READ ALL OF THE FOLLOWING SECTION BEFORE CONTINUING! RAGLAN: NOTE: Continue in the round until bind off for neck. Then work the rest of yoke back and forth.To obtain the correct measurements, make sure your gauge is always correct when working raglan! Repeat dec for raglan every other round/every row from RS 15-16-16-17-18-18 more times (= 8 sts per dec), then dec 2 sts on each side of every raglan(= 16 sts per dec). Repeat dec 1-1-2-2-2-3 more times. NECK DEC: When piece measures 44-45-46-47-48-49 cm / 17¼"-17¾"-18"-18½"-19"-19¼", bind off the middle 14-16-16-16-18-20 sts on front piece for neck. Then work piece back and forth and work edge st towards the neck in GARTER ST - see explanation above. Then dec 1 st inside 1 edge st in garter st on each side of neck - Read DECREASE TIP! Repeat dec every other row until finished measurements. NOTE: Neck dec overlaps dec for raglan on front piece. I.e. when there is not enough sts to dec for raglan on front piece, continue dec for neck over A.1. When raglan and neck dec are done piece measures approx. 66-68-70-72-74-76 cm / 26"-26¾"-27½"-28⅜"-29⅛"-30" from bottom edge to shoulder.. Now work an elevation in the neck: Beg from RS and work as before until 7 sts, turn, tighten yarn, work back until 7 sts remain, turn, tighten yarn, work until 10 sts remain, turn, tighten yarn, work until 10 sts remain, turn, tighten yarn, work until 13 sts remain, turn, tighten yarn, work until 13 sts remain, turn, tighten yarn, work until 16 sts remain, turn, tighten yarn, work until 16 sts remain. Bind off. SHAWL COLLAR: Start mid front on the right side of sts dec for neck. Pick up on circular needle size 5 mm / US 8 with Air: 43-45-46-48-50-52 sts up to shoulder, then pick up 26-27-27-27-29-29 sts in the back of neck, and finally 43-45-46-48-50-52 sts down along left side of neck dec = 112-117-119-123-129-133 sts. (Do not pick up sts at the front of neck where sts were bound off.) K 1 row from WS while AT THE SAME TIME inc 4-7-5-5-7-7 sts evenly = 116-124-124-128-136-140 sts. Then work rib as follows (from RS): 1 edge st in garter st, * K 2, P 2 *, repeat from *-* until 3 sts remain, finish with K 2 and 1 edge st in garter st. Continue rib like this until collar measures approx. 6 cm / 2½". Now inc 1 st in each of the middle 14 P-sections, seen from RS (= back of neck) = 130-138-138-142-150-154 sts. Continue to work until collar measures 10-11-11-11-12-13 cm / 4"-4½"-4½"-4½"-4¾"-5", bind off with K over K and P over P. ASSEMBLY: Lay the collar double (left side over right side) at the bottom of neck opening and sew it to the neck line at the front through both layers. Sew the openings under the sleeves. |
|||||||
Diagram explanations |
|||||||
|
|||||||
Have you made this or any other of our designs? Tag your pictures in social media with #dropsdesign so we can see them! Do you need help with this pattern?You'll find tutorial videos, a Comments/Questions area and more by visiting the pattern on garnstudio.com. © 1982-2024 DROPS Design A/S. We reserve all rights. This document, including all its sub-sections, has copyrights. Read more about what you can do with our patterns at the bottom of each pattern on our site. |
With over 40 years in knitting and crochet design, DROPS Design offers one of the most extensive collections of free patterns on the internet - translated to 17 languages. As of today we count 304 catalogs and 11422 patterns - 11417 of which are translated into English (US/in).
We work hard to bring you the best knitting and crochet have to offer, inspiration and advice as well as great quality yarns at incredible prices! Would you like to use our patterns for other than personal use? You can read what you are allowed to do in the Copyright text at the bottom of all our patterns. Happy crafting!
Comments / Questions (259)
Ruth Poettcker wrote:
Aberdeen sweater in a size Large difficulty with the pattern. I will quote: Cast on 204 sts on #5 needles. Work ribbing for 2 3/8 inches. On next round switch to the size 6 needle and dec 36 stitches evenly= 168 sts. .... I emailed earlier and was told that the dec meant to increase 36 sts = 240 sts which I did but when it was time to bind off for armholes I have way to many stitches left on the needle. I'm not sure what I am doing wrong?
09.12.2023 - 22:47DROPS Design answered:
Dear Ruth, there was a typo in the previous answer, you should decrease 36 sts and obtain 168 stitches. First work the rib 6 cm, then switch to a 6mm circular needle and, on the first row worked with the new needle, decrease 36 sts evenly. Happy knitting!
10.12.2023 - 22:52Ruth Poettcker wrote:
I am knitting the "Aberdeen " jumper, in the pattern for the BODY I have cast on and ribbed the required amount of ribbing. Then it says to continue in stockinette st until finished measurements. I am now quoting the pattern:" on next round switch to circular needle size 6 mm and dec 36 stitches(I am knitting the Large size) evenly. When piece measures bind off... My question is: do I decrease the 36 stitches after I have finished the ribbing? Then do I switch to the size 6 needle?
09.11.2023 - 18:53DROPS Design answered:
Dear Mrs Poettecker, you first work 6 cm rib with needle size 5 mm, then switch to circular needle size 6 mm and work 1 row from RS increasing evenly 36 sts in L (read more about how to increase evenly here) = there are now 156 sts on needle, continue in stoking stitch. Happy knitting!
10.11.2023 - 09:12Gina Øverland wrote:
Er det kanskje en feil i den norske oppskriften? Det står at man skal strikke bolen til den måler 53 cm (i str M) og deretter felle til armer. I den nederlandske og amerikanske oppskriften står det 43 cm (i str M)..
30.09.2023 - 21:08DROPS Design answered:
Hej Gina. Det står 43 cm på den norska oppskriften også (...Når arb måler 42-43-44-45-46-47 cm felles det av m til ermhull...). Mvh DROPS Design
03.10.2023 - 14:06Max wrote:
Just for your info I noticed that this FREE pattern seems to be FOR SALE on Etsy. I don't know of the legality of such a thing but I thought I would let you know as it doesn't seem right to me. Search Etsy for "PDF KNITTING PATTERN Men's Sweater Top Raglan Collar -- Aran Yarn Men's Top Pullover"
08.08.2023 - 19:53DROPS Design answered:
Dear Max, thank you very much for noticing this, please feel free to help us reporting this to Etsy. Thank you!
09.08.2023 - 08:33Susan O Flint wrote:
Help I'm working the sleeve and have no idea how to do the yarn over at the beginning of the round. I'm ready to give up
28.05.2023 - 01:55DROPS Design answered:
Dear Susan, to start with a yarn over, move the yarn in front of the needle and then knit the first stitch. Happy knitting!
28.05.2023 - 19:09Renée Beerens wrote:
Bijzonder dat ik nu net het advies krijg om na het afkanten van de hals het advies krijg om gewoon door te breien. Terwijl er bij meerdere andere vragen wordt gezegd dat bij middenachter de draad moet worden afgeknipt. Dat advies vind ik logischer. Want als je door breit heb je op de rechtermouw een rij te veel aan steken. Daar heb je al een ronde geminderd. Of is dat de bedoeling?
13.05.2023 - 09:30DROPS Design answered:
Dag Renée,
Je kan ervoor kiezen om de draad af te knippen, maar het hoeft niet. Het staat ook niet in het patroon. Als je de draad afknipt, dan doe je dat gelijk midden achter na de naald dat je hebt afgekant aan de voorkant. Als de daarop volgende naald een naald is waarin je minderingen moet maken voor de raglan, dan begin je op de goede kant. Als het een naald is zonder minderingen, dan begin je op de verkeerde kant.
13.05.2023 - 15:23Renée Beerens wrote:
Goedendag, ik heb de mouwen op de rondbreinaald gezet. De eerste raglan mindering is gemaakt. En de 18 stk (maat XXL) voor de hals zijn geminderd. Ik heb de naald uitgebreid tot middenachter. Uit de overige vragen heb ik begrepen dat de draad nu afgeknipt moet worden en opnieuw aangehecht vanaf de hals. Is de eerste naald dan op de verkeerde kant of de goede kant? Ivm om de naald kunnen minderen voor raglan/hals. Bvd. Renee
12.05.2023 - 11:30DROPS Design answered:
Dag Renée,
Na het afkanten voor de hals kun je gewoon doorbreien, maar je breit nu heen en weer in plaats van in de rondte. let erop dat je steeds om de naald mindert in iedere raglanlijn.
13.05.2023 - 09:10Kassie wrote:
This is my first knitted sweater. I have had success with other drops patterns, but I'm having a hard time reconciling the amount of pieces. The jumper doesn't seem to leave room for the raglan, and I am not exactly sure what to do with the yoke. I am sorry this seems basic, but I need to understand the construction before I get started. My preference is to work in the round to avoid sewing sides together.
09.03.2023 - 18:16DROPS Design answered:
Dear Kassie, this video shows how to work a raglan worked from bottom up, ie how to join pieces together and then how to decrease for the raglan (but remember to follow the raglan decreases for this jumper to get the same and not exactly as in the video). Happy knitting!
10.03.2023 - 09:22Paule De Margerie wrote:
J'ai terminé la réhausse pour l'encolure dos. J'en suis à «Rabattre» et je ne sais pas comment faire car j'ai 16 mailles sur une aiguille gauche et toutes les autres sont sur l'aiguille droite. Comment dois-je précéder ? Merci
23.02.2023 - 16:35DROPS Design answered:
Bonjour Mme De Margerie, vous pouvez couper le fil, le joindre au début du rang et rabattre toutes les mailles. Bon tricot!
24.02.2023 - 09:46Nancy Scholl wrote:
I’m finishing the first sleeve increases. I’ve reached the end of the increases on each 5th round but have only 65 stitches not 67. Any idea of where I went wrong ? Should I knit another 5 rounds to make another increase or do it sooner?
23.02.2023 - 02:57DROPS Design answered:
Dear Mrs Scholl, in size M you should increase a total of 8 times on every 6th round then a total of 7 times on every 5th round = 37 + (2x8) + (2x7) = 67 stitches. Happy knitting!
23.02.2023 - 13:52