
Categorie popolari
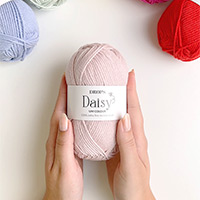
State cercando un filato?


Lasciare un commento sul modello DROPS 164-31
Noi saremmo felici di ricevere i tuoi commenti e opinioni su questo modello!
Se vuoi fare una domanda, fai per favore attenzione a selezionare la categoria corretta nella casella qui sotto per velocizzare il processo di risposta. I campi richiesti sono indicati da *.
|
||||||||||||||||||||||||||||
Lakeside |
||||||||||||||||||||||||||||
|
|
||||||||||||||||||||||||||||
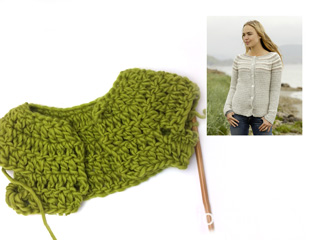
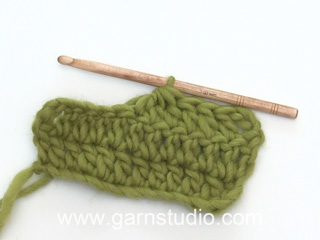
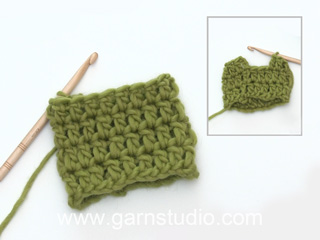
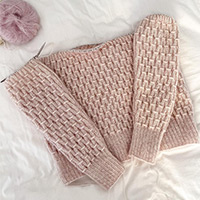
Maglione DROPS lavorato all’uncinetto a maglie alte, motivo traforato e sprone rotondo, lavorato dall'alto in basso (top down) in "Air".
DROPS 164-31 |
||||||||||||||||||||||||||||
|
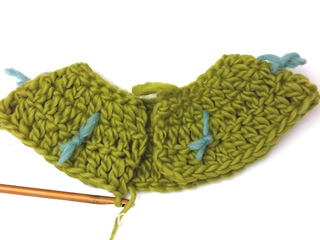
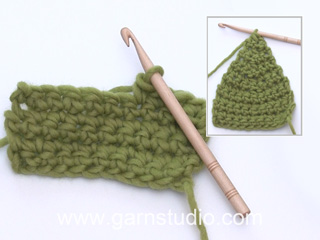
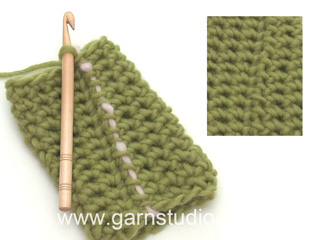
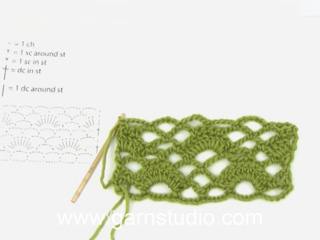
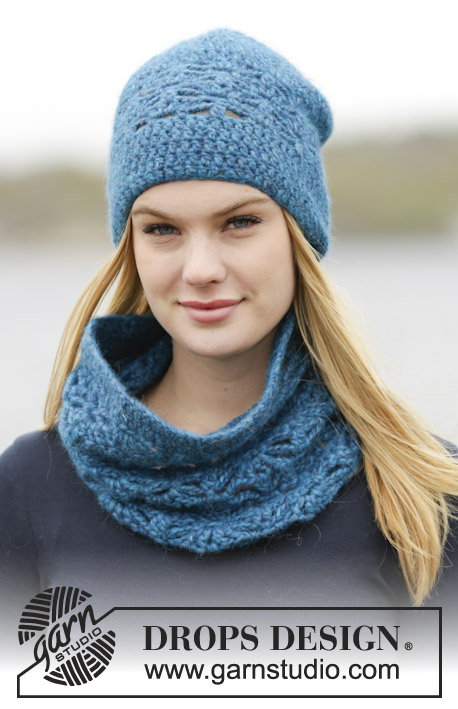
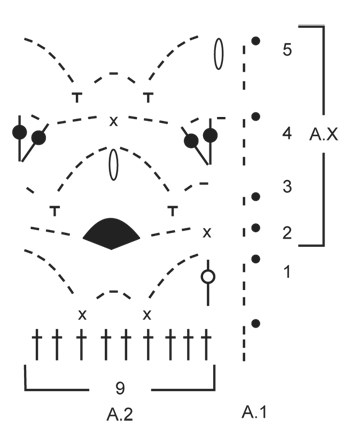
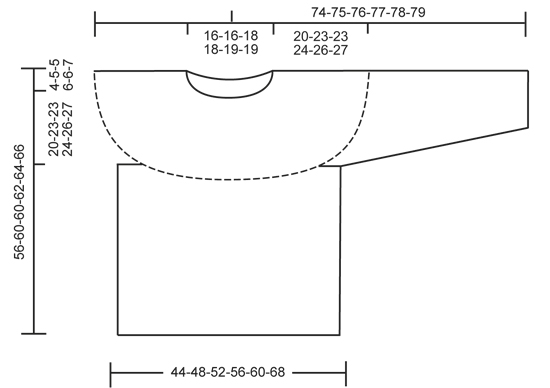
INFORMAZIONI PER IL LAVORO: Sostituire la 1° m.b all'inizio di ogni giro a m.b con 1cat. Finire ogni giro con 1 m.bss nella cat all'inizio del giro. Sostituire la 1° m.a all'inizio di ogni giro a m.a con 3 cat. Finire ogni giro con 1 m.bss nella 3° cat dall'inizio del giro. MOTIVO: Vedere i diagrammi A.1 e A.2. LAVORARE 2 M.A INSIEME (nella m.a): Lavorare 1 m.a nella m.a successiva ma aspettare con l'ultimo passaggio, lavorare un'altra m.a nella stessa m.a, ma sull'ultimo passaggio, far passare il filo attraverso tutte le m sull'uncinetto. LAVORARE 2 M.A INSIEME (attorno alla cat): lavorare 1 m.a attorno alla cat centrale del gruppo di m.a ma aspettare con l'ultimo passaggio, lavorare un'altra m.a attorno alla stessa cat, ma sull'ultimo passaggio, far passare il filo attraverso tutte le m sull'uncinetto. GRUPPO DI M.A: Lavorare un gruppo di m.a attorno all'arco di cat come segue: lavorare * 1 m.a, 1 cat *, ripetere *-* altre 2 volte attorno allo stesso arco di cat, 1 m.a attorno allo stesso arco di cat. SUGGERIMENTO PER GLI AUMENTI: Aumentare 1 m.a lavorando 2 m.a in 1 m.b/m.a. SUGGERIMENTO PER LE DIMINUZIONI: Diminuire 1 m.a all'inizio e alla fine del giro come segue: lavorare 1 m.a (= 3 cat), * lavorare 1 m,a ma aspettare con l'ultimo passaggio (= 2 m sull'uncinetto), poi lavorare la m.a successiva ma sull'ultimo passaggio, far passare il filo attraverso tutte le m sull'uncinetto *, ripetere *-* quando rimangono 3 m.a sul giro = 1 m diminuita a pgni lato del segnapunti. ---------------------------------------------------------- MAGLIONE: Lavorato dall'alto in basso (top down). Lavorato in tondo, il giro inizia al centro dietro. SPRONE: Avviare 66-69-75-82-84-90 cat lasse con l'uncinetto n° 6 mm con Air e formare un anello con 1 m.bss. Lavorare il 1° giro come segue: GIRO 1: lavorare 1 cat - LEGGERE LE INFORMAZIONI PER IL LAVORO, lavorare 1 m.b in ognuna delle prime 1-4-2-1-3-1 cat, * saltare 1 cat, lavorare 1 m.b in ognuna delle 7 cat successive *, ripetere *-* altre 7-7-8-9-9-10 volte = 58-61-66-72-74-79 m.b. GIRO 2: lavorare 1 m.a in ogni m.b e ALLO STESSO TEMPO aumentare 6-8-8-9-12-23 m.a in modo uniforme - LEGGERE IL SUGGERIMENTO PER GLI AUMENTI = 64-69-74-81-86-102 m.a. Ora inserire 8 segnapunti nel lavoro per gli aumenti del raglan senza lavorare le m. Inserire 4 segnapunti a ogni lato dall'inizio del giro in modo che siano a specchio dal centro davanti: Inserire un segnapunti dopo 10-10-10-11-12-15 m.a, inserire il segnapunti successivo dopo 2 m.a, poi inserire il segnapunti successivo dopo 8-10-12-14-14-17 m.a, e finire con l'ultimo segnapunti dopo 2 m.a. Ora ci sono 20-21-22-23-26-30 m.a tra i due segnapunti centrali verso il centro davanti sul maglione. Ora continuare con 1 m.a in ogni m.a, ALLO STESSO TEMPO aumentare 1 m.a sul lato destro degli 8 segnapunti. Poi aumentare in modo alternato sul lato destro e sinistro di tutti i segnapunti. Ripetere gli aumenti a ogni giro altre 9-9-11-12-13-16 volte, e poi a giri alterni 2-3-2-2-2-0 volte = 160-173-186-201-214-238 m.a sul giro. Il lavoro misura circa 20-23-23-24-26-27 cm. FARE ATTENZIONE ALLA TENSIONE DEL LAVORO! Sul giro successivo lavorare come segue: lavorare 21-23-25-28-30-34 m.a (= metà dietro), 8 cat (sotto manica), saltare 38-40-42-45-47-50 m.a dalla riga precedente (= manica), 42-47-52-55-60-70 m.a (= davanti), 8 cat (sotto manica), saltare 38-40-42-45-47-50 m.a dalla riga precedente (= manica) e 21-23-25-27-30-34 m.a (= metà dietro). Inserire un segnapunti, ora misurare il lavoro da qui! CORPO: Ora ci sono 100-109-118-127-136-154 m per il corpo. ORA MISURARE IL LAVORO DA QUI. Lavorare 1 giro con 1 m.a in ogni m.a/cat, poi lavorare il MOTIVO – leggere la spiegazione sopra, come segue: NOTA: lavorare dal 1° giro di A.1-A.2. GIRO 1: lavorare 3 cat (= A.1) – ricordarsi delle informazioni per il lavoro. Poi lavorare A.2 come segue: * lavorare 2 M.A INSIEME (nella m.a) – leggere la spiegazione sopra, 5 cat, saltare 2 m.a, 1 m.b nella m.a successiva, 3 cat, saltare 2 m.a, 1 m.b nella m.a successiva, 5 cat, saltare 2 m.a *, ripetere *-* altre 10-11-12-13-14-16 volte. Finire con 1 m.bss nella 3° cat sul giro (= A.1). GIRO 2: lavorare 1 cat, * lavorare 1 m.b nella 2° m.a lavorata insieme, 3 cat, saltare 1 arco di cat, lavorare 1 GRUPPO DI M.A – leggere la spiegazione sopra, attorno al successivo arco di cat, 3 cat, saltare 1 arco di cat *, ripetere *-* altre 10-11-12-13-14-16 volte. Finire con 1 m.bss nella 1° cat sul giro. GIRO 3: lavorare 1 cat, * 2 cat, 1 m.b attorno all’arco di cat successivo, 5 cat, lavorare 2 M.A INSIEME (attorno alla cat) – leggere la spiegazione sopra, 5 cat, 1 m.b attorno all’arco di cat successivo dopo il gruppo di m.a, 1 cat *, ripetere *-* altre 10-11-12-13-14-16 volte. Finire con 1 m.bss nella 1° cat sul giro. GIRO 4: lavorare 3 cat, lavorare (1 cat, 1 m.a, 1 cat, 1 m.a) attorno al 1° arco di cat, 3 cat, saltare 1 arco di cat, 1 m.b nelle 2 m.a lavorate insieme, 3 cat, saltare un arco di cat, * (1 m.a, 1 cat, 1 m.a, 1 cat, 1 m.a, 1 cat, 1 m.a) attorno all’arco di cat successivo, 3 cat, saltare 1 arco di cat, 1 m.b nelle 2 m.a lavorate insieme, 3 cat, saltare 1 arco di cat *, ripetere *-* altre 9-10-11-12-13-15 volte, (1 m.a, 1 cat, 1 m.a) attorno all’ultimo arco di cat. Finire con 1 m.bss nella 3° cat sul giro. GIRO 5: lavorare 3 cat, * lavorare 2 M.A INSIEME (attorno alla cat), 5 cat, 1 m.b attorno all’arco di cat dopo il gruppo di m.a, 3 cat, 1 m.b attorno all’arco di cat successivo, 5 cat *, ripetere *-* altre 10-11-12-13-14-16 volte, Finire con 1 m.bss nella 3° cat sul giro. Continuare in questo modo e ripetere A.X (= 2°-5° giro) fino a quando il lavoro misura circa 32 cm in tutte le taglie – aggiustare per finire dopo il 2° o 4° giro in A.1-A.2. Il lavoro misura 56-60-60-62-64-66 cm in totale. MANICA: La manica è lavorata in tondo, dall’alto in basso (top down). ORA MISURARE IL LAVORO DA QUI. Inserire un segnapunti al centro delle 8 cat lavorate sotto la manica. Ora misurare il lavoro da qui. Lasciare che il segnapunti segua il lavoro fino alla fine del lavoro. Affrancare il filo con 1 m.bss nella 5° cat delle 8 cat lavorate sullo scalfo sul corpo. Lavorare 3 cat (= 1 m.a), continuare con 1 m.a in ognuna delle 3 cat successive, 1 m.a in ognuna delle m.a per la manica e poi 1 m.a nelle 4 cat rimaste sotto la manica = 46-48-50-53-55-58 m.a – ricordarsi delle INFORMAZIONI PER IL LAVORO! Continuare con 1 m.a in ogni m.a e ALLO STESSO TEMPO quando il lavoro misura circa 4 cm iniziare a diminuire – LEGGERE IL SUGGERIMENTO PER LE DIMINUZIONI. Ripetere le diminuzioni ogni 3-2-2-2-2-1 giri altre 8-9-10-10-11-12 volte = 28-28-28-31-31-32 m.a rimaste. Quando la manica misura 46-44-44-43-42-40 cm, la manica è finita. Lavorare l’altra manica nello stesso modo. ---------------------------------------------------------- Cappello e scaldacollo: Vedere DROPS 164-32 o "Motivi relativi" nel motivo o sul sito. ---------------------------------------------------------- |
||||||||||||||||||||||||||||
Spiegazioni del diagramma |
||||||||||||||||||||||||||||
|
||||||||||||||||||||||||||||
|
||||||||||||||||||||||||||||
|
||||||||||||||||||||||||||||
|
Avete realizzato questo o un altro dei nostri modelli? Taggate le vostre foto nei social media con #dropsdesign in modo che possiamo vederle! Avete bisogno di aiuto con questo modello?Troverete video tutorial, una sezione per i commenti/domande e molto altro guardando il modello su www.garnstudio.com © 1982-2024 DROPS Design A/S. Ci riserviamo tutti i diritti. Questo documento, compreso tutte le sue sotto-sezioni, è protetto dalle leggi sul copyright. Potete leggere quello che potete fare con i nostri modelli alla fine di ogni modello sul nostro sito. |
||||||||||||||||||||||||||||


Con oltre 40 anni di esperienza nel design di modelli di maglia e uncinetto, DROPS Design offre la più estesa collezione di modelli gratuiti su internet - tradotti in 17 lingue. Ad oggi vi possiamo fornire 304 cataloghi e 11422 modelli - 8666 dei quali sono tradotti in Italiano.
Ci stiamo impegnando molto per darvi il meglio che vi possiamo offrire in termini di maglia e uncinetto, ispirazioni e consigli così come filati di grande qualità ad un prezzo incredibile! Volete utilizzare i nostri modelli per qualcosa d'altro oltre al vostro uso personale? Potete leggere tutto ciò che è consentito nel testo sul Copyright in basso su tutte le pagine dei nostri modelli. Buon lavoro!
Commenti / Domande (41)
Marisa Serra wrote:
Sorry for coming back on this but I cannot figure it out. I’ve never crocheted a top-down sweater before and these instructions are not clear to me. I’ve understood that there are 12 rows in the yoke. Round 2 = 64 dc. And we’re supposed to reach 160dc by the end of row 12. How am I to increase by 96 stitches over 10 rows?? The math doesn’t add up. Thank you for your help.
04.12.2018 - 15:23DROPS Design answered:
Dear Mrs Serra, you start with 64 dc and increase 8 sts on each of the next 10 rounds = 80 sts increased + 64 dc = 144 dc. Then you will increase 8 sts every other round a total of 2 times (= 4 rounds x 8 sts inc) = 8 sts x 2 times = 16 sts inc + 144 sts = 160 sts. Yoke should now measure approx. 20 cm. Happy crocheting!
04.12.2018 - 15:44Marisa wrote:
Hello, For size small, could you please clarify this sentence: Repeat inc every round 9 more times, and every other round 2times = 160 dc. What does "every other round" mean? How do I evenly increase from round 3? i.e get from 72 dc to 160 dc? Thank you very much in advance
03.12.2018 - 22:21DROPS Design answered:
Dear Marisa, you will increase at each marker (= 1st increase at the right of the markers = before each marker - 2nd increase at the left of the markers = after each marker = 8 stitches increased on each increase round) first every round a total of 10 times (work 10 rounds inc alternately before and after each marker) then increase a total of 2 times every other round (= work 1 round without dec, 1 round with dec, repeat these 2 rounds a total of 2 times). Happy crocheting!
04.12.2018 - 07:41Superschöner Pullover. Grösse S fällt sehr klein aus, passt meiner 10jährigen wie angegossen. Habe das muster an den ärmeln wiederholt.
29.08.2018 - 20:28Mary Manoly wrote:
Need chart to how to place the markers shal i place them right and left from starting points? Thank you
26.09.2017 - 09:50DROPS Design answered:
Dear Mary, yes you will insert them from beg of round on the right and on the left, so that you will have a total of 8 markers and 20-21-22-23-26-30 tr (UK-En)/dc (US-En) between markers on front piece. Happy crocheting!
26.09.2017 - 13:14Danke, die letzte Erklärung war dann doch noch hilfreich. Wenn Sie eigentlich 10 Rd mit je 8 Zunahmen statt 10 Zunahmen pro Rd meinen ist die Formulierung in der Anleitung nach deutscher Grammatik und Syntax aber leider einfach falsch & unnötig irreführend. Dort steht "Zunahmen IN JEDER Rd nach dem 1. Mal noch weitere 9 Mal wiederholen" = 9 Wiederholungen pro Runde. Nicht 9 Wiederholungen der (Zunahme-)Runde oder R3+4 x Mal wiederholen, was anscheinend eigentlich gemeint ist.
25.09.2017 - 14:39(Meinen Sie vielleicht eigentlich 10 Runden mit je 8 Zunahmen statt 10 Zunahmen pro Runde?) Was meinen Sie mit "in jeder 2. Rd 2 x arb"? Zwei Mal WAS arbeiten? Bitte schreiben Sie doch einfach Runde für Runde auf, was zu tun ist. R3: 8x Zunahme je rechts der Markierer (72M) R4: 8x Zunahme je links der Markierer (80M) R5: ? R6: ? ...
25.09.2017 - 12:53DROPS Design answered:
Ja genau, 8 Zunahmen in jeder der nächsten 10 Runde, dann in jeder 2. Runde = (Eine Runde ohne Zunahme, Eine Runde mit Zunahme), von (bis) insgesamt 2 x wiederholen. Runde 1: 64+8 rechts aller Markierung = 72 M, Rd2: 72+8 M links aller Markierung = 80 M, usw bis Runde 10: 144 M; dann, nächste Runde: keine Zunahme, Rd 12: 144 + 8 = 152 M. Rd 13: keine Zunahme. Rd 14: 152+8= 160 M. Viel Spaß beim stricken!
25.09.2017 - 13:27Danke, das Video habe ich gesehen, mir ist auch klar wie ich 2 Stb in eins häkele, aber das hilft mir leider wie gesagt null weiter, genau wie Ihre Antworten. Wie soll ich bei 8 Markierern und 1 Zunahme pro Markierer 10 Zunahmen pro Runde machen? Wo kommen denn bitte die anderen 2 Zunahmen her/hin? Und warum schreiben Sie dann wieder, dass in jeder Zunahmerunde 8M gearbeitet werden? Was denn jetzt? Können Sie sich nicht enscheiden oder können Sie sich nur nicht ausdrücken?
25.09.2017 - 12:51DROPS Design answered:
Liebe Frau Knaxgurke, es sind 8 Markierungen, so werden 8 M pro Zunahmenrunde zugenommen, dh 1 vor/nach jeder Markierung: zuerst in jeder Runde 8 M insgesamt 10 x abwechselnd vor/nach jeder Markierung, dann in jeder 2. Runde 8 M insgesamt 2 x (in der 1. Größe) vor/nach jeder Markierung zunehmen, dann haben Sie 8 M x 10 + 8 M x 2 zugenommen (= 80+16= 96 M zugenommen + die 64 M von Beginn = es sind 160 M. Hoffentlich hilft es!
25.09.2017 - 13:23Ich wäre Ihnen sehr verbunden wenn Sie mir verständlich erklären könnten, was in Ihrer konfusen Anleitung gemeint ist und diese bei Gelegenheit verständlich überarbeiten könnten. So habe ich jedenfalls keine Lust, Ihre Anleitungen in Zukunft bei der Auswahl meiner Projekte zu berücksichtigen, wenn die alle so geschrieben sind, dass man sich den Frust und die Mühe gleich sparen kann. Die kurze Kommentarfunktion spricht jedenfalls auch für sich, bzw. gegen Sie.
24.09.2017 - 15:12DROPS Design answered:
Liebe Frau Knaxgurke, schauen Sie mal bitte die verschieden Antwort und das Video. Sollten Sie weitere Frage haben, dann melden Sie sich bitte einfach wieder. Viel Spaß beim häkeln!
25.09.2017 - 10:51Ich habe bis jetzt (R2: 64 Maschen) R3: 8x Zunahme je rechts der Markierer (72M) R4: 8x Zunahme je links der Markierer (80M) Aber jetzt hängt's. Ich kann 9 Runden weiter abwechselnd rechts/links zunehmen (9*8=72 + 80 wären dann 152 Maschen statt der angestrebten 160), aber das ergibt mit "in jeder Runde noch 9x wiederholen" keinen Sinn, und mit "jede 2. Runde 2x arbeiten" (Was soll das überhaupt heißen?) erst Recht nicht.
24.09.2017 - 15:11Warum können Sie nicht einfach Reihe für Reihe schreiben, was zu tun ist? Wie soll ich denn 12x (in meinem Fall 9x) mal zunehmen, wenn ich nur an jedem der 8 Markierer eine Zunahme mache?! Es ergibt einfach keinen Sinn. Da müsste ich doch an weiteren Stellen Zunahmen machen, aber WO?! ("Gleichmäßig verteilt zunehmen" finde ich übrigens auch eine ganz tolle Angabe, das zeugt für mich nur von Faulheit, die Anleitung richtig auszuarbeiten.)
24.09.2017 - 15:11DROPS Design answered:
Liebe Frau Knaxgurke, bei der 1. Größe sollen Sie abwechselnd vor und nach allen Markierungen (=rechts und linkes aller Markierungen) in jeder Rd 10 x zunehmen, dann in jeder 2. Rd 2 x arb = 160 Stb - es wird 8 M in jeder Zunahmenrunde gearbeitet, so hatten Sie 64 Stb + (8 M x 10 + 8 M x 2 = 96 Zunahmen) = 160 Stb.
25.09.2017 - 10:49