DROPS Cotton Merino uni colour 50% Wool, 50% Cotton |
3.55 £ /50g |
Order |
Clicking the ORDER button will redirect you to Wool Warehouse Direct Ltd website
The yarn cost is calculated from the pattern’s smallest size and the yarn’s cheapest product type. Looking for an even better price? You might find it on the DROPS Deals!
-------------------------------------------------------
Alternative Yarn – See how to change yarns here
Yarn Groups A to F – Use the same pattern and change the yarn here
Yarn usage using an alternative yarn – Use our yarn converter here
-------------------------------------------------------
DROPS Cotton Merino uni colour 50% Wool, 50% Cotton 3.55 £ /50g Order |
Clicking the ORDER button will redirect you to Wool Warehouse Direct Ltd website
The yarn cost is calculated from the pattern’s smallest size and the yarn’s cheapest product type. Looking for an even better price? You might find it on the DROPS Deals!
This pattern has been corrected. Click here to see the correction/s.
= K from RS, P from WS | |
= slip 1 st as if to K, K 1, psso | |
= K 2 tog | |
= 1 YO between 2 sts, P on next row | |
= 1 YO between 2 sts, P twisted on next row |
|
= slip 1 st as if to K, K 2 tog, psso |
Each of our patterns has specific tutorial videos to help you.
These step-by-step tutorials might also help you:
Why is the knitting/crochet tension so important?
Knitting tension is what determines the final measurements of your work, and is usually measured per 10 x 10 cm. It is provided like so: number of stitches in width x number of rows in height - eg: 19 stitches x 26 rows = 10 x 10 cm.
The knitting tension is very individual; some people knit/crochet loosely while others work tightly. You adjust the knitting tension with the needle size, which is why the suggested needle size is only meant as a guide! You need to adjust this (up or down) to ensure that YOUR knitting tension matches the knitting tension provided in the pattern. If you work with a different knitting tension than provided you will have a different yarn consumption, and your work will have different measurements than what the pattern suggests.
The knitting tension also determines which yarns can replace each other. As long as you achieve the same knitting tension you can replace one yarn with another.
See DROPS lesson: How to measure your tension/gauge
See DROPS video: How to make a gauge tension swatch
How do I know how many balls of yarn I need?
The required amount of yarn is provided in grams, eg: 450 g. To calculate how many balls you’ll need you first need to know how many grams are in 1 ball (25g, 50g or 100g). This information is available if you click on the individual yarn quality on our pages. Divide the amount required with the amount of each ball. For example, if each ball is 50g (the most common amount), the calculation will be as follows: 450 / 50 = 9 balls.
Can I use a different yarn than what the pattern suggests?
The important thing when changing from one yarn to another is that the knitting/crochet tension remains the same. This is so that the measurements of the finished piece will be the same as on the sketch provided. It is easier to achieve the same knitting tension using yarns from the same yarn group. It is also possible to work with multiple strands of a thinner yarn to achieve the knitting tension of a thicker one. Please try our yarn converter. We recommend you to always work a test swatch.
Please NOTE: when changing yarn the garment might have a different look and feel to the garment in the photo, due to individual properties and qualities of each yarn.
See DROPS lesson: Can I use a different yarn than the one mentioned in the pattern?
What are the yarn groups?
All our yarns are categorised into yarn groups (from A to F) according to thickness and knitting tension – group A contains the thinnest yarns and group F the thickest. This makes it easier for you to find alternative yarns to our patterns, should you wish to switch yarn. All yarns within the same group have a similar knitting tension and can easily replace each other. However, different yarn qualities have different structures and properties which will give the finished work a unique look and feel.
How do I use the yarn calculator?
At the top of all our patterns you’ll find a link to our yarn calculator, which is a helpful tool should you wish to use a different yarn than suggested. By filling in the yarn quality you wish to replace, the amount (in your size) and number of strands, the calculator will present good alternative yarns with the same knitting tension. Additionally it will tell you how much you’ll require in the new qualities and whether you’ll need to work with multiple strands. Most skeins are 50g (some are 25g or 100g).
If the pattern is worked with multiple colours, every colour will have to be calculated separately. Similarly, if the pattern is worked with several strands of different yarns (for example 1 strand Alpaca and 1 strand Kid-Silk) you will have to find alternatives for each, individually.
Why do you show discontinued yarns in the patterns?
Since different yarns have different qualities and textures we have chosen to keep the original yarn in our patterns. However, you can easily find options among our available qualities by using our yarn calculator, or simply pick a yarn from the same yarn group.
It is possible that some retailers still have discontinued yarns in stock, or that someone has a few skeins at home that they would like to find patterns for.
The yarn calculator will provide both alternative yarn as well as required amount in the new quality.
What size should I knit?
If you think it's hard to decide what size to make, it can be a good idea to measure a garment you own already and like the size of. Then you can pick the size by comparing those measures with the ones available in the pattern's size chart.
You'll find the size chart at the bottom of the pattern.
See DROPS lesson: How to read size chart
Why do I get the wrong knitting tension with the suggested needle size?
The needle size provided in the pattern serves only as a guide, the important thing is to follow the knitting tension. And since knitting tension is very individual, you will have to adjust the needle size to ensure that YOUR tension is the same as in the pattern – maybe you’ll have to adjust 1, or even 2 needle sizes, up or down to achieve the correct tension. For this, we recommend that you work test swatches.
Should you work with a different knitting tension than the one provided, the measurements of the finished garment might deviate from the measurement sketch.
See DROPS lesson: How to measure your tension/gauge
See DROPS video: How to make a tension/gauge swatch
Why is the pattern worked top-down?
Working a garment top-down provides more flexibility and room for personal adjustment. For example it is easier to try the garment on while working, as well as making adjustments to length of yoke and shoulder caps.
The instructions are carefully explaining every step, in the correct order. Diagrams are adjusted to the knitting direction and are worked as usual.
How do I work according to a knitting diagram?
The diagram depicts all rows/rounds, and every stitch seen from the right side. It is read from bottom to top, from right to left. 1 square = 1 stitch.
When working back and forth, every other row is worked from the right side and every other row is worked from the wrong side. When working from the wrong side, the diagram will have to be worked reversed: from left to right, knit stitches are purled, purl stitches are knit etc.
When working in the round every round is worked from the right side and the diagram are worked from right to left on all rounds.
See DROPS lesson: How to read knitting diagrams
How do I work according to a crochet diagram?
The diagram depicts all rows/rounds, and every stitch seen from the right side. It is worked from bottom to top, from right to left.
When working back and forth every other row is worked from the right side: from right to left and every other row is worked from the wrong side: from left to right.
When working in the round, every row in the diagram are worked from the right side, from right to left.
When working a circular diagram you start in the middle and work your way outwards, counter clockwise, row by row.
The rows usually start with a given number of chain stitches (equivalent to the height of the following stitch), this will either be depicted in the diagram or explained in the pattern.
See DROPS lesson: How to read crochet diagrams
How do I work several diagrams simultaneously on the same row/round?
Instructions for working several diagrams after each other on the same row/round, will often be written like so: “work A.1, A.2, A.3 a total of 0-0-2-3-4 times". This means you work A.1 once, then A.2 is worked once, and A.3 is repeated (in width) the number of times provided for your size – in this case like so: S = 0 times, M = 0 times, L=2 times, XL= 3 times and XXL = 4 times.
The diagrams are worked as usual: begin with the first row in A.1, then work the first row in A.2 etc.
See DROPS lesson: How to read knitting diagrams
See DROPS lesson: How to read crochet diagrams
Why are the sleeves shorter in larger sizes?
The total width of the garment (from wrist-to-wrist) will be larger in the larger sizes, despite the actual sleeves being shorter. The larger sizes have longer sleeve caps and wider shoulders, so there will be a good fit in all sizes.
Where on the garment is the length measured?
The measurement sketch/schematic drawing provides information regarding the full length of the garment. If it’s a jumper or a jacket the length is measured from the highest point on the shoulder closest to the neckline, and straight down to the bottom of the garment. It is NOT measured from the tip of shoulder. Similarly, the length of yoke is measured from the highest point on the shoulder and down to where yoke is split into body and sleeves.
On a jacket measures are never taken along bands, unless specifically stated. Always measure inside band stitches when measuring the length.
See DROPS lesson: How to read a schematic drawing
What is a repeat?
Diagrams are often repeated on the round or in height. 1 repeat is the diagram the way it appears in the pattern. If it says to work 5 repeats of A.1 in the round, then you work A.1 a total of 5 times after/next to each other in the round. If it says to work 2 repeats of A.1 vertically/in height you work the entire diagram once, then begin again at the start and work the entire diagram one more time.
Why does the piece start with more chain stitches than it’s worked with?
Chain stitches are slightly narrower than other stitches and to avoid working the cast-on edge too tight, we simply chain more stitches to begin with. The stitch count will be adjusted on the following row to fit the pattern and measurement sketch.
Why increase before the rib edge when the piece is worked top-down?
The rib edge is more elastic and will contract slightly compared to, for example, stocking stitch. By increasing before the rib edge, you avoid a visible difference in width between the rib edge and the rest of the body.
Why increase in the cast-off edge?
It’s very easy to cast off too tightly, and by making yarn overs while casting off (and simultaneously casting these off) you avoid a too tight cast off edge.
See DROPS video: How to bind off with yarn overs (yo)
How do I increase/decrease on every 3rd and 4th row/round alternately?
To achieve an even increase (or decrease) you can increase on, for example: every 3rd and 4th row alternately, like so: work 2 rows and increase on the 3rd row, work 3 rows and increase on the 4th. Repeat this until the increase is complete.
See DROPS lesson: Increase or decrease 1 st on every 3rd and 4th row alternately
How can I work a jacket in the round instead of back and forth?
Should you prefer to work in the round instead of back and forth, you may of course adjust the pattern. You’ll need to add steeks mid-front (usually 5 stitches), and follow the instructions. When you would normally turn and work from the wrong side, simply work across the steek and continue in the round. At the end you’ll cut the piece open, pick up stitches to work bands, and cover the cut edges.
See DROPS video: How to knit steeks and cut open
Can I work a jumper back and forth instead of in the round?
Should you prefer to work back and forth instead of in the round, you may of course adjust the pattern so you work the pieces separately and then assemble them at the end. Divide the stitches for the body in 2, add 1 edge stitch in each side (for sewing) and work the front and back pieces separately.
See DROPS lesson: Can I adapt a pattern for circular needles into straight needles?
Why is the pattern slightly different than what I see in the photo?
Pattern repeats can vary slightly in the different sizes, in order to get the correct proportions. If you’re not working the exact same size as the garment in the photo, yours might deviate slightly. This has been carefully developed and adjusted so that the complete impression of the garment is the same in all sizes.
Make sure to follow instructions and diagrams for your size!
How do I make a women’s size garment into a men’s size one?
If you have found a pattern you like which is available in women’s size it’s not very difficult to convert it to men’s size. The biggest difference will be the length of sleeves and body. Start working on the women size that you think would fit across the chest. The additional length will be worked right before you cast off for the armhole/sleeve cap. If the pattern is worked top-down you can add the length right after the armhole or before the first decrease on sleeve.
Regarding additional yarn amount, this will depend on how much length you add, but it is better with a skein too many than too few.
How do I prevent a hairy garment from shedding?
All yarns will have excess fibres (from production) that might come off as lint or shedding. Brushed yarns (ie hairier yarns) have more of these loose, excess fibres, causing more shedding.
Shedding also depends on what is worn under or over the garment, and whether this pulls at the yarn fibres. It’s therefore not possible to guarantee that there will be no shedding
Below are some tips on how to get the best result when working with hairier yarns:
1. When the garment is finished (before you wash it) shake it vigorously so the looser hairs come off. NOTE: do NOT use a lint roller, brush or any method that pulls at the yarn.
2. Place the garment in a plastic bag and put it in your freezer - the temperature will cause the fibres to become less attached to each other, and excess fibres will come off easier.
3. Leave in the freezer for a few hours before taking it out and shaking it again.
4. Wash the garment according to the instructions on the yarn label.
Why does my garment pill?
Pilling is a natural process that happens to even the most exclusive of fibers. It's a natural sign of wear and tear that is hard to avoid, and that is most visible in high friction areas of your garment like a sweater's arms and cuffs.
You can make your garment look as new by removing the pilling, using a fabric comb or a pill/lint remover.
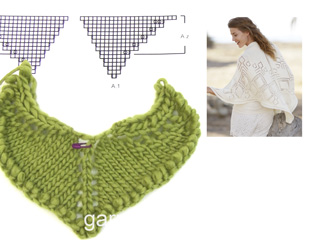
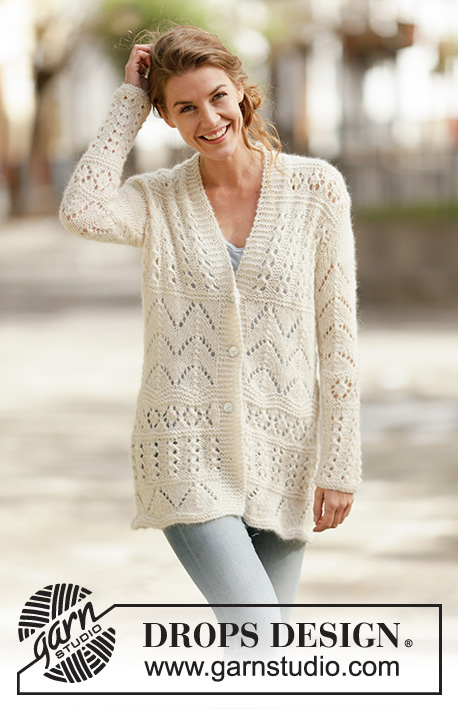
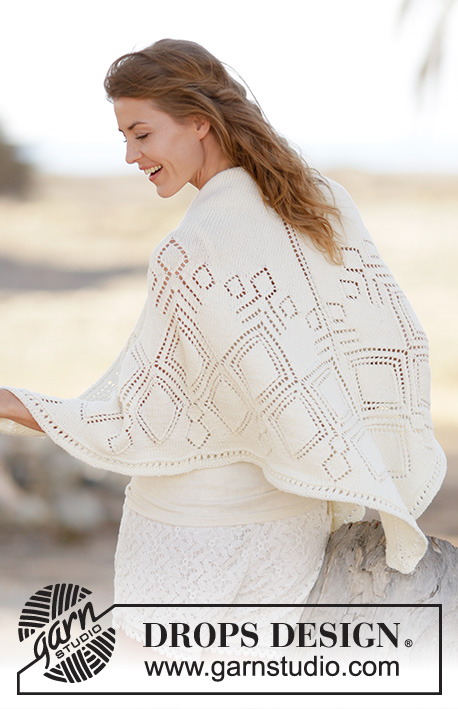
Summer Diamond Shawl |
|||||||||||||||||||
|
|
||||||||||||||||||
Knitted DROPS shawl with lace pattern in ”Cotton Merino”.
DROPS 160-10 |
|||||||||||||||||||
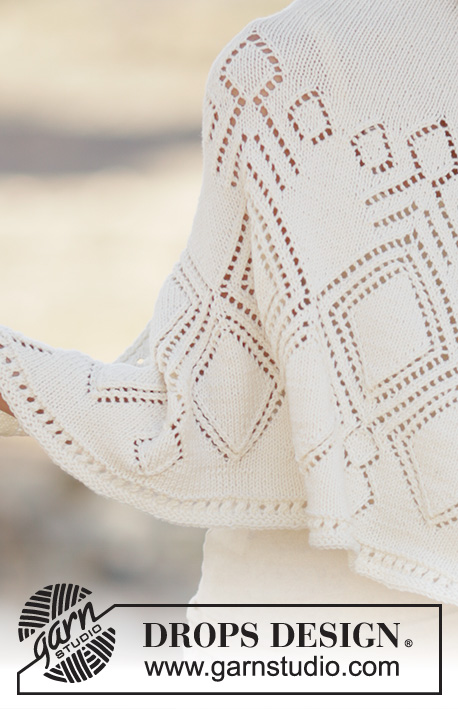
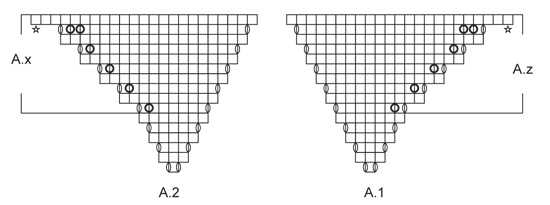
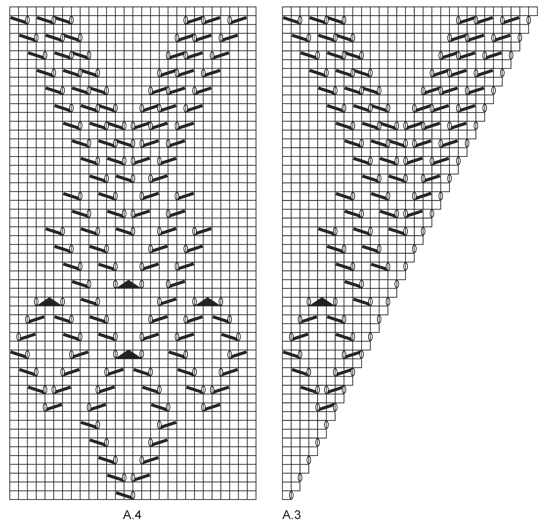
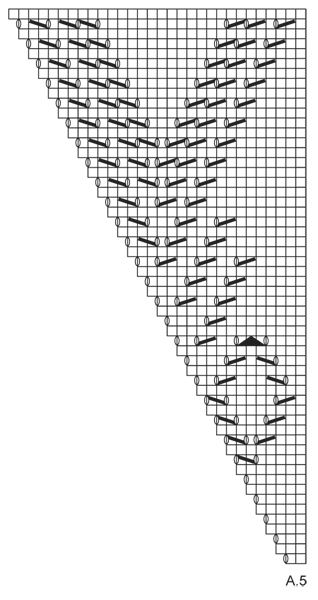
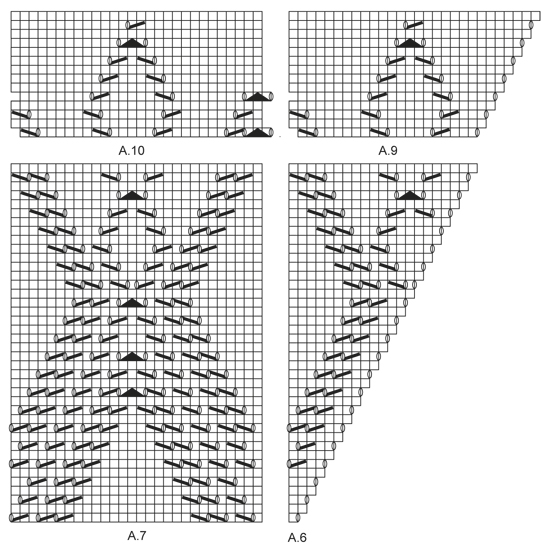
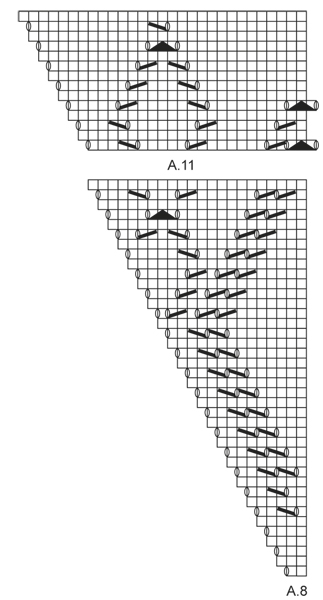
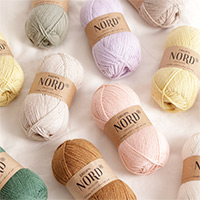
PATTERN: See diagrams A.1-A.11. The diagrams show all rows in pattern seen from RS. 3 EDGE STS: ROW 1 (= RS): K 1, slip 1 st as if to P (with yarn behind work), 1 YO, K 1. Work until 3 sts remain, K 1, 1 YO, slip 1 st as if to P (with yarn behind work), K 1. ROW 2 (= WS): K 1, P 1, drop YO off the needle, P 1. Work until 3 sts remain, P1, drop YO off the needle, P 1, K 1. ---------------------------------------------------------- SHAWL: Worked back and forth on circular needle to make room for all the sts. The shawl is worked from mid back and down. Cast on 9 sts on circular needle size 3.5 mm with Cotton Merino. Insert 1 marker in 5th st (= mid st) and move it upwards in mid st when working. Work mid st in stocking st. Work and inc as shown in diagram A.1 and A.2 as follows: Work 3 EDGE STS - see explanation above, work A.1 until mid st, 1 st in stocking st, work A.2 until 3 edge sts remain and work 3 edge sts. REMEMBER THE KNITTING TENSION When diagram has been worked 1 time vertically, repeat inc as shown in A.z and A.x (i.e. work in stocking st while at the same time inc 1 st on each side of mid st, but inc inside 3 edge sts in each side alternately: 2, 2, 2, 2 and 3 sts in the sides as in diagram (alternately 6, 6, 6, 6 and 8 sts on ever RS row in A.z-A.x). When inc in A.z-A.x have been worked 4 times, work A.z-A.x 1 more time BUT on the last row from RS (se star in diagram) inc only 1 sts (instead of 3 sts) in each of the sides, inc in the middle as in diag = there is now 177 sts on needle. On next row from RS inc 1 st inside 3 edge sts in each side and 1 st on each side of mid st (= 4 sts inc) = 181 sts on needle (i.e. 90 sts on each side of mid st). P 1 row from WS. Then work according to A.3-A.5 as follows: Work 3 edge sts, diagram A.3 over 1 st, repeat A.4 over the next 84 sts (= 3 times), A.5 over 2 sts, 1 st in stocking st (= mid st), A.3 over 1 st, repeat A.4 over the next 84 sts (= 3 times), A.5 over 2 sts and work 3 edge sts. When diagram A.3-A.5 have been worked 1 time vertically, there are 293 sts on needle (i.e. 146 sts on each side of mid st). Work 3 edge sts, diagram A.6 over 1 st, repeat A.7 over the next 140 sts (= 5 times), A.8 over 2 sts, 1 st in stocking st (= mid st), A.6 over 1 st, repeat A.7 over the next 140 sts (= 5 times), A.8 over 2 sts and work 3 edge sts. When diagram A.6-A.8 have been worked 1 time vertically, there are 373 sts on needle (i.e. 186 sts on each side of mid st). Work 3 edge sts, A.9 over 20 sts, repeat A.10 over the next 140 sts (= 5 times), A.11 over 23 sts, 1 st in stocking st (= mid st), A.9 over 20 sts, A.10 over the next 140 sts (= 5 times), A.11 over 23 sts and work 3 edge sts. When diagram A.9-A.11 have been worked 1 time vertically, there are 401 sts on needle (i.e. 200 sts on each side of mid st). Now work an eyelet edge. EYELET EDGE: ROW 1 (1st row = RS): Work 3 edge sts, 1 YO, K until mid st, 1 YO, 1 st in stocking st (= mid st), 1 YO, K until 3 sts remain, 1 YO, 3 edge sts. ROW 2: K all sts. ROW 3: As 1st row. ROW 4: Work 3 edge sts, P from WS until 3 sts remain, 3 edge sts. ROW 5: Work 3 edge sts, 1 YO, K 1, * K 2 tog, 1 YO *, repeat from *-* until 2 sts before mid st, K 2, 1 YO, 1 st in stocking st (= mid st), 1 YO, K 2, * 1 YO, K 2 tog *, repeat from *-* until 4 sts remain, K 1, 1 YO and work 3 edge sts. ROW 6: Work 3 edge sts, P until 3 sts remain, 3 edge sts. Repeat 1st-2nd ROW 2 more times. Loosely cast off with K on next row. |
|||||||||||||||||||
Diagram explanations |
|||||||||||||||||||
|
|||||||||||||||||||
Have you made this or any other of our designs? Tag your pictures in social media with #dropsdesign so we can see them! Do you need help with this pattern?You'll find tutorial videos, a Comments/Questions area and more by visiting the pattern on garnstudio.com. © 1982-2024 DROPS Design A/S. We reserve all rights. This document, including all its sub-sections, has copyrights. Read more about what you can do with our patterns at the bottom of each pattern on our site. |
With over 40 years in knitting and crochet design, DROPS Design offers one of the most extensive collections of free patterns on the internet - translated to 17 languages. As of today we count 304 catalogues and 11422 patterns - 11422 of which are translated into English (UK/cm).
We work hard to bring you the best knitting and crochet have to offer, inspiration and advice as well as great quality yarns at incredible prices! Would you like to use our patterns for other than personal use? You can read what you are allowed to do in the Copyright text at the bottom of all our patterns. Happy crafting!
Comments / Questions (26)
Corinne LECLERCQ SERRATRICE wrote:
Bonjour, J'ai un peu de mal à voir sur la photo les positions des dessins vers la maille centrale. Avez-vous une vue de l'ensemble du châle ? Merci beaucoup, il est magnifique Corinne
11.05.2015 - 14:23DROPS Design answered:
Bonjour Mme Leclerq-Serratrice, nous n'avons pas d'autres photos, pour les motifs, on tricote de chaque côté de la m centrale: 1x A.3, puis A.4 et on termine par A.5, ensuite 1x A.6, puis on répète A.7 et on termine par A.8 et enfin, 1 x A.9, on répète A.10 et 1 x A.11. Bon tricot!
11.05.2015 - 17:42Madeleine wrote:
Jag har stickat a.2 och a.1 4 ggr och nu har jag 177 maskor på stickan och då skall jag egentligen göra 1 omgång till med ökningar med det kan ju aldrig stämma. Även när jag räknar i mönstret kan ja inte få det att stämma. Är mönstret korrekt?
13.04.2015 - 11:09DROPS Design answered:
Hej Madeleine, Vi skal lade Design se på det og så kommer vi tilbage her på bloggen.
13.05.2015 - 15:01DROPS Design wrote:
Hej Sonja. Jeg er enig med dig i at det ser ud til ikke at stemme. Jeg har nu sendt spörgsmaalet videre. Naar jeg ved mere, skal jeg svare paa dit spörgsmaal.
20.03.2015 - 14:39Sonja Hagensen wrote:
Hej jeg kan ikke få A.1 og A.2 samt A.z og Ax hen jeg slår 9 masker op og strikker hele diagram så skal man strikke diagram A.z og A.x 4 gange men så har jeg ikke 177 masker til sidst. Håber der er en der kan hjælpe
18.03.2015 - 16:06DROPS Design answered:
Hej Sonja, Det er svært at sige hvor det går galt, du skal jo tage ud både 2 og 3 gange (sidste udtagningspind) i siderne i A.x.... Held og lykke!
21.05.2015 - 10:25Christiane wrote:
Problème au sujet du nombre de m indiqué dans les explications. Après la série d'augmentations A.x/A.z j'arrive à un totale de 179 m et non 177. Je m'explique : A.1 = 24 m Augmentations de A.z + 16 m ; 3 x ; 16x3 = 48 m Dernière série d'augmentation A.z avec étoile : + 14 m ; 48 +14 = 62 m Soit un total de : 24 m + 62 m = 86 m En symétrie A.2 (+ les augmentations A.x) = 86 m soit un total de (86 m x 2) 172 m Donc 172 m + (2 x 3m de bordure) + 1 m centrale = 179 m.
01.03.2015 - 10:40DROPS Design answered:
Bonjour Christiane, effectivement, il y avait un jeté en trop au début de A.1/A.2, le diagramme va être modifié. Vous pouvez diminuer 1 m de chaque côté de la m centrale au dernier rang sur l'envers (pour bien avoir 177 m au rang suivant sur l'endroit et que les augmentations suivantes tombent ensuite juste). Bon tricot!
06.03.2015 - 10:53Nadine wrote:
Sorry aber wenn ich die zunahmen alle wiederhole, dann komme ich auf mehr als 177 maschen
26.02.2015 - 21:15DROPS Design answered:
Die M berechnen sich wie folgt: 9 M Anschlag + 12 Zun. in der 1. bis 6. R (A.1 = 6 Zun. in der 1.-6. R, A.2 = 6 Zun. in der 1.-6. R), dann in den nächsten 18 R insg. 24 Zun. (6 M pro R, 4 x in jeder 2. R zugen.), dann in der letzten Zun.-R von A.x/A.Z werden insg. 8 M zugen.. Sie nehmen also in A.x/A.z in der ganzen R insgesamt 32 M zu, das können Sie einfach anhand der Umschläge im Diagramm abzählen. Sie stricken A.x/A.z insg. 4x, also 4 x 32 Zun. = 128 M. Plus die 9 M Anschlag und die ersten 12 Zun. = 149 M. Dann wird A.X/A.z noch 1x gestrickt, allerdings werden in der letzten R nicht 8 M zugen., sondern nur 4. Also: 4x 6 M + 1x 4M = 28 M. 149 M + 28 M = 177 M
06.03.2015 - 20:26Nadine wrote:
Also stricken wie abgebildet nur bei der 5. wdh 1 masche statt 3 maschen zunehmen!? Danke
25.02.2015 - 06:23DROPS Design answered:
Bei der 5. Zumahme-R nehmen Sie 3 M statt 2 M zu. A.2 und A.1 bestehen aus 16 R. Von diesen 16 R werden die 7. - 16. R wiederholt. In der 7. R, 9. R, 11. R und 13. R nehmen Sie am Rand je 2 M zu und in der 15. R am Rand 3 M. Zusätzlich nehmen Sie beidseitig der Mittel-M 1 M zu. Im Diagramm sind alle Zunahmen enthalten, Sie müssen lediglich die Zunahmen wie in A.x und A.z gezeigt wiederholen.
25.02.2015 - 18:23Nadine wrote:
Komme mit der Zunahme von A.1 und A.2 nicht klar. Soll sie 4 mal wiederholen, aber wieso heisst es zuerst 4 x 2 Maschen und 1 x 3 Maschen und dann 4 x 6 Maschen und 1 x 8 maschen!? Bedeutet das, dass nur einmal 4 x 2 Maschen und 4 x die 15. Reihe. oder soll man Reihe 7 - 16 so stricken wie sie abgebildet ist um auf die Maschenanzahl von 177 zu kommen?
24.02.2015 - 20:42DROPS Design answered:
Sie können das in den Diagrammen im Bereich A.x und A.z gut sehen: Sie nehmen in 4 R nur jeweils 2 M am Rand zu, in der 7., 9., 11. und 13. Muster-R. In der 15. Muster-R, nehmen Sie 3 M zu. Sie wdh jeweils die Rapporte A.x und A.z, d.h. Sie nehmen in jeder 2. R am Rand so zu: 2 M, 2 M, 2 M, 2 M, 3 M, 2 M, 2 M, 2 M, 2 M, 3 M usw. Insgesamt haben Sie dann in diesen R, d.h. in der 7., 9., 11. und 13. Muster-R 6 M zugenommen (je 2 an den Rändern und 2 in der Mitte) und in der 15. Muster-R haben Sie 8 M zugenommen (je 3 M an den Rändern und 2 in der Mitte).
24.02.2015 - 22:25Katrin wrote:
Wenn man es von dort normal weiterstrickt, kann man am Ende der 4. Wiederholung das Muster stricken wie im Diagramm und kommt so auf die benötigten Maschen und die Muster im Anschluss passen auch. :-) Viele Grüße Katrin
16.02.2015 - 11:25DROPS Design answered:
Vielen Dank für Ihren "Erfahrungsbericht"! :-)
17.02.2015 - 10:32Katrin wrote:
Hallo. Es geht um Reihe 5 . Da sind rechts und links je ein Umschlag (=2 Maschen mehr), in Reihe 6 (der Rückreihe) sind aber insgesamt 3 mehr gezeichnet. Das wundert mich. Gruß Katrin
13.02.2015 - 14:12DROPS Design answered:
Sie haben völlig Recht, ich hatte erst ab R 6/7 geschaut und das nicht gesehen, Entschuldigung. Ich leite es an die Designerinnen weiter und hoffe, dass schnell eine Antwort bzw. eine Korrektur des Diagramms kommt. Bis dahin müssen Sie sich leider etwas gedulden, aber vielleicht haben Sie ja noch ein "Ersatzprojekt" auf Lager. :-)
15.02.2015 - 19:38