
Categorie popolari
State cercando un filato?


Lasciare un commento sul modello DROPS 158-41
Noi saremmo felici di ricevere i tuoi commenti e opinioni su questo modello!
Se vuoi fare una domanda, fai per favore attenzione a selezionare la categoria corretta nella casella qui sotto per velocizzare il processo di risposta. I campi richiesti sono indicati da *.
|
||||||||||||||||
Tell Me |
||||||||||||||||
 |
 |
|||||||||||||||
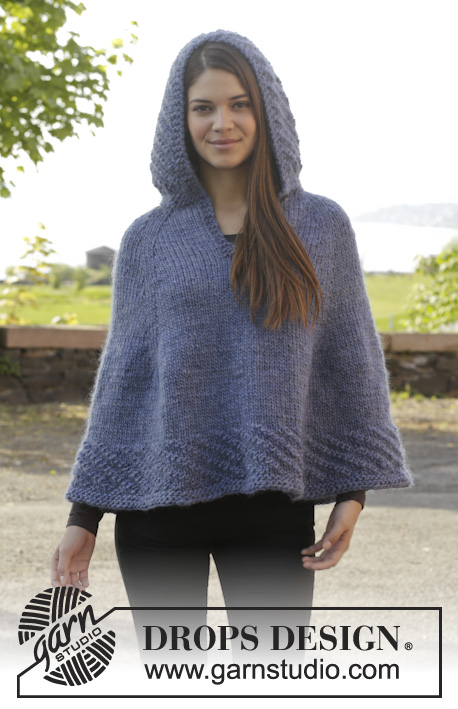
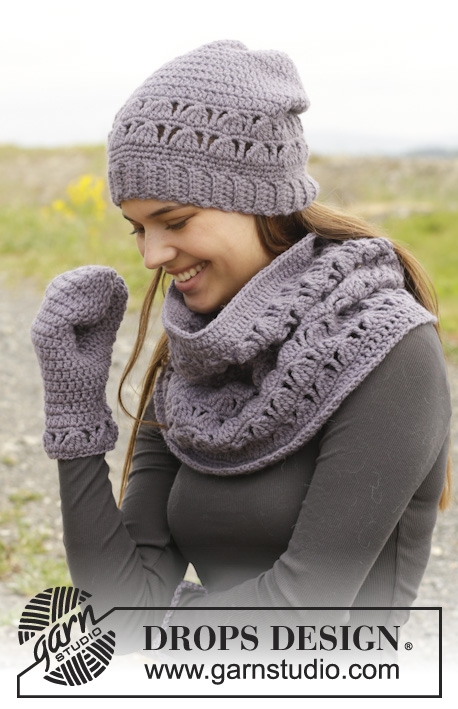
Cappello, scaldacollo e guanti DROPS lavorati all’uncinetto con motivo traforato in "Nepal".
DROPS 158-41 |
||||||||||||||||
|
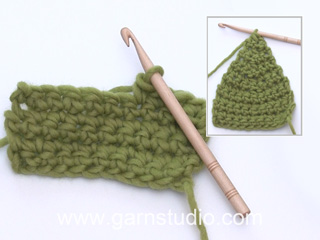
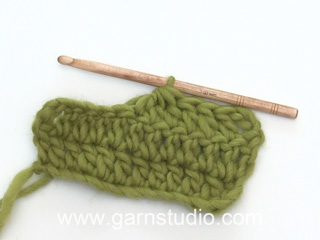
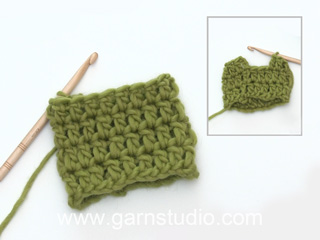
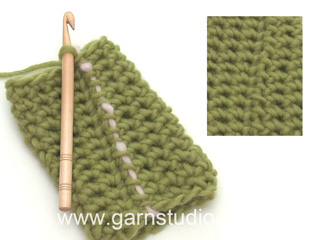
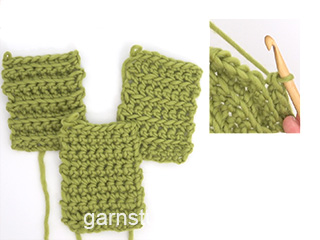
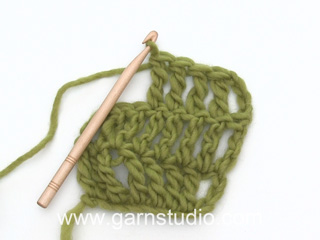
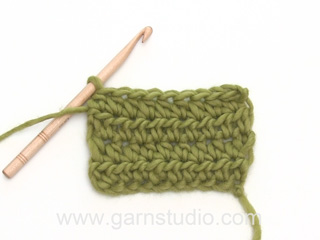
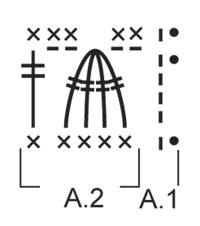
MOTIVO: Vedere i diagrammi A.1 e A.2 – lavorare la 1° riga dal diritto del lavoro. INFORMAZIONI PER IL LAVORO 1: Sostituire la 1° m.m.a all’inizio di ogni riga a m.m.a con 2 cat. INFORMAZIONI PER IL LAVORO 2: All’inizio di ogni giro a m.b, sostituire la 1° m.b con 1 cat e finire ogni giro con 1 m.bss nella 1° cat dall’inizio del giro. Sostituire la 1° m.a all’inzio di ogni giro a m.a con 3 cat, finire ogni giro con 1 m.bss nella 3° cat dall’inizio del giro. SUGGERIMENTO PER LE DIMINUZIONI 1: Lavorare 2 m.b in 1 m.b: lavorare 1 m.b ma aspettare con l’ultimo passaggio (= 2 m sull’uncinetto), poi lavorare la m.b successiva ma sull’ultimo passaggio, far passare il filo attraverso tutte le m sull’uncinetto. SUGGERIMENTO PER LE DIMINUZIONI 2: Lavorare 2 m.a in 1 m.a: lavorare 1 m.a ma aspettare con l’ultimo passaggio (= 2 capi sull’uncinetto), poi lavorare la m.a successiva ma sull’ultimo passaggio, far passare il filo attraverso tutte le m sull’uncinetto. -------------------------------------------------------- CAPPELLO: Lavorare in tondo ma iniziare con un nastrino lavorato da lato a lato in basso. NASTRINO: Avviare 8 cat con l’uncinetto n° 4,5 mm con Nepal, e lavorare la 1° riga come segue: 1 m.m.a nella 3° cat dall’uncinetto (= 2 m.m.a), 1 m.m.a in ognuna delle 5 cat successive = 7 m.m.a, girare il lavoro. LEGGERE LE INFORMAZIONI PER IL LAVORO 1. Poi lavorare a m.m.a avanti e indietro ma lavorare ogni m.m.a nel filo dietro della m (cioè non attraverso tutta la m) = punto a coste. Continuare fino a quando il lavoro misura circa 49-53 cm, tagliare il filo e cucire I lati corti per formare un anello – il nastrino misura circa 4 cm in larghezza. Affrancare il filo. CORONA: Ora lavorare attorno al bordo del nastrino. Lavorare * 1 m.b in ognuna delle 3 righe successive, lavorare 2 m.b nella riga successiva *, ripetere *-* per tutto il giro – LEGGERE LE INFORMAZIONI PER IL LAVORO 2 = circa 83-90 m.b – poi lavorare 1 giro a m.b, ALLO STESSO TEMPO aggiustare il n° di m a 80-85 m.b – LEGGERE IL SUGGERIMENTO PER LE DIMINUZIONI 1! Ora lavorare secondo il 1° giro nel diagramma come segue: A.1, A.2 16-17 volte in totale in larghezza. Ripetere le righe 2 e 3 del diagramma 2 volte in verticale, poi il lavoro misurerà circa 11 cm compreso il nastrino. FARE ATTENZIONE ALLA TENSIONE DEL LAVORO! Continuare a lavorare a m.a, ALLO STESSO TEMPO diminuire come segue: LEGGERE IL SUGGERIMENTO PER LE DIMINUZIONI 2! Distribuire 8-9 diminuzioni in modo uniforme = 72-76 m.a. Sul giro successivo, diminuire 8-7 m.a in modo uniforme. Ripetere le diminuzioni a giri alterni 4 volte in totale = 40-48 m.a. Poi diminuire 8-6 m.a in modo uniforme su ogni giro 1-2 volte in totale = 32-36 m.a. Ora lavorare a m.b con diminuzioni: LEGGERE IL SUGGERIMENTO PER LE DIMINUZIONI 1 – lavorare le m.b insieme 2 a 2 = 16-18 m.b. Ripetere le diminuzioni sul giro successivo = 8-9 m.b. Tagliare il filo, imbastirlo dentro e fuori le m, tirare il filo per stringere e affrancare bene. Il cappello misura circa 24-25 cm in verticale. ---------------------------------------------------------- SCALDACOLLO: Lavorato in tondo. Avviare 144-156 cat con l’uncinetto n° 4,5 mm con Nepal e formare 1 anello con 1 m.bss nella 1° cat. 1° GIRO: LEGGERE LE INFORMAZIONI PER IL LAVORO 2 – lavorare 1 m.a in ognuna delle prime 5 cat, * saltare 1 cat, 1 m.a in ognuna delle 5 cat successive *, ripetere *-* = 120-130 m.a. 2° GIRO: lavorare 1 m.a in ogni m.a. Ora lavorare secondo il 1° giro del diagramma come segue: A.1, A.2 24-26 volte in totale in larghezza. FARE ATTENZIONE ALLA TENSIONE DEL LAVORO! Ripetere le righe 2 e 3 del diagramma in verticale fino a quando il lavoro misura circa 36-38 cm – aggiustarlo dopo un’intera ripetizione in verticale – poi continuare come segue: 1 giro con 1 m.a in ogni m.b, poi 1 giro con 1 m.a in ogni m.a. Chiudere e affrancare. ---------------------------------------------------------- GUANTI: Avviare 30-35 cat LASSE con l’uncinetto n° 4,5 mm con Nepal e formare 1 anello con 1 m.bss nella 1° cat. Lavorare il polsino secondo il 1° giro del diagramma come segue: A.1, A.2 6-7 volte in totale in larghezza. Lavorare il diagramma 1 volta in verticale, poi lavorare 1 giro con 1 m.b in ogni m.b – LEGGERE LE INFORMAZIONI PER IL LAVORO 2 = 30-35 m.b. FARE ATTENZIONE ALLA TENSIONE DEL LAVORO! Poi lavorare a m.a in tondo con 1 m.a in ogni m e ALLO STESSO TEMPO aggiustare il n° di m a 27-30 m.a lavorando 2 m.a insieme in modo uniforme – LEGGERE IL SUGGERIMENTO PER LE DIMIZNUIONI 2 – ALLO STESSO TEMPO quando sono stati lavorati 3 giri a m.a, aumentare 1 m.a per il police a ogni lato della 1° m all’inizio del giro – aumentare 1 m.a lavorando 2 m.a nella stessa m.a. Ripetere gli aumenti a ogni lato di questa m su ogni giro 4-5 volte in totale = 35-40 m.a sul giro (m del pollice = 9-11 m.a). Lavorare il giro successivo come segue: lavorare 1 m.bss in ognuna delle prime 6-7 m.a all’inizio del giro, 3 cat (= 1 m.a), poi lavorare 1 m.a in ognuna delle 25-28 m.a successive, 1 cat e finire con 1 m.bss nella 3° cat all’inizio del giro = 26-29 m.a e 1 cat sul giro. Sul giro successivo, lavorare 1 m.a in ogni m.a e 1 m.a nella cat alla fine del giro = 27-30 m.a. Poi lavorare a m.a in tondo fino a quando il guanto misura 18-21 cm dalla divisione all’altezza del polsino (provare il guanto, mancano circa 3 cm alla fine del lavoro). Continuare a lavorare come segue: 1° GIRO: lavorare 1 m.a in ogni m.a, ALLO STESSO TEMPO lavorare insieme ogni 2° e 3° m.a = 18-20 m.a. 2° GIRO: lavorare 1 m.a in ogni m.a, ALLO STESSO TEMPO lavorare le m.a insieme 2 a 2 = 9-10 m.a. 3° GIRO: lavorare 1 m.b in ogni m.a, ALLO STESSO TEMPO lavorare le m.b insieme 2 a 2. Tagliare il filo, imbastirlo dentro e fuori le m, tirare il filo per stringere e affrancare bene. POLLICE: 1° GIRO: lavorare 1 m.bss nella 1° delle 9-11 m del pollice, 3 cat (= 1 m.a), poi lavorare 1 m.a in ognuna delle 8-10 m.a, poi lavorare 6 m.a dietro il pollice, ALLO STESSO TEMPO lavorare queste 6 m.a insieme 2 a 2 – leggere la spiegazione sopra = 12-14 m.a. 2 + 3° GIRO: lavorare 1 m.a in ogni m.a = 12-14 m.a. Provare il guanto, manca circa 1 cm alla fine del pollice. Lavorare un altro giro con 1 m.a in ogni m.a se necessario. GIRO SUCCESSIVO: lavorare 1 m.a in ogni m.a, ALLO STESSO TEMPO lavorare le m.a insieme 2 a 2 = 6-7 m.a. ULTIMO GIRO: lavorare 1 m.a in ogni m.a, ALLO STESSO TEMPO lavorare le m.b insieme 2 a 2. Tagliare il filo, imbastirlo dentro e fuori le m, tirare il filo per stringere e affrancare bene. Lavorare un altro guanto ma assicurarsi di lavorare gli aumenti del pollice a ogni lato dell’ultima m sul giro (invece della 1° m sul giro). |
||||||||||||||||
Spiegazioni del diagramma |
||||||||||||||||
|
||||||||||||||||
|
||||||||||||||||
|
Avete realizzato questo o un altro dei nostri modelli? Taggate le vostre foto nei social media con #dropsdesign in modo che possiamo vederle! Avete bisogno di aiuto con questo modello?Troverete video tutorial, una sezione per i commenti/domande e molto altro guardando il modello su www.garnstudio.com © 1982-2024 DROPS Design A/S. Ci riserviamo tutti i diritti. Questo documento, compreso tutte le sue sotto-sezioni, è protetto dalle leggi sul copyright. Potete leggere quello che potete fare con i nostri modelli alla fine di ogni modello sul nostro sito. |
||||||||||||||||


Con oltre 40 anni di esperienza nel design di modelli di maglia e uncinetto, DROPS Design offre la più estesa collezione di modelli gratuiti su internet - tradotti in 17 lingue. Ad oggi vi possiamo fornire 304 cataloghi e 11422 modelli - 8666 dei quali sono tradotti in Italiano.
Ci stiamo impegnando molto per darvi il meglio che vi possiamo offrire in termini di maglia e uncinetto, ispirazioni e consigli così come filati di grande qualità ad un prezzo incredibile! Volete utilizzare i nostri modelli per qualcosa d'altro oltre al vostro uso personale? Potete leggere tutto ciò che è consentito nel testo sul Copyright in basso su tutte le pagine dei nostri modelli. Buon lavoro!
Commenti / Domande (25)
Laura wrote:
Hi, thanks for the pattern it looks amazing and i'm trying to make it but i don't understand how to "work veritcally" the patterns a1 and a2. are there any tutorials on this please or would you be so kind and explain? thank you
06.12.2015 - 09:21DROPS Design answered:
Dear Laura, A.1 only shows how to finish & start the round: replace 1st dc (UK-English) with 1 ch and 1st dtr with 4 ch. Finish round with a sl st in the 1st ch at beg of dc round /in the 4th ch at beg of dtr round. Repeat then A.2 around. Happy crocheting!
07.12.2015 - 10:30Ik lees het volgende in de 1e regel van de kroon: KROON: Haak nu verder langs de rand van het lint. Haak * 1 v in elke van de volgende 3 toeren, haak 2 v in de volgende toer *, herhaal van *-* de hele toer -moet hier toer niet het woord steek zijn?
07.10.2015 - 16:32DROPS Design answered:
Hoi Erika. Nee, omdat je haakt in de toeren van de LINT, haak je in elke toer (of steek van de toer)
13.10.2015 - 15:21Bonsoir, j'aimerais me faire expliquer comment faire le motif diagramme..... Je ne le connais pas et ne le comprend pas. Merci Didier
25.09.2015 - 03:45DROPS Design answered:
Bonjour Didier, le diagramme se lit tous les tours de droite à gauche, A.1 montre comment terminer chaque tour (mc dans la 1ère ml du tour) et comment le commencer (1 ou 4 ml). Répétez ensuite A.2 au-dessus des 5 m suivantes soit au rang 1: 1 ms dans chacune des 5 m suivantes, au rang 2, 2 ml, 4 DB écoulées ensemble, 2 ml, 1 DB dans la ms suivante. Au rang 3: 2 ms dans les 2 ml, 2 ms dans les 2 ml, 1 ms dans la DB. Reprenez ensuite au rang 1. Bon crochet!
25.09.2015 - 09:41Bonjour, je ne comprends pas cette partie du bonnet : Crocheter *1 ms dans chacun des 3 rangs suivants, 2 ms dans le rang suivant*, répéter de *-* tout le tour Qu'est-ce que vous appelez ''un rang'' dans ce passage? Merci de détaillez le plus possible votre réponse, Bonne journée
09.02.2015 - 22:28DROPS Design answered:
Bonjour Catia, on a tricoté juste avant la bordure du bonnet (dans le sens de la longueur) que l'on a cousu pour former un anneau (tour de tête). On crochète ensuite le long d'un des côtés de la bordure pour faire le haut du bonnet: vous crochetez alors dans les rangs de la bordure. Bon crochet!
10.02.2015 - 08:44Hi, I don't understand this part of the hat pattern: "Work * 1 sc in each of the next 3 rows, work 2 sc in next row *, repeat from *-* the entire round " Does it mean I have to sc in each of the next 3 STICHES and then work 2sc in the next stitch, or does it mean I need to complete 3 rows around? thank you for your kind answer
05.02.2015 - 15:21DROPS Design answered:
Dear Silvia, you work the crown of the hat around the ribbon, the ribbon has been worked sideways, so that you crochet then along the end/beg of rows of ribbon. Happy crocheting!
05.02.2015 - 17:08Hei! Jos tämä - viiva on ketjusilmukka niin mitä tuo | pystyviiva tarkoittaa mallikuviossa? Ja jos on välin näköinen kohta, kuuluuko siinä hypätä silmukan yli?
09.01.2015 - 21:12DROPS Design answered:
Myös pystyviiva on ketjusilmukka, eli kerroksen alkuun virkattavat ketjusilmukat. Jos tiettyyn kohtaan piirrokseen ei ole tehty merkkiä, siihen ei virkata mitään, eli jätät tämän silmukan väliin.
06.02.2015 - 17:31Jeg forstår ikke diagrammet. Kan det forklares tydeligere hvor jeg begynder og hvilken vej i diagrammet, jeg skal hækle og hvad de lodrette stiplede linjer betyder?
01.01.2015 - 20:48DROPS Design answered:
Hej Line. Du starter nederst og haekler fra venstre mod höjre. Det gör du i hvor omgang, hvis du haekler rundt. Beskrivelse af symbolerne staar nederst i opskriften lige over diagrammet selv. Se ogsaa her hvordan du skal laese vores diagrammer
06.01.2015 - 17:01Har nå heklet ferdig lua i str. s/m og brukte bare 100 g garn.
09.11.2014 - 21:36How many yards or metres of yarn is required?
06.11.2014 - 18:35DROPS Design answered:
Dear Jenny, you will find at the right side of the picture the total amount of yarn for each size, for example for the hat, you need 150 g / 50 g a ball Nepal = 3 balls x 82 yds = 246 yds for the hat. Click on the shadecard to Nepal to learn more about the yarn. Happy crocheting!
07.11.2014 - 10:10Silvia wrote:
I don´t understand how should I adjust stitches during crocheting the neckwarmer. Thnx
23.09.2014 - 12:45DROPS Design answered:
Dear Silvia, work pattern for neckwarmer until stated measurements (36-38 cm approx) adjusting to finish after a whole repetition of the diagram in height. Happy crocheting!
23.09.2014 - 14:28