
Popular categories
Looking for a yarn?


|
||||||||||||||||||||||
Yesterday |
||||||||||||||||||||||
|
|
||||||||||||||||||||||
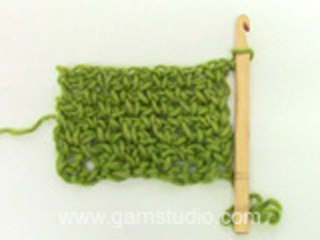
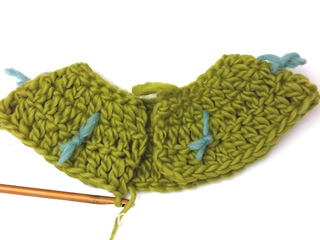
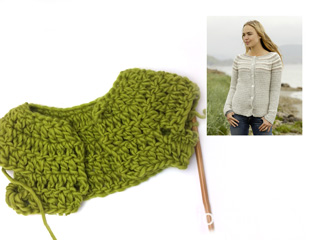
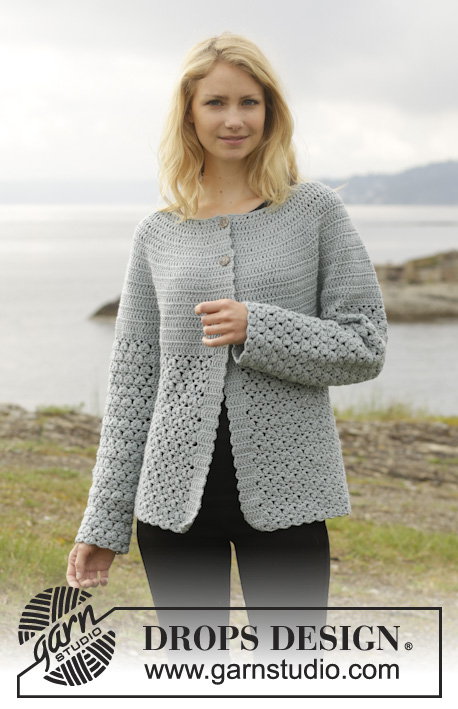
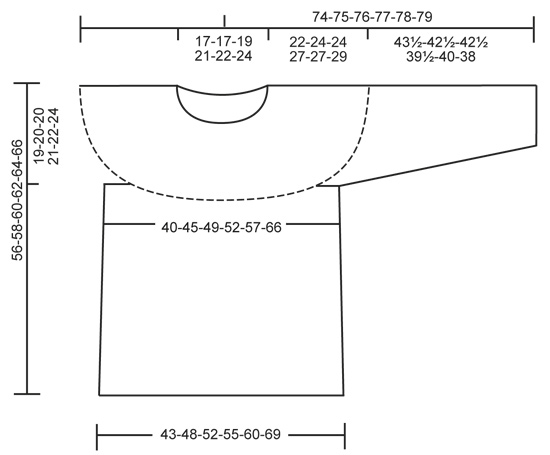
Crochet DROPS jumper with lace pattern, round yoke and detachable collar, worked top down in ”Merino Extra Fine”. Size: S - XXXL.
DROPS 156-18 |
||||||||||||||||||||||
|
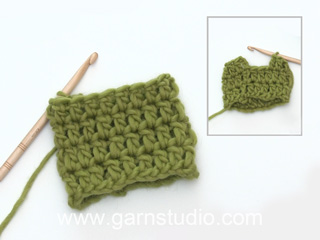
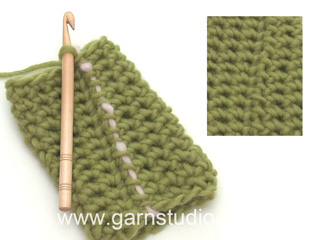
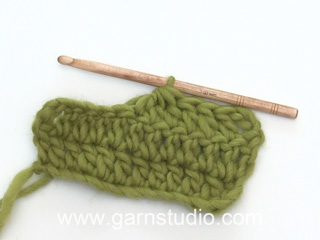
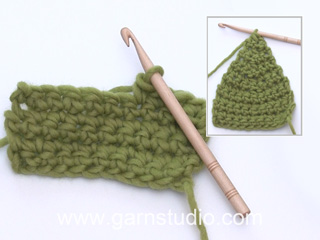
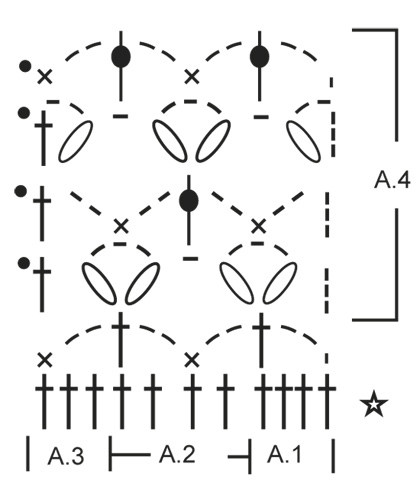
PATTERN: See diagrams A.1-A.4. CROCHET INFO: Replace first tr on every round with 3 ch. Finish every tr round with 1 sl st in 3rd ch from beg of round. Replace first dc on every round with 1 ch. Finish every dc round with 1 sl st in 1st ch on round. INCREASE TIP: Inc 1 st by working 2 tr in 1 tr, first on one side of all markers on round, next time on the other side of all markers on round, continue inc like this. DECREASE TIP: Work 1 tr but wait with last pull through (= 2 sts on hook), then work next tr but on last pull through, pull yarn through all sts on hook = 1 tr dec. ---------------------------------------------------------- BODY: The piece is worked top down. Worked in the round from mid back. Work 93-98-103-113-118-128 ch on hook size 4.5 mm with Merino Extra Fine and form a ring with 1 sl st in first ch. Work next round as follows: 1 ch, 1 dc in first ch, 1 dc in each of the next 2 ch, * skip 1 ch, 1 dc in each of the next 4 ch *, repeat from *-* = 76-80-84-92-96-104 dc – READ CROCHET INFO. Then work an elevation in the back of neck as follows: ROUND 1 (= RS): Beg mid back, work 1 ch, 1 dc in 1st dc, * 1 ch, skip 1 dc, 1 dc in next dc *, repeat from *-* around the neck AT THE SAME TIME insert 1 marker after 38-40-42-46-48-52 sts (= mid front), turn piece. ROW 2 (= WS): Work 1 dc in every ch and 1 ch over every dc around the neck until 28-30-32-36-38-42 sts remain until marker, turn piece. ROW 3: Work 1 dc in every ch and 1 ch over every dc until 28-30-32-36-38-42 sts remain until marker, turn piece. ROW 4: Work 1 dc in every ch and 1 ch over every dc around the neck until 22-24-26-30-32-36 sts remain until marker, turn piece. ROW 5: Work 1 dc in every ch and 1 ch over every dc around the neck until 22-24-26-30-32-36 sts remain until marker, turn piece. ROW 6: Work 1 dc in every ch and 1 ch over every dc around the neck until 16-18-20-24-26-30 sts remain until marker, turn piece. ROW 7: Work 1 dc in every ch and 1 ch over every dc until 16-18-20-24-26-30 sts remain until marker, turn and work back to mid back. Then work in the round with tr AT THE SAME TIME on 1st round insert 19-20-21-23-24-26 markers in piece as follows: Insert 1st marker at beg of round (= mid back), then insert 18-19-20-22-23-25 markers 4 tr apart, after last marker there are 4 tr. Work in the round with tr AT THE SAME TIME inc 1 tr at all markers as follows: Inc every other round 5-6-6-5-5-6 times, and every 4th round 2-2-2-3-3-3 times - READ INCREASE TIP = 209-240-252-276-288-338 tr. Work a round while at the same time inc 14-7-7-7-19-5 tr evenly = 223-247-259-283-307-343 tr. REMEMBER THE CROCHET TENSION! On next round work as follows from mid back: 30-34-37-41-45-52 tr, 8 ch (under sleeve), skip 52-56-56-60-64-68 tr from previous round (to be used for sleeve later), 60-68-74-82-90-104 tr (front piece), 8 ch (under sleeve), skip 52-56-56-60-64-68 tr from previous round (to be used for sleeve later) and 29-33-36-40-44-51 tr = 135-151-163-179-195-223 tr/ch. Insert a marker, now measure piece from here! Work 1 tr in every tr/ch AT THE SAME TIME dec 8-8-8-12-12-12 sts evenly – READ DECREASE TIP = 127-143-155-167-183-211 tr. Continue to work as follows: Work A.1, A.2 30-34-37-40-44-51 repetitions in total in width, finish with A.3. Continue pattern like this. When A.1-A.3 have been worked 1 time vertically, repeat A.4 vertically until finished measurements. When piece measures 14-14-14-15-15-15 cm from marker, adjust so that next round is last round in A.4, inc 1 repetition of A.2 in 8th-9th-9th-10th-11th-13th repetition in ch-space as follows: Work 2 ch, 1 dc in ch-space, 2 ch, 1 tr in same ch-space, 2 ch, 1 dc in same ch-space. Work 14-16-19-20-22-25 repetitions of A.2, in next repetition of A.2 inc the same way. Then continue as before = 32-36-39-42-46-53 repetitions of A.2 in width. Fasten off when piece measures 34-34-36-35-37-37 cm from marker, adjust to finish with next to last round in A.4, piece measures 56-58-60-62-64-66 cm in total. SLEEVE: Sleeve is worked in the round, top down. Insert a marker, now measure piece from here! Beg by working mid under sleeve as follows: Work 1 dc in 5th ch of the 8 ch work in armhole on body, 3 ch (= 1 tr), work 1 tr in each of the next 3 ch, 1 tr in every tr over sleeve, then work 1 tr in each of the remaining 4 ch under sleeve = 60-64-64-68-72-76 tr. Insert 1 marker mid under sleeve. Continue to work as follows: 1 tr in each of the first 11-11-11-13-13-15 tr AT THE SAME TIME dec 1 tr (= 10-10-10-12-12-14 tr), A.1, A.2 8-9-9-9-10-10 times in width, A.3, work 1 tr in each of the last 10-10-10-12-12-14 tr. Continue with 1 tr in each of the 20-20-20-24-24-28 tr mid under sleeve and A.1-A.3 over sleeve. When A.1-A.3 have been worked 1 time vertically, repeat A.4 vertically until finished measurements. Continue this pattern AT THE SAME TIME when piece measures 4 cm, dec 1 tr on each side of marker - Remember DECREASE TIP. Repeat dec every 3½-3½-3½-2½-2½-2 cm 9-9-9-11-11-13 more times. Now work only A.1-A.3 over sleeve. Fasten off when sleeve measures 43½-42½-42½-39½-40-38 cm, adjust to finish with next to last round in A.4 – NOTE – shorter measurements in the larger sizes because of wider neck and shoulders. Work the other the same way. DETACHABLE COLLAR: Worked in the round. Work 99 ch on hook size 4.5 mm with Merino Extra Fine and form a ring with 1 sl st in 1st ch. Work 3rd row in A.1, 3rd row in A.2 23 times and 3rd row in A.3. Repeat A.4 vertically until finished measurements. When piece measures 8 cm, adjust so that next round is last round in A.4, inc 1 repetition of A.2 in each side of piece as follows: Work A.1, then work first A.2 as follows: Work 2 ch, 1 dc in ch-space, 2 ch, 1 tr in same ch-space, 2 ch, 1 dc in same ch-space. Work as before until 1 repetition of A.2 remains before A.3, in next repetition of A.2 inc the same way. Then work as before (= 25 repetitions of A.2 in width) until piece measures approx. 20 cm, adjust to finish with next to last row in A.4. Fasten off. |
||||||||||||||||||||||
Diagram explanations |
||||||||||||||||||||||
|
||||||||||||||||||||||
|
||||||||||||||||||||||
|
||||||||||||||||||||||
|
Have you made this or any other of our designs? Tag your pictures in social media with #dropsdesign so we can see them! Do you need help with this pattern?You'll find tutorial videos, a Comments/Questions area and more by visiting the pattern on garnstudio.com. © 1982-2024 DROPS Design A/S. We reserve all rights. This document, including all its sub-sections, has copyrights. Read more about what you can do with our patterns at the bottom of each pattern on our site. |
||||||||||||||||||||||


With over 40 years in knitting and crochet design, DROPS Design offers one of the most extensive collections of free patterns on the internet - translated to 17 languages. As of today we count 304 catalogues and 11422 patterns - 11422 of which are translated into English (UK/cm).
We work hard to bring you the best knitting and crochet have to offer, inspiration and advice as well as great quality yarns at incredible prices! Would you like to use our patterns for other than personal use? You can read what you are allowed to do in the Copyright text at the bottom of all our patterns. Happy crafting!
Comments / Questions (68)
Rainbow wrote:
Unfortunately its not working with me. the pattern is not clear.
20.01.2015 - 09:51DROPS Design answered:
Dear Rainbow, remember you will find some videos related to that pattern under tab "video" on the right side of the picture and you can also get tips & advices from your DROPS store if you need any individual assistance. Happy crocheting!
20.01.2015 - 10:26Roman wrote:
ROUND 1 (= RS): Beg mid back, work 1 ch, 1 dc in 1st dc, * 1 ch, skip 1 dc, 1 dc in next dc *, repeat from *-* around the neck AT THE SAME TIME insert 1 marker after 38-40-42-46-48-52 sts (= mid front), turn piece. ROW 2 (= WS): Work 1 dc in every ch and 1 ch over every dc around the neck until 28-30-32-36-38-42 sts remain until marker, turn piece. I can't understand the above, Shall I work the stitches and leave the remaining stitches unworked??
19.01.2015 - 08:14DROPS Design answered:
Dear Roman, on 1st round, you work whole round with 1 ch, skip 1 dc, 1 dc in next dc around while inserting a marker for mid front. Then you continue back and forth (in rows), working as before (1 ch, skip 1 dc, 1 dc in next dc) over the the next sts until 28-42 sts remain before marker mid front, turn and work row 3 until 28-42 sts remain before marker mid front and so on. Happy crocheting!
19.01.2015 - 14:16Kunnen jullie van patroon 156-18 een instructie-video maken? Ik weet niet goed, hoe ik het telpatroon moet lezen. Vr.gr. Joke.
05.01.2015 - 22:36DROPS Design answered:
Hoi Joke. Betreft dat het patroon A.4? Ik kan het dan op onze wenslijst zetten, maar ik kan helaas niet zeggen wanneer de video klaar zal zijn.
06.01.2015 - 16:37Bonjour Je comprends pas la rehausse faut il faire des rangs complets ou pas car je vois pas trop comment diminuer de 10 mails par rangés pendant 7 tours sachant qu un tour sur deux ce n'est pas possible. D'où je avoir un triangle qui se dessine avant d attaquer le rang d augmentation. ? Merci
16.11.2014 - 12:22DROPS Design answered:
Bonjour Mme Droulez, pour la ré-hausse dos, on crochète en allers et retours des rangs supplémentaires sur une partie des mailles pour que l'encolure dos soit plus haute que l'encolure devant. Ainsi, on commence par un tour (tour 1) sur toutes les mailles en plaçant un marqueur au milieu devant, puis on tourne, et on crochète le rang suivant jusqu'à ce qu'il reste 28-42 m avant le marqueur, on tourne et on crochète le rang suivant jusqu'à ce qu'il reste 28-42 m avant le marqueur de l'autre côté, et ainsi de suite. Bon crochet!
17.11.2014 - 10:45Merci pour l'aide, j'ai l'habitude de suivre des patrons mais cette fois-ci j'étais complètement embêté. Merci Drpos Design, vous avez de très beau patrons :)
12.11.2014 - 14:21Bonjour, je ne comprend l'explication pour faire le diagramme. "A.1 37 fois" ?!? "A.2 en largeur"?!? " terminer par A.3" ?!? A.1 à A.3 semblent se faire sur 2 rangs, Est-ce que je me trompe? A.2 : Est-ce qu'il y a des espaces entre les brides? Comment fait-on "1 B autour de la m" ??? Merci de m'aider :)
11.11.2014 - 00:53DROPS Design answered:
Bonjour Mireille, les diagrammes A.1 à A.3 commencent par un rang de B et font 6 rangs en hauteur au total, A.1 représente le début du tour, on répète A.2 37 fois en largeur, et on termine le tour par A.3. Quand les 6 rangs du diagrammes sont faits, on répète ensuite uniquement la partie A.4 en hauteur (avec A.1 au début et A.3 à la fin du tour). 1B autour de la m = piquer dans l'arceau et pas dans la ml - les espaces entre les B du 1er tour ne sont pas à prendre en compte. Bon crochet!
11.11.2014 - 09:09Enkele vraagjes; wordt het patroon van deze trui van links naar rechts gelezen of andersom, en van boven naar onder of van onder naar boven? Voor de armsgaten; ik moet een heleboel steken overslaan. Hoe moet dat juist als ik in de rondte haak? De draad telkens afhechten en opnieuw beginnen? Hoe doe je dat juist? Alvast bedankt voor de antwoorden!!
06.11.2014 - 10:53DROPS Design answered:
Hoi Segers. Hier kan je lezen hoe je onze teltekeningen moet lezen. Je slaat de st over en haakt verder over de st voor het lijf in de rondte, je hebt dan twee "armgaten" voor de mouwen, die je later gaat haken. Je hoeft niets af te hechten of opnieuw te beginnen.
06.11.2014 - 12:24Un grand merci pour vos explications très claires.
29.10.2014 - 14:11Bonjour, j'ai compris comment faire la chaînette. Mais quand vous dites 1ms dans chacune des 2 ml suivantes, j'hésite. Dois faire 2ml et 1ms dans la première ml? merci
29.10.2014 - 11:39DROPS Design answered:
Bonjour Marlin, pour commencer, on fait 1 ml puis 1 ms dans la 1ère ml de la chaînette, puis 1 ms dans les 2 ml suiv, soit 3 ms au-dessus de 3 ml (= 1 ms dans chacune de ces 3 ml), *vous sautez 1 ml (= non crochetée), et crochetez ensuite 4 ms (= 1 ml dans chacune des 4 ml suiv), soit 4 ms au-dessus de 5 ml* et répétez de *-* tout le tour. Bon crochet!
29.10.2014 - 12:31Lekker
29.06.2014 - 20:46