
Categorie popolari
State cercando un filato?


Lasciare un commento sul modello DROPS 156-18
Noi saremmo felici di ricevere i tuoi commenti e opinioni su questo modello!
Se vuoi fare una domanda, fai per favore attenzione a selezionare la categoria corretta nella casella qui sotto per velocizzare il processo di risposta. I campi richiesti sono indicati da *.
|
||||||||||||||||||||||
Yesterday |
||||||||||||||||||||||
|
|
||||||||||||||||||||||
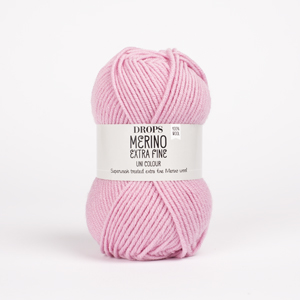
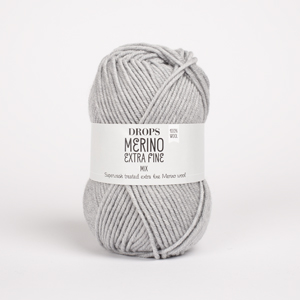
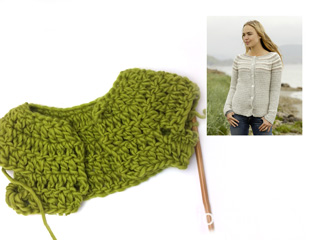
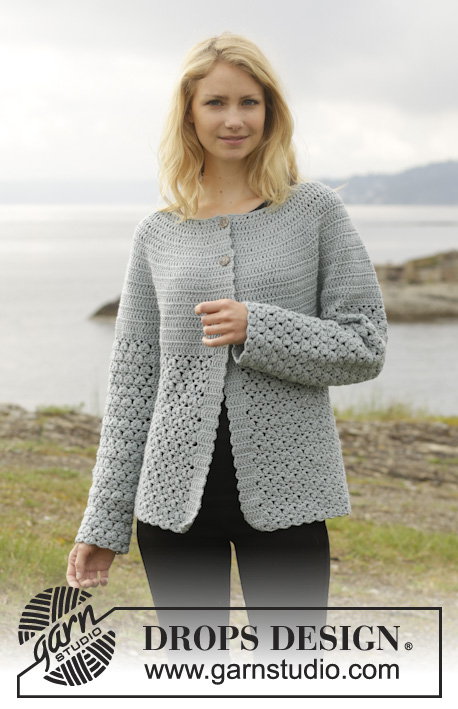
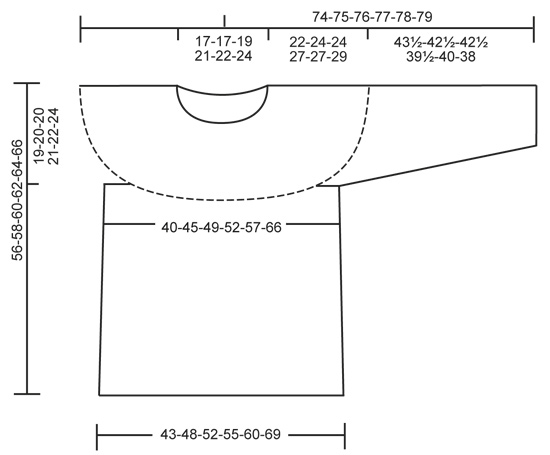
Maglione DROPS all’uncinetto, con motivo traforato, sprone rotondo e collo separato, lavorato top down, in "Merino Extra Fine". Taglie: Dalla S alla XXXL.
DROPS 156-18 |
||||||||||||||||||||||
|
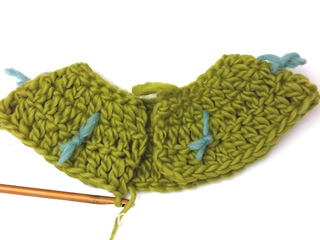
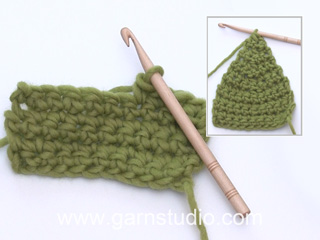
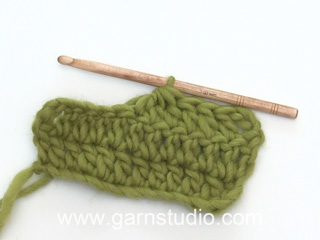
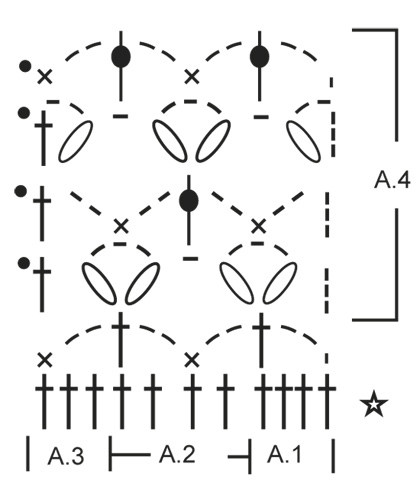
MOTIVO: Vedere i diagrammi da A.1 a A.4. INFORMAZIONI PER IL LAVORO: Sostituire la prima m.a all’inizio di ogni giro con 3 cat. Finire ogni giro di m.a con 1 m.bss nella 3a cat dall’inizio del giro. Sostituire la prima m.b all’inizio di ogni giro con 1 cat Finire ogni giro di m.b con 1 m.bss nella 1a cat del giro. SUGGERIMENTO PER GLI AUMENTI: Per aumentare 1 m, lavorare 2 m.a nella stessa m.a, prima da un lato di tutti i segni del giro, la volta successiva dall’altro lato di tutti i segni del giro. Proseguire ad aumentare in questo modo. SUGGERIMENTO PER LE DIMINUZIONI: Lavorare 1 m.a, ma non fare l’ultima gettata (= 2 m sull’uncinetto), lavorare la m.a successiva e all’ultima gettata, passare il filo attraverso tutte le m sull’uncinetto = è stata diminuita 1 m.a. ---------------------------------------------------------- DAVANTI E DIETRO: Si lavora dall’alto verso il basso, in tondo, dal centro sul dietro. Con l’uncinetto n° 4,5 ed il filato Merino Extra Fine, avviare 93-98-103-113-118-128 cat e formare un anello con 1 m.bss nella prima cat. Lavorare il giro successivo come segue: 1 cat, 1 m.b nella prima cat, 1 m.b in ognuna delle 2 cat successive, * saltare 1 cat, 1 m.b in ognuna delle 4 cat successive *, ripetere da *-* = 76-80-84-92-96-104 m.b – VEDERE LE INFORMAZIONI PER IL LAVORO. Proseguire con un’alzata per il collo sul dietro, come segue: GIRO 1 (= diritto del lavoro): iniziare dal centro, sul dietro, lavorare 1 cat, 1 m.b nella prima m.b, * 1 cat, saltare 1 m.b, 1 m.b nella m.b successiva *, ripetere da *-* intorno al collo; ALLO STESSO TEMPO, inserire 1 segno dopo 38-40-42-46-48-52 m (= centro, sul davanti), girare il lavoro. RIGA 2 (= rovescio del lavoro): Lavorare 1 m.b in ogni cat e 1 cat su ogni m.b intorno al collo finché rimangono 28-30-32-36-38-42 m prima del segno, girare il lavoro. RIGA 3: Lavorare 1 m.b in ogni cat e 1 cat su ogni m.b finché non rimangono 28-30-32-36-38-42 m prima del segno, girare il lavoro. RIGA 4: Lavorare 1 m.b in ogni cat e 1 cat su ogni m.b intorno al collo finché non rimangono 22-24-26-30-32-36 m prima del segno, girare il lavoro. RIGA 5: Lavorare 1 m.b in ogni cat e 1 cat su ogni m.b intorno al collo finché non rimangono 22-24-26-30-32-36 m prima del segno, girare il lavoro. RIGA 6: Lavorare 1 m.b in ogni cat e 1 cat su ogni m.b intorno al collo finché non rimangono 16-18-20-24-26-30 m prima del segno, girare il lavoro. RIGA 7: Lavorare 1 m.b in ogni cat e 1 cat su ogni m.b finché non rimangono 16-18-20-24-26-30 m prima del segno, girare e lavorare fino al centro, sul dietro. Proseguire in tondo con m.a; ALLO STESSO TEMPO, nel corso del primo giro, inserire 19-20-21-23-24-26 segni nel lavoro come segue: inserire il primo segno all’inizio del giro (= centro, sul dietro), poi inserire 18-19-20-22-23-25 segni a distanza di 4 m.a l’uno dall’altro; dopo l’ultimo segno ci sono 4 m.a. Lavorare in tondo con m.a; ALLO STESSO TEMPO, aumentare 1 m.a in corrispondenza di ogni segno, come segue: aumentare ogni 2 giri 5-6-6-5-5-6 volte, e ogni 4 giri 2-2-2-3-3-3 volte - VEDERE IL SUGGERIMENTO PER GLI AUMENTI = 209-240-252-276-288-338 m.a. Lavorare un giro e, ALLO STESSO TEMPO, aumentare 14-7-7-7-19-5 m.a a intervalli regolari = 223-247-259-283-307-343 m.a. RICORDARSI LA TENSIONE DEL LAVORO! Al giro successivo, lavorare come segue dal centro, sul dietro: 30-34-37-41-45-52 m.a, 8 cat (sotto la manica), saltare 52-56-56-60-64-68 m.a del giro precedente (verranno usate successivamente per la manica), 60-68-74-82-90-104 m.a (davanti), 8 cat (sotto la manica), saltare 52-56-56-60-64-68 m.a del giro precedente (verranno usate successivamente per la manica) e 29-33-36-40-44-51 m.a = 135-151-163-179-195-223 m.a /cat. Inserire un segno, da adesso in avanti, misurare il lavoro da questo punto ! Lavorare 1 m.a in ogni m.a /cat; ALLO STESSO TEMPO, diminuire 8-8-8-12-12-12 m a intervalli regolari – VEDERE IL SUGGERIMENTO PER LE DIMINUZIONI = 127-143-155-167-183-211 m.a. Proseguire a lavorare come segue: Lavorare il diagramma A.1, ripetere il diagramma A.2 30-34-37-40-44-51 volte in larghezza, finire con il diagramma A.3. Proseguire con il motivo in questo modo. Dopo aver lavorato i diagrammi A.1-A.3 1 volta in verticale, ripetere il diagramma A.4 in verticale fino alla fine del lavoro. Quando il lavoro misura 14-14-14-15-15-15 cm dal segno, assicurarsi che il giro successivo sia l’ultimo giro del diagramma A.4, aumentare 1 ripetizione del diagramma A.2 nell’arco di cat dell’ 8a -9a-9a-10a-11a-13a ripetizione come segue: Lavorare 2 cat, 1 m.b nell’arco di cat, 2 cat, 1 m.a nello stesso arco di cat, 2 cat, 1 m.b nello stesso arco di cat. Lavorare 14-16-19-20-22-25 ripetizioni del diagramma A.2; nella ripetizione successiva del diagramma A.2 aumentare in modo uguale. Proseguire come prima = 32-36-39-42-46-53 ripetizioni del diagramma A.2 in larghezza. Tagliare il filo quando il lavoro misura 34-34-36-35-37-37 cm dal segno; assicurarsi di finire con il penultimo giro del diagramma A.4. Il lavoro misura 56-58-60-62-64-66 cm in tutto. MANICHE: Si lavorano in tondo, dall’alto verso il basso. Inserire un segno; da adesso in avanti, misurare il lavoro da questo punto ! Iniziare lavorando dal centro, sotto la manica, come segue: Lavorare 1 m.b nella 5a delle 8 cat avviate per lo scalfo, 3 cat (= 1 m.a), lavorare 1 m.a in ognuna delle 3 cat successive, 1 m.a in ogni m.a della manica, proseguire con 1 m.a in ognuna delle rimanenti 4 cat sotto la manica = 60-64-64-68-72-76 m.a. Inserire 1 segno al centro, sotto la manica. Proseguire a lavorare come segue: 1 m.a in ognuna delle prime 11-11-11-13-13-15 m.a; ALLO STESSO TEMPO, diminuire 1 m.a (= 10-10-10-12-12-14 m.a), diagramma A.1, ripetere il diagramma A.2 8-9-9-9-10-10 volte in larghezza, diagramma A.3, lavorare 1 m.a in ognuna delle ultime 10-10-10-12-12-14 m.a. Proseguire con 1 m.a in ognuna delle 20-20-20-24-24-28 m.a al centro, sotto la manica e lavorare i diagrammi A.1-A.3 sulle m della parte superiore della manica. Dopo aver completato una ripetizione in verticale dei diagrammi A.1-A.3, ripetere il diagramma A.4 in verticale fino alla fine del lavoro. Proseguire con il motivo in questo modo e, ALLO STESSO TEMPO, quando il lavoro misura 4 cm, diminuire 1 m.a da ciascun lato del segno - vedere IL SUGGERIMENTO PER LE DIMINUZIONI. Ripetere queste diminuzioni ogni 3½-3½-3½-2½-2½-2 cm altre 9-9-9-11-11-13 volte. Lavorare ora solo i diagrammi A.1-A.3 sulla parte superiore della manica. Tagliare il filo quando la manica misura 43½-42½-42½-39½-40-38 cm; assicurarsi di finire con la penultima riga del diagramma A.4 – ATTENZIONE – misure più corte per le taglie più grandi perché lo sprone è più largo e le spalle sono più larghe. Lavorare l’altra manica in modo uguale. COLLO SEPARATO: Si lavora in tondo. Con l’uncinetto n° 4,5 ed il filato Merino Extra Fine avviare 99 cat e formare un anello con 1 m.bss nella prima cat. Lavorare la riga 3 del diagramma A.1, riga 3 del diagramma A.2 23 volte e riga 3 del diagramma A.3. Ripetere il diagramma A.4 in verticale fino alla fine del lavoro. Quando il lavoro misura 8 cm, assicurarsi che il giro successivo sia l’ultimo giro del diagramma A.4, aumentare 1 ripetizione del diagramma A.2 da ciascun lato del lavoro, come segue: Lavorare il diagramma A.1, lavorare ora la prima ripetizione del diagramma A.2 come segue: Lavorare 2 cat, 1 m.b nell’arco di cat, 2 cat, 1 m.a nello stesso arco di cat, 2 cat, 1 m.b nello stesso arco di cat. Lavorare come prima finché non rimane 1 ripetizione del diagramma A.2 prima del diagramma A.3, nella ripetizione successiva del diagramma A.2 aumentare in modo uguale. Proseguire come prima (= 25 ripetizioni del diagramma A.2 in larghezza) finché il lavoro non misura ca.20 cm; assicurarsi di finire con la penultima riga del diagramma A.4. Tagliare il filo. |
||||||||||||||||||||||
Spiegazioni del diagramma |
||||||||||||||||||||||
|
||||||||||||||||||||||
|
||||||||||||||||||||||
|
||||||||||||||||||||||
|
Avete realizzato questo o un altro dei nostri modelli? Taggate le vostre foto nei social media con #dropsdesign in modo che possiamo vederle! Avete bisogno di aiuto con questo modello?Troverete video tutorial, una sezione per i commenti/domande e molto altro guardando il modello su www.garnstudio.com © 1982-2024 DROPS Design A/S. Ci riserviamo tutti i diritti. Questo documento, compreso tutte le sue sotto-sezioni, è protetto dalle leggi sul copyright. Potete leggere quello che potete fare con i nostri modelli alla fine di ogni modello sul nostro sito. |
||||||||||||||||||||||


Con oltre 40 anni di esperienza nel design di modelli di maglia e uncinetto, DROPS Design offre la più estesa collezione di modelli gratuiti su internet - tradotti in 17 lingue. Ad oggi vi possiamo fornire 304 cataloghi e 11422 modelli - 8666 dei quali sono tradotti in Italiano.
Ci stiamo impegnando molto per darvi il meglio che vi possiamo offrire in termini di maglia e uncinetto, ispirazioni e consigli così come filati di grande qualità ad un prezzo incredibile! Volete utilizzare i nostri modelli per qualcosa d'altro oltre al vostro uso personale? Potete leggere tutto ciò che è consentito nel testo sul Copyright in basso su tutte le pagine dei nostri modelli. Buon lavoro!
Commenti / Domande (68)
Lyn wrote:
Oops, didn't mean to repost same question! Yes I have checked and double checked the number of rounds and my tension is pretty spot on, maybe slightly tighter but not enough to make that much difference. I am making medium size
23.06.2015 - 23:34Lyn wrote:
I am crocheting Pattern 156-18 but it's not looking like the picture. I have completed the treble bodice and into the lace pattern. Even though my measurements seem to be correct for pattern size my bodice appears much shorter than the in the picture where it comes well below the bust line closer to waist. Mine sits high across my bust. Can you offer any explanation? If I lengthen the treble bodice will it mess up the sleeves?
23.06.2015 - 15:26DROPS Design answered:
Dear Lyn, do you also get the corret tension in height, ie 9 rows tr = 10 cm ? You can also check that you have the correct number of rounds for yoke. Happy crocheting!
23.06.2015 - 19:29It is still very confusion. Please can you just confirm how many sts I should work for ROW 2, and how many sts I should work for ROW if for 2nd size? Thx Jing
19.06.2015 - 14:25DROPS Design answered:
Dear Mrs Wang, as you said, on row 2 in 2nd size, you work 10 sts (= leave 30 sts unworked before marker mid front), turn and work these 10 sts back (to marker mid back) + 10 sts past marker mid back (= 30 sts are unworked before marker mid front). Count the sts you leave unworked before starting your next row will help you to make the short rows. Happy crocheting!
19.06.2015 - 18:22Just for your information, I started Body pattern with ch 98. So I inserted 1 marker after 40 sts(mid front) for ROUND 1.
19.06.2015 - 01:44DROPS Design answered:
Dear Mrs Wang, then in 2nd size, work row 2 from WS until 30 sts remain before marker mid front, turn and work row 3 froms RS until 30 sts remain before marker mid front on the other side, turn and work row 4 from WS until 24 sts remain before marker mid front, turn and work row 5 from RS until 24 sts remain before marker mid front on the other side .. Happy crocheting!
19.06.2015 - 09:59Thank you for your answers. If I "work row 2 from WS until 28-42 sts remain before marker mid front, do not work these sts (leave them unworked), turn", does that mean I will only work 10sts for Row 2, after turning, I will only work 20sts for Row 3 ? thx
19.06.2015 - 01:40DROPS Design answered:
Dear Mrs Wang, that's correct for row 2 and 3, then you continue leaving less sts unworked each side as stated for your size. Happy crocheting!
19.06.2015 - 09:50Ok, question 1 is clear now with thx. But I am still confused on question 2. If I "work row 2 from WS until 28-42 sts (see size) remain before marker on mid front, ... Do you mean Not to work all the way cross the maker, but before the maker 28-42 sts? Jing
15.06.2015 - 21:07DROPS Design answered:
Dear Mrs Wang, that's right you will work row 2 from WS until 28-42 sts remain before marker mid front, do not work these sts (leave them unworked), turn, work next row from RS until 28-42 sts remain on the other side of mid front, do not work these sts, turn and work next row, leaving more sts unworked before marker mid front and so on = you will work more rows over some sts this will create an elevation on mid back. Happy crocheting!
16.06.2015 - 08:33Jing Wang wrote:
I have got a few questions for Body pattern: 1. With regard to Round 1, I understand it that I need to work all the way round, not half way, but insert a maker after 38-40-42-46-48-52; Is it right? 2. at Row 2, if I work it as it says and until 28-30-32-36-38-42sts remain until maker, (then turn pieie for Row 3) how can I still do the same (I mean work the same until 28-30-32-36-38-42sts remain until maker) at Row 3 ? ? ? Jing
14.06.2015 - 19:25DROPS Design answered:
Dear Mrs Wang, 1. is correct, then 2. on row 2 you start working short rows for the elevation in the back of the neck: work row 2 from WS until 28-42 sts (see size) remain before marker on mid front, turn and work row 3 from RS until 28-42 sts remain before marker on mid front on the other side. Repeat these 2 rows leaving some more sts unworked at the end of each row on both sides of marker mid front. Happy crocheting!
15.06.2015 - 10:37Beste, dank u voor de gekregen uitleg. Maar ik heb nog een vraagje. Ik was ondertussen al willen beginnen aan die kraag van patroon 156-18. Het is toch een losse hangende kraag, maar ik weet niet hoe ik die meerderen moet uitvoeren. Wil je mij eens duidelijk uitleggen hoe ik dit moet doen aub. Dank u en groetjes. Carine
12.02.2015 - 08:58DROPS Design answered:
Hoi Carine. Je moet haken zoals staat in het patroon: haak A.1, haak dan de eerste A.2 als volgt: haak 2 l, 1 v in de l-lus, 2 l, 1 stk in dezelfde l-lus, 2 l, 1 v in dezelfde l-lus. (dit is de meerdering). aak als hiervoor tot er 1 herhaling van A.2 overblijft voor A.3 en meerder in de volgende herhaling van A.2 op dezelfde manier. Dwz, herhaal hier "2 l, 1 v in de l-lus, 2 l, 1 stk in dezelfde l-lus, 2 l, 1 v in dezelfde l-lus"
12.02.2015 - 17:16Ik versta 'het haken van een ronding op het achterpand van de hals niet. Vanaf toer 1 tot en met toer 7 versta ik niet. ik wil dolgraag deze pull haken, maar hoe begin ik eraan ? Dank U groetjes
11.02.2015 - 08:42DROPS Design answered:
Hoi Carine. In toer 1 heb je 1 markeerder na 38-40-42-46-48-52 st geplaatst (afhankelijk van je gekozen maat). De markeerder = middenvoor, begin van de toer = middenachter. Je haakt nu heen en weer. Dus toer 2 haak je v/l tot 28-30-32-36-38-42 st voor de markeerder. Keer het werk en haak terug tot 28-30-32-36-38-42 st voor de markeerder aan de andere kant, keer enzovoort. Op deze manier haak je een verhoging op de achterkant.
11.02.2015 - 15:53Hi, I have some questions about the sleeves of this pattern. It seems that after the first round I have to dc 13, then decrease one and then start on the detail on the sleeve? But in the pictures the sleeves don't start with the detail until halfway. The sleeve pattern is very confusing..
06.02.2015 - 18:06DROPS Design answered:
Dear Mary, the jumper is worked top down, ie you first work yoke in the round, leave sts unworked on each side for sleeves and continue body in the round. Sleeves are then worked top down over the skipped sts on yoke. Happy crocheting!
07.02.2015 - 09:53