
Popular categories
Looking for a yarn?


|
||||||||||||||||||||||
Yesterday |
||||||||||||||||||||||
|
|
||||||||||||||||||||||
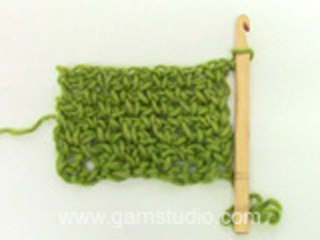
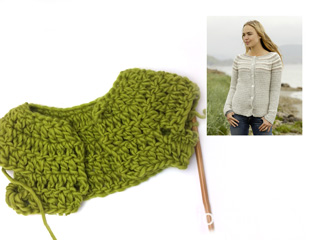
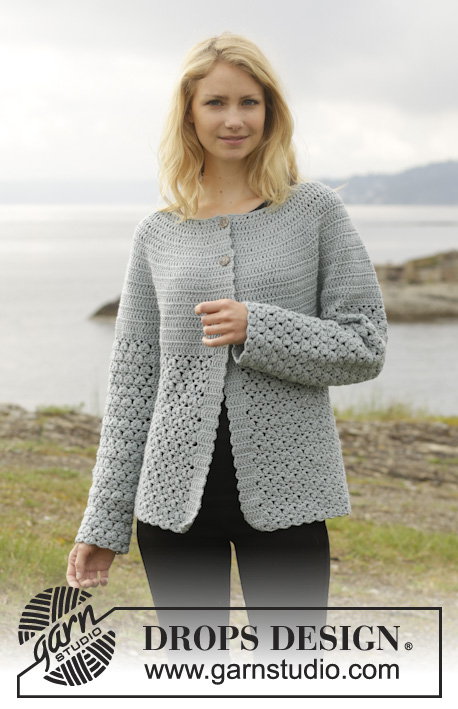
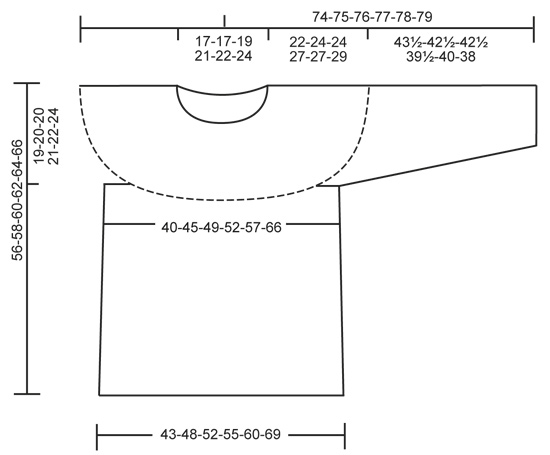
Crochet DROPS jumper with lace pattern, round yoke and detachable collar, worked top down in ”Merino Extra Fine”. Size: S - XXXL.
DROPS 156-18 |
||||||||||||||||||||||
|
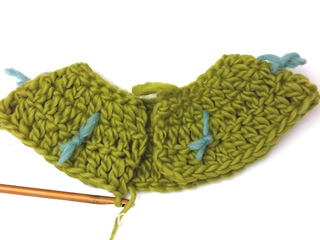
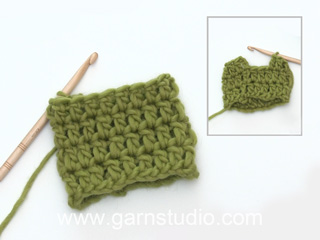
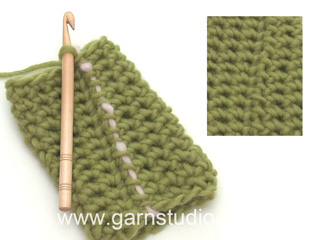
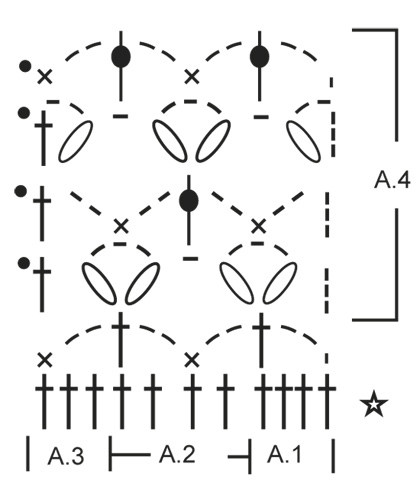
PATTERN: See diagrams A.1-A.4. CROCHET INFO: Replace first tr on every round with 3 ch. Finish every tr round with 1 sl st in 3rd ch from beg of round. Replace first dc on every round with 1 ch. Finish every dc round with 1 sl st in 1st ch on round. INCREASE TIP: Inc 1 st by working 2 tr in 1 tr, first on one side of all markers on round, next time on the other side of all markers on round, continue inc like this. DECREASE TIP: Work 1 tr but wait with last pull through (= 2 sts on hook), then work next tr but on last pull through, pull yarn through all sts on hook = 1 tr dec. ---------------------------------------------------------- BODY: The piece is worked top down. Worked in the round from mid back. Work 93-98-103-113-118-128 ch on hook size 4.5 mm with Merino Extra Fine and form a ring with 1 sl st in first ch. Work next round as follows: 1 ch, 1 dc in first ch, 1 dc in each of the next 2 ch, * skip 1 ch, 1 dc in each of the next 4 ch *, repeat from *-* = 76-80-84-92-96-104 dc – READ CROCHET INFO. Then work an elevation in the back of neck as follows: ROUND 1 (= RS): Beg mid back, work 1 ch, 1 dc in 1st dc, * 1 ch, skip 1 dc, 1 dc in next dc *, repeat from *-* around the neck AT THE SAME TIME insert 1 marker after 38-40-42-46-48-52 sts (= mid front), turn piece. ROW 2 (= WS): Work 1 dc in every ch and 1 ch over every dc around the neck until 28-30-32-36-38-42 sts remain until marker, turn piece. ROW 3: Work 1 dc in every ch and 1 ch over every dc until 28-30-32-36-38-42 sts remain until marker, turn piece. ROW 4: Work 1 dc in every ch and 1 ch over every dc around the neck until 22-24-26-30-32-36 sts remain until marker, turn piece. ROW 5: Work 1 dc in every ch and 1 ch over every dc around the neck until 22-24-26-30-32-36 sts remain until marker, turn piece. ROW 6: Work 1 dc in every ch and 1 ch over every dc around the neck until 16-18-20-24-26-30 sts remain until marker, turn piece. ROW 7: Work 1 dc in every ch and 1 ch over every dc until 16-18-20-24-26-30 sts remain until marker, turn and work back to mid back. Then work in the round with tr AT THE SAME TIME on 1st round insert 19-20-21-23-24-26 markers in piece as follows: Insert 1st marker at beg of round (= mid back), then insert 18-19-20-22-23-25 markers 4 tr apart, after last marker there are 4 tr. Work in the round with tr AT THE SAME TIME inc 1 tr at all markers as follows: Inc every other round 5-6-6-5-5-6 times, and every 4th round 2-2-2-3-3-3 times - READ INCREASE TIP = 209-240-252-276-288-338 tr. Work a round while at the same time inc 14-7-7-7-19-5 tr evenly = 223-247-259-283-307-343 tr. REMEMBER THE CROCHET TENSION! On next round work as follows from mid back: 30-34-37-41-45-52 tr, 8 ch (under sleeve), skip 52-56-56-60-64-68 tr from previous round (to be used for sleeve later), 60-68-74-82-90-104 tr (front piece), 8 ch (under sleeve), skip 52-56-56-60-64-68 tr from previous round (to be used for sleeve later) and 29-33-36-40-44-51 tr = 135-151-163-179-195-223 tr/ch. Insert a marker, now measure piece from here! Work 1 tr in every tr/ch AT THE SAME TIME dec 8-8-8-12-12-12 sts evenly – READ DECREASE TIP = 127-143-155-167-183-211 tr. Continue to work as follows: Work A.1, A.2 30-34-37-40-44-51 repetitions in total in width, finish with A.3. Continue pattern like this. When A.1-A.3 have been worked 1 time vertically, repeat A.4 vertically until finished measurements. When piece measures 14-14-14-15-15-15 cm from marker, adjust so that next round is last round in A.4, inc 1 repetition of A.2 in 8th-9th-9th-10th-11th-13th repetition in ch-space as follows: Work 2 ch, 1 dc in ch-space, 2 ch, 1 tr in same ch-space, 2 ch, 1 dc in same ch-space. Work 14-16-19-20-22-25 repetitions of A.2, in next repetition of A.2 inc the same way. Then continue as before = 32-36-39-42-46-53 repetitions of A.2 in width. Fasten off when piece measures 34-34-36-35-37-37 cm from marker, adjust to finish with next to last round in A.4, piece measures 56-58-60-62-64-66 cm in total. SLEEVE: Sleeve is worked in the round, top down. Insert a marker, now measure piece from here! Beg by working mid under sleeve as follows: Work 1 dc in 5th ch of the 8 ch work in armhole on body, 3 ch (= 1 tr), work 1 tr in each of the next 3 ch, 1 tr in every tr over sleeve, then work 1 tr in each of the remaining 4 ch under sleeve = 60-64-64-68-72-76 tr. Insert 1 marker mid under sleeve. Continue to work as follows: 1 tr in each of the first 11-11-11-13-13-15 tr AT THE SAME TIME dec 1 tr (= 10-10-10-12-12-14 tr), A.1, A.2 8-9-9-9-10-10 times in width, A.3, work 1 tr in each of the last 10-10-10-12-12-14 tr. Continue with 1 tr in each of the 20-20-20-24-24-28 tr mid under sleeve and A.1-A.3 over sleeve. When A.1-A.3 have been worked 1 time vertically, repeat A.4 vertically until finished measurements. Continue this pattern AT THE SAME TIME when piece measures 4 cm, dec 1 tr on each side of marker - Remember DECREASE TIP. Repeat dec every 3½-3½-3½-2½-2½-2 cm 9-9-9-11-11-13 more times. Now work only A.1-A.3 over sleeve. Fasten off when sleeve measures 43½-42½-42½-39½-40-38 cm, adjust to finish with next to last round in A.4 – NOTE – shorter measurements in the larger sizes because of wider neck and shoulders. Work the other the same way. DETACHABLE COLLAR: Worked in the round. Work 99 ch on hook size 4.5 mm with Merino Extra Fine and form a ring with 1 sl st in 1st ch. Work 3rd row in A.1, 3rd row in A.2 23 times and 3rd row in A.3. Repeat A.4 vertically until finished measurements. When piece measures 8 cm, adjust so that next round is last round in A.4, inc 1 repetition of A.2 in each side of piece as follows: Work A.1, then work first A.2 as follows: Work 2 ch, 1 dc in ch-space, 2 ch, 1 tr in same ch-space, 2 ch, 1 dc in same ch-space. Work as before until 1 repetition of A.2 remains before A.3, in next repetition of A.2 inc the same way. Then work as before (= 25 repetitions of A.2 in width) until piece measures approx. 20 cm, adjust to finish with next to last row in A.4. Fasten off. |
||||||||||||||||||||||
Diagram explanations |
||||||||||||||||||||||
|
||||||||||||||||||||||
|
||||||||||||||||||||||
|
||||||||||||||||||||||
|
Have you made this or any other of our designs? Tag your pictures in social media with #dropsdesign so we can see them! Do you need help with this pattern?You'll find tutorial videos, a Comments/Questions area and more by visiting the pattern on garnstudio.com. © 1982-2024 DROPS Design A/S. We reserve all rights. This document, including all its sub-sections, has copyrights. Read more about what you can do with our patterns at the bottom of each pattern on our site. |
||||||||||||||||||||||


With over 40 years in knitting and crochet design, DROPS Design offers one of the most extensive collections of free patterns on the internet - translated to 17 languages. As of today we count 304 catalogues and 11422 patterns - 11422 of which are translated into English (UK/cm).
We work hard to bring you the best knitting and crochet have to offer, inspiration and advice as well as great quality yarns at incredible prices! Would you like to use our patterns for other than personal use? You can read what you are allowed to do in the Copyright text at the bottom of all our patterns. Happy crafting!
Comments / Questions (68)
Hallo, ich habe da ein kleines Problem mit eurer Anleitung. Wie ist das mit der Zunahme an allen Markierern je 1 Stb gedacht: In jeder 2. Rd 5-6-6-5-5-6 x und danach in jeder 4. Rd 2-2-2-3-3-3 x . LG Steffi
25.05.2017 - 10:30DROPS Design answered:
Liebe Steffi, die Zunahmen an allen Markierern sind unter ZUNAHMETIPP erklärt - siehe auch Technik in diesem Video. Viel Spaß beim häkeln!
26.05.2017 - 10:18Salve, non ho capito cos'è l'alzata del collo. Non mi è chiaro nemmeno dalla riga 1 alla riga 7, come fanno a diminuire le maglie intorno al collo. Chiedo cortesemente una spiegazione più dettagliata. Grazie
30.04.2017 - 18:13DROPS Design answered:
Buongiorno Anita. Per una vestibilità migliore viene suggerito di lavorare qualche riga in più solo su alcune maglie dietro il collo. Dopo aver lavorato il giro 1 su tutte le maglie e inserito il segno, lavora avanti indietro solo su alcune maglie. Riga 2, taglia S: lavora finchè non rimangono 28 m prima del segno; gira e torna indietro finchè non rimangono 28 m prima del segno e così via come indicato. Quando riprende a lavorare in tondo, il numero complessivo delle m sul giro non è cambiato. Buon lavoro!
30.04.2017 - 19:27Lijf toer 1-7 is gelukt , dan komen de meerderingen , lukt ook . Alleen gaat het hele geheel rimpelen door het meerderen , als je het op je schouders legt ligt het niet mooi . Komt dit goed ?? als ik doorga, heb nu 5 rondes gemeerderd (11 toeren) , dit deed het ook bij vorige pogingen .
11.02.2017 - 16:57DROPS Design answered:
Hoi Ilja. Of je doet iets verkeerd met de meerderingen of je stekenverhouding is niet helemaal goed, wat maakt dat het te wijd wordt. Het is helaas een beetje moeilijk voor mij te zien zonder je werk in het echt te bekijken.
13.02.2017 - 14:21Volgens mij klopt het gedeelte van de losse kraag niet. Zou ik doen wat er staat, dan wordt de kraag heel klein. Verder mist er een sterretje. Welk deel herhalen??
19.08.2016 - 11:48Ik heb toer 1-7 gehaakt, na 3 keer uithalen is het me eindelijk gelukt. Nu krijg ik dat hele deel met meerderen. Maar dit deel snap ik niet. Hoe wordt dit bedoeld? Want er staat bij alle markeerders? En dat om de toer? Of moet ik dit anders lezen?
31.07.2016 - 10:31DROPS Design answered:
Er staat precies aangegeven waar de markeerders geplaatst moeten worden, volg deze aanwijzingen op. Vervolgens staat er dat er gemeerderd moet worden en wordt gezegd: Zie tip voor het meerderen. Deze vindt u bovenaan het patroon. Succes met haken.
05.08.2016 - 10:31Lyn wrote:
Where do I find the pictures to help explain how to crochet whole diagram?
04.04.2016 - 23:21DROPS Design answered:
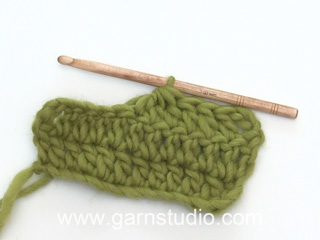
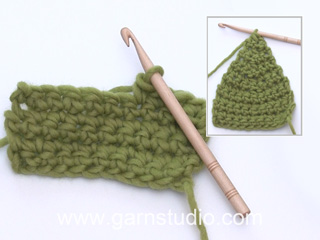
Dear Lyn, click here - English text is written in blue there. Happy crocheting!
05.04.2016 - 09:24Lyn wrote:
I am having trouble understanding the collar pattern - I work the chain and form the ring as the pattern says but my interpretation of row 2 reduces the diameter drastically thus its far too small to get over my head! Obviously not interpretaing it properly or should there be some chain stitches between the single and double crochets. Its the second row that I cant get past, then hopefully it will become clear again
04.04.2016 - 15:17DROPS Design answered:
Dear Lyn, remember to check your tension - you will find here some pictures explaining how to crochet whole diagram, this may help you. Happy crocheting!
04.04.2016 - 15:32Hei, jeg har et spørsmål når det gjelder første runde etter økning I halsen. Skal de 8 løsmaskene feste? Etter 8 løsmasker skal jeg jo hoppe over 56 masker. Bør jeg da feste tråden før jeg starter med de neste 74 stavene? Hjelp????
01.02.2016 - 15:04DROPS Design answered:
Hej, nej du fortsætter bare i m 57 og fortsætter hele vejen rundt. Nu hækler du så kun over bolen. De 56 ærmemasker i hver side skal fortsættes senere. God fornøjelse!
03.03.2016 - 15:47Pour le dos et devant la réhausse se fait entièrement en rond? en fermant tjrs par une mc? malgré les allers retours? comment éviter un trou? je ne comprends pas le diagramme: A1 en largeur? A1-A.3 en hauteur? A4 en hauteur? merci de m'expliquer comment le lire Merci d'avance (la boutique KALIDOU n'a pas pu me renseigner)
28.10.2015 - 15:30DROPS Design answered:
Bonjour Mme Carpentier, la ré-hausse DOS se crochète en allers retours en suivant le tour 1 pour placer le marqueur puis les rangs 2 à 7 (on tourne à la fin de chaque rang = allers et retours). On continue ensuite de nouveau en rond. Pour les diagrammes, commencez par A.1 en début de tour, puis répétez A.2 et terminez par A.3 (fin de tour) en commençant en bas à droite jusqu'au dernier rang (partie marquée A.4)- puis répétez la partie A.4 comme indiqué. Bon crochet!
28.10.2015 - 18:20Elaine wrote:
Can you help me to determine how many stiches I need to have the right tension? I am working with a much thicker yarn and use a nr.6 pen. 12 stitches and 7 rows give me 4" . My bust size is 34". How many stiches must I start with? Thank you
20.07.2015 - 23:02DROPS Design answered:
Dear Elaine, you can recalculate the number of sts required with the help of the measurement chart at the very bottom of the pattern. Measurements are taken flat from side to side and are in cm (convert here into inches). Happy crocheting!
27.07.2015 - 16:15