
Popular categories
Looking for a yarn?


|
|
Chloe |
|
 |
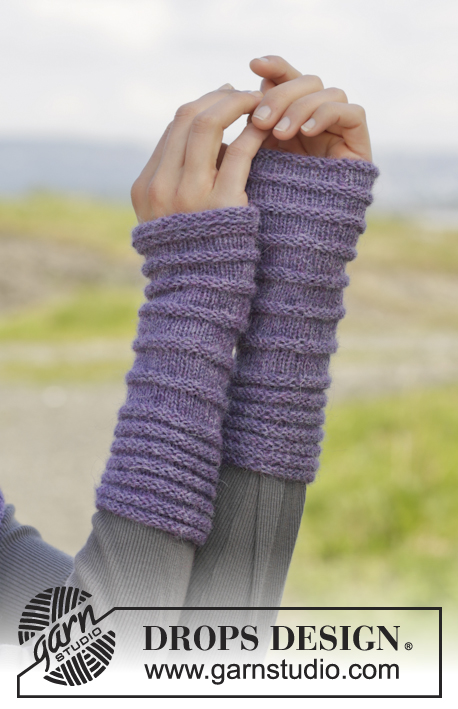 |
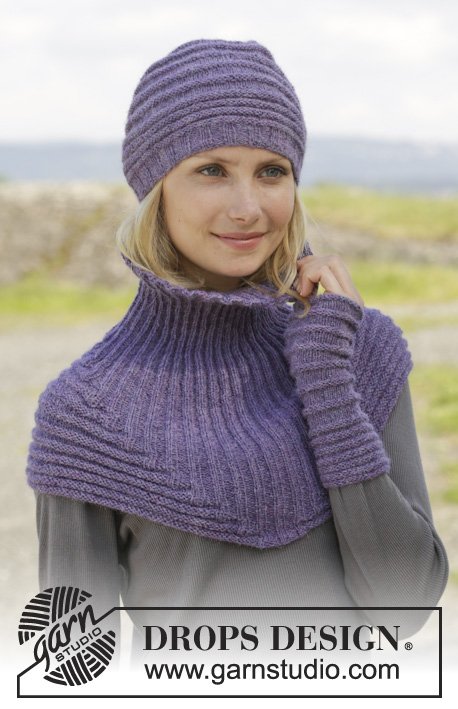
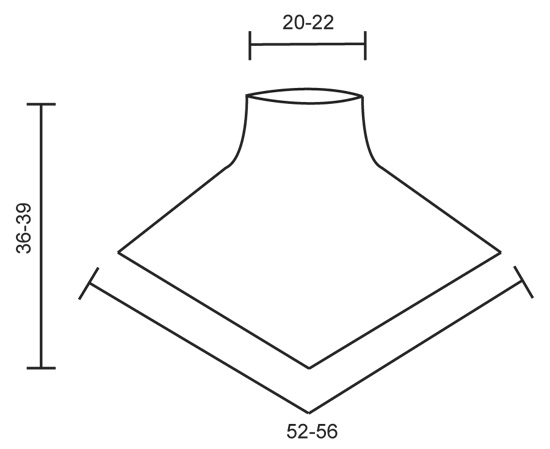
Knitted DROPS hat, neck warmer and wrist warmers in garter st with rib in ”Alpaca”.
DROPS 158-6 |
|
|
WIDE GARTER ST PATTERN 1: * P 3 rounds, K 4 rounds *, repeat from *-*, 1 ridge = 7 rounds. WIDE GARTER ST PATTERN 2: * P 3 rounds, K 8 rounds *, repeat from *-*, 1 ridge = 11 rounds. DECREASE TIP: Dec before every marker as follows: Work until 3 sts remain before marker, slip 1 st as if to K, K 1, psso, K 1. Dec after every marker as follows: K 2 tog. ---------------------------------------------------------- NECK WARMER: Worked in the round on circular needle from bottom up. Loosely cast on 253-273 sts on circular needle size 3 mm / US 2.5 with Alpaca. Then work WIDE GARTER ST PATTERN 1 - see explanation above, over the first 120-130 sts, work the next 12 sts as follows: K 2, P 3, K 2 (= mid front), P 3 and K 2, wide garter st pattern over the next 121-131 sts. Insert a marker at beg of round and continue with wide garter st pattern and rib this way until 1 ridge in wide garter st pattern has been worked vertically. REMEMBER THE KNITTING GAUGE AND READ THE ENTIRE SECTION BEFORE CONTINUING! After one whole ridge in wide garter st pattern vertically, work 5 new sts on each side of rib at the front with rib pattern, i.e. work 5 sts before rib K 2, P 3, after rib work P 3 and K 2. AT THE SAME TIME insert 6 markers in the piece. Insert first marker 45 sts before beg of round, then insert the other markers 18 sts apart. Dec at these markers on first row in every section in stockinette st but alternately 6 and 12 sts. When 6 sts are dec, dec alternately before and after markers (i.e. dec 1 st at each marker). When 12 sts are dec, dec before and after markers (dec 2 sts at each marker). Continue to dec at the markers and work more and more sts into rib. Dec 10 times in total, after all dec 3 sts remain between each marker. Continue to work sts into rib until there are no more sts in wide garter st pattern. Continue to work rib until rib measures approx. 8 cm / 3 1/8'' measured from where last wide garter st pattern ended (= mid back). Bind off sts with K over K and P over P. HAT: Worked in the round on circular needle and then on double pointed needles. Cast on 120-130 sts on circular needle size 3 mm / US 2.5 with Alpaca and K 1 row. Then work rib with P 3 and K 2 until piece measures 3-4 cm / 1"-1½". K 1 round while dec 1-4 sts evenly = 119-126 sts. Now work WIDE GARTER ST PATTERN 1 - see explanation above, 4 times in total. Then K 4 rounds. Work WIDE GARTER ST PATTERN 2 - see explanation above, 4 times or until piece measures approx. 22 cm / 8 3/4'' vertically lightly pulled, adjust to work 1 whole ridge in wide garter st pattern. Then P 3 rounds. Insert 7 markers in piece 17-18 sts between every marker. Now work in stockinette st from here AT THE SAME TIME dec 2 sts at every marker - see DECREASE TIP above. Dec like this on every 3rd round 4 times in total, then every other round 3 times in total = 21-28 sts remain on needle. On next round K 1-0 and K 2 and 2 tog = 11-14 sts remain on needle. Cut the yarn and pull it through sts, tighten tog and fasten. WRIST WARMERS: Worked in the round on double pointed needles. Loosely cast on 48 sts on double pointed needles size 3 mm / US 2.5 with Alpaca. Work WIDE GARTER ST PATTERN 1 - see explanation above, 7 times in total, then K 4 rounds. Then work WIDE GARTER ST PATTERN 2 - see explanation above, 6 times in total. Finish with P 3 round, K 1 round and loosely bind off with K. Knit another wrist warmer the same way. |
|
|
|
|
Have you made this or any other of our designs? Tag your pictures in social media with #dropsdesign so we can see them! Do you need help with this pattern?You'll find tutorial videos, a Comments/Questions area and more by visiting the pattern on garnstudio.com. © 1982-2024 DROPS Design A/S. We reserve all rights. This document, including all its sub-sections, has copyrights. Read more about what you can do with our patterns at the bottom of each pattern on our site. |
|


With over 40 years in knitting and crochet design, DROPS Design offers one of the most extensive collections of free patterns on the internet - translated to 17 languages. As of today we count 304 catalogs and 11422 patterns - 11417 of which are translated into English (US/in).
We work hard to bring you the best knitting and crochet have to offer, inspiration and advice as well as great quality yarns at incredible prices! Would you like to use our patterns for other than personal use? You can read what you are allowed to do in the Copyright text at the bottom of all our patterns. Happy crafting!
Comments / Questions (50)
Ich glaube, bei der Pulswärmeranleitung fehlt die Angabe für das Daumenloch. Wie stricke ich das?
14.02.2018 - 14:54DROPS Design answered:
Liebe Mila, diese Pulswärmer haben kein Loch für das Daumen. Viel Spaß beim stricken!
14.02.2018 - 18:49Hei. Jeg er ferdig med halsen men passformen er ikke lik den på bildet. Den er alt for trang for å nå over skuldrene og fellingen bak gjøre at det bølger seg. Jeg er str M men strikket str L. Den passer til min 11år gml datter, men sitter ikke pent . Hva kan jeg endre for å få en like den på bildet? Fasongen ligner heller ikke på den tegnede når jeg legger halsen flatt.
06.12.2017 - 13:58DROPS Design answered:
Hej Anja, det er svært at svare på hvor det er gået galt... men har du målt strikkefastheden så du har 24 m i bredden og 32 pinde glatstrik i højden på 10x10 cm?
07.12.2017 - 14:12Hei. Har problemer med å plassere merketrådene (for fellingene) riktig på halsen. Kommer skjevt ut fra første merketråd.... Mener dere første merktråd ved de siste 45 m før der omg startet (altså midt bak)? Eller skal det være 45 m ut etter omg start? Og hvor skal jeg så telle de neste 18 m fra? Fra første merketråd (45 siste før starten/evt. 45 m ut etter starten) eller 18 m etter der omgangen starter? De seks merktrådene kommer alle uansett kun på den ene siden av halsen.....
28.11.2017 - 00:04DROPS Design answered:
Hej, Hvis du begynder med at markere starten av omg. Tæller 45 masker til højre for starten og sætter 1 mærketråd, tæller 18 m og sætter næste mærketråd, tæller 18 m og sætter 3. mærketråd, fortsæt til du har sat 6 mærketråde (ud over den som markerer starten af omgangen). Nu har du 6 mærketråde som er jævnt fordelt over den halve stykke og det er her du foretager dine indtagninger. God fornøjelse!
13.12.2017 - 10:59Wenn ich die Markierer setze muss ich dann auch in den Längsreihen abnehmen? So kommt das bei mir aus, oder mache ich was falsch. Ich spreche von dem Kragenschal. Im voraus besten Dank. Elke Gerhardy
09.11.2017 - 12:53DROPS Design answered:
Liebe Frau Gerhardy, wenn die 6 Markierer eingesetzt sind, wird es so abegnommen: abwechselnd 6 Maschen pro Runde (= 1 Abnahme beim jedem Markierer = 1. Abnahme vor jedem Markierer, nächste Abnahme nach jedem Markierer und diese 2 Abnahmen so wiederholen) und 12 Maschen pro Runde (= 2 Abnahmen beim jedem Markierer = 1 M wird beidseitig von jedem Markierer abgenommen). Viel Spaß beim stricken!
09.11.2017 - 13:23Bonjour J'aimerais savoir quand tricoter de nouvelles mailles en côtes. Tous les rangs ? Une fois par côte mousse du point de goudron ? Je vous remercie de votre réponse.
27.01.2017 - 20:05DROPS Design answered:
Bonjour Valérie, on tricote les mailles en côtes au fur et à mesure que l'on diminue, soit après chaque section en jersey avec diminutions, on tricote 5 m de plus en côtes de chaque côté des côtes du devant. Bon tricot!
30.01.2017 - 10:32Ou commence le début du tour?? Est-ce que c'est au milieu des cotes mousse? lorsque je mets les 6 marqueurs je me retrouve a diminuer dans les cotes mousses est-ce que c'est normal? Car le début du tour est composé de 130m suivi des 12 m cote mousse et 131m.. Moi mon début du tour est au milieu du dos en arrière comme le patron le dit, je n'ai peut-être pas bien comprise que le début du tour était au milieu du devant dans les cotes mousses?
31.03.2016 - 14:06DROPS Design answered:
Bonjour Mme Plouffe, le début des tours se trouve à la jonction des mailles dès le 1er tour, c'est-à-dire entre les 120-130 premières m tricotées au point de godron 1 et les 121-131 dernières m tricotés au point de godron. Les diminutions (aux marqueurs) se font uniquement dans le dos pour obtenir la forme souhaitée. Bon tricot!
31.03.2016 - 15:54What does dec alternately before and after markers (i.e. decrease 1 stitch at each marker) It seems if one is to dec before and after markers one would be decreasing 2 stitches at a time - and the word alternately is confusing as well
18.01.2016 - 01:03DROPS Design answered:
Dear Cathy, you will first dec 6 sts, then dec 12 sts and repeat these 2 dec rounds. When dec 6 sts, dec first 6 sts before all markers (= 6 sts dec), and when you will dec 6 sts only next time, dec after all markers (= 6 sts dec) - when dec 12 sts, dec 2 sts at each marker (= 12 sts dec). Happy knitting!
18.01.2016 - 15:16Sandra wrote:
Please clarify for me the decrease spacing for Drops 158-6. It seems very uneven and one sided? What stitch numbers (ie. 253 sts total) should the markers be at? The pattern seems to suggest 208, 190, 172, 154, 136, and 118 - with no decreasing between 1-117 sts. Is this correct?
04.04.2015 - 16:12DROPS Design answered:
Dear Sandra, first marker is inserted 45 sts before the beg of round and 5 remaining markers 18 sts apart, ie first one will be inserted after 208th st on round, 2nd one after 226th st, 3rd one after 244th, then after 9th st of round, 27th st and 45th st. The decrease will be done only on the back. Happy knitting!
07.04.2015 - 08:52J'ai fait le tour de cou et les caches-poignets. Très beau modèle. Merci.
17.03.2015 - 10:12Si je comprend bien, à la fin des diminutions il reste 163 m pou finir le col. merci.
25.02.2015 - 10:08DROPS Design answered:
Bonjour Christiane, effectivement en taille S/M, il va rester 163 m, veillez à bien avoir 3 m entre chaque marqueur quand les diminutions sont faites. Bon tricot!
25.02.2015 - 14:08