
Categorie popolari
State cercando un filato?


Lasciare un commento sul modello DROPS 156-19
Noi saremmo felici di ricevere i tuoi commenti e opinioni su questo modello!
Se vuoi fare una domanda, fai per favore attenzione a selezionare la categoria corretta nella casella qui sotto per velocizzare il processo di risposta. I campi richiesti sono indicati da *.
|
||||||||||||||||||||||||||||
Alana |
||||||||||||||||||||||||||||
 |
 |
|||||||||||||||||||||||||||
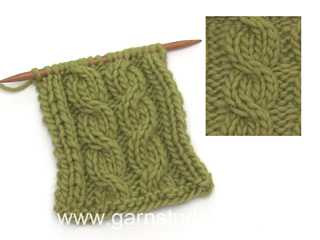
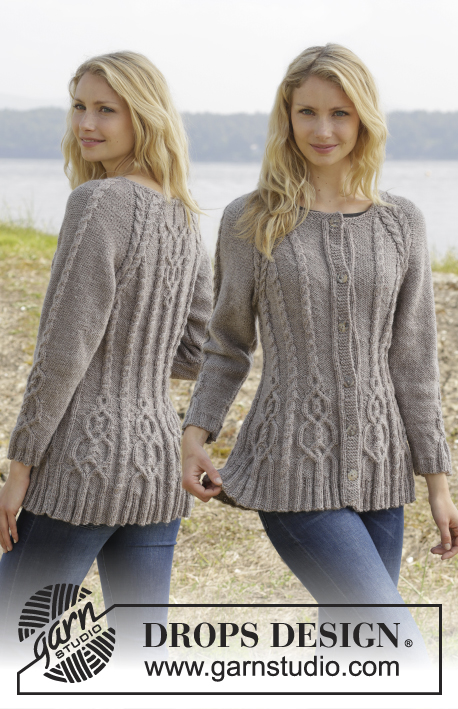
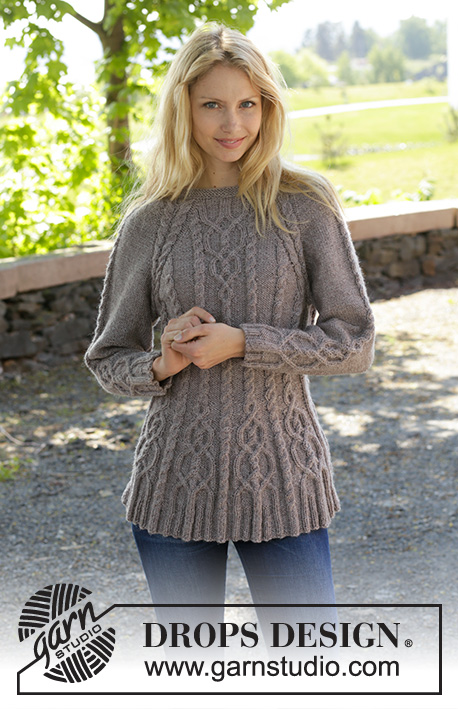
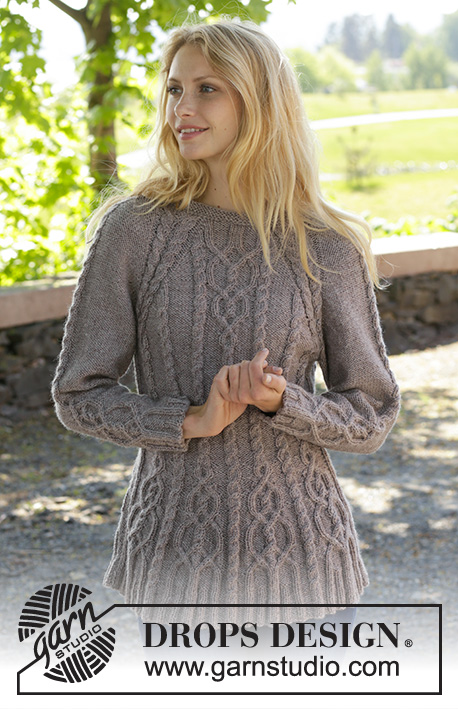
Maglione DROPS lavorato ai ferri con trecce e raglan in ”Karisma”, lavorato top down. Taglie: S-XXL.
DROPS 156-19 |
||||||||||||||||||||||||||||
|
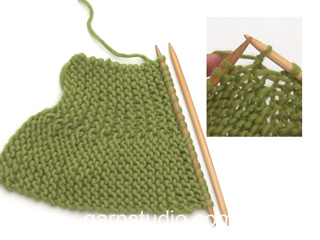
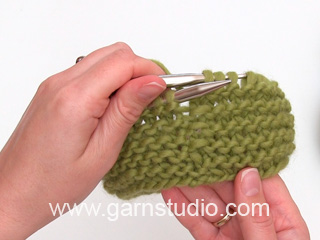
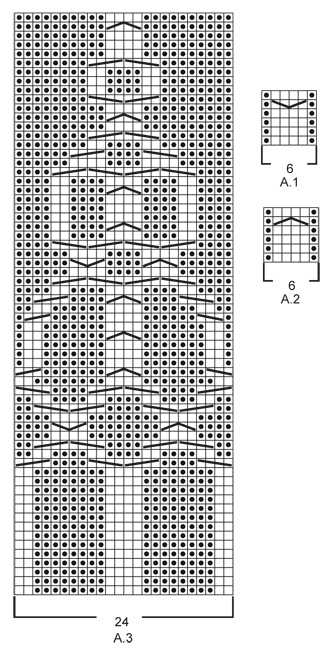
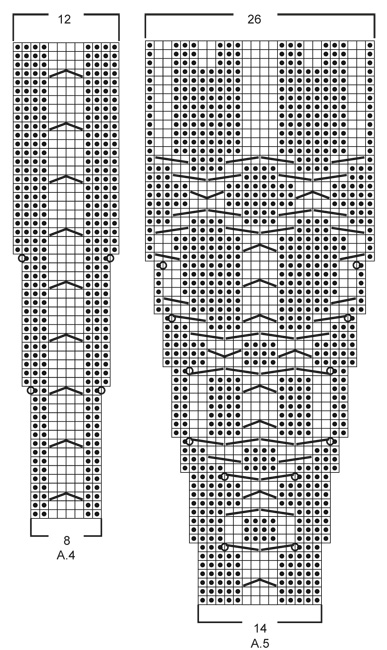
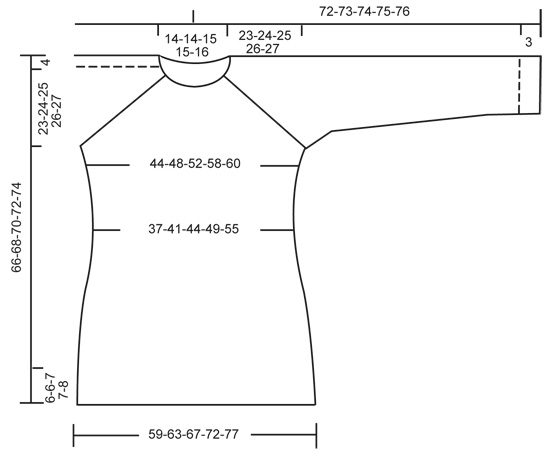
M LEGACCIO (in tondo con i f circolari): * 1 giro dir e 1 giro rov *, ripetere *-*. 1 “costa” a m legaccio = 2 giri. M LEGACCIO (avanti e indietro sui f): Lavorare tutti i f a dir. 1 “costa” a m legaccio = 2 f dir. MOTIVO: Vedere i diagrammi A.1 - A.5. I diagrammi mostrano tutti i f del motivo visti dal diritto del lavoro. RAGLAN: Aumentare a ogni lato delle m del raglan (A.1/A.2, segnapunti, A.2/A.1) facendo 1 gettato = 8 aumenti sul giro. Sul giro successivo lavorare i gettati a dir ritorto per evitare buchi. Poi lavorare a rov le nuove m sulle maniche, e sul davanti e dietro lavorare le nuove m con il motivo come spiegato sotto. SUGGERIMENTO PER LE DIMINUZIONI (applicato alle maniche): Diminuire a ogni lato del segnapunti come segue: lavorare fino a quando rimangono 3 m prima del segnapunti, 2 m insieme a rov, 2 m rov, 2 m insieme a rov = 2 diminuzioni. SUGGERIMENTO PER GLI AUMENTI: Aumentare 1 m facendo 1 gettato. Sul giro successivo lavorare i gettati a rov ritorto, cioè lavorare nel filo dietro della m per evitare buchi. Lavorare a rov le nuove m. ---------------------------------------------------------- MAGLIONE: Lavorato top down in tondo con i f circolari. Lavorare la manica in tondo con i f circolari/a doppia punta. SPRONE: Avviare 92-92-97-97-101 m con i f circolari n° 4 mm con Karisma. Lavorare 3 “coste” a M LEGACCIO in tondo con i f circolari – leggere la spiegazione sopra. Continuare a lavorare un’alzata a M LEGACCIO avanti e indietro – leggere la spiegazione sopra, dal centro dietro come segue (1° f = diritto del lavoro): ora lavorare 5-5-7-7-9 m, girare, lavorare 10-10-14-14-18 m, girare, lavorare 15-15-19-19-23 m, girare, lavorare 20-20-24-24-28 m, girare, lavorare 25-25-29-29-33 m, girare, lavorare 30-30-34-34-38 m, girare, lavorare 35-35-39-39-43 m, girare, lavorare 40-40-43-43-48 m, girare, tornare indietro fino all’inizio del giro. Ora lavorare 1 giro dir e ALLO STESSO TEMPO distribuire 24-24-23-23-27 aumenti in modo uniforme = 116-116-120-120-128 m. Lavorare 18-18-19-19-21 m rov, inserire qui il 1° segnapunti (= ora questo è l’inizio del giro), A.2, 2 m rov, A.2, 2 m rov, A.1, inserire qui il 2° segnapunti, A.2, 0-0-1-1-3 m rov, A.3, 0-0-1-1-3 m rov, A.1, inserire qui il 3° segnapunti, A.2, 2 m rov, A.2, 2 m rov, A.1, inserire qui il 4° segnapunti, A.2, 0-0-1-1-3 m rov, A.3, 0-0-1-1-3 m rov, A.1. LEGGERE LE 2 SEZIONI SUCCESSIVE PRIMA DI CONTINUARE! FARE ATTENZIONE ALLA TENSIONE DEL LAVORO! Sul giro successivo iniziare ad aumentare per il RAGLAN – leggere la spiegazione sopra, ALLO STESSO TEMPO lavorare il motivo come segue: RAGLAN: Ripetere gli aumenti su ogni giro 0-2-10-20-20 volte in totale. Poi aumentare a giri alterni 23-32-30-26-27 volte e poi ogni 3 giri 6-0-0-0-0 volte = 348-388-440-488-504 m. MOTIVO: Lavorare il motivo sul corpo come segue (lavorare a rov gli aumenti sulle maniche): lavorare le prime 6 m aumentate in A.2, poi lavorare a rov le 8-9-7-8-8 m aumentate successive, lavorare le successive 6 m aumentate in A.2, lavorare a rov le 8-9-7-8-8 aumentate successive. NOTA: (Per le taglie M-L-XL-XXL): Dopo aver lavorato A.3 1 volta in verticale, proseguire con A.2 sulla treccia e lavorare a rovescio le restanti m di A.3 fino all'inizio del corpo. S/M: Poi aumentare come prima sulla manica e aumentare all’interno di A.1/A.2 (cioè tra A.1 e A.2, verso il segnapunti per il raglan) sul davanti e dietro altre 1-4 volte. Lavorare a rov le nuove m. L/XL/XXL: Continuare con A.2 sulle 6 m aumentate successive, lavorare a rov le successive 7-8-8 m aumentate, poi aumentare come prima sulla manica e aumentare all’interno di A.1/A.2 (cioè tra A.1 e A.2, verso il segnapunti per il) sul davanti e dietro altre 1-4 volte. Lavorare a rov le ultime 1-4-5 m aumentate. Il lavoro ora misura 27-28-29-30-31 cm dalla spalla. Ora lavorare come segue: trasferire le prime 80-90-102-114-116 m su un fermamaglie per la manica, avviare 12 nuove m sotto la manica, inserire un segnapunti blu al centro di queste nuove m, lavorare le 94-104-118-130-136 m successive (= davanti), trasferire le 80-90-102-114-116 m successive su un fermamaglie per la manica, avviare 12 nuove m sotto la manica, inserire un segnapunti blu al centro di queste nuove m, lavorare le 94-104-118-130-136 m rimaste sul giro (= dietro). ORA MISURARE IL LAVORO DA QUI. CORPO: Ora ci sono 212-232-260-284-296 m per il corpo. Poi continuare il motivo come segue: S/M: 6-3 m rov, * A.2 0-1 volte in larghezza, 7-7 m rov, A.2, 8-9 m rov, inserire un segnapunti, A.2, 8-9 m rov, inserire un segnapunti, A.2, 9-9 m rov, A.2, 9-9 m rov, A.2, inserire un segnapunti, 8-9 m rov, A.2, inserire un segnapunti, 8-9 m rov, A.1 *, 7-7 m rov, ripetere *-* un’altra volte, 1-4 m rov. L/XL/XXL: 3-3-0 m rov, * A.2 1-1-2 volte in larghezza, 4-6-5 m rov, A.2, 7-8-8 m rov, inserire un segnapunti, A.2, 7-8-8 m rov, inserire un segnapunti, A.2, 7-8-8 m rov, inserire un segnapunti, A.2, 10-11-12 m rov, A.2, 10-11-12, A.2 m rov, inserire un segnapunti, 7-8-8 m rov, A.2, inserire un segnapunti, 7-8-8 m rov, A.2, inserire un segnapunti, 7-8-8 m rov, A.1 *, 4-6-5 m rov, ripetere *-* un’altra volta, 1-3-5 m rov. LEGGERE LE 2 SEZIONI SUCCESSIVE PRIMA DI CONTINUARE! Ora diminuire e aumentare allo stesso tempo come segue: DIMINUZIONI: Diminuire in modo diverso come segue – LEGGERE IL SUGGERIMENTO PER LE DIMINUZIONI: Diminuire 1 m a ogni lato della treccia centrale sul davanti e sul dietro. Ripetere le diminuzioni ogni 2-2-1½-1½-1½ cm altre 3-3-4-4-6 volte. ALLO STESSO TEMPO diminuire 1 m verso la treccia in ogni sezioni con m a rov con il segnapunti (= 8-8-12-12-12 segnapunti). Ripetere le diminuzioni ogni 3-2½-5-4-4 cm altre 2-3-1-2-2 volte. AUMENTI (verso i lati): Quando il lavoro misura 3 cm, aumentare lungo la treccia verso la manica (cioè la treccia dal raglan) nelle sezioni a rov verso i lati – LEGGERE IL SUGGERIMENTO PER GLI AUMENTI! Aumentare 4 m sul giro. Ripetere gli aumenti ogni 1½-1½-2½-1½-1 cm altre 3-4-2-4-10 volte. Alla fine di tutte le diminuzioni e aumenti, rimangono 188-204-228-248-276 m. Quando il lavoro misura 11-12-12-13-14 cm, lavorare il motivo come segue: 6-3-6-6-0 m rov, A.2 0-1-1-1-2 volte in larghezza, 7-8-6-11-15 m rov, A.4 0-0-1-1-1 volte in larghezza, * A.5, A.4 *, ripetere *-* altre 2-2-3-3-3 volte in larghezza, A.5 1-1-0-0-0 volte in larghezza, 7-8-6-11-15 m rov, A.2 0-1-1-1-2 volte in larghezza, 7-8-6-11-15 m rov, A.4 0-0-1-1-1 volte in larghezza, * A.5, A.4 *, ripetere *-* altre 2-2-3-3-3 volte in larghezza, A.5 1-1-0-0-0 volte in larghezza, 1-5-0-5-15 m rov. NOTA: Aggiustare la 1° treccia in A.4 e A.5 per ottenere un bel passaggio tra i diagrammi. Continuare con il motivo e gli aumenti secondo il diagramma. Quando A.4 e A.5 sono stati lavorati in verticale e il lavoro misura circa 33-34-34-35-35 cm, ci sono 308-324-364-384-412 m sul f. Inserire un segnapunti qui. ORA MISURARE IL LAVORO DA QUI. Ora lavorare a coste come segue: S/M: * lavorare dir su dir e rov su rov fino a quando rimangono 7-11 m prima del segnapunti blu a lato, 2 m rov, 2 m dir, 3-4 m rov *, ripetere *-* un’altra volta e continuare con dir su dir e rov su rov per il resto del giro. L/XL/XXL: * lavorare dir su dir e rov su rov fino a quando rimangono 8-14-21 m prima del segnapunti blu a lato, 2-2-2 m dir, 3-4-3 m rov, 0-2-2 m dir, 0-3-3 m rov, 0-0-2 m dir, 0-0-3 m rov *, ripetere *-* un’altra volta e continuare con dir su dir e rov su rov per il resto del giro. Quando le coste sono state lavorate per 2 cm dal segnapunti, aumentare facendo 1 gettato prima della 1° m rov nella sezione a rov – ricordarsi del SUGGERIMENTO PER GLI AUMENTI. Quando le coste sono state lavorate per 5-5-6-6-6 cm, intrecciare con dir su dir e rov su rov. MANICHE: Riportare le 80-90-102-114-116 m dal fermamaglie sui f circolari. Lavorare 1 f dir su tutte le m e avviare 12 nuove m alla fine del f = 92-102-114-126-128 m. Inserire un segnapunti al centro delle nuove m (cioè 6 m a ogni lato del segnapunti). ORA MISURARE IL LAVORO DA QUI. Poi lavorare la manica in tondo con i f circolari/doppia punta. Continuare la treccia centrale sulla manica come prima ma lavorare a rov sulle trecce nel raglan. Sul 2° giro iniziare a diminuire a ogni lato del segnapunti – LEGGERE IL SUGGERIMENTO PER LE DIMINUZIONI. Ripetere le diminuzioni a giri alterni altre 6 volte = 78-88-100-112-114 m. Poi diminuire 1 m a ogni lato del segnapunti ogni 2-1½-1-1-1 cm 13-17-22-27-27 volte = 52-54-56-58-60 m. ALLO STESSO TEMPO quando il lavoro misura 15 cm, lavorare A.5 sulla treccia al centro della manica – aggiustare la 1° treccia in A.5 per ottenere un bel passaggio tra i diagrammi. NOTA: non aumentare in A.5 sulla manica, cioè non lavorare I gettati nel diagramma. Alla fine di A.5 e quando la manica misura 37 cm, lavorare a coste come segue dal segnapunti all’inizio del giro: 0-0-1-2-3 m rov, 1-2-2-2-2 m dir, 3 m rov, 2 m dir, 3 m rov, 2 m dir, 2 m rov, continuare a coste come sull’ultimo f in A.5 (= 26 m), 2 m rov, 2 m dir, 3 m rov, 2 m dir, 3 m rov, 1-2-2-2-2 m dir, 0-0-1-2-3 m rov. Continuare in questo modo per 3 cm, intrecciare con dir su dir e rov su rov. CONFEZIONE: Cucire i buchi sotto le maniche. |
||||||||||||||||||||||||||||
Spiegazioni del diagramma |
||||||||||||||||||||||||||||
|
||||||||||||||||||||||||||||
|
||||||||||||||||||||||||||||
|
||||||||||||||||||||||||||||
|
||||||||||||||||||||||||||||
|
Avete realizzato questo o un altro dei nostri modelli? Taggate le vostre foto nei social media con #dropsdesign in modo che possiamo vederle! Avete bisogno di aiuto con questo modello?Troverete video tutorial, una sezione per i commenti/domande e molto altro guardando il modello su www.garnstudio.com © 1982-2024 DROPS Design A/S. Ci riserviamo tutti i diritti. Questo documento, compreso tutte le sue sotto-sezioni, è protetto dalle leggi sul copyright. Potete leggere quello che potete fare con i nostri modelli alla fine di ogni modello sul nostro sito. |
||||||||||||||||||||||||||||


Con oltre 40 anni di esperienza nel design di modelli di maglia e uncinetto, DROPS Design offre la più estesa collezione di modelli gratuiti su internet - tradotti in 17 lingue. Ad oggi vi possiamo fornire 304 cataloghi e 11422 modelli - 8666 dei quali sono tradotti in Italiano.
Ci stiamo impegnando molto per darvi il meglio che vi possiamo offrire in termini di maglia e uncinetto, ispirazioni e consigli così come filati di grande qualità ad un prezzo incredibile! Volete utilizzare i nostri modelli per qualcosa d'altro oltre al vostro uso personale? Potete leggere tutto ciò che è consentito nel testo sul Copyright in basso su tutte le pagine dei nostri modelli. Buon lavoro!
Commenti / Domande (218)
Last part before the sleeves: When rib has been worked for 2 cm from marker, inc by making 1 YO before first P st in every P section. How many st do I have to increase in total ? My size is M. Thank you !
18.12.2021 - 20:13DROPS Design answered:
Dear Liesbeth, simply make 1 yarn over at the beginning of each section with purled stitches and continue in rib with K over K and P over P (knit the yarn overs twisted on next row from WS to avoid holes). Happy knitting!
20.12.2021 - 07:322nd question: When rib has been worked 2cm I need to inc before first P st in every P section. "P section" would this include all sections (including P3 sections)? Can you tell me please how many increased sts there would be for size M? Also is this only done for one round? Then continue (with no further increases) until rib measures 5cm?
19.11.2021 - 22:30DROPS Design answered:
Dear Mrs Simmonds, simply increase 1 stitch in every section worked with purl stitches seen from right side. You increase to avoid the ribbing tightening the bottom edge of the jumper. And then work in rib with K over K and P over P until ribbing edge measures 5 cm. Happy knitting!
22.11.2021 - 07:42Hi. Pattern 156-19 Size M. I have just finished A4 & A5 and ready to work the rib on body. Work K over K and P over P until 11sts remain before blue marker. P2, K2, P4 does not fit. The blue marker is in the middle of A2 down the side. I think I will adjust it to show even ribbing on either side of the A2 cable. I think instructions are wrong here. Would this be the correct thing to do? Please see next question to follow as running out of characters.
19.11.2021 - 22:24DROPS Design answered:
Dear Mrs Simmonds, work K over K and P over P until 11 sts remain before blue marker, then work the next sts before A.2 as follows: P2, K2, P4, then repeat from *-* = work the sts in A.2 K over K and P over P. Happy knitting!
22.11.2021 - 07:41Thank you so much for your quick reply ! I understand. After finishing the raglan my work doesn't measure 28 yet. Should I continue without increasing the number of sts till 28 cm before beginning the body ?
03.11.2021 - 14:51DROPS Design answered:
Dear Liesbeth, correct, continue as before but do not increase anymore until piece measures 28 cm - remember to measure from shoulder and not from cast on edge (see chart: 24 cm + 4 cm shoulder). Happy knitting!
03.11.2021 - 16:48I've knitted the RAGLAN (size M). I've got 388 sts. I see these 388 sts in "BODY', But I don't understand why in the second part of 'Pattern' it is said I have to inc 4 more times. The sts which I would inc here, I don't find them in the description of the body.
03.11.2021 - 10:30DROPS Design answered:
Dear Liesbeth, the section PATTERN explains how to work the increased stitches on body as well as on sleeve in the different sizes. Hope this will help, happy knitting!
03.11.2021 - 12:19Zie mijn vraag van 15 oktober. Die is nog niet beantwoord.
01.11.2021 - 16:10See my question just asked. If I add rows to A4 it will affect when I do the increase rows. So if I am supposed to add 10 rows to A4, am I best to do this at the beginning or the end of the graph please? I am enjoying seeing the progress.
31.10.2021 - 23:56DROPS Design answered:
Dear Linda, see the aswer to your previous question. Just repeat the last "twist of the vable in pattern A.4. Happy Stitching!
01.11.2021 - 11:33Hi. I am halfway thru the body and at the point where we start A5,A4. My question is - why is there 10 rows less in A4 compared to A5? The 2 graphs start together in the same row and are both to be worked until completed vertically. Do I just start with them both lined up in the beginning then continue working A4 by repeating the last 6 rows to form additional cables? Or do I do extra cable rows at the beginning of A4 so that it lines up with A5 when I get to the end of the graph?
31.10.2021 - 23:52DROPS Design answered:
Dear Linda, when you finish A.4, just repeat the last 4 rows, until you catch up with the A.5 (ie., adding some ectra "twist" to your cablw qithout the increasees.). Happy Knitting!
01.11.2021 - 11:28Ik ben klaar met het stukje tekst RAGLAN en brei maat M. Ik heb dus 388 steken, waarvan 2x 10⁴ in de panden. Dit aantal zie ik terug in de beschrijvingvan hey LIJF, maar daarom snap ik niet de 2e alinea van de tekst PATROON waarin staat dat ik nog 4x moet meerderen. De steken die er dan bij komen, vind ik in de beschrijving van het lijf niet terug.
15.10.2021 - 21:22See my question 1/10/21. The P9 must be the space between the cables (A2) down the front/back, so the inc sts still have to be made in the next 18 rounds? Then for the next 6sts in A2, do I start creating the cable as the 6sts are gradually being achieved? So I will have done the 5th row in the cable using the cable needle by the time I have 6 sts? I think I should have done this with the 1st A2 started directly beside A3? But I did this once I had 6 inc sts. It looks OK so I will leave as is.
03.10.2021 - 23:09DROPS Design answered:
Dear Mrs Simmonds, correct, the first 6 inc will be worked into a new cable = A.2, then the next 9 sts inc will be purled, and then the next 6 sts increased for a new A.2, adjust the cables so that they will be worked at the same time as the previous A.2 worked, so that all cables in each A.2/A.1 will be worked always at the same round. Happy knitting!
04.10.2021 - 08:42