
Popular categories
Looking for a yarn?


|
||||||||||||||||||||||||||||
Alana |
||||||||||||||||||||||||||||
 |
 |
|||||||||||||||||||||||||||
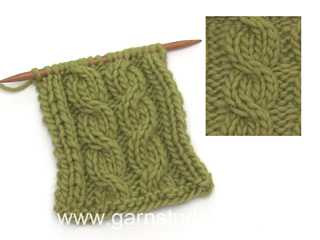
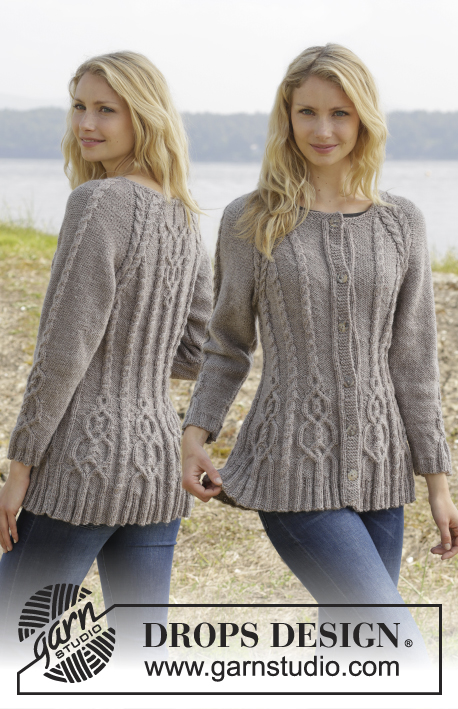
Knitted DROPS jumper with cables and raglan, worked top down in ”Karisma”. Size S-XXL
DROPS 156-19 |
||||||||||||||||||||||||||||
|
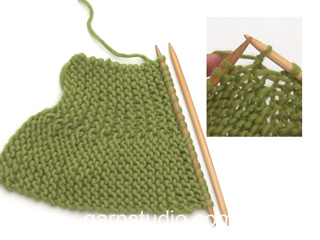
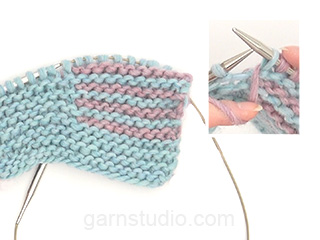
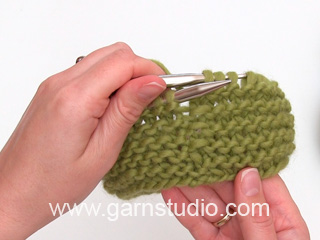
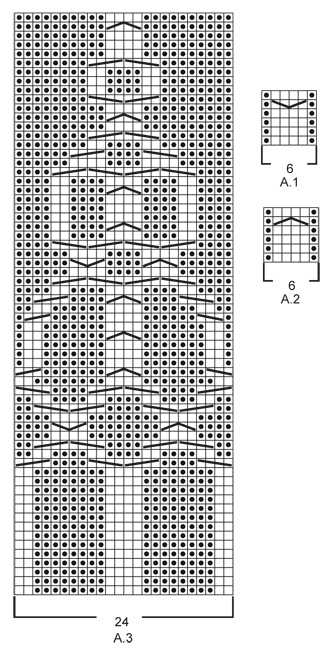
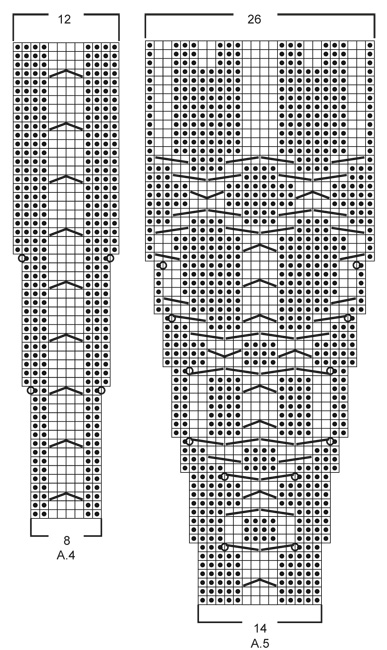
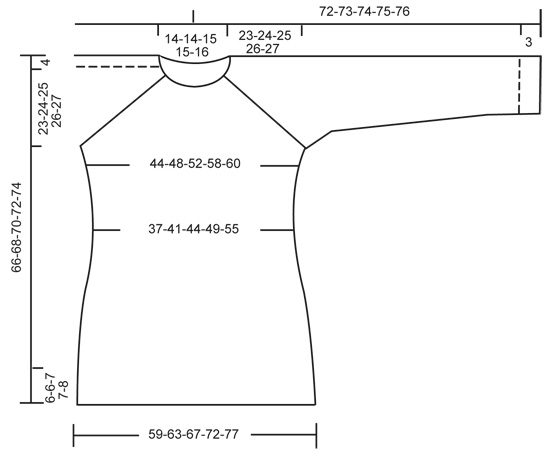
GARTER ST (in the round on circular needle): * K 1 round and P 1 round *, repeat from *-*. 1 ridge = 2 rounds. GARTER ST (back and forth on needle): K all rows. 1 ridge = K2 rows. PATTERN: See diagrams A.1 - A.5. The diagrams show all rows in pattern seen from RS. RAGLAN: Inc on each side of raglan sts (A.1/A.2, marker, A.2/A.1) by making 1 YO = 8 inc on round. On next round K the YOs twisted to avoid holes. Then P the new sts on sleeves, and on front and back piece work the new sts in pattern as explained below. DECREASE TIP (applies to sleeves): Dec on each side of marker as follows: Work until 3 sts remain before marker, P 2 tog, P 2, P 2 tog = 2 sts dec. INCREASE TIP: Inc 1 st by making a YO. On next round P YOs twisted, i.e. work in the back loop of st instead of front to avoid holes. P the new sts. ---------------------------------------------------------- JUMPER: Worked top down in the round on circular needle. Work sleeve in the round on circular needle/double pointed needles. YOKE: Cast on 92-92-97-97-101 sts on circular needle size 4 mm / US 6 with Karisma. Work 3 ridges in GARTER ST in the round on circular needle - see explanation above. Continue to work an elevation in GARTER ST back and forth -see explanation above, from mid back as follows (1st row = RS): Now work 5-5-7-7-9 sts, turn, work 10-10-14-14-18 sts, turn, work 15-15-19-19-23 sts, turn, work 20-20-24-24-28 sts, turn, work 25-25-29-29-33 sts, turn, work 30-30-34-34-38 sts, turn, work 35-35-39-39-43 sts, turn, work 40-40-43-43-48 sts, turn, work back to beg of round. Now K 1 round AT THE SAME TIME inc 24-24-23-23-27 sts evenly = 116-116-120-120-128 sts. P 18-18-19-19-21, insert 1st marker here (= this is now beg of round), A.2, P 2, A.2, P 2, A.1, insert 2nd marker here, A.2, P 0-0-1-1-3, A.3, P 0-0-1-1-3, A.1, insert 3rd marker here, A.2, P 2, A.2, P 2, A.1, insert 4th marker here, A.2, P 0-0-1-1-3, A.3, P 0-0-1-1-3, A.1. READ THE NEXT 2 SECTIONS BEFORE CONTINUING! REMEMBER THE GAUGE! On next round beg inc for RAGLAN – see explanation above, AT THE SAME TIME work pattern as follows: RAGLAN: Repeat inc every round 0-2-10-20-20 times in total. Then inc every other round 23-32-30-26-27 times and every 3rd round 6-0-0-0-0 times = 348-388-440-488-504 sts. PATTERN: Work pattern on body as follows (P the inc sts on sleeves): Work the first 6 sts inc in A.2, then P next 8-9-7-8-8 inc sts, work the next 6 inc sts in A.2, P the next 8-9-7-8-8 inc sts. NOTE: (Size M-L-XL-XXL): When A.3 has been worked 1 time vertically, continue with A.2 over cable and P the remaining sts from A.3 until start of body. S/M: Then inc as before on sleeve and inc inside A.1/A.2 (i.e. between A.1 and A.2, towards marker for raglan) on front and back piece 1-4 more times. P the new sts. L/XL/XXL: Continue with A.2 over the next 6 inc sts, P the next 7-8-8 inc sts, then inc as before on sleeve and inc inside A.1/A.2 (i.e. between A.1 and A.2, towards marker for raglan) on front and back piece 1-4-5 more times. P the last 1-4-5 inc sts. Piece now measures 27-28-29-30-31 cm / 10½"-11"-11½"-11 3/4"-12 1/4" from shoulder. Now work as follows: Slip the first 80-90-102-114-116 sts on a stitch holder for sleeve, cast on 12 new sts under sleeve, insert a blue marker in the middle of these new sts, work the next 94-104-118-130-136 sts (= front piece), slip the next 80-90-102-114-116 sts on a stitch holder for sleeve, cast on 12 new sts under sleeve, insert a blue marker in the middle of these new sts, work the remaining 94-104-118-130-136 sts on round (= back piece). NOW MEASURE THE PIECE FROM HERE. BODY: There are now 212-232-260-284-296 sts for body. Then continue pattern as follows: S/M: P 6-3, * A.2 0-1 time in width, P 7-7, A.2, P 8-9, insert a marker, A.2, P 8-9, insert a marker, A.2, P 9-9, A.2, P 9-9, A.2, insert a marker, P 8-9, A.2, insert a marker, P 8-9, A.1*, P 7-7, repeat from *-* 1 more time, P 1-4 L/XL/XXL: P 3-3-0, * A.2 1-1-2 times in width, P 4-6-5, A.2, P 7-8-8, insert a marker, A.2, P 7-8-8, insert a marker, A.2, P 7-8-8, insert a marker, A.2, P 10-11-12, A.2, P 10-11-12, A.2, insert a marker, P 7-8-8, A.2, insert a marker, P 7-8-8, A.2, insert a marker, P 7-8-8, A.1 *, P 4-6-5, repeat from *-* 1 more time, P 1-3-5. READ THE NEXT 2 SECTIONS BEFORE CONTINUING! Now dec and inc at the same time as follows: DECREASE: Dec differently as follows - READ DECREASE TIP: Dec 1 st on each side of the middle cable on front and back piece. Repeat dec every 2-2-1½-1½-1½ cm / ½"-½"-½"-3/4"-3/4" 3-3-4-4-6 more times. AT THE SAME TIME dec 1 st towards cable in every section with P sts with marker in (= 8-8-12-12-12 markers). Repeat dec every 3-2½-5-4-4 cm / 1 1/8"-7/8"-2"-1½"-1½" 2-3-1-2-2 more times. INCREASE (towards the sides): When piece measures 3 cm / 1'', inc along the cable towards the sleeve (i.e. cable from raglan) in P section towards the sides – READ INCREASE TIP! Inc 4 sts on round. Repeat inc every 1½-1½-2½-1½-1 cm / ½"-½"-7/8"-½"-3/8" 3-4-2-4-10 more times. When all dec and inc are done, 188-204-228-248-276 sts remain. When piece measures 11-12-12-13-14 cm / 4½"-4 3/4"-4 3/4"-5"-5½", work pattern as follows: P 6-3-6-6-0, A.2 0-1-1-1-2 times in width, P 7-8-6-11-15, A.4 0-0-1-1-1 time in width, * A.5, A.4 *, repeat from *-* 2-2-3-3-3 more times in width, A.5 1-1-0-0-0 times in width, P 7-8-6-11-15, A.2 0-1-1-1-2 times in width, P 7-8-6-11-15, A.4 0-0-1-1-1 time in width, * A.5, A.4 *, repeat from *-* 2-2-3-3-3 more times in width, A.5 1-1-0-0-0 times in width, P 1-5-0-5-15. NOTE: Adjust the first cable in A.4 and A.5 to get a nice transition between diagrams. Continue with pattern and inc according to diagram. When A.4 and A.5 have been worked vertically and piece measures approx. 33-34-34-35-35 cm / 13"-13½"-13½"-13 3/4"-13 3/4", there are 308-324-364-384-412 sts on round. Insert a marker here. NOW MEASURE THE PIECE FROM HERE. Now work rib as follows: S/M: * Work K over K and P over P until 7-11 sts remain before the blue marker in the side, P 2, K 2, P 3-4 *, repeat from *-* 1 more time and continue with K over K and P over P the rest of round. L/XL/XXL: * Work K over K and P over P until 8-14-21 sts remain before the blue marker in the side, K 2-2-2, P 3-4-3, K 0-2-2, P 0-3-3, K 0-0-2, P 0-0-3 *, repeat from *-* 1 more time and continue with K over K and P over P the rest of round. When rib has been worked for 2 cm / 3/4'' from marker, inc by making 1 YO before first P st in every P section - remember INCREASE TIP. When rib has been worked for 5-5-6-6-6 cm / 2"-2"-2½"-2½"-2½", bind off with K over K and P over P. SLEEVES: Slip the 80-90-102-114-116 sts from stitch holder back on circular needle. K 1 row over all sts and cast on 12 new sts at the end of row = 92-102-114-126-128 sts. Insert a marker in the middle of the new sts (i.e. 6 sts on each side of marker). NOW MEASURE THE PIECE FROM HERE. Then work sleeve in the round on circular needle/double pointed needles. Continue the middle cable on sleeve as before but work P over cables in raglan. On 2nd round beg dec on each side of marker - READ DECREASE TIP. Repeat dec in every other round 6 more times = 78-88-100-112-114 sts. Then dec 1 st on each side of marker every 2-1½-1-1-1 cm / 3/4"-½"-3/8"-3/8"-3/8" 13-17-22-27-27 times = 52-54-56-58-60 sts. AT THE SAME TIME when piece measures 15 cm / 6'', work A.5 over cable in the middle of sleeve - adjust the first cable in A.5 to get a nice transition between diagrams. NOTE: Do not inc in A.5 on sleeve, i.e. do not work YOs in diagram. When A.5 is finished and sleeve measures 37 cm / 14½'', work rib as follows from marker at beg of round: P 0-0-1-2-3, K 1-2-2-2-2, P 3, K 2, P 3, K 2, P 2, continue rib as on last row in A.5 (= 26 sts), P 2, K 2, P 3, K 2, P 3, K 1-2-2-2-2, P 0-0-1-2-3. Continue like this for 3 cm / 1'', bind off with K over K and P over P. ASSEMBLY: Sew the holes under the sleeves. |
||||||||||||||||||||||||||||
Diagram explanations |
||||||||||||||||||||||||||||
|
||||||||||||||||||||||||||||
|
||||||||||||||||||||||||||||
|
||||||||||||||||||||||||||||
|
||||||||||||||||||||||||||||
|
Have you made this or any other of our designs? Tag your pictures in social media with #dropsdesign so we can see them! Do you need help with this pattern?You'll find tutorial videos, a Comments/Questions area and more by visiting the pattern on garnstudio.com. © 1982-2024 DROPS Design A/S. We reserve all rights. This document, including all its sub-sections, has copyrights. Read more about what you can do with our patterns at the bottom of each pattern on our site. |
||||||||||||||||||||||||||||


With over 40 years in knitting and crochet design, DROPS Design offers one of the most extensive collections of free patterns on the internet - translated to 17 languages. As of today we count 304 catalogs and 11422 patterns - 11417 of which are translated into English (US/in).
We work hard to bring you the best knitting and crochet have to offer, inspiration and advice as well as great quality yarns at incredible prices! Would you like to use our patterns for other than personal use? You can read what you are allowed to do in the Copyright text at the bottom of all our patterns. Happy crafting!
Comments / Questions (218)
Last part before the sleeves: When rib has been worked for 2 cm from marker, inc by making 1 YO before first P st in every P section. How many st do I have to increase in total ? My size is M. Thank you !
18.12.2021 - 20:13DROPS Design answered:
Dear Liesbeth, simply make 1 yarn over at the beginning of each section with purled stitches and continue in rib with K over K and P over P (knit the yarn overs twisted on next row from WS to avoid holes). Happy knitting!
20.12.2021 - 07:322nd question: When rib has been worked 2cm I need to inc before first P st in every P section. "P section" would this include all sections (including P3 sections)? Can you tell me please how many increased sts there would be for size M? Also is this only done for one round? Then continue (with no further increases) until rib measures 5cm?
19.11.2021 - 22:30DROPS Design answered:
Dear Mrs Simmonds, simply increase 1 stitch in every section worked with purl stitches seen from right side. You increase to avoid the ribbing tightening the bottom edge of the jumper. And then work in rib with K over K and P over P until ribbing edge measures 5 cm. Happy knitting!
22.11.2021 - 07:42Hi. Pattern 156-19 Size M. I have just finished A4 & A5 and ready to work the rib on body. Work K over K and P over P until 11sts remain before blue marker. P2, K2, P4 does not fit. The blue marker is in the middle of A2 down the side. I think I will adjust it to show even ribbing on either side of the A2 cable. I think instructions are wrong here. Would this be the correct thing to do? Please see next question to follow as running out of characters.
19.11.2021 - 22:24DROPS Design answered:
Dear Mrs Simmonds, work K over K and P over P until 11 sts remain before blue marker, then work the next sts before A.2 as follows: P2, K2, P4, then repeat from *-* = work the sts in A.2 K over K and P over P. Happy knitting!
22.11.2021 - 07:41Thank you so much for your quick reply ! I understand. After finishing the raglan my work doesn't measure 28 yet. Should I continue without increasing the number of sts till 28 cm before beginning the body ?
03.11.2021 - 14:51DROPS Design answered:
Dear Liesbeth, correct, continue as before but do not increase anymore until piece measures 28 cm - remember to measure from shoulder and not from cast on edge (see chart: 24 cm + 4 cm shoulder). Happy knitting!
03.11.2021 - 16:48I've knitted the RAGLAN (size M). I've got 388 sts. I see these 388 sts in "BODY', But I don't understand why in the second part of 'Pattern' it is said I have to inc 4 more times. The sts which I would inc here, I don't find them in the description of the body.
03.11.2021 - 10:30DROPS Design answered:
Dear Liesbeth, the section PATTERN explains how to work the increased stitches on body as well as on sleeve in the different sizes. Hope this will help, happy knitting!
03.11.2021 - 12:19Zie mijn vraag van 15 oktober. Die is nog niet beantwoord.
01.11.2021 - 16:10See my question just asked. If I add rows to A4 it will affect when I do the increase rows. So if I am supposed to add 10 rows to A4, am I best to do this at the beginning or the end of the graph please? I am enjoying seeing the progress.
31.10.2021 - 23:56DROPS Design answered:
Dear Linda, see the aswer to your previous question. Just repeat the last "twist of the vable in pattern A.4. Happy Stitching!
01.11.2021 - 11:33Hi. I am halfway thru the body and at the point where we start A5,A4. My question is - why is there 10 rows less in A4 compared to A5? The 2 graphs start together in the same row and are both to be worked until completed vertically. Do I just start with them both lined up in the beginning then continue working A4 by repeating the last 6 rows to form additional cables? Or do I do extra cable rows at the beginning of A4 so that it lines up with A5 when I get to the end of the graph?
31.10.2021 - 23:52DROPS Design answered:
Dear Linda, when you finish A.4, just repeat the last 4 rows, until you catch up with the A.5 (ie., adding some ectra "twist" to your cablw qithout the increasees.). Happy Knitting!
01.11.2021 - 11:28Ik ben klaar met het stukje tekst RAGLAN en brei maat M. Ik heb dus 388 steken, waarvan 2x 10⁴ in de panden. Dit aantal zie ik terug in de beschrijvingvan hey LIJF, maar daarom snap ik niet de 2e alinea van de tekst PATROON waarin staat dat ik nog 4x moet meerderen. De steken die er dan bij komen, vind ik in de beschrijving van het lijf niet terug.
15.10.2021 - 21:22See my question 1/10/21. The P9 must be the space between the cables (A2) down the front/back, so the inc sts still have to be made in the next 18 rounds? Then for the next 6sts in A2, do I start creating the cable as the 6sts are gradually being achieved? So I will have done the 5th row in the cable using the cable needle by the time I have 6 sts? I think I should have done this with the 1st A2 started directly beside A3? But I did this once I had 6 inc sts. It looks OK so I will leave as is.
03.10.2021 - 23:09DROPS Design answered:
Dear Mrs Simmonds, correct, the first 6 inc will be worked into a new cable = A.2, then the next 9 sts inc will be purled, and then the next 6 sts increased for a new A.2, adjust the cables so that they will be worked at the same time as the previous A.2 worked, so that all cables in each A.2/A.1 will be worked always at the same round. Happy knitting!
04.10.2021 - 08:42