
Popular categories
Looking for a yarn?


|
||||||||||||||||||||||||||||
Alana |
||||||||||||||||||||||||||||
 |
 |
|||||||||||||||||||||||||||
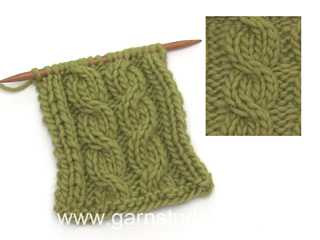
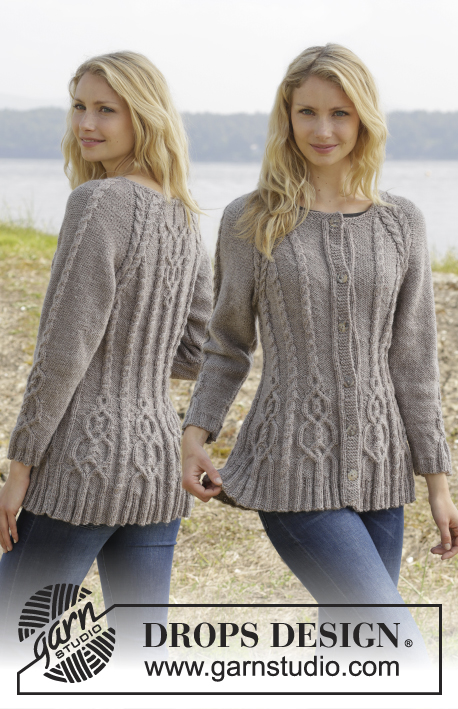
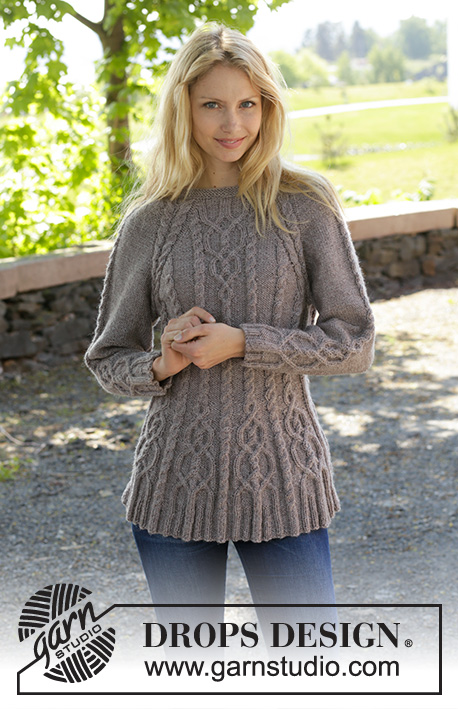
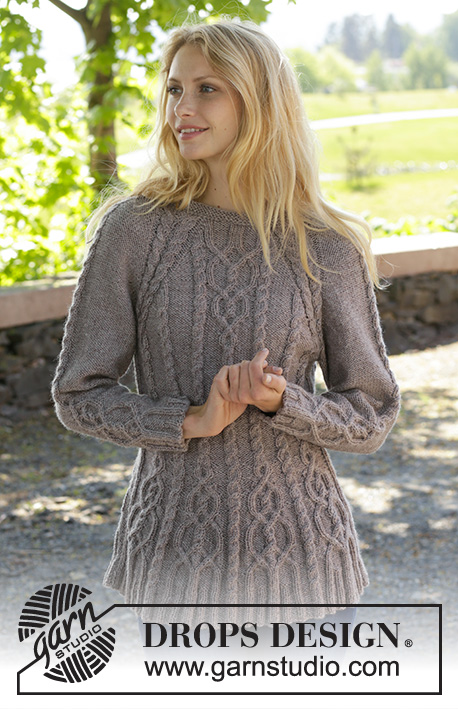
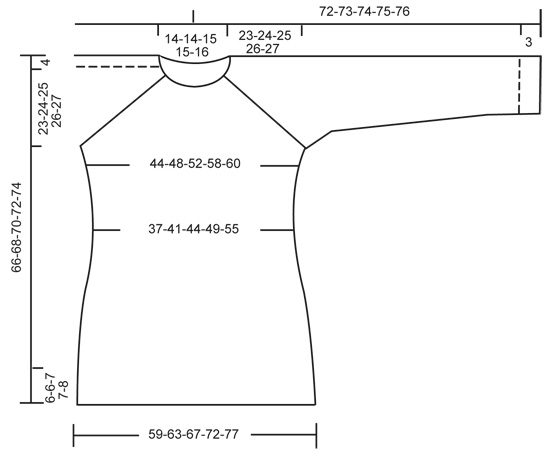
Knitted DROPS jumper with cables and raglan, worked top down in ”Karisma”. Size S-XXL
DROPS 156-19 |
||||||||||||||||||||||||||||
|
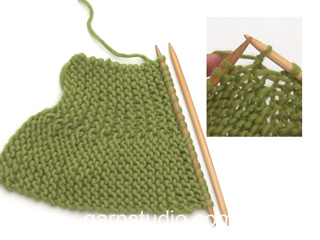
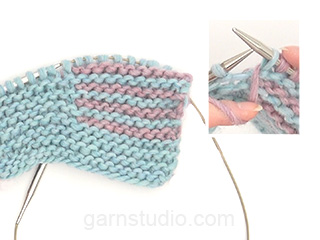
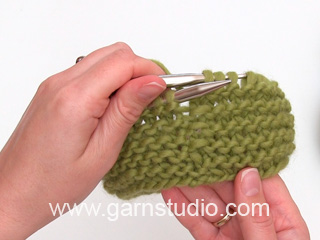
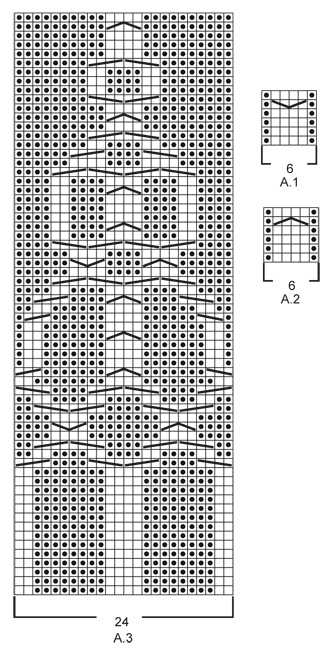
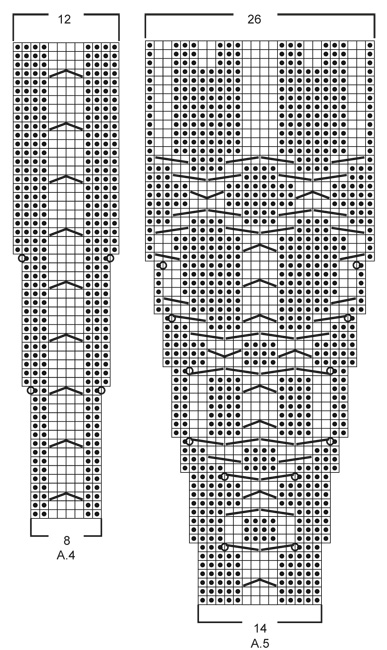
GARTER ST (in the round on circular needle): * K 1 round and P 1 round *, repeat from *-*. 1 ridge = 2 rounds. GARTER ST (back and forth on needle): K all rows. 1 ridge = 2 rows K. PATTERN: See diagrams A.1 - A.5. The diagrams show all rows in pattern seen from RS. RAGLAN: Inc on each side of raglan sts (A.1/A.2, marker, A.2/A.1) by making 1 YO = 8 inc on round. On next round K the YOs twisted to avoid holes. Then P the new sts on sleeves, and on front and back piece work the new sts in pattern as explained below. DECREASE TIP (applies to sleeves): Dec on each side of marker as follows: Work until 3 sts remain before marker, P 2 tog, P 2, P 2 tog = 2 sts dec. INCREASE TIP: Inc 1 st by making a YO. On next round P YOs twisted, i.e. work in the back loop of st instead of front to avoid holes. P the new sts. ---------------------------------------------------------- JUMPER: Worked top down in the round on circular needle. Work sleeve in the round on circular needle/double pointed needles. YOKE: Cast on 92-92-97-97-101 sts on circular needle size 4 mm with Karisma. Work 3 ridges in GARTER ST in the round on circular needle - see explanation above. Continue to work an elevation in GARTER ST back and forth -see explanation above, from mid back as follows (1st row = RS): Now work 5-5-7-7-9 sts, turn, work 10-10-14-14-18 sts, turn, work 15-15-19-19-23 sts, turn, work 20-20-24-24-28 sts, turn, work 25-25-29-29-33 sts, turn, work 30-30-34-34-38 sts, turn, work 35-35-39-39-43 sts, turn, work 40-40-43-43-48 sts, turn, work back to beg of round. Now K 1 round AT THE SAME TIME inc 24-24-23-23-27 sts evenly = 116-116-120-120-128 sts. P 18-18-19-19-21, insert 1st marker here (= this is now beg of round), A.2, P 2, A.2, P 2, A.1, insert 2nd marker here, A.2, P 0-0-1-1-3, A.3, P 0-0-1-1-3, A.1, insert 3rd marker here, A.2, P 2, A.2, P 2, A.1, insert 4th marker here, A.2, P 0-0-1-1-3, A.3, P 0-0-1-1-3, A.1. READ THE NEXT 2 SECTIONS BEFORE CONTINUING! REMEMBER THE KNITTING TENSION! On next round beg inc for RAGLAN – see explanation above, AT THE SAME TIME work pattern as follows: RAGLAN: Repeat inc every round 0-2-10-20-20 times in total. Then inc every other round 23-32-30-26-27 times and every 3rd round 6-0-0-0-0 times = 348-388-440-488-504 sts. PATTERN: Work pattern on body as follows (P the inc sts on sleeves): Work the first 6 sts inc in A.2, then P next 8-9-7-8-8 inc sts, work the next 6 inc sts in A.2, P the next 8-9-7-8-8 inc sts. NOTE: (Size M-L-XL-XXL): When A.3 has been worked 1 time vertically, continue with A.2 over cable and P the remaining sts from A.3 until start of body. S/M: Then inc as before on sleeve and inc inside A.1/A.2 (i.e. between A.1 and A.2, towards marker for raglan) on front and back piece 1-4 more times. P the new sts. L/XL/XXL: Continue with A.2 over the next 6 inc sts, P the next 7-8-8 inc sts, then inc as before on sleeve and inc inside A.1/A.2 (i.e. between A.1 and A.2, towards marker for raglan) on front and back piece 1-4-5 more times. P the last 1-4-5 inc sts. Piece now measures 27-28-29-30-31 cm from shoulder. Now work as follows: Slip the first 80-90-102-114-116 sts on a stitch holder for sleeve, cast on 12 new sts under sleeve, insert a blue marker in the middle of these new sts, work the next 94-104-118-130-136 sts (= front piece), slip the next 80-90-102-114-116 sts on a stitch holder for sleeve, cast on 12 new sts under sleeve, insert a blue marker in the middle of these new sts, work the remaining 94-104-118-130-136 sts on round (= back piece). NOW MEASURE THE PIECE FROM HERE. BODY: There are now 212-232-260-284-296 sts for body. Then continue pattern as follows: S/M: P 6-3, * A.2 0-1 time in width, P 7-7, A.2, P 8-9, insert a marker, A.2, P 8-9, insert a marker, A.2, P 9-9, A.2, P 9-9, A.2, insert a marker, P 8-9, A.2, insert a marker, P 8-9, A.1*, P 7-7, repeat from *-* 1 more time, P 1-4 L/XL/XXL: P 3-3-0, * A.2 1-1-2 times in width, P 4-6-5, A.2, P 7-8-8, insert a marker, A.2, P 7-8-8, insert a marker, A.2, P 7-8-8, insert a marker, A.2, P 10-11-12, A.2, P 10-11-12, A.2, insert a marker, P 7-8-8, A.2, insert a marker, P 7-8-8, A.2, insert a marker, P 7-8-8, A.1 *, P 4-6-5, repeat from *-* 1 more time, P 1-3-5. READ THE NEXT 2 SECTIONS BEFORE CONTINUING! Now dec and inc at the same time as follows: DECREASE: Dec differently as follows - READ DECREASE TIP: Dec 1 st on each side of the middle cable on front and back piece. Repeat dec every 2-2-1½-1½-1½ cm 3-3-4-4-6 more times. AT THE SAME TIME dec 1 st towards cable in every section with P sts with marker in (= 8-8-12-12-12 markers). Repeat dec every 3-2½-5-4-4 cm 2-3-1-2-2 more times. INCREASE (towards the sides): When piece measures 3 cm, inc along the cable towards the sleeve (i.e. cable from raglan) in P section towards the sides – READ INCREASE TIP! Inc 4 sts on round. Repeat inc every 1½-1½-2½-1½-1 cm 3-4-2-4-10 more times. When all dec and inc are done, 188-204-228-248-276 sts remain. When piece measures 11-12-12-13-14 cm, work pattern as follows: P 6-3-6-6-0, A.2 0-1-1-1-2 times in width, P 7-8-6-11-15, A.4 0-0-1-1-1 time in width, * A.5, A.4 *, repeat from *-* 2-2-3-3-3 more times in width, A.5 1-1-0-0-0 times in width, P 7-8-6-11-15, A.2 0-1-1-1-2 times in width, P 7-8-6-11-15, A.4 0-0-1-1-1 time in width, * A.5, A.4 *, repeat from *-* 2-2-3-3-3 more times in width, A.5 1-1-0-0-0 times in width, P 1-5-0-5-15. NOTE: Adjust the first cable in A.4 and A.5 to get a nice transition between diagrams. Continue with pattern and inc according to diagram. When A.4 and A.5 have been worked vertically and piece measures approx. 33-34-34-35-35 cm, there are 308-324-364-384-412 sts on round. Insert a marker here. NOW MEASURE THE PIECE FROM HERE. Now work rib as follows: S/M: * Work K over K and P over P until 7-11 sts remain before the blue marker in the side, P 2, K 2, P 3-4 *, repeat from *-* 1 more time and continue with K over K and P over P the rest of round. L/XL/XXL: * Work K over K and P over P until 8-14-21 sts remain before the blue marker in the side, K 2-2-2, P 3-4-3, K 0-2-2, P 0-3-3, K 0-0-2, P 0-0-3 *, repeat from *-* 1 more time and continue with K over K and P over P the rest of round. When rib has been worked for 2 cm from marker, inc by making 1 YO before first P st in every P section - remember INCREASE TIP. When rib has been worked for 5-5-6-6-6 cm, cast off with K over K and P over P. SLEEVES: Slip the 80-90-102-114-116 sts from stitch holder back on circular needle. K 1 row over all sts and cast on 12 new sts at the end of row = 92-102-114-126-128 sts. Insert a marker in the middle of the new sts (i.e. 6 sts on each side of marker). NOW MEASURE THE PIECE FROM HERE. Then work sleeve in the round on circular needle/double pointed needles. Continue the middle cable on sleeve as before but work P over cables in raglan. On 2nd round beg dec on each side of marker - READ DECREASE TIP. Repeat dec in every other round 6 more times = 78-88-100-112-114 sts. Then dec 1 st on each side of marker every 2-1½-1-1-1 cm 13-17-22-27-27 times = 52-54-56-58-60 sts. AT THE SAME TIME when piece measures 15 cm, work A.5 over cable in the middle of sleeve - adjust the first cable in A.5 to get a nice transition between diagrams. NOTE: Do not inc in A.5 on sleeve, i.e. do not work YOs in diagram. When A.5 is finished and sleeve measures 37 cm, work rib as follows from marker at beg of round: P 0-0-1-2-3, K 1-2-2-2-2, P 3, K 2, P 3, K 2, P 2, continue rib as on last row in A.5 (= 26 sts), P 2, K 2, P 3, K 2, P 3, K 1-2-2-2-2, P 0-0-1-2-3. Continue like this for 3 cm, cast off with K over K and P over P. ASSEMBLY: Sew the holes under the sleeves. |
||||||||||||||||||||||||||||
Diagram explanations |
||||||||||||||||||||||||||||
|
||||||||||||||||||||||||||||
|
||||||||||||||||||||||||||||
|
||||||||||||||||||||||||||||
|
||||||||||||||||||||||||||||
|
Have you made this or any other of our designs? Tag your pictures in social media with #dropsdesign so we can see them! Do you need help with this pattern?You'll find tutorial videos, a Comments/Questions area and more by visiting the pattern on garnstudio.com. © 1982-2024 DROPS Design A/S. We reserve all rights. This document, including all its sub-sections, has copyrights. Read more about what you can do with our patterns at the bottom of each pattern on our site. |
||||||||||||||||||||||||||||


With over 40 years in knitting and crochet design, DROPS Design offers one of the most extensive collections of free patterns on the internet - translated to 17 languages. As of today we count 304 catalogues and 11422 patterns - 11422 of which are translated into English (UK/cm).
We work hard to bring you the best knitting and crochet have to offer, inspiration and advice as well as great quality yarns at incredible prices! Would you like to use our patterns for other than personal use? You can read what you are allowed to do in the Copyright text at the bottom of all our patterns. Happy crafting!
Comments / Questions (218)
Bonjour, J'ai deux questions pour le moment : J'ai posé mes marqueurs et je m'attaque au raglan. Mais je ne comprends pas où je dois faire les jetés d'augmentation. Au contact du marqueur ou bien avant A1 ? Ensuite. J'ai compris que les augmentations des manches sont à l'envers. Par contre je ne comprends pas les augmentations des devants et dos. Dois-je recréer un motif A2 avec les mailles ajoutées ? Merci d'avance.
25.10.2022 - 19:51DROPS Design answered:
Bonjour Eloïse, les augmentations pour le raglan se font de chaque côté des mailles du raglan autrement dit avant (A.1 ou A.2, marqueur, A.2 ou A.1) - cf RAGLAN au tout début des explications. Sur le dos et le devant, les augmentations doivent être tricotées d'abord progressivement pour faire un nouveau A.2, puis en mailles envers, puis encore une fois A.2, puis en mailles envers. On a ainsi 2 torsades A.2 de part et d'autre de A.3 au milieu dos et au milieu devant. Bon tricot!
26.10.2022 - 07:42In the body decreases the pattern says "Dec 1 st on each side of the middle cable on front and back piece. Repeat dec every 2-2-1½-1½-1½ cm / ½"-½"-½"-3/4"-3/4" 3-3-4-4-6 more times." Those measurements don't convert correctly, so I don't know whether to repeat the decrease every 2 cm (a bit over 3/4 ") or every 1/2" (which would be about every 1.25 cm) - size S.
06.10.2022 - 21:55DROPS Design answered:
Dear Erica, there seems to be a problem in the inches measurement. In any case, since the original pattern is in Norsk and written in cm, when in doubt, always follow the cm instructions. Happy knitting!
07.10.2022 - 00:15Bonjour. Je souhaiterais faire le pull alana/ drops 156-19 mais est-ce qu'il existe les explications de bas en haut. Je ne sais pas tricoter en aiguilles circulaires de haut en bas. Merci. Cordialement
06.10.2022 - 08:36DROPS Design answered:
Bonjour Mme Luison, ce modèle existe seulement en version de haut en bas - retrouvez ici tous nos modèles de pulls tricotés de bas en haut - filtrez si besoin pour affiner votre recherche - cette leçon vous donne quelques conseils pour adapter sur aiguilles droites si besoin. Bon tricot!
06.10.2022 - 09:05Hi thank you for your help on the L size I am now at the under arm but first of all to get 440 stitches I have an extra 2 stitches on the last 7 increases so there for instead of 7 I have 9 if I take those off I will only have 432 where have I gone wrong and where do I start once the 12 stitches are cast on for the under arm thanking you
28.07.2022 - 23:09DROPS Design answered:
Dear Joy, since the increases are included in the graphs, please double check how you worked the diagrams, in case you missed an increase somewhere. It's difficult for us to help you from here. You cast on 12 stitches from the marker in the back (the start of the round). The stitches for the sleeve are slipped to an auxiliary needle in the meantime. Happy knitting!
31.07.2022 - 18:04Hi I am doing large I have an extra stitch is this right after doing my first row of the pattern what do I do with it thank you
04.07.2022 - 01:37DROPS Design answered:
Dear Mrs Stevenson, check that your first row was worked as explained: A.2 (6 sts), P 2, A.2(6sts), P 2, A.1 (6sts), 2nd marker here, A.2 (6sts), P 1, A.3 (24 sts), P 1, A.1 (6sts), insert 3rd marker here, A.2 (6sts), P 2, A.2 (6sts), P 2, A.1 (6sts), 4th marker here, A.2 (6sts), P 1, A.3 (24 sts), P 1, A.1 (6sts) = 6+2+6+2+6+6+1+24+1+6+6+2+6+2+6+6+1+24+1+6=120 sts. Happy knitting!
04.07.2022 - 08:36Size XXL Body Starts with 296 sts DEC: 2 sts x 7 times = 14 sts dec DEC: 12 sts x 3 times = 36 sts dec INC: 4 sts x 11 times = 44 sts inc 296 - 14 - 36 + 44 = 290 but pattern says 276 sts Where did I go wrong?????
16.06.2022 - 23:59DROPS Design answered:
Dear Mrs McMillan, you decrease 1 st on each side of the middle cable on front and back piece (= 4 sts decreased per round (and not only 2) x 7 times in total), so that you will have: 296 - 28 - 36 + 44=276 sts. Happy knitting!
17.06.2022 - 07:59I have been knitting for 50 years and I have never met a pattern I can’t make except this one! After a lot of frogging, I finally got it to where the sleeves are on scrap yarn. However, I had to skip the part about inc between a1 and a2 as I already have the right number of stitches. Now I am at P3, A2 1 time in width, P4, insert marker. I am at the 12 cast on sts of the underarm. If I P3, there are only 3 more sts before the marker, how can I A2? This is beyond confusing!
05.06.2022 - 23:32DROPS Design answered:
Dear Donna, after dividing piece, rounds continue at the same place as before and you continue cables as before (keep the A.1/A.2 towards front/back piece) and working 1 more repeat of A.2/A.1 mid under sleeve. Hope this will help. Happy knitting!
07.06.2022 - 09:34Hallo, wenn ich in den Linksrippen am Ende des Rumpfteils jeweils eine Masche zugenommen habe, wie viele Maschen habe ich dann vor dem Abketten auf der Nadel bei Größe XL?
11.02.2022 - 21:49DROPS Design answered:
Liebe Frau Martin, nehmen Sie einfach 1 Masche in jedem Linksrippen damit das Rippenmuster nicht zusammenzieht, dh jedesmal Sie links stricken Sollen (im Diagram oder Rippenmuster), nehmen Sie 1 Masche zu. Viel Spaß beim stricken!
14.02.2022 - 08:18Ik heb de trui in M gebreid en precies het patroon gevolgd maar de mouwen zijn 10 cm te kort. Zelfs als ik L zou breien, zouden de mouwen nog steeds 7 cm te kort zijn.
07.01.2022 - 20:09Thank you so mucht for jour quick reply, but I'm still not sure what to do. For example the A5 pattern ends with 1P, 2K, 3P, 2K, 3P, 4K, 3P, 2K, 3P, 2K, 1P. If I increase after every time starting with P (or after K in fact), that would mean increasing 5 sts in one A5 pattern. And it would mean increasing 1 st in evey A4 pattern. Is this correct?
20.12.2021 - 10:15DROPS Design answered:
Dear Lisbeth, correct :) there should be 1 extra purl stitch in every P-section (to avoir the ribbing edge to tighten piece together at the bottom of the jumper). Happy knitting!
20.12.2021 - 14:35