DROPS Alaska
DROPS Alaska
100% Wool
from 2.15 € /50g
Get the yarn to make this pattern from 25.80€.

The yarn cost is calculated from the pattern’s smallest size and the yarn’s cheapest product type. Looking for an even better price? You might find it on the DROPS Deals!

DROPS Super Sale

Autumn Stroll

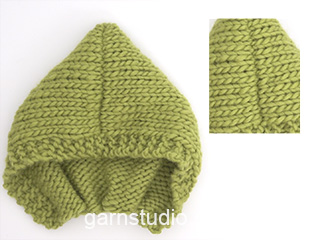
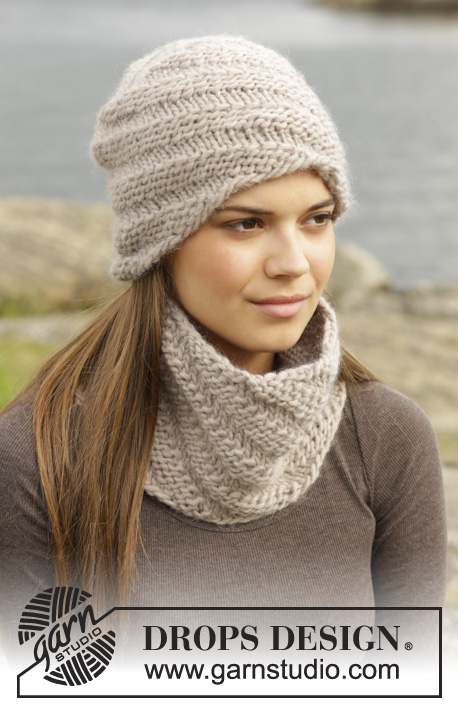
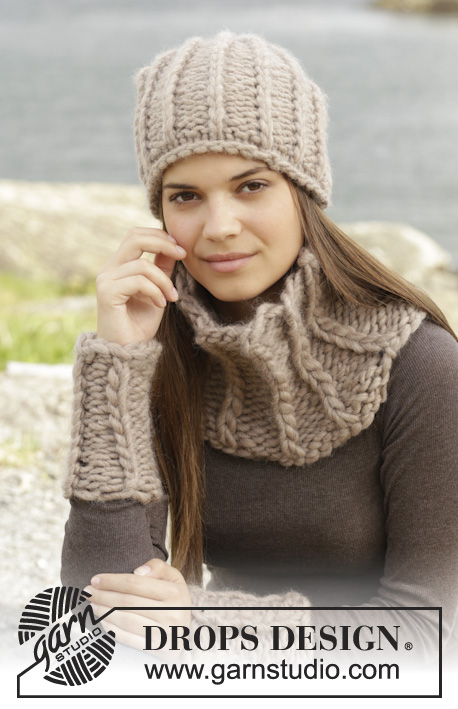
Knitted DROPS poncho with hood and vent, worked top down in ”Alaska”. Size: S -XXXL

DROPS 157-37
DROPS design: Pattern no x-405
Yarn group C or A + A
-----------------------------------------------------------
Size: S/M - L/XL - XXL/XXXL
Materials:
DROPS ALASKA from Garnstudio
600-750-900 g colour no 03, light grey

DROPS CIRCULAR NEEDLE (80 cm) SIZE 5 mm - or size needed to get 17 sts x 22 rows in stocking st = 10 x 10 cm.
DROPS SILVER ANTIQUE BUTTON NO 533: 1 piece for all sizes

-------------------------------------------------------

Alternative Yarn – See how to change yarns here
Yarn Groups A to F – Use the same pattern and change the yarn here
Yarn usage using an alternative yarn – Use our yarn converter here

-------------------------------------------------------

DROPS Alaska
DROPS Alaska
100% Wool
from 2.15 € /50g
Get the yarn to make this pattern from 25.80€.

The yarn cost is calculated from the pattern’s smallest size and the yarn’s cheapest product type. Looking for an even better price? You might find it on the DROPS Deals!

Pattern instructions

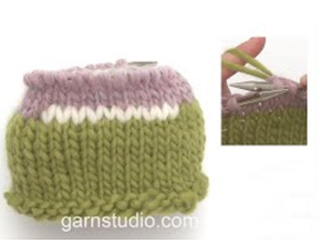
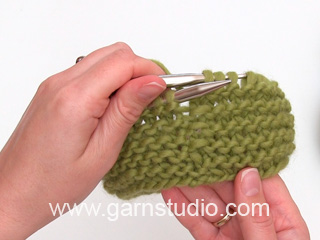
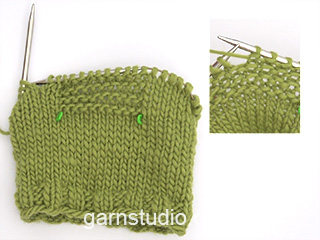
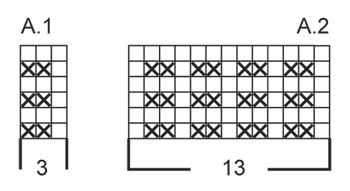
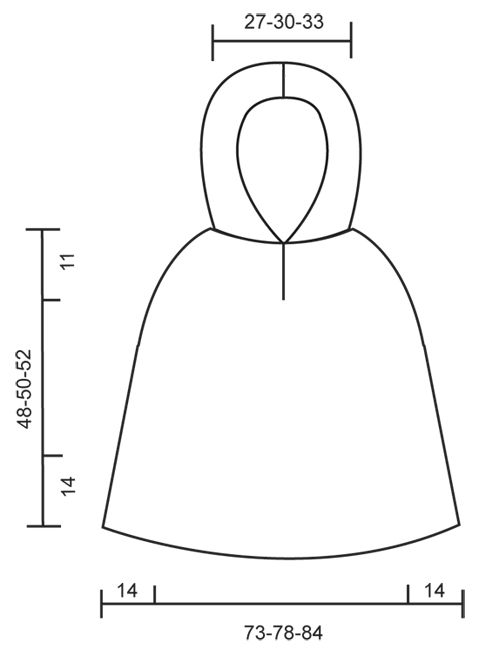
GARTER ST (back and forth on needle):
K all rows. 1 ridge = 2 rows K.

GARTER ST (in the round on circular needle):
* K 1 round and P 1 round *, repeat from *-*. 1 ridge = 2 rounds.

PATTERN:
See diagrams A.1 and A.2. The diagrams show all rows in pattern seen from RS.

INCREASE TIP:
All inc are done from RS.
Inc 1 st by making a YO. On next row work YO twisted to avoid holes. Then work the new sts in stocking st.

BUTTONHOLES:
Dec for buttonhole on right band. 1 buttonhole = K tog third and fourth st from edge and make 1 YO.
Dec for buttonhole when piece measures approx. 2 cm from cast-on edge.
----------------------------------------------------------

PONCHO:
Poncho and hood are worked separately and sewn tog at the end.
The poncho is worked top down. Work back and forth until vent mid front is done, then work in the round until vents in each side beg, then work front and back piece back and forth.
Cast on 92-102-112 sts on circular needle size 5 mm with Alaska. Work 4 ridges in GARTER ST - see explanation above, AT THE SAME TIME on 1st row in last ridge (= RS) inc 30-32-34 sts evenly = 122-134-146 sts. REMEMBER BUTTONHOLES! Then work as follows from mid front: 3 band sts in garter st, 8-10-12 sts in stocking st, insert 1st marker here, A.2 (= 13 sts), insert 2nd marker here, 13-15-17 sts in stocking st, insert 3rd marker here, A.2, insert 4th marker here, 22-26-30 sts in stocking st, insert 5th marker here, A.2, insert 6th marker here, 13-15-17 sts in stocking st, insert 7th marker here, A.2, insert 8th marker here, 8-10-12 sts in stocking st, 3 band sts in garter st.
READ ALL OF THE FOLLOWING SECTION BEFORE CONTINUING! REMEMBER THE KNITTING TENSION! Continue like this, AT THE SAME TIME on next row from RS inc on each side of every repetition of A.2 – READ INCREASE TIP! NOTE: Inc differently on front and back piece and on side pieces:
Inc as follows before 1st and 5th marker and after 4th and 8th marker: Every other row 5-6-7 times, every 4th row/round 4-6-9 times and every 6th round 6-6-4 times.
Inc as follows before 3rd and 7th marker and after 2nd and 6th marker: Every other row 7-8-9 times, every 4th row/round 9-10-11 times and every 6th round 2-2-2 times. When inc are done, there are 254-286-314 sts on round. AT THE SAME TIME when piece measures 11 cm in total, the vent mid front is done and work in the round as follows: Work until first repetition of A.2 (= beg of round), work the round in the round as before with pattern and inc until the 3 sts in garter st before vent mid front, then work 6 sts in GARTER ST in the round on circular needle – see explanation above, over the 3 sts in garter st on each side of vent. Continue like this until there are 2 ridges under vent.

Then continue with stocking st, inc and A.2 until piece measures 34-36-38 cm in total. Now work as follows from beg of round: * A.2, 21-24-27 sts in stocking st, 7 sts in garter st, 21-24-27 sts in stocking st *, A.2, stocking st until next A.2, repeat from *-*, A.2, work the rest of round in stocking st. Continue like this until there are 2 ridges on each side piece, AT THE SAME TIME on last round cast off the middle sts of the 7 sts in garter st in each side (= 6 sts in garter st remain), work until cast off st in the side = 252-284-312 sts on round. Then finish front and back piece separately.

FRONT PIECE:
Turn piece and work as follows from WS: 3 sts in garter st, stocking st over the next 21-24-27 sts, A.2 as before, stocking st over the next 52-62-70 sts, AT THE SAME TIME inc 1-0-1 st, work A.2, 21-24-27 sts in stocking st, 3 sts in garter st = 127-142-157 sts. When piece measures 41-43-45 cm, work as follows from RS: 3 sts in garter st, A.1 until 4 sts remain, K 1 (= 1st st in A.1), 3 sts in garter st. Continue like this back and forth until piece measures 48-50-52 cm in total. Cast off.

BACK PIECE:
Work as front piece. Adjust length according to front piece.

HOOD:
Worked back and forth on needle.
Cast on 92-102-112 sts on circular needle size 5 mm with Alaska. Work 1 ridge AT THE SAME TIME inc 8-1-0 sts evenly on last row = 100-103-112 sts. Then work as follows: 3 edge sts in garter st, A.1 (= 3 sts) until 4 sts remain, K 1, 3 edge sts in garter st. Continue like this until piece measures 30 cm. Work 1 ridge. Cast off.

ASSEMBLY:
Fold hood and sew cast-off edge neatly tog st by st. Sew hood to poncho st by st. Sew the button on to left band 2 cm in from egde. Cut and fasten the yarn.

This pattern has been corrected.

Updated online: 01.09.2014
under ASSEMBLY:... Sew the button on to left band 2 cm in from edge. Cut and fasten the yarn.

Diagram

symbols = K from RS, P from WS
symbols = P from RS, K from WS
diagram
diagram

Each of our patterns has specific tutorial videos to help you.

Do you have a question? See a list of frequently asked questions (FAQ)

Knitting tension is what determines the final measurements of your work, and is usually measured per 10 x 10 cm. It is provided like so: number of stitches in width x number of rows in height - eg: 19 stitches x 26 rows = 10 x 10 cm.

The knitting tension is very individual; some people knit/crochet loosely while others work tightly. You adjust the knitting tension with the needle size, which is why the suggested needle size is only meant as a guide! You need to adjust this (up or down) to ensure that YOUR knitting tension matches the knitting tension provided in the pattern. If you work with a different knitting tension than provided you will have a different yarn consumption, and your work will have different measurements than what the pattern suggests.

The knitting tension also determines which yarns can replace each other. As long as you achieve the same knitting tension you can replace one yarn with another.

See DROPS lesson: How to measure your tension/gauge

See DROPS video: How to make a gauge tension swatch

The required amount of yarn is provided in grams, eg: 450 g. To calculate how many balls you’ll need you first need to know how many grams are in 1 ball (25g, 50g or 100g). This information is available if you click on the individual yarn quality on our pages. Divide the amount required with the amount of each ball. For example, if each ball is 50g (the most common amount), the calculation will be as follows: 450 / 50 = 9 balls.

The important thing when changing from one yarn to another is that the knitting/crochet tension remains the same. This is so that the measurements of the finished piece will be the same as on the sketch provided. It is easier to achieve the same knitting tension using yarns from the same yarn group. It is also possible to work with multiple strands of a thinner yarn to achieve the knitting tension of a thicker one. Please try our yarn converter. We recommend you to always work a test swatch.

Please NOTE: when changing yarn the garment might have a different look and feel to the garment in the photo, due to individual properties and qualities of each yarn.

See DROPS lesson: Can I use a different yarn than the one mentioned in the pattern?

All our yarns are categorised into yarn groups (from A to F) according to thickness and knitting tension – group A contains the thinnest yarns and group F the thickest. This makes it easier for you to find alternative yarns to our patterns, should you wish to switch yarn. All yarns within the same group have a similar knitting tension and can easily replace each other. However, different yarn qualities have different structures and properties which will give the finished work a unique look and feel.

Click here for an overview of the yarns in each yarn group

At the top of all our patterns you’ll find a link to our yarn calculator, which is a helpful tool should you wish to use a different yarn than suggested. By filling in the yarn quality you wish to replace, the amount (in your size) and number of strands, the calculator will present good alternative yarns with the same knitting tension. Additionally it will tell you how much you’ll require in the new qualities and whether you’ll need to work with multiple strands. Most skeins are 50g (some are 25g or 100g).

If the pattern is worked with multiple colours, every colour will have to be calculated separately. Similarly, if the pattern is worked with several strands of different yarns (for example 1 strand Alpaca and 1 strand Kid-Silk) you will have to find alternatives for each, individually.

Click here to see our yarn calculator

Since different yarns have different qualities and textures we have chosen to keep the original yarn in our patterns. However, you can easily find options among our available qualities by using our yarn calculator, or simply pick a yarn from the same yarn group.

It is possible that some retailers still have discontinued yarns in stock, or that someone has a few skeins at home that they would like to find patterns for.

The yarn calculator will provide both alternative yarn as well as required amount in the new quality.

If you think it's hard to decide what size to make, it can be a good idea to measure a garment you own already and like the size of. Then you can pick the size by comparing those measures with the ones available in the pattern's size chart.

You'll find the size chart at the bottom of the pattern.

See DROPS lesson: How to read size chart

The needle size provided in the pattern serves only as a guide, the important thing is to follow the knitting tension. And since knitting tension is very individual, you will have to adjust the needle size to ensure that YOUR tension is the same as in the pattern – maybe you’ll have to adjust 1, or even 2 needle sizes, up or down to achieve the correct tension. For this, we recommend that you work test swatches.

Should you work with a different knitting tension than the one provided, the measurements of the finished garment might deviate from the measurement sketch.

See DROPS lesson: How to measure your tension/gauge

See DROPS video: How to make a tension/gauge swatch

Working a garment top-down provides more flexibility and room for personal adjustment. For example it is easier to try the garment on while working, as well as making adjustments to length of yoke and shoulder caps.

The instructions are carefully explaining every step, in the correct order. Diagrams are adjusted to the knitting direction and are worked as usual.

The diagram depicts all rows/rounds, and every stitch seen from the right side. It is read from bottom to top, from right to left. 1 square = 1 stitch.

When working back and forth, every other row is worked from the right side and every other row is worked from the wrong side. When working from the wrong side, the diagram will have to be worked reversed: from left to right, knit stitches are purled, purl stitches are knit etc.

When working in the round every round is worked from the right side and the diagram are worked from right to left on all rounds.

See DROPS lesson: How to read knitting diagrams

The diagram depicts all rows/rounds, and every stitch seen from the right side. It is worked from bottom to top, from right to left.

When working back and forth every other row is worked from the right side: from right to left and every other row is worked from the wrong side: from left to right.

When working in the round, every row in the diagram are worked from the right side, from right to left.

When working a circular diagram you start in the middle and work your way outwards, counter clockwise, row by row.

The rows usually start with a given number of chain stitches (equivalent to the height of the following stitch), this will either be depicted in the diagram or explained in the pattern.

See DROPS lesson: How to read crochet diagrams

Instructions for working several diagrams after each other on the same row/round, will often be written like so: “work A.1, A.2, A.3 a total of 0-0-2-3-4 times". This means you work A.1 once, then A.2 is worked once, and A.3 is repeated (in width) the number of times provided for your size – in this case like so: S = 0 times, M = 0 times, L=2 times, XL= 3 times and XXL = 4 times.

The diagrams are worked as usual: begin with the first row in A.1, then work the first row in A.2 etc.

See DROPS lesson: How to read knitting diagrams

See DROPS lesson: How to read crochet diagrams

The total width of the garment (from wrist-to-wrist) will be larger in the larger sizes, despite the actual sleeves being shorter. The larger sizes have longer sleeve caps and wider shoulders, so there will be a good fit in all sizes.

The measurement sketch/schematic drawing provides information regarding the full length of the garment. If it’s a jumper or a jacket the length is measured from the highest point on the shoulder closest to the neckline, and straight down to the bottom of the garment. It is NOT measured from the tip of shoulder. Similarly, the length of yoke is measured from the highest point on the shoulder and down to where yoke is split into body and sleeves.

On a jacket measures are never taken along bands, unless specifically stated. Always measure inside band stitches when measuring the length.

See DROPS lesson: How to read a schematic drawing

Diagrams are often repeated on the round or in height. 1 repeat is the diagram the way it appears in the pattern. If it says to work 5 repeats of A.1 in the round, then you work A.1 a total of 5 times after/next to each other in the round. If it says to work 2 repeats of A.1 vertically/in height you work the entire diagram once, then begin again at the start and work the entire diagram one more time.

Chain stitches are slightly narrower than other stitches and to avoid working the cast-on edge too tight, we simply chain more stitches to begin with. The stitch count will be adjusted on the following row to fit the pattern and measurement sketch.

The rib edge is more elastic and will contract slightly compared to, for example, stocking stitch. By increasing before the rib edge, you avoid a visible difference in width between the rib edge and the rest of the body.

It’s very easy to cast off too tightly, and by making yarn overs while casting off (and simultaneously casting these off) you avoid a too tight cast off edge.

See DROPS video: How to bind off with yarn overs (yo)

To achieve an even increase (or decrease) you can increase on, for example: every 3rd and 4th row alternately, like so: work 2 rows and increase on the 3rd row, work 3 rows and increase on the 4th. Repeat this until the increase is complete.

See DROPS lesson: Increase or decrease 1 st on every 3rd and 4th row alternately

Should you prefer to work in the round instead of back and forth, you may of course adjust the pattern. You’ll need to add steeks mid-front (usually 5 stitches), and follow the instructions. When you would normally turn and work from the wrong side, simply work across the steek and continue in the round. At the end you’ll cut the piece open, pick up stitches to work bands, and cover the cut edges.

See DROPS video: How to knit steeks and cut open

Should you prefer to work back and forth instead of in the round, you may of course adjust the pattern so you work the pieces separately and then assemble them at the end. Divide the stitches for the body in 2, add 1 edge stitch in each side (for sewing) and work the front and back pieces separately.

See DROPS lesson: Can I adapt a pattern for circular needles into straight needles?

Pattern repeats can vary slightly in the different sizes, in order to get the correct proportions. If you’re not working the exact same size as the garment in the photo, yours might deviate slightly. This has been carefully developed and adjusted so that the complete impression of the garment is the same in all sizes.

Make sure to follow instructions and diagrams for your size!

If you have found a pattern you like which is available in women’s size it’s not very difficult to convert it to men’s size. The biggest difference will be the length of sleeves and body. Start working on the women size that you think would fit across the chest. The additional length will be worked right before you cast off for the armhole/sleeve cap. If the pattern is worked top-down you can add the length right after the armhole or before the first decrease on sleeve.

Regarding additional yarn amount, this will depend on how much length you add, but it is better with a skein too many than too few.

All yarns will have excess fibres (from production) that might come off as lint or shedding. Brushed yarns (ie hairier yarns) have more of these loose, excess fibres, causing more shedding.

Shedding also depends on what is worn under or over the garment, and whether this pulls at the yarn fibres. It’s therefore not possible to guarantee that there will be no shedding

Below are some tips on how to get the best result when working with hairier yarns:

1. When the garment is finished (before you wash it) shake it vigorously so the looser hairs come off. NOTE: do NOT use a lint roller, brush or any method that pulls at the yarn.

2. Place the garment in a plastic bag and put it in your freezer - the temperature will cause the fibres to become less attached to each other, and excess fibres will come off easier.

3. Leave in the freezer for a few hours before taking it out and shaking it again.

4. Wash the garment according to the instructions on the yarn label.

Pilling is a natural process that happens to even the most exclusive of fibers. It's a natural sign of wear and tear that is hard to avoid, and that is most visible in high friction areas of your garment like a sweater's arms and cuffs.

You can make your garment look as new by removing the pilling, using a fabric comb or a pill/lint remover.

Still can't find the answer you need? Then scroll down and leave your question so one of our experts can try to help you. This will be done normally within 5 to 10 working days.
In the meantime, you can read the questions and answers that others have left to this pattern or join the DROPS Workshop on Facebook to get help from fellow knitters/crocheters!

You might also like...

Post a comment to pattern DROPS 157-37

We would love to hear what you have to say about this pattern!

If you want to leave a question, please make sure you select the correct category in the form below, to speed up the answering process. Required fields are marked *.

Comments / Questions (65)

country flag Dorthe Keller wrote:

Jeg kan sagtens forstå udtagningerne ... altså hvordan de skal være på hver side af rækkerne med mønster ,men jeg kan simpelthen ikke finde ud af hver 2 4 6 pind x antal gange... Hvordan kan det forenkles eller forklares til mig... alle de rester garn jeg har sat og nu skal jeg også have flere markører til antal omgange og på hver side ... Det er altså for rodet ...

08.03.2016 - 17:10

DROPS Design answered:

Hej Dorthe, Hvilken størrelse strikker du, så skal jeg forsøge at forklare det for dig?

09.03.2016 - 15:08

country flag Febe Pardaens wrote:

Ik vrees dat ik het deel over de meerderingen niet helemaal begrijp. Zouden jullie dit kunnen uitleggen? Danku wel

24.01.2016 - 12:28

DROPS Design answered:

Hoi Febe. Je hebt 4 keer A.2 en 8 markeerders. Je meerdert aan elke kant van het A.2 patroon. Je meerdert door een omslag te maken. Je meerdert voor markeerder 1 en 5 en na markeerder 4 en 8 om de nld (= elke 2e nld) 5-6-7 keer, elke 4e nld 4-6-9 keer en elke 6e nld 6-6-4 keer. EN je meerdert voor markeerder 3 en 7 en na markeerder om de nld 7-8-9 keer, elke 4e nld 9-10-11 keer en elke 6e nld 2-2-2 keer. Het is even concentreren en goed volgen. Je kan eventueel de verschillende markeerders (bijv 1-4-5-8) in één kleur en de andere in een andere kleur om ze goed uit elkaar te houden. Succes.

28.01.2016 - 13:30

country flag Hanne Pedersen wrote:

Hej. Jeg forstår simpelthen ikke: "Strik 8 P retstrik frem og tilbage-samtidig på 1. P i sidste retrille (=retsiden) tages der 32 m ud jævnt fordelt ....???

15.09.2015 - 23:20

DROPS Design answered:

Hej Hanne, Du strikker 8 p retstrik frem og tilbage, på 7.p tager du 32 m ud jævnt fordelt. God fornøjelse!

16.09.2015 - 15:07

Hong wrote:

Inc every other row 5-6-7 times, every 4th row/round 4-6-9 times and every 6th round 6-6-4 times. Every other row = every other RS row (4 rows including RS and WS)? Every 4th row = on each 4th RS row, meaning 8 rows including WS? Every 6th row = 6-6-4 times, you're increasing 6 times with size small but only 4 with size large. Is that right, or is it an error? If you only count the RS, then the piece will be twice as long, so I am wondering how the rows/rounds are counted.

15.08.2015 - 00:27

DROPS Design answered:

Dear Mrs Hong, when you inc every other row, you inc on next row, then work 1 row without inc. When inc every 4th row, inc on next row, work 3 rows without inc. Number of inc are adjusted to each size, in larger size you inc more times every other row and very 4th row but less time (than other sizees) every 6th row. Happy knitting!

17.08.2015 - 09:08

country flag Elsalöfgren wrote:

Med beskrivning på 157-37 hur gör man med ökningen ökar man både bak och fram stycket samtidigt eller gör man ökningar på framstycket först klart sedan bakstycket

18.05.2015 - 18:24

DROPS Design answered:

Hej. Du gör ökningar på både fram-, bak- och sidostyckena samtidigt men det ökas olika på fram- och bakst och på sidstyckena. Följ bara texten i beskrivningen så ska det bli riktigt. Lycka till!

19.05.2015 - 07:48

country flag GARATTI wrote:

Bonjour, Je ne comprends pas comment assembler les deux côtés en rond avant le premier motif A2. Pour moi il faut joindre un niveau de la fente au milieu devant et donc le début du tour se situe entre les 6 mailles point mousse et non avant A2. Pouvez vous m'expliquer?

09.04.2015 - 07:39

DROPS Design answered:

Bonjour Mme Garatti, pour fermer la fente d'encolure on continue en rond sur l'endroit en décalant le début du tour à partir du 1er motif A.2: on tricote comme avant jusqu'au 1er A2 puis on continue en rond en tricotant au point mousse les 3 m de la fin des rangs et les 3 m du début des rangs, on évite ainsi un décalage dans le point mousse au niveau de la fente d'encolure. Bon tricot!

09.04.2015 - 09:54

country flag Sabina wrote:

Jeg synes ikk jeg kan undgå at få huller i når jeg tager ud? Jeg synes jeg har prøvet mange ting

09.03.2015 - 12:04

DROPS Design answered:

Hej Sabina. Strikker du omslaget drejet? Der kan nogle gange stadig vaere et lille hul - men det forsvinder höjst sandsynligt naar du har vasket den förste gang.

11.03.2015 - 15:44

country flag Anna Rita wrote:

Buonasera, fino ad ora il lavoro procede bene. Devo iniziare a lavorare in tondo. Le spiegazioni Dicono di lavorare fino alla prima ripetizione di A.2 dove inizia il giro. Come lavoro questo pezzetto con 3 legati e dritto? Quando arrivo alle 3 maglie per lato della scollatura non si crea uno scalino avendo lavorato già per arrivare all'inizio del giro? Grazie come sempre per la risposta.

13.02.2015 - 23:08

DROPS Design answered:

Risposta tardiva, scusa! Quando si inizia a lavorare in tondo devi lavorare fino alla prima ripetizione di A.2 e qui inserisci un segno perché sarà l'inizio del lavoro d'ora in poi. Arrivata alle 3 m legaccio, devi lavorare ora 6 m a legaccio (che passa sotto la spaccatura), e continuare così per 4 giri (legaccio in tondo:

24.04.2015 - 17:00

country flag Anna Rita wrote:

Buonasera, ho fatto le 4 coste a legaccio Lavorando avanti e indietro sui ferri circolari e nel frattempo ho fatto l'asola. Cosa significa "proseguire dal centro? Io le 3 maglie a punto legaccio per il bordo le ho fatte all'inizio del 9 ferro (diritto del lavoro) ; è giusto? Ancora non devo lavorare in tondo. .. inoltre gli aumenti ogni quanto vanno fatti? E quali? In contemporanea tutti quelli indicati rispetto ai segnapunti? Grazie

11.02.2015 - 23:16

DROPS Design answered:

Buongiorno Anna Rita. Sta lavorando correttamente. Le 3 m a legaccio sono le m dei bordi (le prime e ultime 3 m sui ferri); la fotografia dovrebbe aiutarla ad individuarle facilmente. Gli aumenti vanno lavorati contemporaneamente. Cambia il numero di volte che deve ripetere gli aumenti, a seconda del segno. Inoltre, quando il lavoro misura 11 cm (gli aumenti non saranno ancora finiti), avrà completato l’apertura sul davanti e inizierà a lavorare in tondo. Ci riscriva se ha ancora difficoltà. Buon lavoro!

12.02.2015 - 09:30

country flag Hyun wrote:

Hi, I am making a small size and I have a difficulty on the step of the beginning of round. I understand that the round should begin from the A.2 but I don't get it how the round is started from A.2 not from 3 sts band. and "work until first repetition of A2" is right side? I'm so confused. Help me please~!

31.01.2015 - 03:15

DROPS Design answered:

Dear Mrs Hyun, the new beg of round will be the first repeat of A.2, continue working all sts (from RS), and join at the end of the row to work then in the round - remember to work 2 ridges in garter sts over the 6 sts under vent. Happy knitting!

02.02.2015 - 09:15