
Popular categories
Looking for a yarn?


|
|
Heartthrob Hat |
|
|
|
|
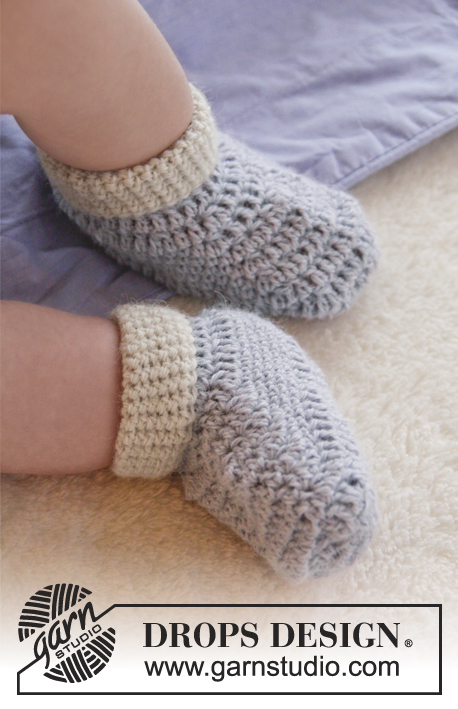
Crochet baby hat in DROPS Alpaca. Size 0 - 4 years.
DROPS Baby 25-23 |
|
|
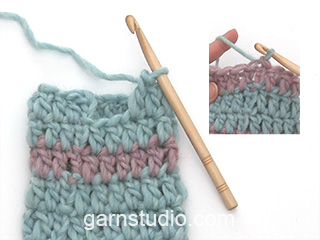
CROCHET TIP: Beg every sc round with 1 ch (this does NOT replace first sc) and finish with 1 sl st in first sc from beg of round. Work every round alternately from RS and WS. STRIPE PATTERN: * Work 6 rounds sc with light steel blue, then 6 rounds sc with off white *, repeat from *-*. DECREASE TIP: Dec 1 sc by working 2 sts tog. This is done as follows: Insert hook in first st and pull yarn through, insert hook in next st and pull yarn through, make 1 YO and pull yarn through all 3 sts on hook. ---------------------------------------------------------- HAT: Work top down and work alternately from RS and WS, i.e. turn piece after every finishing round. Ch 4 with light steel blue on hook size 3 mm and form a ring with 1 sl st in first ch. READ CROCHET TIP! Work STRIPE PATTERN as explained above. Rounds start mid back. ROUND 1: Work 7 sc in ch-ring. ROUND 2: Work 2 sc in every sc = 14 sc. ROUND 3: * Work 1 sc in first sc, 2 sc in next sc *, repeat from *-* the entire round = 21 sc. ROUND 4: * Work 1 sc in each of the first 2 sc, 2 sc in next sc *, repeat from *-* the entire round = 28 sc. ROUND 5: Work * 1 sc in each of the first 3 sc, 2 sc in next sc *, repeat from *-* the entire round = 35 sc. Continue inc the same way, i.e. there is 1 sc more for every time 2 sc are worked in 1 st, until there are 98-98-105 (112-119) sc on round. Then work 1 round while AT THE SAME TIME inc 0-4-3 (2-1) sc evenly = 98-102-108 (114-120) sc. Continue with 1 sc in every sc and stripe pattern until piece measures 13-14-15 (16-17) cm / 5"-5½"-6" (6¼"-6¾") – finish after 6 rounds with light steel blue, fasten off. Then work ear flaps. EAR FLAP: Work entire ear flap in light steel blue. Count 10-10-10 (11-11) sc from mid back - beg here. Work 1 sc in each of the next 25-25-27 (28-30) sc. Turn piece with 1 ch and work 1 sc in every sc. Continue like this until 4-4-6 (6-8) rows have been worked. On next row dec 1 sc at beg and end by working the 2 first and last sc tog – READ DECREASE TIP! Repeat dec every other row 2 more times (= 3 dec in total) and then every row 5-5-6 (6-7) times in total = 9-9-9 (10-10) sc remain, fasten off. Work another ear flap the same way in the other side, there should be 20-20-20 (22-22) sc between ear flaps mid back and 28-32-34 (36-38) sc between ear flaps mid front. FINISHING EDGE + TIE: Work with off white - beg mid back. Work 1 round with 1 sc + 1 ch around the entire hat incl ear flaps, but on the middle of each ear flap work 1 tie as follows: Ch loosely for approx. 25-25-30 (30-35) cm / 9¾"-9¾"-11¾" (11¾"-13¾"), turn and work 1 sc in every ch back (beg in 2nd ch from hook). Finish with 1 sl st in first sc from beg of round mid back, fasten off. |
|
|
Have you made this or any other of our designs? Tag your pictures in social media with #dropsdesign so we can see them! Do you need help with this pattern?You'll find tutorial videos, a Comments/Questions area and more by visiting the pattern on garnstudio.com. © 1982-2024 DROPS Design A/S. We reserve all rights. This document, including all its sub-sections, has copyrights. Read more about what you can do with our patterns at the bottom of each pattern on our site. |


With over 40 years in knitting and crochet design, DROPS Design offers one of the most extensive collections of free patterns on the internet - translated to 17 languages. As of today we count 304 catalogs and 11422 patterns - 11417 of which are translated into English (US/in).
We work hard to bring you the best knitting and crochet have to offer, inspiration and advice as well as great quality yarns at incredible prices! Would you like to use our patterns for other than personal use? You can read what you are allowed to do in the Copyright text at the bottom of all our patterns. Happy crafting!
Comments / Questions (38)
Bonjours, je fais ce modele en taille 1,3 mois. Apres avoir fait toute mes augmentations et environ 7 cm du bonnet. Ce dernier est plat, pouvez me dire où je me suis trompé svp. Merci d'avance
25.08.2015 - 21:39DROPS Design answered:
Bonjour Pamela, le bonnet se commence par le fond, on crochète un rond (= plat) jusqu'à ce qu'on ait le périmètre souhaité pour la taille (98 ms en 1ère taille), puis on continue tout droit sans augmenter, on va ainsi former le bonnet. Bon crochet!
26.08.2015 - 10:24Grazie per la risposta rapidissima!
27.05.2015 - 17:20Sono alle prime armi e vorrei capire meglio come procedere arrivata a questo punto: "Poi lavorare 1 giro e ALLO STESSO TEMPO aumentare 0-4-3 (2-1) m.b. In modo uniforme"... Ringrazio in anticipo per un tempestivo chiarimento.
27.05.2015 - 15:57DROPS Design answered:
Buongiorno Elisa. Nel corso del giro che sta lavorando, deve aumentare, a seconda della taglia, 0-4-3 (2-1) m.b a intervalli regolari. Quindi: per la taglia 1/3 mesi non ci sarà nessun aumento, per la taglia 6/8 mesi deve aumentare in tutto 4 m.b (aumenta 1 m.b una volta dopo 24 m.b, la volta successiva dopo 25 m.b, poi di nuovo dopo 24 m.b e dopo 25 m.b), per la taglia 12/18 mesi aumenta 3 m.b in tutto (aumenta 1 m.b ogni 35 m.b) e così via. Buon lavoro!
27.05.2015 - 16:13CAPITO ALLORA NN MI TROVO CON L ATERNANZA DEI COLORI...ADESSO SONO A 13 CM ED HO FINITO CON IL BLU GHIACCIO SECONDO LE SPIEGAZIONI DOVREI FARE ALTRI SEI GIRI CON IL BLU GHIACCIO (PER UN TOT DI 12 QUINDI)
10.10.2014 - 11:52DROPS Design answered:
Buongiorno Ida. Se capiamo correttamente, il suo lavoro misura 13 cm e gli ultimi sei giri che ha lavorato sono in blu ghiaccio, come indicato nelle spiegazioni. Le rimangono da lavorare solo i paraorecchie. Buon lavoro!
10.10.2014 - 13:37PER LA TAGLIA 0/3 MESI QUANDO SI PARLA DI 13 CM BISOGNA MISURARE DAL CENTRO DEL CAPPELLO O DALL ULTIMO GIRO DI AUMENTI?
09.10.2014 - 21:46DROPS Design answered:
Buonasera Ida. I 13 cm fanno riferimento alla misura complessiva del lavoro, quindi dall’inizio. Buon lavoro!
09.10.2014 - 22:59Tässä ohjeessa pieni virhe silmukkamäärissä. "..kunnes työssä on 98-102-108 (114-120) ks. Virkkaa sitten 1 krs ja lisää SAMALLA tasavälein 0-4-3 (2-1) ks = 98-98-108 (114-120) ks." "..till det är 98-98-105 (112-119) fm på v. Sedan virkas 1 v SAMTIDIGT som det ökas 0-4-3 (2-1) fm jämnt fördelat = 98-102-108 (114-120) fm."
04.10.2014 - 10:59Hei. Har heklet på denne luen i helga, og resultatet ble ikke en lue. Den ble altfor stor. Har gått gjennom oppskriften mange ganger og forstår ikke hvor jeg har gjort feil. Men ser at en skal ha 28 fm på 10 cm i høyden som jeg har, men det skal være 26 fm i bredden på 10 cm og det får jeg ikke til. Har heklet så stramt som det overhode går an og fekk tilslutt 26 fm på 13 cm. Er dette en feil i oppskriften? Eller jeg som har misforstått noe?
09.09.2014 - 14:42DROPS Design answered:
Hej Anne Lise. Pröv da med en mindre heklenaal for at faa den rette heklefasthed.
09.09.2014 - 17:43I denne opskrift står der at man skal hækle til arbejdet måler 13 cm. Hvor måler man fra? Midten af cirklen eller hele vejen over cirklen? Det bliver nærmest en kalot hvis det er hele vejen over cirklen man måler.. Men jeg bliver i tvivl.
28.07.2014 - 20:59DROPS Design answered:
Hej Ditte. Du skal måle fra midten.
04.08.2014 - 15:59