
Popular categories
Looking for a yarn?


|
|
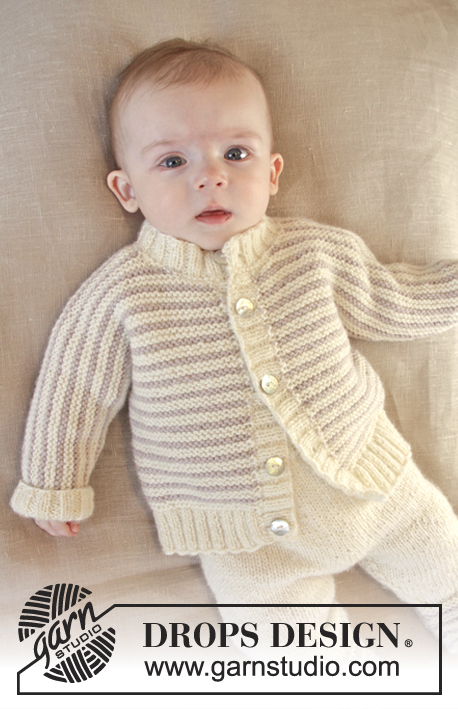
Little Darcy |
|
 |
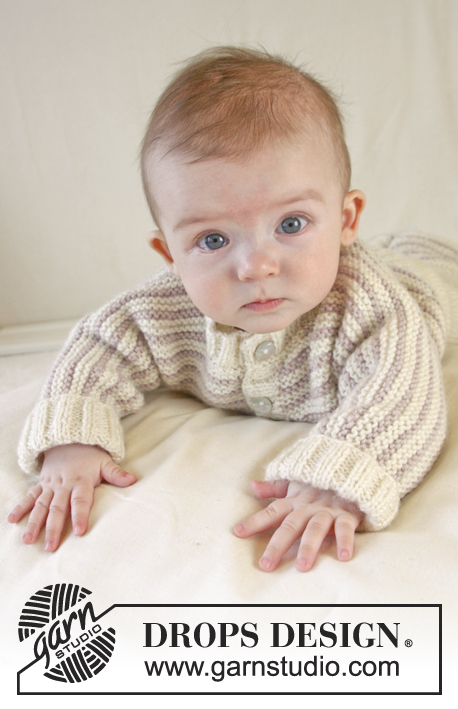 |
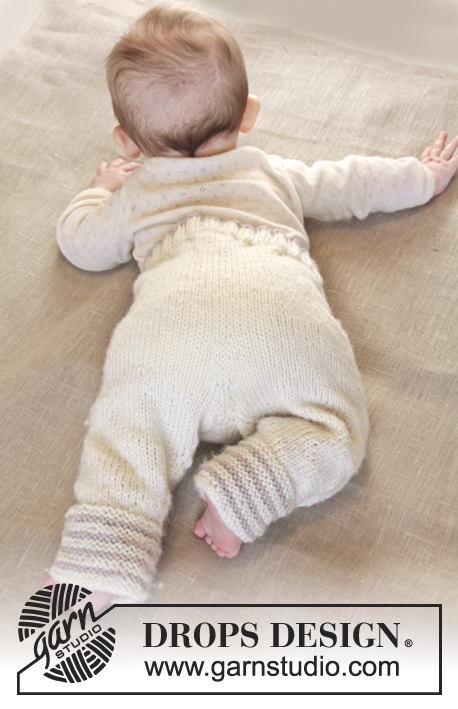
Knitted baby jacket in garter st with stripes and rib edges in DROPS Karisma. Size 0 – 4 years
DROPS Baby 25-18 |
|
|
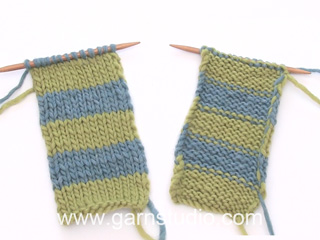
GARTER ST (back and forth on circular needle): K all rows. 1 ridge = K2 rows. STRIPES: * 1 ridge off white, 1 ridge light beige, 1 ridge off white *, repeat from *-* (i.e. when repeating there will be 2 ridges in off white between every ridge with light beige). ---------------------------------------------------------- JACKET: Worked back and forth on circular needle. Beg on front piece, cast on new sts for sleeve and work up to the shoulder. Put piece aside and work the other front piece. Then place both front pieces tog and work down the back piece. RIGHT FRONT PIECE: Cast on 34-38-38-42 (42-46) sts (includes 1 edge st in each side) on circular needle size 3 mm / US 2.5 with off white. P 1 row from WS. Then work next row as follows from RS: 1 edge st in GARTER ST - see explanation above - * K 2, P 2 *, repeat from *-* until 1 st remains and finish with 1 edge st in GARTER ST. Continue rib like this. When piece measures 4 cm / 1½'', K 1 row from RS while AT THE SAME TIME dec 9-11-9-11 (9-10) sts evenly = 25-27-29-31 (33-36) sts. Switch to circular needle size 4 mm / US 6 and K 1 row from WS. Then work in GARTER ST – see explanation above while AT THE SAME TIME working STRIPES – see explanation above. REMEMBER THE GAUGE! When piece measures 14-17-18-20 (22-25) cm / 5½"-6 3/4"-7"-8" (8 3/4"-9 3/4"), cast on new sts for sleeve at the end of every row from RS as follows: Cast on 5 sts 3-5-0-0 (4-5) times in total, 4 sts 0-0-7-8 (5-7) times in total and then 7-4-5-7 (8-4) sts 1 time = 47-56-62-70 (81-93) sts. After last inc continue in garter st and stripes until piece measures 20-24-26-28 (31-35) cm / 8"-9½"-10 1/4"-11" (12 1/4"-13 3/4"). Now slip the first 4-5-6-6 (7-8) sts at beg of row from RS on 1 stitch holder for neck (work sts before slipping them on holder to avoid cutting the yarn). Then bind off at beg of every row from RS as follows: bind off 2 sts 2 times and then 1 st 2-2-2-2 (3-3) times = 37-45-50-58 (67-78) sts. Continue to work until piece measures 24-28-30-33 (36-40) cm / 9½"-11"-11 3/4"-13" (14 1/4"-15 3/4"). Insert 1 marker (= mid on top of shoulder) – NOW MEASURE PIECE FROM HERE! Continue in garter st and with stripes as before until 1 cm / ½'' has been worked from marker but on last row from WS cast on 2 new sts at the end of row towards the neck. Slip 39-47-52-60 (69-80) sts on 1 stitch holder. LEFT FRONT PIECE: Cast on and work as right but reversed, i.e. rib beg with 2 P after 1 edge st in the side and ends with 2 K before 1 edge st towards mid front. When casting on new sts for sleeve at the end of every row from WS, dec for neck at beg of every row from WS and when casting on 2 new sts towards the neck, this is done at the end of last row from RS, then K 1 row from WS so that both front pieces end after 1 row K from WS. BACK PIECE: Work the 39-47-52-60 (69-80) sts from left front piece (1st row = K from RS and continue stripes as before), cast on 14-16-18-18 (22-24) new sts on needle (= neckline in the back of neck) and work the 39-47-52-60 (69-80) sts from right front piece on to same circular needle = 92-110-122-138 (160-184) sts. Continue in garter st and with stripes. When piece measures 8-8-8-9 (9-9) cm / 3"-3"-3"-3½" (3½"-3½") from marker on shoulder (make sure that no of rows and stripes is the same on front piece according to marker on shoulder), now bind off at beg of every row in each side as follows: bind off 7-4-5-7 (8-4) sts 1 time, 4 sts 0-0-7-8 (5-7) times in total and 5 sts 3-5-0-0 (4-5) times in total = 48-52-56-60 (64-70) sts remain on back piece. Work until piece measures 20-24-26-29 (32-36) cm / 8"-9½"-10 1/4"-11½" (12½"-14 1/4") from marker on shoulder – adjust according to front piece and make sure to finish stripes the way they started on front piece. Switch to circular needle size 3 mm / US 2.5 and off white and K 1 row from RS AT THE SAME TIME inc 20-20-20-20 (20-22) sts evenly = 68-72-76-80 (84-92) sts. Work next row as follows from WS: 1 edge st in garter st, * P 2, K 2 *, repeat from *-* until 3 sts remain and finish with P 2 and 1 edge st in garter st (from RS there are 2 K sts in each side inside edge st). Continue rib like this. When rib measures 4 cm / 1½'' (piece measures approx. 24-28-30-33 (36-40) cm / 9½"-11"-11 3/4"-13" (14 1/4"-15 3/4") from marker on shoulder), K 1 row (from RS) over all sts before loosely binding off. RIGHT BAND: Pick up from RS approx. 42 to 74 sts along right front piece inside 1 edge st in garter st on circular needle size 3 mm / US 2.5 with off white. K 1 row from WS. K 1 row from RS while AT THE SAME TIME inc evenly to 53-61-65-73 (81-89) sts. Work next row as follows from WS: 1 edge st in garter st, * P 2, K 2 *, repeat from *-* until 4 sts remain and finish with P 2 and 2 edge sts in garter st. Continue rib like this. When band measures 1 cm / ½'', dec on next row from RS for 4-4-4-5 (5-5) buttonholes evenly. 1 buttonhole = P 2 tog and make 1 YO (dec in a P-section seen from RS will look more pretty). Upper buttonhole should be approx. 4 cm / 1½'' from neck edge, and bottom buttonhole approx. 2 cm / 3/4'' from bottom edge. Continue to work until band measures 2½-2½-2½-3 (3-3) cm / 3/4"-3/4"-3/4"-1" (1"-1") and loosely bind off with K over K and P over P. LEFT BAND: Work as right band but do not dec for buttonholes on left band. NECK EDGE: Pick up from RS approx. 56 to 78 sts (incl sts on stitch holders) around the neck (also over bands) on circular needle size 3 mm / US 2.5 with off white. K 1 row from WS. K 1 row from RS while AT THE SAME TIME inc evenly to 68-72-76-80 (88-92) sts. Work next row as follows from WS: 1 edge st in garter st, * P 2, K 2 *, repeat from *-* until 3 sts remain and finish with P 2 and 1 edge sts in garter st. Continue rib like this. When neck edge measures 1 cm / ½'', dec for 1 buttonhole over the other holes on right band. Continue to work until neck edge measures 2½-2½-2½-3 (3-3) cm / 3/4"-3/4"-3/4"-1" (1"-1") and loosely bind off with K over K and P over P. ASSEMBLY: Sew side and underarm seams in one inside 1 edge st. Sew on buttons. SLEEVE EDGE: Pick up from RS approx. 34 to 38 sts at the bottom around the sleeve on double pointed needles size 3 mm / US 2.5 with off white. P 1 round. K 1 round while AT THE SAME TIME inc evenly to 40-40-40-44 (48-48) sts. Then work rib = K 2/P 2. When sleeve edge measures 4 cm / 1½'', loosely bind off with K over K and P over P. Repeat at the bottom around the other sleeve. |
|

|
|
|
Have you made this or any other of our designs? Tag your pictures in social media with #dropsdesign so we can see them! Do you need help with this pattern?You'll find tutorial videos, a Comments/Questions area and more by visiting the pattern on garnstudio.com. © 1982-2024 DROPS Design A/S. We reserve all rights. This document, including all its sub-sections, has copyrights. Read more about what you can do with our patterns at the bottom of each pattern on our site. |
|


With over 40 years in knitting and crochet design, DROPS Design offers one of the most extensive collections of free patterns on the internet - translated to 17 languages. As of today we count 304 catalogs and 11422 patterns - 11417 of which are translated into English (US/in).
We work hard to bring you the best knitting and crochet have to offer, inspiration and advice as well as great quality yarns at incredible prices! Would you like to use our patterns for other than personal use? You can read what you are allowed to do in the Copyright text at the bottom of all our patterns. Happy crafting!
Comments / Questions (36)
Hej. jag undrar om det är fel i mönstret. Höger framstycke "Sedan minskas det till hals i början på varje v från rätsidan så här: minska 2 m 2 ggr och 1 m 2-2-2-2 (3-3) ggr = 37-45-50-58 (67-78) m. " Jag får inte ihop det. Jag har 56 maskor inför detta moment. Jag ska minska 6 maskor och enl beskrivningen det ska vara 45 maskor kvar. Jag får inte ihop . Gör jag fel
30.10.2018 - 12:14DROPS Design answered:
Hej, innan du börjar avmaska för halsen ska du sätta de yttersta 5 maskorna mot halsen på en tråd, du har alltså 51 maskor när du börjar maska av för halsen.
30.10.2018 - 18:02Bonjour, J'ai fait le devant droit sans problème, mais pour le devant gauche, je trouve très compliqué de monter les mailles pour les manches du même côté que le changement de fil. Y a-t-il une solution pour que ça ne soit pas du même côté mais que j'aie le même nombre de rangs au moment de rejoindre les deux devant. Merci d'avance.
25.03.2018 - 11:50DROPS Design answered:
Bonjour Mme Sabatier, pour le devant droit, vous avez monté les mailles de la manche à la fin d'un rang sur l'endroit, pour le devant gauche, montez les mailles de la même façon, mais à la fin d'un rang sur l'envers. Vous aurez peut-être un rang de décalage, mais on ne le verra pas. Bon tricot!
26.03.2018 - 11:28Can you recommend a pattern for a hat to match?
03.03.2018 - 15:13DROPS Design answered:
Dear Jennifer, sorry, we don't have a baby hat with the exact same pattern, however I think any simple garter stitch hat would go well with this sweater, like the DROPS Baby 25-10, or 25-6. If you want something that ties under the chin check out the DROPS Baby 25-3 pattern. Happe Knitting!
04.03.2018 - 18:13Eine kurze Frage. Muss ich auf der linken Vorderseite von der Jacke auch die 4 Maschen auf eine Hilfsfaden legen oder nur rechts?
23.06.2016 - 20:56DROPS Design answered:
Liebe Jacqueline, ja das müssen Sie, das ist ja der Halsausschnitt. Wie angegeben legen Sie aber die Maschen nun am Anfang jeder Rück-R still.
06.07.2016 - 10:10Hi there - when I sew the side and arm seams will I need to weave in loose ends from before or will the stitching hold them in place and then I can just cut them short, but not too short? As you can see, I'm nearly there and I've really enjoyed making the jacket. Thank you. Ruth
19.04.2016 - 14:32DROPS Design answered:
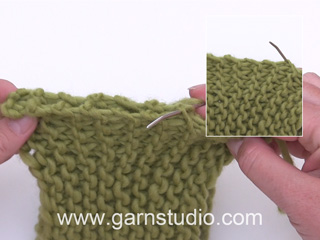
Dear Mrs Eastman, rather always keep some tails and weave them in finished piece to avoid piece from unraveling if they would have been cut too short - see below how to weave in ends in a garter st piece. Happy Assembly!
19.04.2016 - 16:44Thanks for your quick reply. It's actually the underarm area, where the sleeves begin, not the shoulder. Do I still need to cut the yarn?
29.03.2016 - 15:29DROPS Design answered:
Dear Mrs Eastman, that's right, but if you don't cut the yarn on left front piece, you will then have loose loops when working on the stripes. Cut then the colours at the side and join at the beg of row from RS. Happy knitting!
29.03.2016 - 17:24Sorry, I have another question. On the LH front, when casting on 4 stitches etc for striped sleeves from end of WS row I find I am left with a long loop of the old colour. (I didn't have this problem with the RH front from end of RS row because it was the same colour.) Do you have any suggestions, please?
29.03.2016 - 15:17DROPS Design answered:
Dear Mrs Eastman, you can cut the yarn to avoid long loop in the other colours on left front piece. Happy knitting!
29.03.2016 - 15:29Hello, Thank you for your reply. That makes sense. I've worked the RS and WS row as you described and am about to cast off the next RS row. Should I cut the yarn that's now at the far end of the st holder, i.e. along centre edge, or use it and create a loop at the back?
25.03.2016 - 01:10DROPS Design answered:
Dear Mrs Eastman, if you mean the yarn for the stripes, yes you will have to cut them to continue stripes on the first shoulder. Happy knitting!
25.03.2016 - 11:19I'm making the Little Darcy and am confused by these instructions in the right front: Slip the first 6 sts at beg of row from RS on 1 stitch holder for neck (work sts before slipping them on holder to avoid cutting the yarn). Then bind off at beg of every row from RS What I thought it meant was knit 6 stitches, slip them off, then work the rest of the row. What that has done is left me with a long tail at the end of my stitch holder (the wrong end!).
24.03.2016 - 01:51DROPS Design answered:
Dear Mrs Eastman, on right front piece first work 1 row from RS and put the 6 sts towards mid front on a st holder, finish row from RS, turn and work next row from WS, then at the beg of next row from RS cast off 2 sts, work remaining sts on row, return row and continue like this, casting off the sts for neck at the beg of every row from RS. Happy knitting!
24.03.2016 - 09:16Hei, Miten raidoituksen saa menemään oikein sen jälkeen kun silmukoita aletaan lisäämään hihaan varten? Raidoitus pyörähtää aina väärin päin
03.08.2015 - 14:17DROPS Design answered:
Raidoitusta jatketaan kuten aiemmin, eli jos muut silmukat neulotaan luonnonvalkoisella, myös hihan silmukat luodaan luonnonvalkoisella ja päinvastoin, jos muut silmukat neulotaan beigellä, myös hihan silmukat luodaan beigellä.
12.08.2015 - 13:18