DROPS Muskat uni colour 100% Cotton |
1.85 £ /50g |
Order |
Clicking the ORDER button will redirect you to Wool Warehouse Direct Ltd website
The yarn cost is calculated from the pattern’s smallest size and the yarn’s cheapest product type. Looking for an even better price? You might find it on the DROPS Deals!
-------------------------------------------------------
Alternative Yarn – See how to change yarns here
Yarn Groups A to F – Use the same pattern and change the yarn here
Yarn usage using an alternative yarn – Use our yarn converter here
-------------------------------------------------------
DROPS Muskat uni colour 100% Cotton 1.85 £ /50g Order |
Clicking the ORDER button will redirect you to Wool Warehouse Direct Ltd website
The yarn cost is calculated from the pattern’s smallest size and the yarn’s cheapest product type. Looking for an even better price? You might find it on the DROPS Deals!
= dc | |
= ch | |
= picot: ch 3, 1 tr in the first of the 3 ch, skip 2 dc/tr | |
= tr |
Each of our patterns has specific tutorial videos to help you.
These step-by-step tutorials might also help you:
Why is the knitting/crochet tension so important?
Knitting tension is what determines the final measurements of your work, and is usually measured per 10 x 10 cm. It is provided like so: number of stitches in width x number of rows in height - eg: 19 stitches x 26 rows = 10 x 10 cm.
The knitting tension is very individual; some people knit/crochet loosely while others work tightly. You adjust the knitting tension with the needle size, which is why the suggested needle size is only meant as a guide! You need to adjust this (up or down) to ensure that YOUR knitting tension matches the knitting tension provided in the pattern. If you work with a different knitting tension than provided you will have a different yarn consumption, and your work will have different measurements than what the pattern suggests.
The knitting tension also determines which yarns can replace each other. As long as you achieve the same knitting tension you can replace one yarn with another.
See DROPS lesson: How to measure your tension/gauge
See DROPS video: How to make a gauge tension swatch
How do I know how many balls of yarn I need?
The required amount of yarn is provided in grams, eg: 450 g. To calculate how many balls you’ll need you first need to know how many grams are in 1 ball (25g, 50g or 100g). This information is available if you click on the individual yarn quality on our pages. Divide the amount required with the amount of each ball. For example, if each ball is 50g (the most common amount), the calculation will be as follows: 450 / 50 = 9 balls.
Can I use a different yarn than what the pattern suggests?
The important thing when changing from one yarn to another is that the knitting/crochet tension remains the same. This is so that the measurements of the finished piece will be the same as on the sketch provided. It is easier to achieve the same knitting tension using yarns from the same yarn group. It is also possible to work with multiple strands of a thinner yarn to achieve the knitting tension of a thicker one. Please try our yarn converter. We recommend you to always work a test swatch.
Please NOTE: when changing yarn the garment might have a different look and feel to the garment in the photo, due to individual properties and qualities of each yarn.
See DROPS lesson: Can I use a different yarn than the one mentioned in the pattern?
What are the yarn groups?
All our yarns are categorised into yarn groups (from A to F) according to thickness and knitting tension – group A contains the thinnest yarns and group F the thickest. This makes it easier for you to find alternative yarns to our patterns, should you wish to switch yarn. All yarns within the same group have a similar knitting tension and can easily replace each other. However, different yarn qualities have different structures and properties which will give the finished work a unique look and feel.
How do I use the yarn calculator?
At the top of all our patterns you’ll find a link to our yarn calculator, which is a helpful tool should you wish to use a different yarn than suggested. By filling in the yarn quality you wish to replace, the amount (in your size) and number of strands, the calculator will present good alternative yarns with the same knitting tension. Additionally it will tell you how much you’ll require in the new qualities and whether you’ll need to work with multiple strands. Most skeins are 50g (some are 25g or 100g).
If the pattern is worked with multiple colours, every colour will have to be calculated separately. Similarly, if the pattern is worked with several strands of different yarns (for example 1 strand Alpaca and 1 strand Kid-Silk) you will have to find alternatives for each, individually.
Why do you show discontinued yarns in the patterns?
Since different yarns have different qualities and textures we have chosen to keep the original yarn in our patterns. However, you can easily find options among our available qualities by using our yarn calculator, or simply pick a yarn from the same yarn group.
It is possible that some retailers still have discontinued yarns in stock, or that someone has a few skeins at home that they would like to find patterns for.
The yarn calculator will provide both alternative yarn as well as required amount in the new quality.
What size should I knit?
If you think it's hard to decide what size to make, it can be a good idea to measure a garment you own already and like the size of. Then you can pick the size by comparing those measures with the ones available in the pattern's size chart.
You'll find the size chart at the bottom of the pattern.
See DROPS lesson: How to read size chart
Why do I get the wrong knitting tension with the suggested needle size?
The needle size provided in the pattern serves only as a guide, the important thing is to follow the knitting tension. And since knitting tension is very individual, you will have to adjust the needle size to ensure that YOUR tension is the same as in the pattern – maybe you’ll have to adjust 1, or even 2 needle sizes, up or down to achieve the correct tension. For this, we recommend that you work test swatches.
Should you work with a different knitting tension than the one provided, the measurements of the finished garment might deviate from the measurement sketch.
See DROPS lesson: How to measure your tension/gauge
See DROPS video: How to make a tension/gauge swatch
Why is the pattern worked top-down?
Working a garment top-down provides more flexibility and room for personal adjustment. For example it is easier to try the garment on while working, as well as making adjustments to length of yoke and shoulder caps.
The instructions are carefully explaining every step, in the correct order. Diagrams are adjusted to the knitting direction and are worked as usual.
How do I work according to a knitting diagram?
The diagram depicts all rows/rounds, and every stitch seen from the right side. It is read from bottom to top, from right to left. 1 square = 1 stitch.
When working back and forth, every other row is worked from the right side and every other row is worked from the wrong side. When working from the wrong side, the diagram will have to be worked reversed: from left to right, knit stitches are purled, purl stitches are knit etc.
When working in the round every round is worked from the right side and the diagram are worked from right to left on all rounds.
See DROPS lesson: How to read knitting diagrams
How do I work according to a crochet diagram?
The diagram depicts all rows/rounds, and every stitch seen from the right side. It is worked from bottom to top, from right to left.
When working back and forth every other row is worked from the right side: from right to left and every other row is worked from the wrong side: from left to right.
When working in the round, every row in the diagram are worked from the right side, from right to left.
When working a circular diagram you start in the middle and work your way outwards, counter clockwise, row by row.
The rows usually start with a given number of chain stitches (equivalent to the height of the following stitch), this will either be depicted in the diagram or explained in the pattern.
See DROPS lesson: How to read crochet diagrams
How do I work several diagrams simultaneously on the same row/round?
Instructions for working several diagrams after each other on the same row/round, will often be written like so: “work A.1, A.2, A.3 a total of 0-0-2-3-4 times". This means you work A.1 once, then A.2 is worked once, and A.3 is repeated (in width) the number of times provided for your size – in this case like so: S = 0 times, M = 0 times, L=2 times, XL= 3 times and XXL = 4 times.
The diagrams are worked as usual: begin with the first row in A.1, then work the first row in A.2 etc.
See DROPS lesson: How to read knitting diagrams
See DROPS lesson: How to read crochet diagrams
Why are the sleeves shorter in larger sizes?
The total width of the garment (from wrist-to-wrist) will be larger in the larger sizes, despite the actual sleeves being shorter. The larger sizes have longer sleeve caps and wider shoulders, so there will be a good fit in all sizes.
Where on the garment is the length measured?
The measurement sketch/schematic drawing provides information regarding the full length of the garment. If it’s a jumper or a jacket the length is measured from the highest point on the shoulder closest to the neckline, and straight down to the bottom of the garment. It is NOT measured from the tip of shoulder. Similarly, the length of yoke is measured from the highest point on the shoulder and down to where yoke is split into body and sleeves.
On a jacket measures are never taken along bands, unless specifically stated. Always measure inside band stitches when measuring the length.
See DROPS lesson: How to read a schematic drawing
What is a repeat?
Diagrams are often repeated on the round or in height. 1 repeat is the diagram the way it appears in the pattern. If it says to work 5 repeats of A.1 in the round, then you work A.1 a total of 5 times after/next to each other in the round. If it says to work 2 repeats of A.1 vertically/in height you work the entire diagram once, then begin again at the start and work the entire diagram one more time.
Why does the piece start with more chain stitches than it’s worked with?
Chain stitches are slightly narrower than other stitches and to avoid working the cast-on edge too tight, we simply chain more stitches to begin with. The stitch count will be adjusted on the following row to fit the pattern and measurement sketch.
Why increase before the rib edge when the piece is worked top-down?
The rib edge is more elastic and will contract slightly compared to, for example, stocking stitch. By increasing before the rib edge, you avoid a visible difference in width between the rib edge and the rest of the body.
Why increase in the cast-off edge?
It’s very easy to cast off too tightly, and by making yarn overs while casting off (and simultaneously casting these off) you avoid a too tight cast off edge.
See DROPS video: How to bind off with yarn overs (yo)
How do I increase/decrease on every 3rd and 4th row/round alternately?
To achieve an even increase (or decrease) you can increase on, for example: every 3rd and 4th row alternately, like so: work 2 rows and increase on the 3rd row, work 3 rows and increase on the 4th. Repeat this until the increase is complete.
See DROPS lesson: Increase or decrease 1 st on every 3rd and 4th row alternately
How can I work a jacket in the round instead of back and forth?
Should you prefer to work in the round instead of back and forth, you may of course adjust the pattern. You’ll need to add steeks mid-front (usually 5 stitches), and follow the instructions. When you would normally turn and work from the wrong side, simply work across the steek and continue in the round. At the end you’ll cut the piece open, pick up stitches to work bands, and cover the cut edges.
See DROPS video: How to knit steeks and cut open
Can I work a jumper back and forth instead of in the round?
Should you prefer to work back and forth instead of in the round, you may of course adjust the pattern so you work the pieces separately and then assemble them at the end. Divide the stitches for the body in 2, add 1 edge stitch in each side (for sewing) and work the front and back pieces separately.
See DROPS lesson: Can I adapt a pattern for circular needles into straight needles?
Why is the pattern slightly different than what I see in the photo?
Pattern repeats can vary slightly in the different sizes, in order to get the correct proportions. If you’re not working the exact same size as the garment in the photo, yours might deviate slightly. This has been carefully developed and adjusted so that the complete impression of the garment is the same in all sizes.
Make sure to follow instructions and diagrams for your size!
How do I make a women’s size garment into a men’s size one?
If you have found a pattern you like which is available in women’s size it’s not very difficult to convert it to men’s size. The biggest difference will be the length of sleeves and body. Start working on the women size that you think would fit across the chest. The additional length will be worked right before you cast off for the armhole/sleeve cap. If the pattern is worked top-down you can add the length right after the armhole or before the first decrease on sleeve.
Regarding additional yarn amount, this will depend on how much length you add, but it is better with a skein too many than too few.
How do I prevent a hairy garment from shedding?
All yarns will have excess fibres (from production) that might come off as lint or shedding. Brushed yarns (ie hairier yarns) have more of these loose, excess fibres, causing more shedding.
Shedding also depends on what is worn under or over the garment, and whether this pulls at the yarn fibres. It’s therefore not possible to guarantee that there will be no shedding
Below are some tips on how to get the best result when working with hairier yarns:
1. When the garment is finished (before you wash it) shake it vigorously so the looser hairs come off. NOTE: do NOT use a lint roller, brush or any method that pulls at the yarn.
2. Place the garment in a plastic bag and put it in your freezer - the temperature will cause the fibres to become less attached to each other, and excess fibres will come off easier.
3. Leave in the freezer for a few hours before taking it out and shaking it again.
4. Wash the garment according to the instructions on the yarn label.
Why does my garment pill?
Pilling is a natural process that happens to even the most exclusive of fibers. It's a natural sign of wear and tear that is hard to avoid, and that is most visible in high friction areas of your garment like a sweater's arms and cuffs.
You can make your garment look as new by removing the pilling, using a fabric comb or a pill/lint remover.
Delphine |
|||||||||||||
|
|||||||||||||
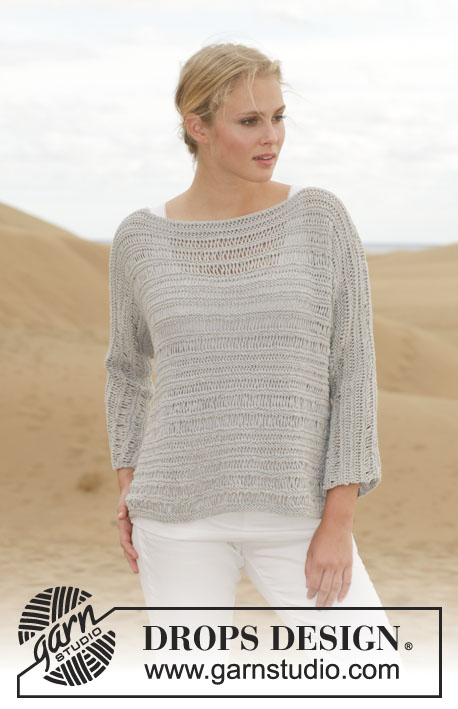
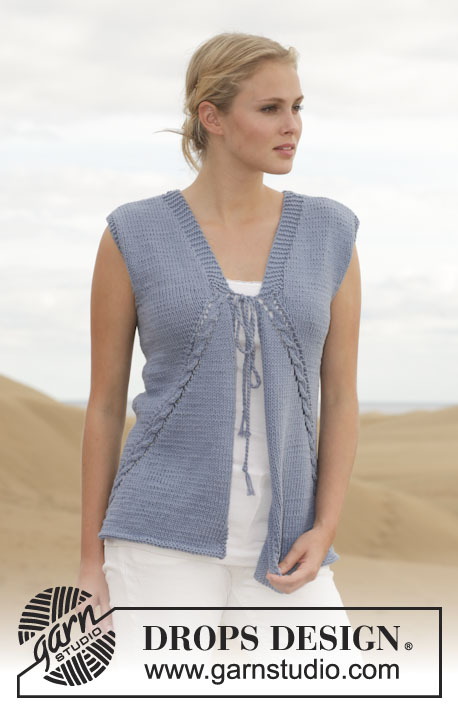
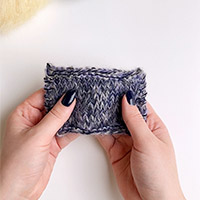
Crochet DROPS vest with fan pattern in ”Muskat”. Size: S - XXXL.
DROPS 153-27 |
|||||||||||||
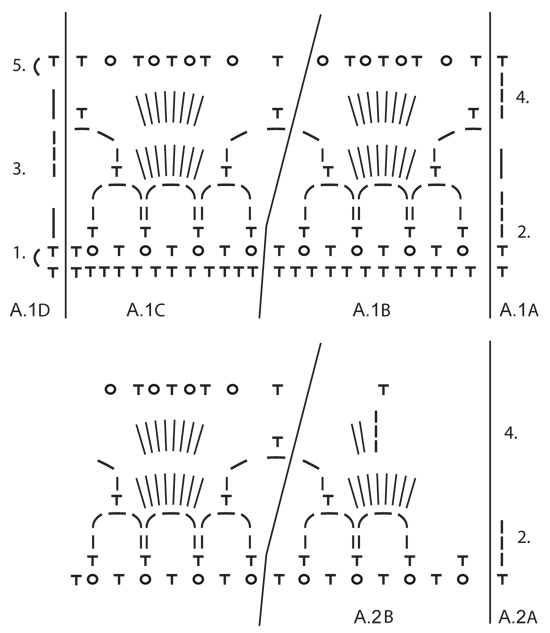
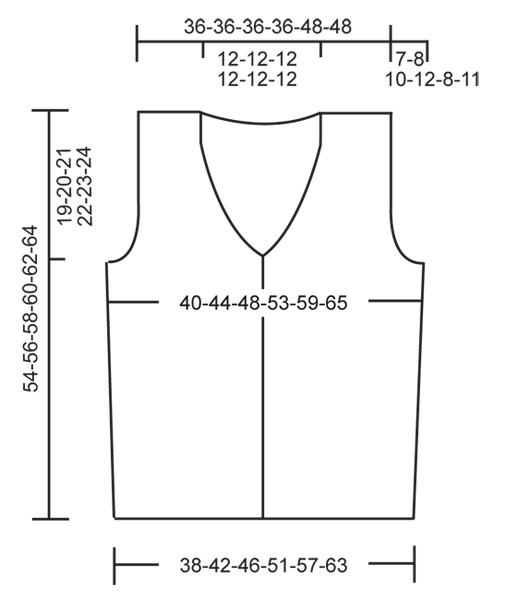
PATTERN: See diagrams A.1 and A.2. In A.1 start to work on the row marked with 1st in the diagram. Repeat rows 2 to 5. In A.2 start to work on the row marked with 2nd in the diagram. SIDE: In the side work tr/dc as shown in diagrams A.1A and A.1D. I.e. Work dc on row 1 and 5 in diagram, work row 2, 3 and 4 with tr. Marker is in the middle of st in each side. -------------------------------------------------------- VEST: Work 155-167-183-199-227-247 LOOSE ch on hook size 4 mm with Muskat. Turn piece. Skip 1st ch, then work 1 dc in every ch the entire row = 154-166-182-198-226-246 dc. Insert 1 marker after 39-42-46-50-57-62 dc in from each side (back piece = 76-82-90-98-112-122 dc). Then work as follows (beg on 1st row in diagram): A.1A, repeat A.1B 2-2-2-2-3-3 times, A.1C, 4-10-18-26-16-26 dc/tr in the SIDE - see explanation above -, repeat A.1B 5-5-5-5-7-7 times, A.1C, 4-10-18-26-16-26 dc/tr in the SIDE – see explanation above, repeat A.1B 2-2-2-2-3-3 times, A.1C and A.1D. Continue to work like this until piece measures approx. 15-15-16-16-17-17 cm. Now inc 1 dc/tr in each side on each side of each marker one time. Inc by working 2 dc/tr in 1 dc/tr on each side of each marker (= 4 dc/tr inc in total). Continue as before with 2 dc/tr more in each side. Continue like this until piece measures approx. 35-36-37-38-39-40 cm, adjust after one whole repetition vertically. Cut the yarn. Now divide the piece and finish each part separately. BACK PIECE: = 3-6-10-14-9-14 dc/tr in each side. Beg by working inside 2-3-7-11-6-11 dc/tr. Work 1-3-3-3-3-3 dc/tr, repeat A.1B 5-5-5-5-7-7 times, A.1C and 1-3-3-3-3-3 dc/tr (2-3-7-11-6-11 dc/tr remain on row), turn piece. Work pattern as before until 0-1-1-1-1-1 dc/tr remain, turn piece. Work pattern as before until 0-1-1-1-1-1 dc/tr remain, turn piece. Work pattern as before until 0-1-1-1-1-1 dc/tr remain, turn piece. Work pattern as before until 0-1-1-1-1-1 dc/tr remain. There are now 1 dc/tr in each side. Continue back and forth with pattern as before and 1 dc/tr in each side. When piece measures approx. 50-52-54-56-58-60 cm (adjust after whole repetition vertically), divide the piece for neck and finish each shoulder separately. RIGHT SHOULDER: Beg in the side. Work over 1 dc/tr in the side, A.1B 1-1-1-1-2-2 times, A.1C and 1 dc/tr. Continue like this until repetition has been worked vertically. Piece measures approx. 54-56-58-60-62-64 cm. LEFT SHOULDER: Work as right but reversed, (i.e. 2 repetitions mid back = neck). RIGHT FRONT PIECE: = 3-6-10-14-9-14 dc/tr in the side.Start mid front and work as follows: A.1A, repeat A.1B 2-2-2-2-3-3 times, A.1C and 1-3-3-3-3-3 dc/tr (2-3-7-11-6-11 dc/tr remain in the side). Turn piece. Work pattern as before. Turn piece. Work pattern as before until 0-1-1-1-1-1 dc/tr remain in the side, turn piece. Work pattern as before, turn piece. Work pattern as before until 0-1-1-1-1-1-1 dc/tr remain in the side, turn piece. Work pattern as before. There are now 1 dc/tr in the side. Continue back and forth with pattern as before. AT THE SAME TIME when 1 repetition has been worked vertically after piece was divided, dec for neck. Work as follows from RS: A.2 A, A.2 B, A.1B 1-1-1-1-2-2 times, A.1C, A.1D. When all dec for armhole and neck are done, work as follows - from mid front: A.1A, A.1B 1-1-1-1-2-2 times, A.1C and A.1D. Continue like this until piece measures approx. 54-56-58-60-62-64 cm (adjust according to back piece to work the no of repetitions on front piece vertically as on back piece). Fasten off. LEFT FRONT PIECE: Work as right front piece but reversed. ASSEMBLY: Sew the shoulder seams. Sew edge to edge with small stitches to avoid a chunky seam. ARMHOLE EDGE: Work an edge around the armhole as follows: ROUND 1: Beg mid under sleeve. Work 1 ch, then work dc around the armhole, finish with 1 sl st in ch from beg of round. ROUND 2: Work 3 ch, then work 1 tr in every dc the entire round, finish with 1 sl st in 3rd ch from beg of round. Fasten off. Work the same way around the other armhole. EDGE AROUND BODY: Work an edge around the body. Beg at the bottom of right front piece, work up along front piece, around the neck, down along left front piece and along bottom edge. Work as follows: ROUND 1: Work 1 ch, then work dc around the body, finish with 1 sl st in ch from beg of round. ROUND 2: 1 ch, then work 1 dc in every dc, finish with 1 sl st in ch from beg of round. ROUND 3: 1 ch, then work 1 dc in first dc, * 3 ch, then work 1 tr in the first of the 3 ch, skip 2 dc, 1 dc in next dc *, repeat from *-* and finish with 1 sl st in ch from beg of round. Fasten off. ASSEMBLY: Sew 2 buttons on left front piece, the top button directly below neck dec and the other approx. 6 cm from first button. Button between tr in edge on right front piece. |
|||||||||||||
Diagram explanations |
|||||||||||||
|
|||||||||||||
Have you made this or any other of our designs? Tag your pictures in social media with #dropsdesign so we can see them! Do you need help with this pattern?You'll find tutorial videos, a Comments/Questions area and more by visiting the pattern on garnstudio.com. © 1982-2024 DROPS Design A/S. We reserve all rights. This document, including all its sub-sections, has copyrights. Read more about what you can do with our patterns at the bottom of each pattern on our site. |
With over 40 years in knitting and crochet design, DROPS Design offers one of the most extensive collections of free patterns on the internet - translated to 17 languages. As of today we count 304 catalogues and 11422 patterns - 11422 of which are translated into English (UK/cm).
We work hard to bring you the best knitting and crochet have to offer, inspiration and advice as well as great quality yarns at incredible prices! Would you like to use our patterns for other than personal use? You can read what you are allowed to do in the Copyright text at the bottom of all our patterns. Happy crafting!
Comments / Questions (86)
Monika Andersen wrote:
DROPS 153-27. I'm confused! Size XL, I understand row 1 as: A.1A- 1x, A.1B- 2x, A1C- 1x, NOW I'M CONFUSED ... Am I suppose to do 26 sc ??? So the "shell" pattern does not go completely around (?) .. it's just in the front and back and under the arms it's either sc or dc dependent on which row your on? Please advise.
19.06.2017 - 23:52DROPS Design answered:
Dear Mrs Andersen, on 1st row in A.1 work (from 1.): A.1D = 1 sc, A.1C (= *1 dc in next st, 1 picot, skip 2 sts* repeat fom *-* a total of 4 times), A.1B (= *1 dc in next st, 1 picot, skip 2 sts*, repeat from *-* a total of 4 times = 1 repeat in width (make 2 repeats)) and A.1A = 1 sc in last sc on row. Happy crocheting!
22.06.2017 - 16:51Janine wrote:
Hallo, ich weiß nicht wir ich in Reihe 2 die 10lm zwischen A1B und A1C unterbringen soll. Das Muster geht dann nicht auf. Gibt es vielleicht ein Video dazu? Vielen Dank für Ihre Hilfe.
14.03.2016 - 15:02DROPS Design answered:
Hallo Janine, haben Sie gesehen, dass wir auf diese Frage von Ihnen bereits geantwortet haben?
14.03.2016 - 15:05Janine wrote:
Hallo, ich weiß nicht wir ich in Reihe 2 die 10lm zwischen A1B und A1C unterbringen soll. Das Muster geht dann nicht auf. Gibt es vielleicht ein Video dazu? Vielen Dank für Ihre Hilfe.
16.02.2016 - 14:55DROPS Design answered:
Liebe Janine, die Linie bezeichnet die Stelle, an der Sie die Stäbchen häkeln. Sie häkeln das Muster bis zur Linie, dann die angegebenen Stäbchen, dann direkt nach der Linie im Muster weiterhäkeln.
08.03.2016 - 08:55Rajiajith wrote:
I cant follow the back piece, i am doing large size.... in back you mentioned to start with 10 dc/sc..... working with 7 dc/sc...then 3 dc/sc.... can u explain where should i put 3 dc .... is it in the place of A1A
22.01.2016 - 04:38DROPS Design answered:
Dear Rajiajith, back piece is "located" where there are 10 dc/sc on each side (size L). Then skp the first 7 sts, and crochet 3 sc/dc (the unworked sts are for armhole), continue in pattern then finish with 3 sc/dc (= 7 sc/dc remain unworked for 2nd armhole). Happy crocheting!
22.01.2016 - 10:44Paula wrote:
Kan men dit voor een 11jarige maken (dus extra smal) ??? voor mijn kleindochter ! bedankt
07.05.2015 - 11:38DROPS Design answered:
Hoi Paula. Je kan het patroon aanpassen om kleiner te zijn. Zie de afmetingen voor de maten onderaan en pas aan volgens de afmetingen van jouw kleindochter.
07.05.2015 - 12:32Ekaterina wrote:
Dear DROPS Design! I have difficulties with edge around the body: how to crochet neck edge in order to save picot pattern?
12.10.2014 - 00:37DROPS Design answered:
Dear Ekaterina, you first work 2 rounds dc (UK-English) around front and back pieces, then work the last roundn with picot around. Happy crocheting!
13.10.2014 - 09:43Susana wrote:
Hola, lo me explicas lo entiendo, lo que no se hacer es como empezar el cuerpo. Un saludo
02.09.2014 - 11:21DROPS Design answered:
Hola Susana. La espalda se empieza dejando sin hacer en la talla S los 2 primeros p.b./p.a. y trabajando en el 3er p.b./p.a.; para la talla M dejamos sin hacer los 3 primeros y trabajamos en el 4º; en la L empezamos en el 8º y así sucesivamente y después se trabaja según el patrón. Los delanteros se trabajan de la misma manera.
04.09.2014 - 10:32Susana wrote:
Hola, estoy realizando el chaleco talla M, y después de poner las separaciones,no se como seguir, si tengo que cortar el hilo y empezar desde el medio, espero vuestra respuesta. gracias
21.08.2014 - 12:22DROPS Design answered:
Hola Susana. Después de trabajar el cuerpo (hasta 36 cm en tu talla) se corta el hilo y cada parte (espalda, hombros y delanteros) se trabaja por separado.
23.08.2014 - 10:54Bernadette wrote:
Ich habe noch eine Frage (sie wurde so ähnlich schon gestellt aber für mich nicht klar genug beantwortet): in Reihe 5 bei A1C (dasselbe gilt auch für A1B) stehen mir aus der 4. Reihe 10 Maschen zur Verfügung um 5 fM und 4 Picot unterzubringen. Dafür müssten mir aber 13 Maschen zur Verfügung stehen um für jede Picot 2 Maschen zu überspringen! Wie soll das bitte gehen?
12.07.2014 - 21:49DROPS Design answered:
Liebe Bernadette, Ihre beiden Fragen müssen an die Designerinnen weitergeleitet werden, da beide Punkte tatsächlich nicht ohne Weiteres zu beantworten sind. Allerings ist man dort gerade vollauf mit der neuen Kolletion beschäftigt, sodass eine Antwort leider noch etwas dauern kann... Ich hoffe, Sie können sich noch ein wenig gedulden!
14.07.2014 - 21:58Bernadette wrote:
Hallo, ich habe gleich eine Frage zum Beginn des Musters: Nach dem Luftmaschenanschlag und der ersten Reihe mit fM steht "mit der 1. R des Diagramms beginnen" und dann die Ausführung: A.1A, A.1B 2x, etc. Laut Diagramm wäre die 1. R aber von links nach rechts zu häkeln und würde mit A.1D beginnen. Wie ist es nun wirklich richtig?
08.07.2014 - 11:49