
Popular categories
Looking for a yarn?


|
|||||||||||||||||||
Verano |
|||||||||||||||||||
|
|
|||||||||||||||||||
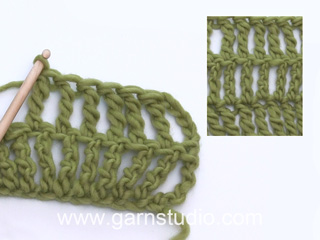
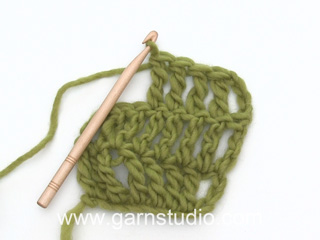
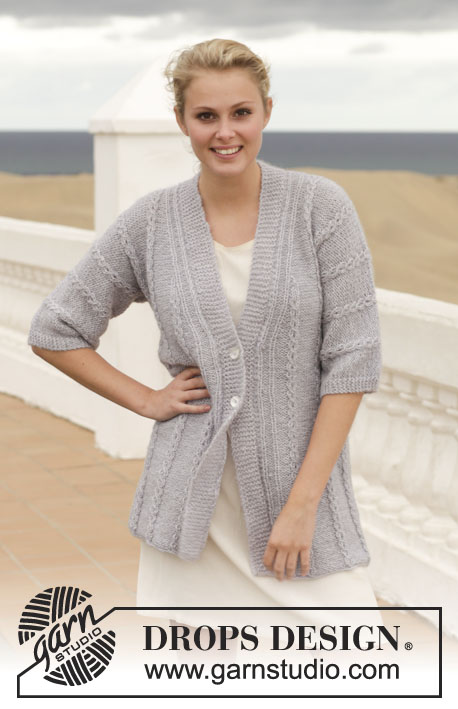
Crochet DROPS jacket with lace pattern and treble crochet in ”Cotton Merino”. Size: S - XXXL.
DROPS 153-14 |
|||||||||||||||||||
|
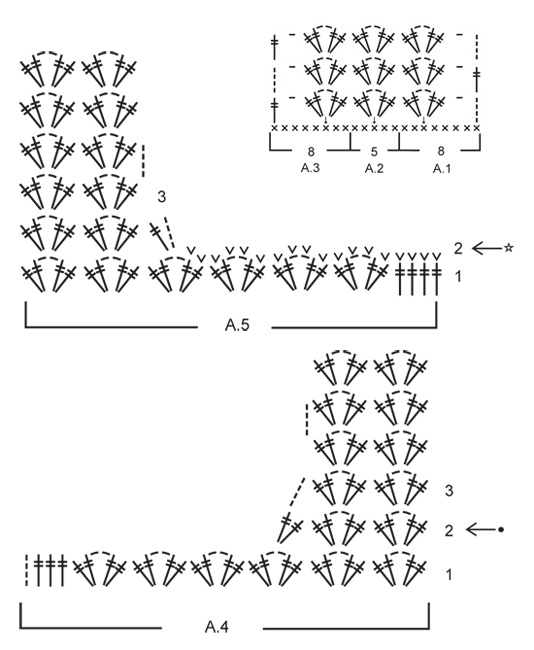
CROCHET INFO: Replace first tr at beg of every tr row with 4 ch. PATTERN: See diagrams A.1 - A.5. CROCHET TIP: ROW 1 in diagram A.4 and A.5 are not worked on back piece but on front piece. BUTTONHOLES: Do not dec for buttonholes but sew the buttons on to left band and button between two tr/dtr in right band. Sew on buttons measured from cast-on edge as follows: SIZE S/M: 12, 20, 28, 36 and 44 cm / 4 3/4",8",11",14 1/4",17 1/4" SIZE L/XL: 14, 22, 30, 38 and 46 cm / 5½",8 3/4",11 3/4",15",18" SIZE XXL: 10, 20, 30, 40 and 50 cm / 4",8",11 3/4",15 3/4",19 3/4" SIZE XXXL: 12, 22, 32, 42 and 52 cm / 4 3/4",8 3/4",12½",16½",20½" ---------------------------------------------------------- BACK PIECE: Worked back and forth. Work 83-95-108-120 ch on hook size 5 mm / H/8 with Cotton Merino. Work first row as follows (= WS): 1 sc in 2nd ch from hook = 1 sc, 1 sc in each of the next 1-3-1-3 ch, * skip ch 1, 1 sc in each of the next 4 ch *, repeat from *-* 16-18-21-23 times = 66-76-86-96 sc. Continue to work as follows: ROW 1 (= RS): Work A.1 1 time, then work A.2 until 8 sc remain (= 10-12-14-16 times in width) and finish with A.3 1 time. REMEMBER THE CROCHET GAUGE! ROW 2 (= WS): Turn piece and work A.3 1 time, A.2 (= 10-12-14-16 times in width), A.1 1 time. ROW 3 (= RS): Turn piece and work A.1 1 time, A.2 (= 10-12-14-16 times in width), A.3 1 time. Repeat 2nd and 3rd row until piece measures approx. 29-28-28-29 cm / 11½"-11"-11"-11½'' - adjust to finish with 3rd row (= RS). Fasten off. Continue to work as follows: * Work 10-5-5-5 loose ch, beg from WS and continue A.3, A.2 and A.1 over back piece as before and finish with 10-5-5-5 loose ch, turn piece. Continue to work as follows: ROW 1 (= RS): Work ch 5, in 10th ch from hook work 2 tr + 2 ch + 2 tr (= 1 repetition of A.1), work A.2 2-1-1-1 time (work last repetition of A.2 around the 2 ch in A.1 from previous row). Then continue with A.2 10-12-14-16 times in total over the entire back piece as before and finish row as follows: Work A.2 around the 2 ch in A.3 from previous row, then continue with A.2 1-0-0-0 times, and then A.3 the last 1 tr will be in 1st ch on previous row. Finish with 1 tr in 1st ch on previous row. Cut the yarn and turn piece *, in size L/XL – XXL – XXXL repeat *-* 1 more time, AT THE SAME TIME work 2 extra repetitions of A.2 over back piece. I.e. work 1 extra repetition of A.2 over the inc repetition from previous row in each side of piece = 16-18-20 repetitions in total of A.2 in size L/XL – XXL – XXXL. NOTE! Do not repeat *-* in size S/M but continue as explained below: Work 13-13-13-13 loose ch, beg from WS and continue with A.2 in ch-space from A.3 on previous row, A.2 over sleeves and back piece as before, and A.2 in ch-space in A.1 on previous row and finish with 13-13-13-13 loose ch. Continue to work as follows: ROW 1 (= RS): Work A.1 and A.2 1 time over the new sts. Continue with A.2 over sleeves and back piece as before and finish with 1 repetition of A.2 and A.3. Continue this pattern until piece measures approx. 49-51-55-57 cm / 19 1/4"-20"-21½"-22½" - adjust to finish after a row from WS. Then finish each shoulder separately as follows: RIGHT SHOULDER: Work A.1 1 time and A.2 5-6-6-7 times in total, then work 2nd row of diagram A.4 – READ CROCHET TIP! Turn and work 3rd row of A.4, and continue row with A.2 and A.1 as before. Continue like this until piece measures 52-54-58-60 cm / 20½"-21 1/4"-22 3/4"-23½" in total. Fasten off. LEFT SHOULDER: Work left shoulder the same way but reversed, and work A.3 instead of A.1 and 2nd row of A.5 instead of A.4. Beg with 2nd row of A.5 in the middle of row, so that there are 4-4-6-6 repetitions of A.2 in width for neck. RIGHT FRONT PIECE: Worked back and forth. Work 45-52-58-64 ch on hook size 5 mm / H/8 with Cotton Merino. Work first row as follows (= WS): 1 sc in 2nd ch from hook, 1 sc in each of the next 4-1-2-3 ch, * skip ch 1, 1 sc in each of the next 4 ch *, repeat from *-* 7-9-10-11 times in total and finish with 1 sc in each of the next 4 ch = 37-42-47-52 sc. ROW 1 (= RS): 4 ch (= 1 tr), 1 tr in each of the next 3 sc (= 4 tr for band) NOTE: Work band with every other row tr and dtr. Then work A.2 5-6-7-8 times in total, finish with A.3 1 time. Repeat this pattern, with 4 tr/dtr for band towards mid front until piece measures approx. 29-28-28-29 cm / 11½"-11"-11"-11½'' – adjust according to back piece and finish with a row from RS. Fasten off. Then work 10-5-5-5 loose ch for sleeve and continue as on back piece. When piece measures 42-44-46-48 cm / 16½"-17 1/4"-18"-19", work as follows on 1st row from WS: Pattern as before until 3 repetitions of A.2 and 4 tr remain. Work pattern according to diagram A.5 over these sts. Turn and work A.5, continue row with pattern as before. Continue like this back and forth until piece measures 52-54-58-60 cm / 20½"-21 1/4"-22 3/4"-23½" in total. Fasten off. LEFT FRONT PIECE: Work as right but reversed. Work according to diagram A.1 instead of A.3, and when neck dec beg, work according to A.4 instead of A.5. ASSEMBLY: Place front piece on top of back piece and work the shoulders as follows: * 1 sc through both layers, ch 3, skip 2 tr *, repeat from *-*. Work the sides tog as follows: 1 sc, * ch 3, 1 sc in ch-space on next row *, repeat from *-*. Work tog under sleeves as follows: * 1 sc in ch in next tr-group, 3 ch *, repeat from *-* and finish with 1 sc. Sew buttons on left band and button through two tr/dtr in right band. NECK EDGE: Work a neck edge as follows, beg from WS: ROW 1: Fasten yarn with 1 sc at the edge, * ch 3, skip approx. 2 cm / 3/4'', 1 sc *, repeat from *-* around the entire neck edge. Turn piece. ROW 2: ch 4, 3 tr in first ch-space, * 3 tr in next ch-space *, repeat from *-* along the entire row, and finish with 1 tr in first ch on previous row. Turn piece. ROW 3: * ch 3, skip 3 tr, 1 sc between the next two tr-groups *, repeat from *-* along the entire row. Turn piece. ROW 4: ch 2, 1 sc in first ch-space, * ch 2, 1 sc in next ch-space *, repeat from *-* along the entire row. Fasten off. |
|||||||||||||||||||
Diagram explanations |
|||||||||||||||||||
|
|||||||||||||||||||
|
|||||||||||||||||||
|
|||||||||||||||||||
|
Have you made this or any other of our designs? Tag your pictures in social media with #dropsdesign so we can see them! Do you need help with this pattern?You'll find tutorial videos, a Comments/Questions area and more by visiting the pattern on garnstudio.com. © 1982-2024 DROPS Design A/S. We reserve all rights. This document, including all its sub-sections, has copyrights. Read more about what you can do with our patterns at the bottom of each pattern on our site. |
|||||||||||||||||||


With over 40 years in knitting and crochet design, DROPS Design offers one of the most extensive collections of free patterns on the internet - translated to 17 languages. As of today we count 304 catalogs and 11422 patterns - 11417 of which are translated into English (US/in).
We work hard to bring you the best knitting and crochet have to offer, inspiration and advice as well as great quality yarns at incredible prices! Would you like to use our patterns for other than personal use? You can read what you are allowed to do in the Copyright text at the bottom of all our patterns. Happy crafting!
Comments / Questions (108)
Why do I need to lose 3 in first row? Why and how? I don't understand the instruction: 1sc in each of the next 1-3 1-3 ch.
24.04.2017 - 21:28DROPS Design answered:
Dear Sonja, according to the instruction you mention, you should crochet 1 sc in each of the 1-3-1-3 stitch. These numbers for the sizes, in other words 1 stitch for the size S/M; 3 stitch for the size L /XL, 1 stitch for the size XXL, and 3 stitch for the size XXL. Also, you leave out 1 chain stitches, in order to have the edge not as tight, a bit more elastic. I hope, this helped. Happy crocheting!
24.04.2017 - 23:05I'm sorry. I'm still confused. I finished the back piece, fastened off, chained 5, reattached, but now I have these 5 chains just hanging off the edge. I'm also confused as to how to work the end with the chain 5. Is there a video?
13.04.2017 - 22:34DROPS Design answered:
Dear Mrs Greaves, you can find here a tutorial with pictures showing how to work the sleeves with the 5 ch at the beg and end of row. Happy crocheting!
18.04.2017 - 09:35I have read the responses for the back and I am still confused about what to do after the back measures 11". If I fasten off, where do I reattach the yarn to do the chain 5? I'm assuming the ch 5 at each end is the sleeves.
11.04.2017 - 00:58DROPS Design answered:
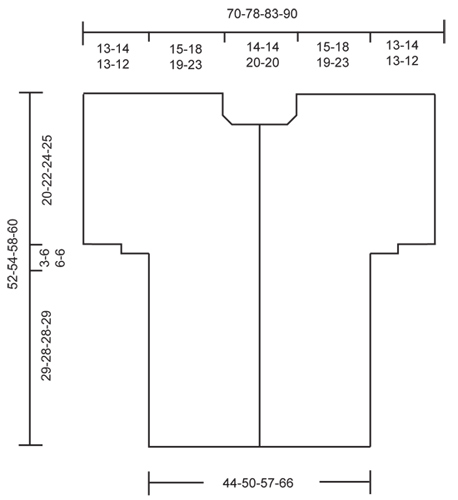
Dear Robyn! You are right - the 5 ch at each end are the sleeves. Just attach them to the edge of your work - please see the schematic drawing at the end of the pattern. Happy knitting!
11.04.2017 - 13:30Hola, soy Merche, me estoy haciendo esta bonita chaqueta y por mas que me leo el patrón no acabo de entender como se unen la espalda con los delanteros y también me gustaría saber si los delanteros por la parte que se unen a la espalda empiezan de la misma forma que la espalda como A 1 y acaban como A 3 . Le agradecería que me lo aclarara, un saludo. Merche
06.04.2017 - 00:05DROPS Design answered:
Hola Merche. La chaqueta se trabaja de abajo a arriba. Las mangas se trabajan junto con el cuerpo, montando las cadenetas adicionales. Al finalizar la espalda y el delantero, se unen a ganchillo en la parte del hombro/manga. Mira los diagramas A.4 y A.5 para trabajar la parte del escote.
14.04.2017 - 12:11So I just want to make sure I understand this right. Once I finish the back side I cut yarn. Then I chain ten for small and attach it to to the wrong side where I cut yarn? I'm not sure where I'm supposed to add the ten back. I understand that I need the ten extra on each side for the sleeves.
26.03.2017 - 00:25DROPS Design answered:
Dear Christina, after you have cut the yarn on bottom of back piece, chain 10, then work over sts on bottom of back piece as before, ie from WS A.3, A.2 and A.1 as before and finih row with 10 ch (= inc for sleeve), then turn and work next row from RS as described, ie in the 10 ch for sleeve on each side and over A.1, A.2 and A.3. Happy crocheting!
27.03.2017 - 09:10Ciao, quando si procede alla confezione conviene mettere i pezzi rovescio su rovescio oppure no? Grazie!!
13.03.2017 - 15:08DROPS Design answered:
Buongiorno Giulia. Dovrebbe unire i pezzi sul diritto del lavoro. Buon lavoro!
13.03.2017 - 15:41Renay wrote:
HI, I am confused with the instructions for the front piece. From 'when piece measures 42cm'...................I get the bit of pattern as before until 3 repetitions of A2 and 4tr remain. Then I start with A5 and work as per the diagram. How many repetitions should I have left after that? I have finished the front according to what I thought, but the inside sleeve piece does'nt fit exactly to the back sleeve. Is that correct and when I join the two, I éase'the one to fit the back?
24.02.2017 - 19:26DROPS Design answered:
Dear Mrs Renay, when piece measures 42 cm, finish row as shown in A.5 (= read diagram from left towards right on 1st row = from WS), then turn, and work row 2 in A.5 from RS = sl st into the first sts as shown, then continue as before on the last sts on row. Turn and work as before finish row with A.5 from WS, and start row with A.5 from RS. Dec for neck are shown in A.5. Sleeve on front piece should fit back piece, you have to adjust that the first row for sleeve on right front piece is worked from WS. Happy crocheting!
27.02.2017 - 08:52Miten tämä malli aloitetaan minulla on 108kjs?
20.01.2017 - 10:17DROPS Design answered:
Voit käydä paikallisessa DROPS-jälleenmyyjäliikkeessäsi, he auttavat sinua mielellään paikan päällä.
30.01.2017 - 17:32Bonjour j ai commencer ce patron en s/m j ai monter mon dos et mais 2 devant jusqu a 29 cm mais la je suis bloquer je ne comprend pas les explications pour continuer. Pouvez vous m expliquer svp merci
09.08.2016 - 23:30DROPS Design answered:
Bonjour Mia, retrouvez en images dans le lien ci-dessous (voir réponse précédente) comment procéder pour les manches. Bon crochet!
10.08.2016 - 08:41Bonjour j ai commencer ce patron en s/m j ai monter mon dos et mais 2 devant jusqu a 29 cm mais la je suis bloquer je ne comprend pas les explications pour continuer. Pouvez vous m expliquer svp merci
08.08.2016 - 00:16DROPS Design answered:
Bonjour Mia, vous trouverez ici un tuto en photos expliquant comment faire les emmanchures. N'hésitez pas à rejoindre le forum pour toute assistance complémentaire. Bon crochet!
08.08.2016 - 10:07