
Popular categories
Looking for a yarn?


|
|||||||||||||
Ladylike |
|||||||||||||
 |
 |
||||||||||||
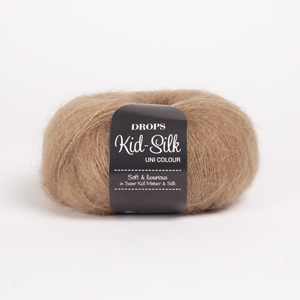
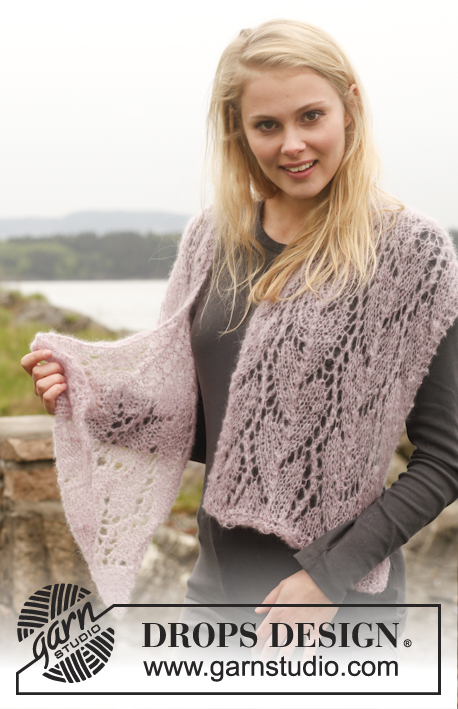
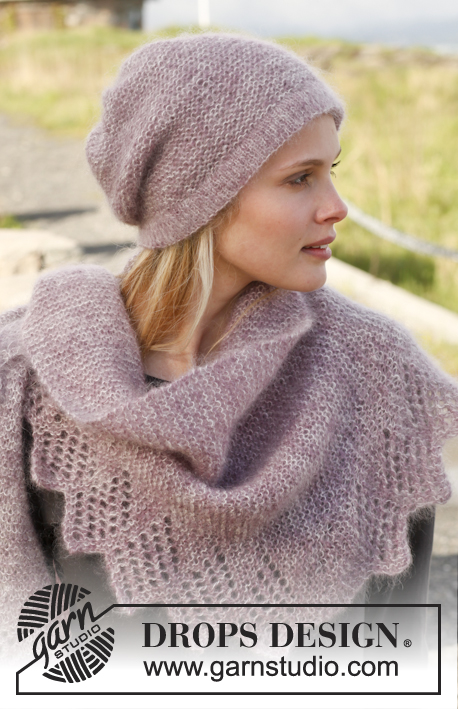
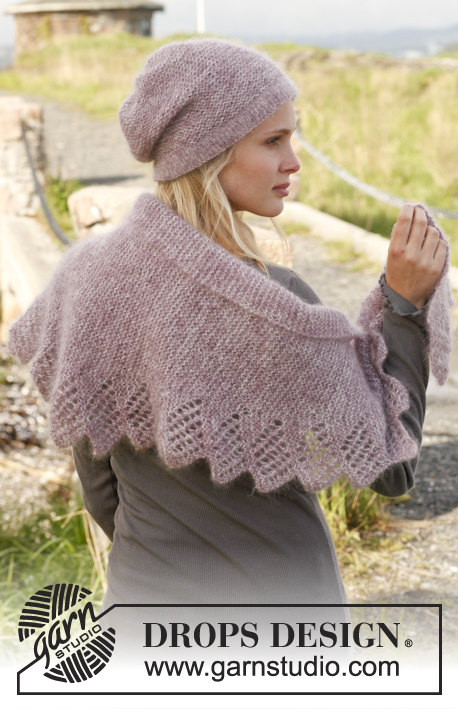
Set consists of: Knitted DROPS hat and shawl in garter st with lace pattern in 2 strands ”Kid-Silk”.
DROPS 151-8 |
|||||||||||||
|
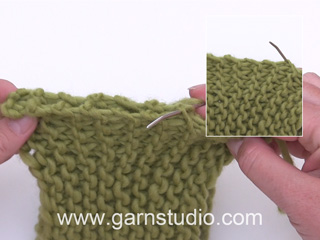
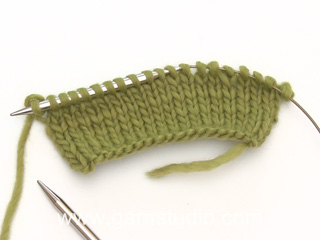
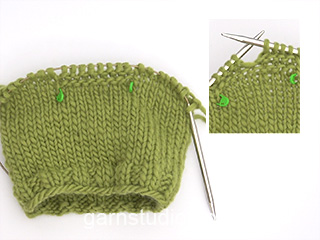
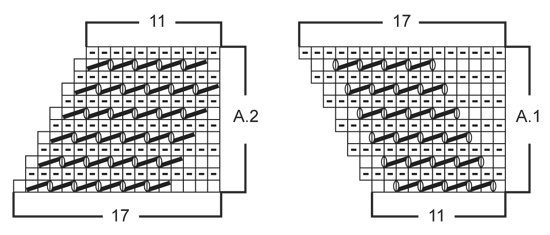
GARTER ST (back and forth on circular needle): K all rows. 1 ridge = 2 rows K. INCREASE TIP: Inc 1 st by making 1 YO, K YO twisted on next row to avoid holes. PATTERN: See diagrams A.1 and A.2. The diagrams show all rows in pattern seen from RS. SHORT ROWS 1: Work short rows to get a nice shape on lace edge as follows: Beg from RS and K over all sts, turn piece and K 17 from WS (i.e. until marker), turn piece and K 17 from RS, turn piece, cast off the first 6 sts and K over all sts on row = 1 repetition with short rows. SHORT ROWS 2: Beg from RS and K over all sts, turn piece and K 11 from WS (i.e. until marker), turn piece and K 11 from RS, turn piece and K 8 from WS, turn piece and K 8 from RS, turn piece and K 5 from WS, turn piece and K 5 from RS, turn piece and K 2 from WS, turn piece and K 2 from RS. Work 2 ridges in garter st back and forth over all 68 sts, the shawl has been worked to the middle. Then work as follows, beg from WS: K 2, turn piece and K 2 from RS, turn piece and K 5 from WS, turn piece and K 5 from RS, turn piece and K 8 from WS, turn piece and K 8 from RS, turn piece and K 11 from WS, turn piece and K 11 from RS, turn piece and K back over all sts = 1 repetition with short rows. SHORT ROWS 3: Beg from RS, K over all sts and cast on 6 new sts at end of row, turn piece and K 17 from WS (i.e. until marker), turn piece and K 17 from RS, turn piece and K back over all sts on row = 1 repetition with short rows. DECREASE TIP: Dec 1 st by K 2 sts tog. ---------------------------------------------------------- HAT: Worked back and forth on circular needle. Cast on 100 sts with 1 strand of each colour (= 2 strands) on circular needle size 3.5 mm. Work in stocking st for 3 cm with 1 edge st in GARTER ST in each side - see explanation above. K 1 row from WS (= folding edge) and continue in stocking st with 1 edge st in garter st in each side for 3 cm – adjust so that next row is from RS. Switch to circular needle size 5 mm and work 1 ridge in garter st AT THE SAME TIME dec 16 sts evenly on 1st row = 84 sts. NOW MEASURE THE PIECE FROM HERE. Continue in garter st back and forth until piece measures 20 cm. On next row from RS K all sts tog 2 by 2 = 42 sts remain on needle. K 3 rows. On next row (= RS) K all sts tog 2 by 2 = 21 sts remain on needle. K 3 rows. On next row (= RS) K all sts tog 2 by 2 = 11 sts remain on needle. Cut the yarn and pull it through the remaining sts, tighten tog and fasten. ASSEMBLY: Fold the bottom edge on hat double towards WS in folding edge and fasten with small stitches - make sure to avoid a tight seam. Then sew hat tog mid back, sew in front loop of outermost st to avoid a chunky seam. Hat measures approx. 26 cm vertically (incl 3 cm edge at the bottom). ---------------------------------------------------------- SHAWL: Shawl is worked in garter st with an edge in lace pattern and worked back and forth on circular needle. Cast on 14 sts on circular needle size 5 mm with 1 strand of each colour (= 2 strands). Work 1 ridge in GARTER ST - see explanation above (1st row = RS). Then work as follows: Row 1 (= RS): K 3, insert 1 marker, work pattern according to diagram A.1 (= 11 sts) = 15 sts on needle, turn piece. Row 2 (= WS): Work A.1 over the first 12 sts, marker, K the rest of row, turn piece. Row 3 (= RS): K until marker, 1 YO – READ INCREASE TIP, marker, A.1 over the last 12 sts = 17 sts on row, turn piece. Row 4 (= WS): Work A.1 over the first 13 sts, marker, K YO twisted and K the rest of row, turn piece. Row 5 (= RS): K until marker and work A.1 over the last 13 sts = 18 sts on row, turn piece. Row 6 (= WS): Work A.1 over the first 14 sts, marker, K the rest of row, turn piece. Row 7 (= RS): K until marker, 1 YO (READ INCREASE TIP), marker, A.1 over the last 14 sts = 20 sts on row, turn piece. Row 8 (= WS): Work A.1 over the first 15 sts, marker, K the rest of row, turn piece. Row 9 (= RS): K until marker, A.1 over the last 15 sts = 21 sts on row, turn piece. Row 10 (= WS): Work A.1 over the first 16 sts, marker, K the rest of row, turn piece. Row 11 (= RS): K until marker, 1 YO, marker, A.1 over the last 16 sts = 23 sts on row, turn piece. Row 12 (= WS): Work A.1 over the first 17 sts, marker, K the rest of row. 1 repetition with A.1 has now been worked and 3 sts have been inc in garter st before marker (seen from RS). Work 1 repetition with SHORT ROWS 1 - see explanation above, over sts in lace edge (do not work the other sts on row). Then work alternately 1 repetition A.1 vertically and 1 repetition SHORT ROWS 1 (NOTE: Every time 1st row in A.1 is worked, there will be 3 sts more before marker). REMEMBER THE KNITTING TENSION! When A.1 and SHORT ROWS 1 have been worked 18 times vertically in total, there are 57 sts in garter st before marker and 11 sts in lace edge after marker = 68 sts on needle. Work 1 repetition SHORT ROWS 2 - see explanation above. After short rows 2 work 1 repetition with SHORT ROWS 3 - see explanation above = 74 sts on needle. Then work back and forth over all sts as follows: Row 1 (= RS): K until marker, work pattern according to diagram A.2 (= 17 sts) = 73 sts on row, turn piece. Row 2 (= WS): Work A.2 over the first 16 sts, marker, K the rest of row, turn piece. Row 3 (= RS): K until 2 sts remain before marker, K 2 tog, marker, A.2 over the last 16 sts = 71 sts on row, turn piece. Row 4 (= WS): Work A.2 over the first 15 sts, marker, K the rest of row, turn piece. Row 5 (= RS): K until marker and work A.2 over the last 15 sts = 70 sts on row, turn piece. Row 6 (= WS): Work A.2 over the first 14 sts, marker, K the rest of row, turn piece. Row 7 (= RS): K until 2 sts remain before marker, K 2 tog, marker, A.2 over the last 14 sts = 68 sts on row, turn piece. Row 8 (= WS): Work A.2 over the first 13 sts, marker, K the rest of row, turn piece. Row 9 (= RS): K until marker and work A.2 over the last 13 sts = 67 sts on row, turn piece. Row 10 (= WS): Work A.2 over the first 12 sts, marker, K the rest of row, turn piece. Row 11 (= RS): K until 2 sts remain before marker, K 2 tog, marker, A.2 over the last 12 sts = 65 sts on row, turn piece. Row 12 (= WS): Work A.2 over the first 11 sts, marker, K the rest of row, turn piece. 1 repetition with A.2 has now been worked and 3 sts have been dec in garter st before marker (seen from RS). Work 1 repetition with SHORT ROWS 3 - see explanation above, over sts in lace edge (do not work the other sts on row). Then work alternately 1 repetition A.2 vertically and 1 repetition SHORT ROWS 3 (NOTE: Every time 1st row in A.2 is worked, there will be 3 sts less before marker). When A.2 and SHORT ROWS 3 have been worked 18 times vertically in total there are 14 sts on needle. Work 1 ridge in garter st over all sts and loosely cast off. Shawl measures approx. 145 cm in width and approx. 40 cm in the middle. |
|||||||||||||
Diagram explanations |
|||||||||||||
|
|||||||||||||
|
|||||||||||||
|
Have you made this or any other of our designs? Tag your pictures in social media with #dropsdesign so we can see them! Do you need help with this pattern?You'll find tutorial videos, a Comments/Questions area and more by visiting the pattern on garnstudio.com. © 1982-2024 DROPS Design A/S. We reserve all rights. This document, including all its sub-sections, has copyrights. Read more about what you can do with our patterns at the bottom of each pattern on our site. |
|||||||||||||


With over 40 years in knitting and crochet design, DROPS Design offers one of the most extensive collections of free patterns on the internet - translated to 17 languages. As of today we count 304 catalogues and 11422 patterns - 11422 of which are translated into English (UK/cm).
We work hard to bring you the best knitting and crochet have to offer, inspiration and advice as well as great quality yarns at incredible prices! Would you like to use our patterns for other than personal use? You can read what you are allowed to do in the Copyright text at the bottom of all our patterns. Happy crafting!
Comments / Questions (78)
Ich stricke mir gerade das Set, ein Traum, tolle Farbe und Dank der guten Anleitung sehr gutes Nacharbeiten! Vielen Dank! 😀
31.10.2015 - 10:46MARIA CHOUMANIDI wrote:
Hello. I am knitting the second half of the shawl and I noticed that the lace part has one YO less compared to the lace of the first part. Am I doing something wrong or is this how the pattern works? Thank you
04.10.2015 - 08:45DROPS Design answered:
Dear Mrs Choumanidi, that's correct, when working 11th row (= from RS) in the 2nd part, you dec 2 sts: K2 tog before marker + 1 st in A.2 = 65 sts remain. Happy knitting!
05.10.2015 - 09:51Hab die Teile gestrickt und verschenkt. Am liebsten würde ich sie auch haben. Besonders das Tuch - ein Traum.
05.09.2015 - 19:55Je suis ravie de ce patron; un vrai plaisir à tricoter et un si beau résultat, merci à vous!
04.09.2015 - 18:40Muß ich nach 18 mal stricken von A1 auch noch verkürzte Reihe-1 durchführen und 6 Maschen abketteln? Und danach erst verkürzte Reihen -2 und -3 ?
14.02.2015 - 14:15DROPS Design answered:
Sie stricken ja immer abwechselnd A.1 und verkürzte R-1 (also A.1, verkürzte R-1, A.1, verkürzte-R 1, A.1, verkürzte R-1 usw.), das Ganze 18x, dabei enden Sie mit verkürzte R-1 (komplett wie beschrieben, mit Abketten) und stricken direkt anschließend verkürzte R-2, dann verkürzte R-3.
15.02.2015 - 20:39Ok, Askepott har ikke gitt seg! Har strikket prøve, som jeg anbefaler til alle nybegynnerne(!) og plutselig skjønt mønstere, hurra! Nå er det kjempegøy, og skjerfet blir veldig delikat. Men: det er fremdeles ikke særlig gøy å strikke spindelvev! :-) Lykke til alle!
26.11.2014 - 14:28Hei, jeg har problemer allerede i begynnelsen. Legg opp 14 masker, strikk de første 3 masker, strikk A1=11 masker, hvordan kan jeg få 15 masker her? 3+11=14 Til dette tidspunktet ser jeg ikke at man skulle øke. Kan dere hjelpe? Fortvilet hilsen :-/
26.11.2014 - 06:55DROPS Design answered:
Hej Karin, jo men du øger 1m allerede på 1.p i diagrammet. God fornøjelse!
26.11.2014 - 14:59For et fint skjerf, tenkte jeg og satt i gang, men: dette er ikke en fin strikkeopplevelse:-( Jeg føler meg som Askepott som skal strikke spindelvev med tjukke greiner:-(( siden tråden er doppelt, er det ekstra vanskelig! Respekt for alle som har klart det skjerfet:-) kan ikke tenke meg at jeg fortsetter :-(
25.11.2014 - 23:32Josee wrote:
I've practiced the shawl pattern with regular worsted yarn...because short rows were new to me and had misfortunes with previous patterns that required Kid-Silk. I've successfully made the shawl with Kid-Silk (as a gift) and the end result is wonderful. :)
21.11.2014 - 22:18Come posso far diventare la sciarpa uno scaldacollo ?
17.08.2014 - 10:18DROPS Design answered:
Buongiorno Anna, il modello che ha scelto è uno scialle, ed è un pò difficile farlo diventare uno scaldacollo. Ci sono parecchi modelli di scaldacollo nel database, provi a dare un'occhiata. Buon lavoro!!
17.08.2014 - 10:26