
Popular categories
Looking for a yarn?


|
|||||||||||||
Ladylike |
|||||||||||||
 |
 |
||||||||||||
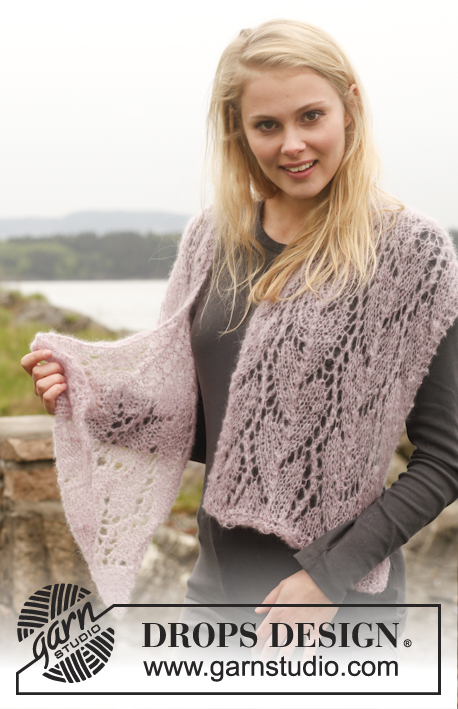
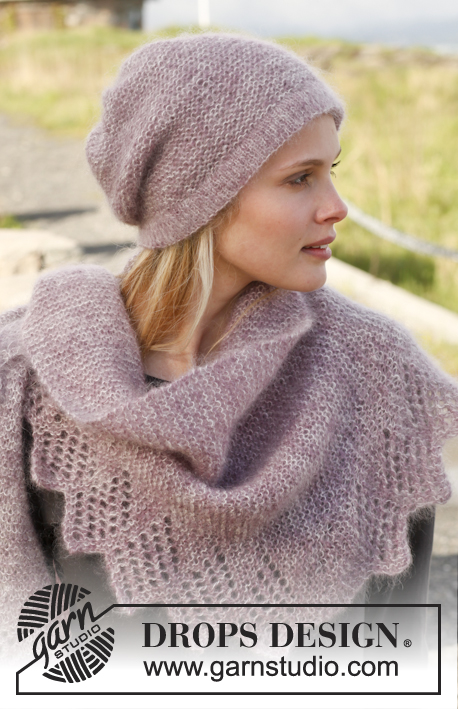
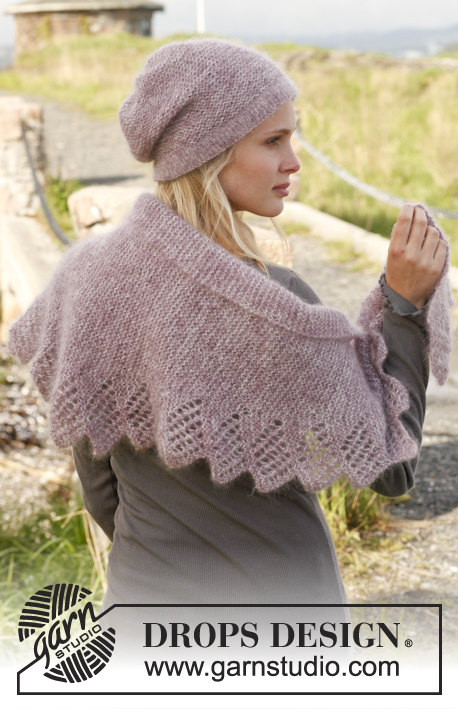
Set consists of: Knitted DROPS hat and shawl in garter st with lace pattern in 2 strands ”Kid-Silk”.
DROPS 151-8 |
|||||||||||||
|
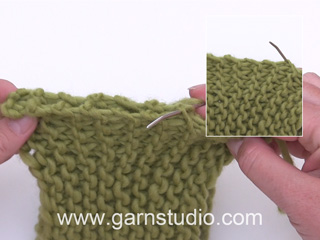
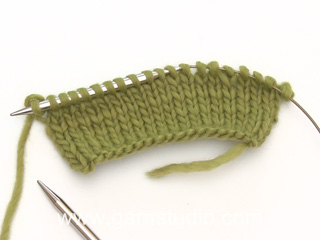
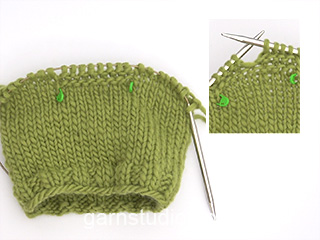
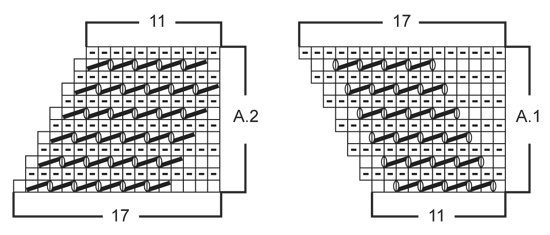
GARTER ST (back and forth on circular needle): K all rows. 1 ridge = 2 rows K. INCREASE TIP: Inc 1 st by making 1 YO, K YO twisted on next row to avoid holes. PATTERN: See diagrams A.1 and A.2. The diagrams show all rows in pattern seen from RS. SHORT ROWS 1: Work short rows to get a nice shape on lace edge as follows: Beg from RS and K over all sts, turn piece and K 17 from WS (i.e. until marker), turn piece and K 17 from RS, turn piece, cast off the first 6 sts and K over all sts on row = 1 repetition with short rows. SHORT ROWS 2: Beg from RS and K over all sts, turn piece and K 11 from WS (i.e. until marker), turn piece and K 11 from RS, turn piece and K 8 from WS, turn piece and K 8 from RS, turn piece and K 5 from WS, turn piece and K 5 from RS, turn piece and K 2 from WS, turn piece and K 2 from RS. Work 2 ridges in garter st back and forth over all 68 sts, the shawl has been worked to the middle. Then work as follows, beg from WS: K 2, turn piece and K 2 from RS, turn piece and K 5 from WS, turn piece and K 5 from RS, turn piece and K 8 from WS, turn piece and K 8 from RS, turn piece and K 11 from WS, turn piece and K 11 from RS, turn piece and K back over all sts = 1 repetition with short rows. SHORT ROWS 3: Beg from RS, K over all sts and cast on 6 new sts at end of row, turn piece and K 17 from WS (i.e. until marker), turn piece and K 17 from RS, turn piece and K back over all sts on row = 1 repetition with short rows. DECREASE TIP: Dec 1 st by K 2 sts tog. ---------------------------------------------------------- HAT: Worked back and forth on circular needle. Cast on 100 sts with 1 strand of each colour (= 2 strands) on circular needle size 3.5 mm. Work in stocking st for 3 cm with 1 edge st in GARTER ST in each side - see explanation above. K 1 row from WS (= folding edge) and continue in stocking st with 1 edge st in garter st in each side for 3 cm – adjust so that next row is from RS. Switch to circular needle size 5 mm and work 1 ridge in garter st AT THE SAME TIME dec 16 sts evenly on 1st row = 84 sts. NOW MEASURE THE PIECE FROM HERE. Continue in garter st back and forth until piece measures 20 cm. On next row from RS K all sts tog 2 by 2 = 42 sts remain on needle. K 3 rows. On next row (= RS) K all sts tog 2 by 2 = 21 sts remain on needle. K 3 rows. On next row (= RS) K all sts tog 2 by 2 = 11 sts remain on needle. Cut the yarn and pull it through the remaining sts, tighten tog and fasten. ASSEMBLY: Fold the bottom edge on hat double towards WS in folding edge and fasten with small stitches - make sure to avoid a tight seam. Then sew hat tog mid back, sew in front loop of outermost st to avoid a chunky seam. Hat measures approx. 26 cm vertically (incl 3 cm edge at the bottom). ---------------------------------------------------------- SHAWL: Shawl is worked in garter st with an edge in lace pattern and worked back and forth on circular needle. Cast on 14 sts on circular needle size 5 mm with 1 strand of each colour (= 2 strands). Work 1 ridge in GARTER ST - see explanation above (1st row = RS). Then work as follows: Row 1 (= RS): K 3, insert 1 marker, work pattern according to diagram A.1 (= 11 sts) = 15 sts on needle, turn piece. Row 2 (= WS): Work A.1 over the first 12 sts, marker, K the rest of row, turn piece. Row 3 (= RS): K until marker, 1 YO – READ INCREASE TIP, marker, A.1 over the last 12 sts = 17 sts on row, turn piece. Row 4 (= WS): Work A.1 over the first 13 sts, marker, K YO twisted and K the rest of row, turn piece. Row 5 (= RS): K until marker and work A.1 over the last 13 sts = 18 sts on row, turn piece. Row 6 (= WS): Work A.1 over the first 14 sts, marker, K the rest of row, turn piece. Row 7 (= RS): K until marker, 1 YO (READ INCREASE TIP), marker, A.1 over the last 14 sts = 20 sts on row, turn piece. Row 8 (= WS): Work A.1 over the first 15 sts, marker, K the rest of row, turn piece. Row 9 (= RS): K until marker, A.1 over the last 15 sts = 21 sts on row, turn piece. Row 10 (= WS): Work A.1 over the first 16 sts, marker, K the rest of row, turn piece. Row 11 (= RS): K until marker, 1 YO, marker, A.1 over the last 16 sts = 23 sts on row, turn piece. Row 12 (= WS): Work A.1 over the first 17 sts, marker, K the rest of row. 1 repetition with A.1 has now been worked and 3 sts have been inc in garter st before marker (seen from RS). Work 1 repetition with SHORT ROWS 1 - see explanation above, over sts in lace edge (do not work the other sts on row). Then work alternately 1 repetition A.1 vertically and 1 repetition SHORT ROWS 1 (NOTE: Every time 1st row in A.1 is worked, there will be 3 sts more before marker). REMEMBER THE KNITTING TENSION! When A.1 and SHORT ROWS 1 have been worked 18 times vertically in total, there are 57 sts in garter st before marker and 11 sts in lace edge after marker = 68 sts on needle. Work 1 repetition SHORT ROWS 2 - see explanation above. After short rows 2 work 1 repetition with SHORT ROWS 3 - see explanation above = 74 sts on needle. Then work back and forth over all sts as follows: Row 1 (= RS): K until marker, work pattern according to diagram A.2 (= 17 sts) = 73 sts on row, turn piece. Row 2 (= WS): Work A.2 over the first 16 sts, marker, K the rest of row, turn piece. Row 3 (= RS): K until 2 sts remain before marker, K 2 tog, marker, A.2 over the last 16 sts = 71 sts on row, turn piece. Row 4 (= WS): Work A.2 over the first 15 sts, marker, K the rest of row, turn piece. Row 5 (= RS): K until marker and work A.2 over the last 15 sts = 70 sts on row, turn piece. Row 6 (= WS): Work A.2 over the first 14 sts, marker, K the rest of row, turn piece. Row 7 (= RS): K until 2 sts remain before marker, K 2 tog, marker, A.2 over the last 14 sts = 68 sts on row, turn piece. Row 8 (= WS): Work A.2 over the first 13 sts, marker, K the rest of row, turn piece. Row 9 (= RS): K until marker and work A.2 over the last 13 sts = 67 sts on row, turn piece. Row 10 (= WS): Work A.2 over the first 12 sts, marker, K the rest of row, turn piece. Row 11 (= RS): K until 2 sts remain before marker, K 2 tog, marker, A.2 over the last 12 sts = 65 sts on row, turn piece. Row 12 (= WS): Work A.2 over the first 11 sts, marker, K the rest of row, turn piece. 1 repetition with A.2 has now been worked and 3 sts have been dec in garter st before marker (seen from RS). Work 1 repetition with SHORT ROWS 3 - see explanation above, over sts in lace edge (do not work the other sts on row). Then work alternately 1 repetition A.2 vertically and 1 repetition SHORT ROWS 3 (NOTE: Every time 1st row in A.2 is worked, there will be 3 sts less before marker). When A.2 and SHORT ROWS 3 have been worked 18 times vertically in total there are 14 sts on needle. Work 1 ridge in garter st over all sts and loosely cast off. Shawl measures approx. 145 cm in width and approx. 40 cm in the middle. |
|||||||||||||
Diagram explanations |
|||||||||||||
|
|||||||||||||
|
|||||||||||||
|
Have you made this or any other of our designs? Tag your pictures in social media with #dropsdesign so we can see them! Do you need help with this pattern?You'll find tutorial videos, a Comments/Questions area and more by visiting the pattern on garnstudio.com. © 1982-2024 DROPS Design A/S. We reserve all rights. This document, including all its sub-sections, has copyrights. Read more about what you can do with our patterns at the bottom of each pattern on our site. |
|||||||||||||


With over 40 years in knitting and crochet design, DROPS Design offers one of the most extensive collections of free patterns on the internet - translated to 17 languages. As of today we count 304 catalogues and 11422 patterns - 11422 of which are translated into English (UK/cm).
We work hard to bring you the best knitting and crochet have to offer, inspiration and advice as well as great quality yarns at incredible prices! Would you like to use our patterns for other than personal use? You can read what you are allowed to do in the Copyright text at the bottom of all our patterns. Happy crafting!
Comments / Questions (78)
Les augmentations aux rangs 3, 7 et 11 se trouvent de quel côté.... près du bord au point mousse ou près du bord au point fantaisie ?
03.03.2021 - 12:33DROPS Design answered:
Bonjour Véronique M, placez bien un marqueur au tout premier rang, juste avant de tricoter A.1 et faites bien suivre ce marqueur au fur et à mesure, vous allez augmenter en faisant 1 jeté avant ce marqueur (sur l'endroit, rangs 3, 7, 11, etc..). L'augmentation va se faire ainsi avant toutes les mailles de A.1, vu sur l'endroit. Bon tricot!
03.03.2021 - 12:58Hallo, mijn omslagdoek is niet hetzelfde als ik op de foto zie, als ik volg wat er geschreven staat, dan gaan die gaatjes niet tot in de driehoekjes bij mij, maar zijn de driehoekjes bij mij in het a1 enkel rechte steken ( van ( 0 tot 6 steken ) en in a2 omgekeerd, ( van 6 naar 0) . wat heb ik verkeerd gedaan. de naalden aan de goede kant zijn op het telpatroon toch van links naar rechts? en de naalden aan de verkeerde kant toch van rechts naar links mvg vanessa
26.12.2020 - 09:58Ciao, ho fatto lo scialle! È venuto benissimo! Spiegazioni molto precise! Grazie!!!
20.11.2020 - 22:53Hallo liebes tiem warum muss ich soviele verkürzte reihen stricken z,b, A2 ist es nicht zuviel und ohne zweg diese reihen kann ich nicht nach A1 mit A3 weiter arbeiten. ich finde dass sieht nicht gut aus mit denn A2 reichen VIELEN DANK.
15.07.2020 - 06:47DROPS Design answered:
Liebe Frau Kassalia, so wurde das Tuch im Foto gestrickt, um das gleiche Ergebnis zu bekommen strickt man A.2 und die verkürzten Reihen-1, -2 und -3. Viel Spaß beim stricken!
15.07.2020 - 07:48No me salen el diagrama A2 Como lo muestra. Y como disminuyo los puntos en las vueltas del revés en el mismo diagrama
11.04.2020 - 05:33DROPS Design answered:
Hola Lucia. Había una errata en el diagrama. Ya está corregida. Se trabajan 2 puntos juntos de derecho.
12.04.2020 - 19:26Ich habe die Anleitung zu dem Schal Ladylike ( aus dem Sonderheft Anna) leider nicht ganz verstanden.Bei der 2. Hälfte wird beschrieben 16 Reihen nach Muster B zu arbeiten, allerdings geht das Strick- Schema nur bis Reihe 11 Wie muss ich denn Reihe 13 und 15 arbeiten?. Über ein hilfreiche Antwort würde ich mich sehr freuen MfG Margit
19.12.2019 - 21:35DROPS Design answered:
Liebe Frau Morcinkowski, es tut mir leid, ich verstehe leider nicht was Sie mit Reihen 13 und 15 meinen. Die 2. Hälfte beginnt mit 74 M und 12 Reihen (= A.2), + verkürzten Reihen-3; wo liegt mein Denkfehler mit Ihrer Frage?
20.12.2019 - 09:13Hi. I have only 11 sts left in the needle after the 1 repetition short rows 1. Then I have to work alternatively 1 repetition with A.1 vertically and 1 repetition short rows 1. May I know whether I should start the row 1 from the diagram A.1 immediately or need to follow Row 1: K3, insert 1 marker, work pattern diagram A.1? Thanks.
29.10.2019 - 16:15DROPS Design answered:
Dear Mrs Bon, work the 2 rows from short rows-1 then start A.1 once again from row 1, adjust marker so that it is placed just inside the stitches in A.1. Happy knitting!
04.11.2019 - 13:30Beste, wat een mooie sjaal. zou ik zo graag breien, maar ik raak niet wijs uit het patroon. Het deel van de verkorte toeren snap ik niet. patroon breien zou me nog net lukken denk ik. groeten, Ann
06.01.2019 - 17:41DROPS Design answered:
Dag Ann,
Verkorte toeren betekent dat je de toeren niet helemaal tot het einde breit, maar ergens halverwege het werk keert en terug breit. In het patroon staat aangegeven tot hoever je precies moet breien voordat je het werk keert.
13.01.2019 - 10:54Hej! Mönstret blir jättefint men när jag kommit förbi hälften och gör M2 med vändningar 3 så blir uddarna helt symmetriska, uddarna med M1 och vändningar 1 fick ett extra varv där jag maskade av som inte blir lika när jag lägger upp nya maskor. Är det ett mönsterfel eller är det jag som gör något tokigt?
03.03.2018 - 17:42DROPS Design answered:
Hej Vendela, det är svårt att säga... Då A.1 och A.2 stickas åt var sitt håll, så vill det bli lite annorlunda... testa evt att göra små provlappar enligt diagrammet. Lycka till!
08.03.2018 - 16:35Bonjour, Merci pour les explications. Je vais donc recommencer en espérant obtenir le nombre de mailles nécessaires. Cordialement
03.02.2018 - 11:31