Clicking the ORDER button will redirect you to Wool Warehouse Direct Ltd website
The yarn cost is calculated from the pattern’s smallest size and the yarn’s cheapest product type. Looking for an even better price? You might find it on the DROPS Deals!
-------------------------------------------------------
Alternative Yarn – See how to change yarns here
Yarn Groups A to F – Use the same pattern and change the yarn here
Yarn usage using an alternative yarn – Use our yarn converter here
-------------------------------------------------------
Clicking the ORDER button will redirect you to Wool Warehouse Direct Ltd website
The yarn cost is calculated from the pattern’s smallest size and the yarn’s cheapest product type. Looking for an even better price? You might find it on the DROPS Deals!
= K from RS, P from WS | |
= P from RS, K from WS | |
= this st has been cast off | |
= 1 YO between 2 sts | |
= slip 1 st as if to K, K 2, psso the 2 K sts | |
= slip 4 sts on cable needle in front of piece, K 4, K 4 from cable needle | |
= slip 4 sts on cable needle behind piece, K 4, K 4 from cable needle | |
= slip 1 st on cable needle behind piece, K 4, P 1 from cable needle | |
= slip 4 sts on cable needle in front of piece, P 1, K 4 from cable needle | |
= slip 3 sts on cable needle behind piece, K 4, P 3 from cable needle | |
= slip 4 sts on cable needle in front of piece, P 3, K 4 from cable needle |
Each of our patterns has specific tutorial videos to help you.
These step-by-step tutorials might also help you:
Why is the knitting/crochet tension so important?
Knitting tension is what determines the final measurements of your work, and is usually measured per 10 x 10 cm. It is provided like so: number of stitches in width x number of rows in height - eg: 19 stitches x 26 rows = 10 x 10 cm.
The knitting tension is very individual; some people knit/crochet loosely while others work tightly. You adjust the knitting tension with the needle size, which is why the suggested needle size is only meant as a guide! You need to adjust this (up or down) to ensure that YOUR knitting tension matches the knitting tension provided in the pattern. If you work with a different knitting tension than provided you will have a different yarn consumption, and your work will have different measurements than what the pattern suggests.
The knitting tension also determines which yarns can replace each other. As long as you achieve the same knitting tension you can replace one yarn with another.
See DROPS lesson: How to measure your tension/gauge
See DROPS video: How to make a gauge tension swatch
How do I know how many balls of yarn I need?
The required amount of yarn is provided in grams, eg: 450 g. To calculate how many balls you’ll need you first need to know how many grams are in 1 ball (25g, 50g or 100g). This information is available if you click on the individual yarn quality on our pages. Divide the amount required with the amount of each ball. For example, if each ball is 50g (the most common amount), the calculation will be as follows: 450 / 50 = 9 balls.
Can I use a different yarn than what the pattern suggests?
The important thing when changing from one yarn to another is that the knitting/crochet tension remains the same. This is so that the measurements of the finished piece will be the same as on the sketch provided. It is easier to achieve the same knitting tension using yarns from the same yarn group. It is also possible to work with multiple strands of a thinner yarn to achieve the knitting tension of a thicker one. Please try our yarn converter. We recommend you to always work a test swatch.
Please NOTE: when changing yarn the garment might have a different look and feel to the garment in the photo, due to individual properties and qualities of each yarn.
See DROPS lesson: Can I use a different yarn than the one mentioned in the pattern?
What are the yarn groups?
All our yarns are categorised into yarn groups (from A to F) according to thickness and knitting tension – group A contains the thinnest yarns and group F the thickest. This makes it easier for you to find alternative yarns to our patterns, should you wish to switch yarn. All yarns within the same group have a similar knitting tension and can easily replace each other. However, different yarn qualities have different structures and properties which will give the finished work a unique look and feel.
How do I use the yarn calculator?
At the top of all our patterns you’ll find a link to our yarn calculator, which is a helpful tool should you wish to use a different yarn than suggested. By filling in the yarn quality you wish to replace, the amount (in your size) and number of strands, the calculator will present good alternative yarns with the same knitting tension. Additionally it will tell you how much you’ll require in the new qualities and whether you’ll need to work with multiple strands. Most skeins are 50g (some are 25g or 100g).
If the pattern is worked with multiple colours, every colour will have to be calculated separately. Similarly, if the pattern is worked with several strands of different yarns (for example 1 strand Alpaca and 1 strand Kid-Silk) you will have to find alternatives for each, individually.
Why do you show discontinued yarns in the patterns?
Since different yarns have different qualities and textures we have chosen to keep the original yarn in our patterns. However, you can easily find options among our available qualities by using our yarn calculator, or simply pick a yarn from the same yarn group.
It is possible that some retailers still have discontinued yarns in stock, or that someone has a few skeins at home that they would like to find patterns for.
The yarn calculator will provide both alternative yarn as well as required amount in the new quality.
What size should I knit?
If you think it's hard to decide what size to make, it can be a good idea to measure a garment you own already and like the size of. Then you can pick the size by comparing those measures with the ones available in the pattern's size chart.
You'll find the size chart at the bottom of the pattern.
See DROPS lesson: How to read size chart
Why do I get the wrong knitting tension with the suggested needle size?
The needle size provided in the pattern serves only as a guide, the important thing is to follow the knitting tension. And since knitting tension is very individual, you will have to adjust the needle size to ensure that YOUR tension is the same as in the pattern – maybe you’ll have to adjust 1, or even 2 needle sizes, up or down to achieve the correct tension. For this, we recommend that you work test swatches.
Should you work with a different knitting tension than the one provided, the measurements of the finished garment might deviate from the measurement sketch.
See DROPS lesson: How to measure your tension/gauge
See DROPS video: How to make a tension/gauge swatch
Why is the pattern worked top-down?
Working a garment top-down provides more flexibility and room for personal adjustment. For example it is easier to try the garment on while working, as well as making adjustments to length of yoke and shoulder caps.
The instructions are carefully explaining every step, in the correct order. Diagrams are adjusted to the knitting direction and are worked as usual.
How do I work according to a knitting diagram?
The diagram depicts all rows/rounds, and every stitch seen from the right side. It is read from bottom to top, from right to left. 1 square = 1 stitch.
When working back and forth, every other row is worked from the right side and every other row is worked from the wrong side. When working from the wrong side, the diagram will have to be worked reversed: from left to right, knit stitches are purled, purl stitches are knit etc.
When working in the round every round is worked from the right side and the diagram are worked from right to left on all rounds.
See DROPS lesson: How to read knitting diagrams
How do I work according to a crochet diagram?
The diagram depicts all rows/rounds, and every stitch seen from the right side. It is worked from bottom to top, from right to left.
When working back and forth every other row is worked from the right side: from right to left and every other row is worked from the wrong side: from left to right.
When working in the round, every row in the diagram are worked from the right side, from right to left.
When working a circular diagram you start in the middle and work your way outwards, counter clockwise, row by row.
The rows usually start with a given number of chain stitches (equivalent to the height of the following stitch), this will either be depicted in the diagram or explained in the pattern.
See DROPS lesson: How to read crochet diagrams
How do I work several diagrams simultaneously on the same row/round?
Instructions for working several diagrams after each other on the same row/round, will often be written like so: “work A.1, A.2, A.3 a total of 0-0-2-3-4 times". This means you work A.1 once, then A.2 is worked once, and A.3 is repeated (in width) the number of times provided for your size – in this case like so: S = 0 times, M = 0 times, L=2 times, XL= 3 times and XXL = 4 times.
The diagrams are worked as usual: begin with the first row in A.1, then work the first row in A.2 etc.
See DROPS lesson: How to read knitting diagrams
See DROPS lesson: How to read crochet diagrams
Why are the sleeves shorter in larger sizes?
The total width of the garment (from wrist-to-wrist) will be larger in the larger sizes, despite the actual sleeves being shorter. The larger sizes have longer sleeve caps and wider shoulders, so there will be a good fit in all sizes.
Where on the garment is the length measured?
The measurement sketch/schematic drawing provides information regarding the full length of the garment. If it’s a jumper or a jacket the length is measured from the highest point on the shoulder closest to the neckline, and straight down to the bottom of the garment. It is NOT measured from the tip of shoulder. Similarly, the length of yoke is measured from the highest point on the shoulder and down to where yoke is split into body and sleeves.
On a jacket measures are never taken along bands, unless specifically stated. Always measure inside band stitches when measuring the length.
See DROPS lesson: How to read a schematic drawing
What is a repeat?
Diagrams are often repeated on the round or in height. 1 repeat is the diagram the way it appears in the pattern. If it says to work 5 repeats of A.1 in the round, then you work A.1 a total of 5 times after/next to each other in the round. If it says to work 2 repeats of A.1 vertically/in height you work the entire diagram once, then begin again at the start and work the entire diagram one more time.
Why does the piece start with more chain stitches than it’s worked with?
Chain stitches are slightly narrower than other stitches and to avoid working the cast-on edge too tight, we simply chain more stitches to begin with. The stitch count will be adjusted on the following row to fit the pattern and measurement sketch.
Why increase before the rib edge when the piece is worked top-down?
The rib edge is more elastic and will contract slightly compared to, for example, stocking stitch. By increasing before the rib edge, you avoid a visible difference in width between the rib edge and the rest of the body.
Why increase in the cast-off edge?
It’s very easy to cast off too tightly, and by making yarn overs while casting off (and simultaneously casting these off) you avoid a too tight cast off edge.
See DROPS video: How to bind off with yarn overs (yo)
How do I increase/decrease on every 3rd and 4th row/round alternately?
To achieve an even increase (or decrease) you can increase on, for example: every 3rd and 4th row alternately, like so: work 2 rows and increase on the 3rd row, work 3 rows and increase on the 4th. Repeat this until the increase is complete.
See DROPS lesson: Increase or decrease 1 st on every 3rd and 4th row alternately
How can I work a jacket in the round instead of back and forth?
Should you prefer to work in the round instead of back and forth, you may of course adjust the pattern. You’ll need to add steeks mid-front (usually 5 stitches), and follow the instructions. When you would normally turn and work from the wrong side, simply work across the steek and continue in the round. At the end you’ll cut the piece open, pick up stitches to work bands, and cover the cut edges.
See DROPS video: How to knit steeks and cut open
Can I work a jumper back and forth instead of in the round?
Should you prefer to work back and forth instead of in the round, you may of course adjust the pattern so you work the pieces separately and then assemble them at the end. Divide the stitches for the body in 2, add 1 edge stitch in each side (for sewing) and work the front and back pieces separately.
See DROPS lesson: Can I adapt a pattern for circular needles into straight needles?
Why is the pattern slightly different than what I see in the photo?
Pattern repeats can vary slightly in the different sizes, in order to get the correct proportions. If you’re not working the exact same size as the garment in the photo, yours might deviate slightly. This has been carefully developed and adjusted so that the complete impression of the garment is the same in all sizes.
Make sure to follow instructions and diagrams for your size!
How do I make a women’s size garment into a men’s size one?
If you have found a pattern you like which is available in women’s size it’s not very difficult to convert it to men’s size. The biggest difference will be the length of sleeves and body. Start working on the women size that you think would fit across the chest. The additional length will be worked right before you cast off for the armhole/sleeve cap. If the pattern is worked top-down you can add the length right after the armhole or before the first decrease on sleeve.
Regarding additional yarn amount, this will depend on how much length you add, but it is better with a skein too many than too few.
How do I prevent a hairy garment from shedding?
All yarns will have excess fibres (from production) that might come off as lint or shedding. Brushed yarns (ie hairier yarns) have more of these loose, excess fibres, causing more shedding.
Shedding also depends on what is worn under or over the garment, and whether this pulls at the yarn fibres. It’s therefore not possible to guarantee that there will be no shedding
Below are some tips on how to get the best result when working with hairier yarns:
1. When the garment is finished (before you wash it) shake it vigorously so the looser hairs come off. NOTE: do NOT use a lint roller, brush or any method that pulls at the yarn.
2. Place the garment in a plastic bag and put it in your freezer - the temperature will cause the fibres to become less attached to each other, and excess fibres will come off easier.
3. Leave in the freezer for a few hours before taking it out and shaking it again.
4. Wash the garment according to the instructions on the yarn label.
Why does my garment pill?
Pilling is a natural process that happens to even the most exclusive of fibers. It's a natural sign of wear and tear that is hard to avoid, and that is most visible in high friction areas of your garment like a sweater's arms and cuffs.
You can make your garment look as new by removing the pilling, using a fabric comb or a pill/lint remover.
Gwendolen |
||||||||||||||||||||||||||||||||||
|
|
|||||||||||||||||||||||||||||||||
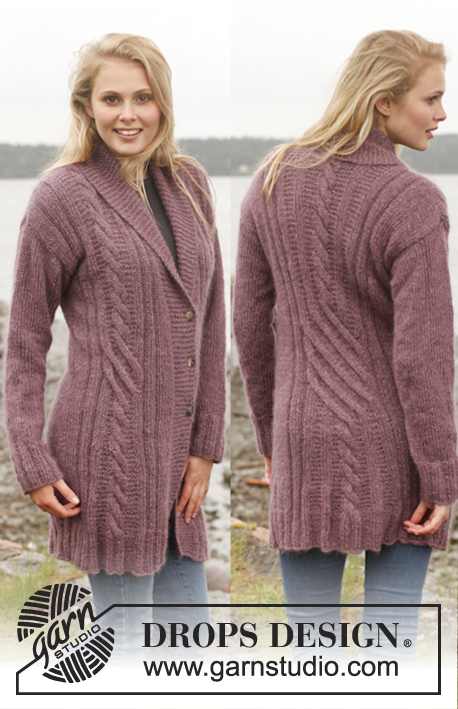
Knitted DROPS jacket with cables and shawl collar in ”Karisma”. Size: S - XXXL.
DROPS 151-1 |
||||||||||||||||||||||||||||||||||
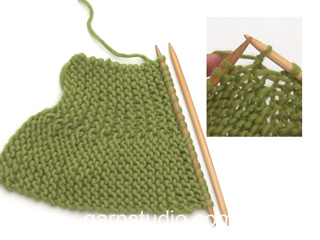
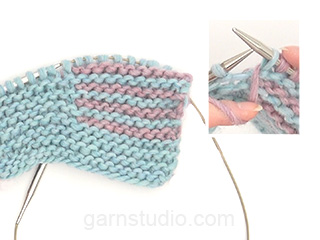
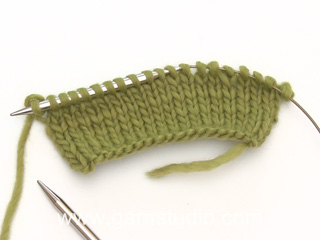
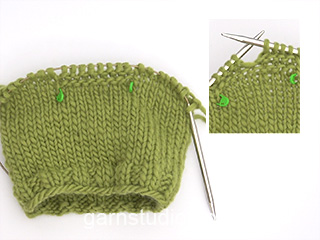
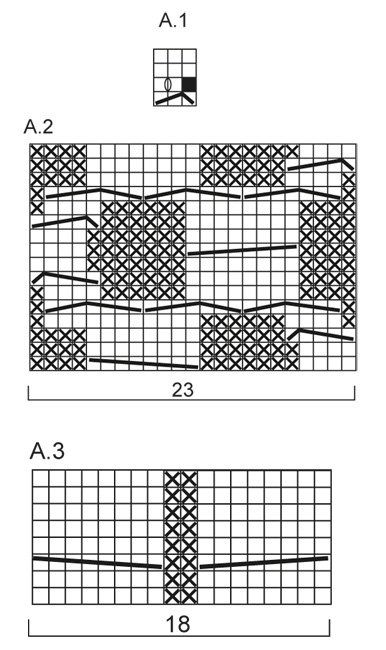
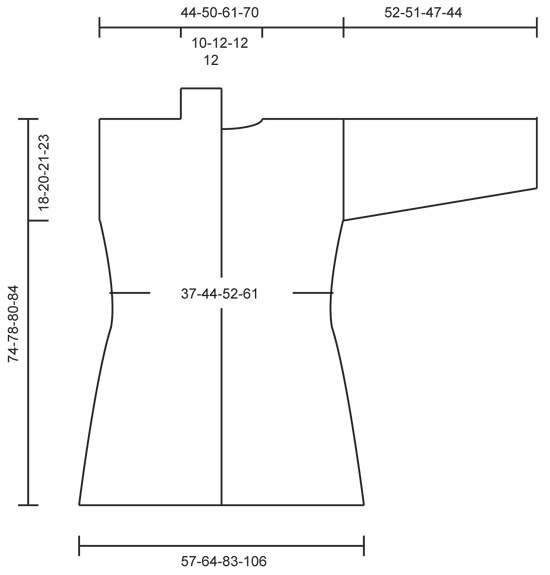
GARTER ST (back and forth on needle): K all rows. 1 ridge = 2 rows K. PATTERN: See diagrams A.1 to A.3. Diagrams show all rows in pattern from RS. SHORT ROWS IN BAND: Work short rows over sts in band to avoid it contracting vertically. Work like this every 10th row – from RS: Work 18 sts (= right band), turn and work back. Work 1 row over all sts as before. Turn and work 18 sts (= left band), turn and work back. Turn and work 1 row over all sts as before. BUTTONHOLES: Dec for buttonholes on right band. 1 buttonhole = K tog 3rd and 4th st from mid front, make 1 YO, K 8, K tog 13th and 14th st from mid front, make 1 YO (= 2 buttonholes). Dec for buttonholes when piece measures: SIZE S: 29 and 37 cm. SIZE M/L: 30 and 38 cm. SIZE XL: 31 and 39 cm. SIZE XXL/XXXL: 33 and 41 cm. ---------------------------------------------------------- BODY: Worked back and forth on circular needle to make room for all the sts. Cast on 266-290-350-386 sts (incl 18 band sts in each side towards mid front) on circular needle size 4 mm with Karisma. Work 2 RIDGES in garter st - see explanation above AT THE SAME TIME on last row inc 40 sts evenly = 306-330-390-426 sts. Then work as follows from RS: 18 sts in garter st (= band), P 8-8-8-10, * A.1 (= 3 sts), P 10-12-12-14 *, repeat from *-* 1-1-2-2 times in total, A.2 (= 23 sts), P 10-12-12-14, * A.1, P 10-12-12-14 *, repeat from *-* 2-2-2-2 times in total, A.2, * P 10-12-12-14, A.1 *, repeat from *-* 1-1-2-2 times in total, P 10-12-12-14, A.3 (= 18 sts), P 10-12-12-14, * A.1, P 10-12-12-14 *, repeat from *-* 1-1-2-2 times in total, A.2, P 10-12-12-14, * A.1, P 10-12-12-14 *, repeat from *-* 2 times in total, A.2, * P 10-12-12-14, A.1 *, repeat from *-* 1-1-2-2 times in total, P 8-8-8-10, 18 sts in garter st (= band). Continue this pattern AT THE SAME TIME work short rows over sts in band – see explanation above. AT THE SAME TIME when piece measures 8 cm, dec 1 st at beg of every P-section, P the first 2 sts tog (= 14-14-18-18 dec sts). Repeat dec every 5-5½-5½-6 cm, dec alternately at beg and end of all P-sections 5 more times (= 6 dec in total) = 222-246-282-318 sts. Remember to dec for BUTTONHOLES on right band - see explanation above. When piece measures 40-41-42-44 cm, on next RS row inc 1 st at beg of every P-section, inc with a YO and K yo twisted on next row from WS (= 14-14-18-18 inc sts). Repeat inc but at the end of every P-section when piece measures 50-52-53-55 cm = 250-274-318-354 sts. When piece measures 56-58-59-61 cm, divide the piece, finish front and back piece separately as follows: Slip the first and last 66-71-82-91 sts on a stitch holder for front piece, cut the yarn, then work only over the middle 118-132-154-172 sts (= back piece). BACK PIECE: = 118-132-154-172 sts. Continue pattern as before. When piece measures 72-76-78-82 cm, cast off the middle 22-26-26-26 sts for neck = 48-53-64-73 sts remain on each shoulder. Finish each part separately. Continue with pattern until piece measures 74-78-80-84 cm, cast off. RIGHT FRONT PIECE: Slip the first 66-71-82-91 sts back on needle. Continue pattern as before. When piece measures 74-78-80-84 cm, cast off the first 48-53-64-73 sts from WS for shoulder = 18 sts remain on needle. Work the rest of row. Then work short rows over the 18 sts as follows - beg from RS: * Work 2 rows back and forth over the first 9 sts, work 2 rows over all sts *, repeat from *-* until neck edge measures 7-8-8-8 cm at the shortest. Cast off. LEFT FRONT PIECE: Work as right but reversed. Cast off for shoulder from RS and beg short rows from WS. SLEEVE: Worked in the round on double pointed needles. Cast on 56-60-64-68 sts on double pointed needles size 3.5 mm with Karisma. Work rib = K 2/P 2. When piece measures 16-16-16-14 cm, switch to double pointed needles size 4 mm, continue in stocking st AT THE SAME TIME on 1st round dec 8-8-10-10 sts evenly = 48-52-54-58 sts. Insert 1 marker at the beg of round. AT THE SAME TIME inc 1 st on each side of marker, repeat inc every 2½-2-1½-1½ cm 13-15-16-18 more times (14-16-17-19 inc in total) = 76-84-88-96 sts. When piece measures 52-51-47-44 cm (shorter measurements in the larger sizes because of wider shoulders), cast off all sts. Knit another sleeve. ASSEMBLY: Sew the shoulder seams. Sew in sleeves. Sew the collar tog mid back and sew it to the neckline. Sew the buttons on to left band. |
||||||||||||||||||||||||||||||||||
Diagram explanations |
||||||||||||||||||||||||||||||||||
|
||||||||||||||||||||||||||||||||||
Have you made this or any other of our designs? Tag your pictures in social media with #dropsdesign so we can see them! Do you need help with this pattern?You'll find tutorial videos, a Comments/Questions area and more by visiting the pattern on garnstudio.com. © 1982-2024 DROPS Design A/S. We reserve all rights. This document, including all its sub-sections, has copyrights. Read more about what you can do with our patterns at the bottom of each pattern on our site. |
With over 40 years in knitting and crochet design, DROPS Design offers one of the most extensive collections of free patterns on the internet - translated to 17 languages. As of today we count 304 catalogues and 11422 patterns - 11422 of which are translated into English (UK/cm).
We work hard to bring you the best knitting and crochet have to offer, inspiration and advice as well as great quality yarns at incredible prices! Would you like to use our patterns for other than personal use? You can read what you are allowed to do in the Copyright text at the bottom of all our patterns. Happy crafting!
Comments / Questions (184)
Hella De Knegt wrote:
Bedankt! Ik ga het weer proberen vr. Gr. Hella
19.01.2016 - 18:28Hella De Knegt wrote:
Beste mensen, schitterend vest! Ik krijg alleen het a1 patroon niet goed als ik averecht brei, ik doe 1 st av dubbele omsl 1 av en dan kant ik 1 st af? Is dit goed of lees ik het verkeerd, ik heb het al 2 x helemaal uitgehaald graag uw hulp! vr. Bedankt, Hella
17.01.2016 - 20:16DROPS Design answered:
Hoi Hella. Ja, je kant 1 st af aan de goede kant: 1 st r afh, 2 st r, afgeh st over de 2 rechte st halen (1 st geminderd), maar in de volgende nld (aan de verkeerde kant) brei je: 1 av, 1 omsl, 1 av, dwz, je meerdert weer 1 st en op deze manier blijft het aantal st in A.1 constant
19.01.2016 - 15:04Gill Charlton wrote:
Can you tell me the measurements that equate to S,M,L,XL etc please? Many thanks
30.12.2015 - 14:11DROPS Design answered:
Dear Mrs Charlton, you will find at the end of the pattern a measurement chart with all measurements for each size - taken flat from side to side. Compare these to a similar garment you have and like the shape to find out the matching size. Happy knitting!
02.01.2016 - 15:35An Meulders wrote:
Ik heb 2 vragen: Ik heb de eerste naald na de 2 ribbels gebreid, nu wil ik aan de volgende naald, dat is de verkkerde kant, beginnen. Moet ik dan telkens als er staat : 14 st av, 14 steken rechts breien, of ook Av? En de verkorte toeren, is dat in de 10e naald aan de goede kant, dus eigenlijk de 19enaald, of na 10 naalden, 5 aan de goede en 5 aan de slechte? Dankkewel alvast voor de hulp.
11.12.2015 - 20:52DROPS Design answered:
Hoi An. Bij ons is de 5e nld de goede kant. (eerste nld is goede kant en je hebt 4 nld ribbelst gebreid = 2 ribbels). Je breit de verkorte toeren op de goede kant; de 10e nld die je breit van de goede kant.
15.12.2015 - 16:07Ana Sarita wrote:
Buenas tardes: Le escribo desde Mendoza, Argentina. He encontrado en este patrón en español, en la sección donde se explican en significado de los diagramas. En el A.1, 3 puntos, la 1era fila dice: desl 1 pt como de derecho, 2pjd, pasar el pt desl por encima 2 pts. Debe decir: desl 1 pt como de derecho, 2pd, pasar el pt desl por encima 2 pts. Es una ayuda para que lo puedan corregir y así ayudar a otra tejedora. Saludos Ana Sarita Tejidos
17.08.2015 - 02:30Esther wrote:
Hi! Ik heb niet genoeg garen om het hele vest te maken, en het garen dat ik wil gebruiken is uit de handel! Is het mogelijk het vest 10/15cm in te korten? En hoe moet ik dan rekenen met de steken en het patroon?
03.08.2015 - 15:23DROPS Design answered:
Hoi Esther. Ik kan je helaas niet helpen met individuele aanpassingen op de gratis patronen - je mag natuurlijk altijd vragen in de winkel waar je het garen hebt gekocht.
04.08.2015 - 15:01Kym wrote:
Are the odd rows a basic knit your knits and purl the purl? Is the graph standard reading right to left as 1st row and left to right 2nd row or are the all right side only (no wrong side rows on graph?)
05.04.2015 - 22:43DROPS Design answered:
Dear Kym, diagrams show all rows in pattern, ie RS and WS rows: 1 square = 1 st x 1 row. You read diagrams from the right towards the left from RS (starting on the bottom corner on the right side) and from the left towards the right from WS. Happy knitting!
07.04.2015 - 09:32Caja wrote:
Hallo, Waar kan ik mijn werk het beste meten? Op de knopenbies, middenvoor, of midden achter, of op 1 van de kabels?
02.02.2015 - 01:08DROPS Design answered:
Hoi Caja. Ik zou meten net naast de voorbies in het averecht gedeelte in een rechte lijn tot aan de schouder.
03.02.2015 - 15:25Yvonne wrote:
Ik heb het idee dat er veel meer wol in gaat dan er bij het patroon staat. Ik heb 5.5 cm gebreid met 1 bol. (Maat M/L. )Als ik zie wat ik nog moet breien gaat er toch meer wol in?
30.01.2015 - 00:51DROPS Design answered:
Hoi Yvonne. Wij doen ons best om de patronen goed te controleren en wij hebben nog geen opmerkingen ontvangen op de hoeveelheid garen gebruikt in het patroon. Kijk goed dat je stekenverhouding/afmetingen klopt. Kom je later tekort, dan horen wij dat graag. Geef dan ook aan welk maat u heeft gemaakt.
30.01.2015 - 10:08Birte Berntsen wrote:
Hej , der står nat jeg skal tage en maske ind hver 5 cm i de 8 vrang masker , men jeg kan ikke få maskeantal til at passe , der står jeg skal gøre det 6 gange , det kan da kun blive til 12 masker i alt, og så skulle jeg have 222 maske tilbage , det kan jeg heller ikke få til at passe ?? jeg får det til 294 masker når de er taget ind?
26.01.2015 - 11:48DROPS Design answered:
Hej Birte. Du har 14 vrangpartier og du skal tage ind i hvert parti totalt 6 gange = 84 m. Saa ender du ogsaa med 222 m (306-84).
28.01.2015 - 16:29