DROPS Nepal
DROPS Nepal
65% Wool, 35% Alpaca
from 1.70 £ /50g
DROPS Vienna
DROPS Vienna
91% Mohair, 9% Polyester
Discontinued
find alternatives
DROPS Super Sale

Veronica

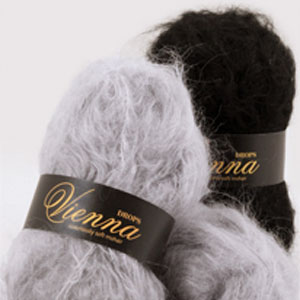
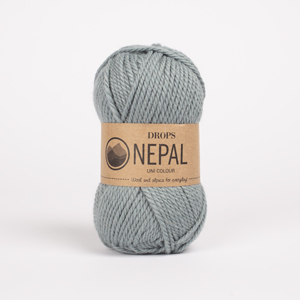
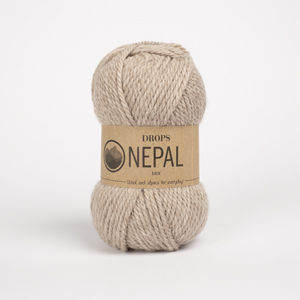
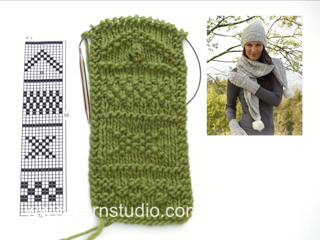
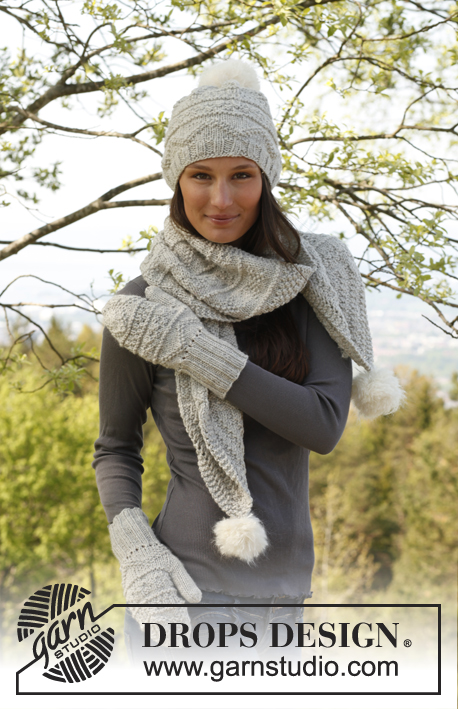
Knitted DROPS mittens, hat and scarf with textured pattern in "Nepal", pompoms in "Vienna".

DROPS 141-23
DROPS design: Pattern no NE-100
Yarn group C
-----------------------------------------------------------
HAT:
Size: One-size
Materials:
DROPS NEPAL from Garnstudio
100 g colour no 0500, light grey
And use:
DROPS VIENNA from Garnstudio
50 g colour no 21, off white

DROPS DOUBLE POINTED NEEDLES and CIRCULAR NEEDLE (40 cm) SIZE 4.5 mm - or size needed to get 18 sts x 23 rows in stocking st = 10 x 10 cm.
DROPS CIRCULAR NEEDLE (40 cm) SIZE 3.5 mm – for rib.

SCARF:
Measurements: approx. 26 cm wide x 150 cm long.
Materials:
DROPS NEPAL from Garnstudio
300 g colour no 0500, light grey
And use:
DROPS VIENNA from Garnstudio
50 g colour no 21, off white

DROPS STRAIGHT NEEDLES SIZE 5.5 mm - or size needed to get 16 sts x 20 rows in stocking st = 10 x 10 cm.

MITTENS:
Size: One-size
Materials:
DROPS NEPAL from Garnstudio
100 g colour no 0500, light grey

DROPS DOUBLE POINTED NEEDLES SIZE 4.5 mm - or size needed to get 18 sts x 23 rows in stocking st with Nepal = 10 x 10 cm.
DROPS DOUBLE POINTED NEEDLES SIZE 3.5 mm – for rib

-------------------------------------------------------

Alternative Yarn – See how to change yarns here
Yarn Groups A to F – Use the same pattern and change the yarn here
Yarn usage using an alternative yarn – Use our yarn converter here

-------------------------------------------------------

DROPS Nepal
DROPS Nepal
65% Wool, 35% Alpaca
from 1.70 £ /50g
DROPS Vienna
DROPS Vienna
91% Mohair, 9% Polyester
Discontinued
find alternatives

Pattern instructions

NOTE: This pattern is written in British English. All measurements in charts are in cm. For conversion from cm to inches - click here. There are different terms for crocheting in British and American English. If this pattern includes crochet, click for "crochet terms" here. For this pattern in American English, please click here.
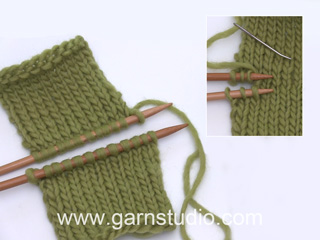
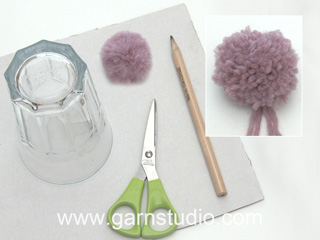
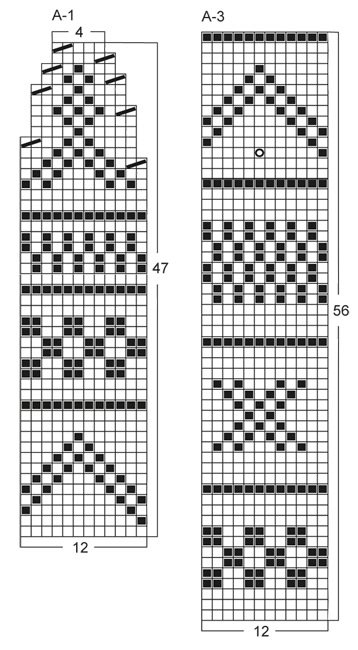
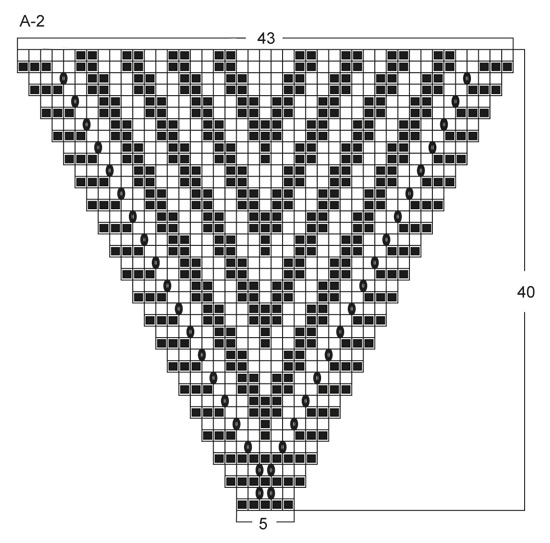
PATTERN:
See diagram A-1 for hat and mittens, and A-2 and A-3 for scarf. Diagrams show 1 repetition of pattern.
----------------------------------------------------------

HAT:
Worked in the round.
Cast on 84 sts on circular needle size 3.5 mm with Nepal. K 1 round, then work 6 rounds rib = K 2/P 2. Switch to circular needle size 4.5 mm, then work diagram A-1 (= 7 repetitions on the round). REMEMBER THE KNITTING TENSION! When A-1 has been worked, 28 sts remain on needle, work 1 round where all sts are K tog 2 by 2 = 14 sts. Cut the thread and pull it through the remaining sts and tighten tog.

POMPOM:
Make 1 large, dense pompom with Vienna with an approx. diameter of 10 cm. Sew the pompom at the top of the hat.
----------------------------------------------------------

SCARF:
Worked in 2 parts back and forth on needle and sewn tog in the middle when finished.
Cast on 5 sts on needle size 5.5 mm with Nepal. Work and inc according to diagram A-2 (1st row = WS). When A-2 has been worked, there are 43 sts on needle and piece measures approx. 20 cm. Continue as follows (1st row = WS): 3 sts in garter st, A-3 three times in breadth, then work first st in A-3 one more time and work the last 3 sts in garter st. REMEMBER THE KNITTING TENSION! Repeat A-3 until piece measures approx. 75 cm – finish after one whole pattern border, then K 2 rows over all sts. Put piece aside and knit another part.

ASSEMBLY:
Sew the 2 parts tog with grafting/kitchener sts.

POMPOMS:
Make 2 large, dense pompoms with Vienna with an approx. diameter of 8 cm. Fasten 1 pompom in each end of scarf.
----------------------------------------------------------

MITTEN:
Worked in the round on double pointed needles.
Cast on 36 sts on double pointed needles size 3.5 mm with Nepal, K 1 round then work rib = K 2/P 2 for 10 cm. Work next round as follows: * K 2 tog, 1 YO *, repeat from *-* the rest of round. Switch to double pointed needles size 4.5 mm, then work diagram A-1 (= 3 repetitions on the round). REMEMBER THE KNITTING TENSION! Insert a marker in first st on round (= thumb st). When A-1 has been worked for 2 cm, beg inc for thumb gusset. Inc on each side of thumb st by making 1 YO, on next round K YOs twisted. Repeat inc every other round 3 more times - inc on each side of all thumb sts every time, i.e. next time inc on each side of 3 sts, then 5 sts etc. – work the inc sts in stocking st. After all inc, there are 9 thumb sts and 44 sts in total. When A-1 has been worked for 6 cm, slip the 9 thumb sts on a stitch holder and cast on 1 new st over stitch holder = 36 sts. Work until A-1 is finished, 12 sts now remain on needle. Work 1 round where all sts are K tog 2 by 2 = 6 sts. Cut the thread and pull it through the remaining sts and tighten tog.

THUMB:
Slip sts from stitch holder over thumb gusset on double pointed needles size 4.5 mm and knit in addition up 3 sts along the edge behind the thumb = 12 sts. Work in stocking st for 5 cm, then K all sts tog 2 by 2 = 6 sts. Cut the thread and pull it through the remaining sts and tighten tog.

Knit another mitten.

----------------------------------------------------------
Poncho - see pattern 141-22
----------------------------------------------------------

Diagram

symbols = P from RS, K from WS
symbols = K from RS, P from WS
symbols = K 2 tog
symbols = 1 YO between 2 sts
symbols = Bobble: Work 4 sts in 1 st by working alternately in front and back loop of st, work 4 rows in reverse stocking st back and forth over the 4 sts, sts are now on right needle, pass second st over first, third st over first and fourth st over first.
diagram
diagram
Do you have a question? See a list of frequently asked questions (FAQ)

Knitting tension is what determines the final measurements of your work, and is usually measured per 10 x 10 cm. It is provided like so: number of stitches in width x number of rows in height - eg: 19 stitches x 26 rows = 10 x 10 cm.

The knitting tension is very individual; some people knit/crochet loosely while others work tightly. You adjust the knitting tension with the needle size, which is why the suggested needle size is only meant as a guide! You need to adjust this (up or down) to ensure that YOUR knitting tension matches the knitting tension provided in the pattern. If you work with a different knitting tension than provided you will have a different yarn consumption, and your work will have different measurements than what the pattern suggests.

The knitting tension also determines which yarns can replace each other. As long as you achieve the same knitting tension you can replace one yarn with another.

See DROPS lesson: How to measure your tension/gauge

See DROPS video: How to make a gauge tension swatch

The required amount of yarn is provided in grams, eg: 450 g. To calculate how many balls you’ll need you first need to know how many grams are in 1 ball (25g, 50g or 100g). This information is available if you click on the individual yarn quality on our pages. Divide the amount required with the amount of each ball. For example, if each ball is 50g (the most common amount), the calculation will be as follows: 450 / 50 = 9 balls.

The important thing when changing from one yarn to another is that the knitting/crochet tension remains the same. This is so that the measurements of the finished piece will be the same as on the sketch provided. It is easier to achieve the same knitting tension using yarns from the same yarn group. It is also possible to work with multiple strands of a thinner yarn to achieve the knitting tension of a thicker one. Please try our yarn converter. We recommend you to always work a test swatch.

Please NOTE: when changing yarn the garment might have a different look and feel to the garment in the photo, due to individual properties and qualities of each yarn.

See DROPS lesson: Can I use a different yarn than the one mentioned in the pattern?

All our yarns are categorised into yarn groups (from A to F) according to thickness and knitting tension – group A contains the thinnest yarns and group F the thickest. This makes it easier for you to find alternative yarns to our patterns, should you wish to switch yarn. All yarns within the same group have a similar knitting tension and can easily replace each other. However, different yarn qualities have different structures and properties which will give the finished work a unique look and feel.

Click here for an overview of the yarns in each yarn group

At the top of all our patterns you’ll find a link to our yarn calculator, which is a helpful tool should you wish to use a different yarn than suggested. By filling in the yarn quality you wish to replace, the amount (in your size) and number of strands, the calculator will present good alternative yarns with the same knitting tension. Additionally it will tell you how much you’ll require in the new qualities and whether you’ll need to work with multiple strands. Most skeins are 50g (some are 25g or 100g).

If the pattern is worked with multiple colours, every colour will have to be calculated separately. Similarly, if the pattern is worked with several strands of different yarns (for example 1 strand Alpaca and 1 strand Kid-Silk) you will have to find alternatives for each, individually.

Click here to see our yarn calculator

Since different yarns have different qualities and textures we have chosen to keep the original yarn in our patterns. However, you can easily find options among our available qualities by using our yarn calculator, or simply pick a yarn from the same yarn group.

It is possible that some retailers still have discontinued yarns in stock, or that someone has a few skeins at home that they would like to find patterns for.

The yarn calculator will provide both alternative yarn as well as required amount in the new quality.

If you think it's hard to decide what size to make, it can be a good idea to measure a garment you own already and like the size of. Then you can pick the size by comparing those measures with the ones available in the pattern's size chart.

You'll find the size chart at the bottom of the pattern.

See DROPS lesson: How to read size chart

The needle size provided in the pattern serves only as a guide, the important thing is to follow the knitting tension. And since knitting tension is very individual, you will have to adjust the needle size to ensure that YOUR tension is the same as in the pattern – maybe you’ll have to adjust 1, or even 2 needle sizes, up or down to achieve the correct tension. For this, we recommend that you work test swatches.

Should you work with a different knitting tension than the one provided, the measurements of the finished garment might deviate from the measurement sketch.

See DROPS lesson: How to measure your tension/gauge

See DROPS video: How to make a tension/gauge swatch

Working a garment top-down provides more flexibility and room for personal adjustment. For example it is easier to try the garment on while working, as well as making adjustments to length of yoke and shoulder caps.

The instructions are carefully explaining every step, in the correct order. Diagrams are adjusted to the knitting direction and are worked as usual.

The diagram depicts all rows/rounds, and every stitch seen from the right side. It is read from bottom to top, from right to left. 1 square = 1 stitch.

When working back and forth, every other row is worked from the right side and every other row is worked from the wrong side. When working from the wrong side, the diagram will have to be worked reversed: from left to right, knit stitches are purled, purl stitches are knit etc.

When working in the round every round is worked from the right side and the diagram are worked from right to left on all rounds.

See DROPS lesson: How to read knitting diagrams

The diagram depicts all rows/rounds, and every stitch seen from the right side. It is worked from bottom to top, from right to left.

When working back and forth every other row is worked from the right side: from right to left and every other row is worked from the wrong side: from left to right.

When working in the round, every row in the diagram are worked from the right side, from right to left.

When working a circular diagram you start in the middle and work your way outwards, counter clockwise, row by row.

The rows usually start with a given number of chain stitches (equivalent to the height of the following stitch), this will either be depicted in the diagram or explained in the pattern.

See DROPS lesson: How to read crochet diagrams

Instructions for working several diagrams after each other on the same row/round, will often be written like so: “work A.1, A.2, A.3 a total of 0-0-2-3-4 times". This means you work A.1 once, then A.2 is worked once, and A.3 is repeated (in width) the number of times provided for your size – in this case like so: S = 0 times, M = 0 times, L=2 times, XL= 3 times and XXL = 4 times.

The diagrams are worked as usual: begin with the first row in A.1, then work the first row in A.2 etc.

See DROPS lesson: How to read knitting diagrams

See DROPS lesson: How to read crochet diagrams

The total width of the garment (from wrist-to-wrist) will be larger in the larger sizes, despite the actual sleeves being shorter. The larger sizes have longer sleeve caps and wider shoulders, so there will be a good fit in all sizes.

The measurement sketch/schematic drawing provides information regarding the full length of the garment. If it’s a jumper or a jacket the length is measured from the highest point on the shoulder closest to the neckline, and straight down to the bottom of the garment. It is NOT measured from the tip of shoulder. Similarly, the length of yoke is measured from the highest point on the shoulder and down to where yoke is split into body and sleeves.

On a jacket measures are never taken along bands, unless specifically stated. Always measure inside band stitches when measuring the length.

See DROPS lesson: How to read a schematic drawing

Diagrams are often repeated on the round or in height. 1 repeat is the diagram the way it appears in the pattern. If it says to work 5 repeats of A.1 in the round, then you work A.1 a total of 5 times after/next to each other in the round. If it says to work 2 repeats of A.1 vertically/in height you work the entire diagram once, then begin again at the start and work the entire diagram one more time.

Chain stitches are slightly narrower than other stitches and to avoid working the cast-on edge too tight, we simply chain more stitches to begin with. The stitch count will be adjusted on the following row to fit the pattern and measurement sketch.

The rib edge is more elastic and will contract slightly compared to, for example, stocking stitch. By increasing before the rib edge, you avoid a visible difference in width between the rib edge and the rest of the body.

It’s very easy to cast off too tightly, and by making yarn overs while casting off (and simultaneously casting these off) you avoid a too tight cast off edge.

See DROPS video: How to bind off with yarn overs (yo)

To achieve an even increase (or decrease) you can increase on, for example: every 3rd and 4th row alternately, like so: work 2 rows and increase on the 3rd row, work 3 rows and increase on the 4th. Repeat this until the increase is complete.

See DROPS lesson: Increase or decrease 1 st on every 3rd and 4th row alternately

Should you prefer to work in the round instead of back and forth, you may of course adjust the pattern. You’ll need to add steeks mid-front (usually 5 stitches), and follow the instructions. When you would normally turn and work from the wrong side, simply work across the steek and continue in the round. At the end you’ll cut the piece open, pick up stitches to work bands, and cover the cut edges.

See DROPS video: How to knit steeks and cut open

Should you prefer to work back and forth instead of in the round, you may of course adjust the pattern so you work the pieces separately and then assemble them at the end. Divide the stitches for the body in 2, add 1 edge stitch in each side (for sewing) and work the front and back pieces separately.

See DROPS lesson: Can I adapt a pattern for circular needles into straight needles?

Pattern repeats can vary slightly in the different sizes, in order to get the correct proportions. If you’re not working the exact same size as the garment in the photo, yours might deviate slightly. This has been carefully developed and adjusted so that the complete impression of the garment is the same in all sizes.

Make sure to follow instructions and diagrams for your size!

If you have found a pattern you like which is available in women’s size it’s not very difficult to convert it to men’s size. The biggest difference will be the length of sleeves and body. Start working on the women size that you think would fit across the chest. The additional length will be worked right before you cast off for the armhole/sleeve cap. If the pattern is worked top-down you can add the length right after the armhole or before the first decrease on sleeve.

Regarding additional yarn amount, this will depend on how much length you add, but it is better with a skein too many than too few.

All yarns will have excess fibres (from production) that might come off as lint or shedding. Brushed yarns (ie hairier yarns) have more of these loose, excess fibres, causing more shedding.

Shedding also depends on what is worn under or over the garment, and whether this pulls at the yarn fibres. It’s therefore not possible to guarantee that there will be no shedding

Below are some tips on how to get the best result when working with hairier yarns:

1. When the garment is finished (before you wash it) shake it vigorously so the looser hairs come off. NOTE: do NOT use a lint roller, brush or any method that pulls at the yarn.

2. Place the garment in a plastic bag and put it in your freezer - the temperature will cause the fibres to become less attached to each other, and excess fibres will come off easier.

3. Leave in the freezer for a few hours before taking it out and shaking it again.

4. Wash the garment according to the instructions on the yarn label.

Pilling is a natural process that happens to even the most exclusive of fibers. It's a natural sign of wear and tear that is hard to avoid, and that is most visible in high friction areas of your garment like a sweater's arms and cuffs.

You can make your garment look as new by removing the pilling, using a fabric comb or a pill/lint remover.

Still can't find the answer you need? Then scroll down and leave your question so one of our experts can try to help you. This will be done normally within 5 to 10 working days.
In the meantime, you can read the questions and answers that others have left to this pattern or join the DROPS Workshop on Facebook to get help from fellow knitters/crocheters!

You might also like...

Post a comment to pattern DROPS 141-23

We would love to hear what you have to say about this pattern!

If you want to leave a question, please make sure you select the correct category in the form below, to speed up the answering process. Required fields are marked *.

Comments / Questions (26)

country flag Margaret wrote:

Please help me with A3. I have watched the video several times and correlated the stitches writing them on my printed pattern, but I can't seem to get past Row 4. Your video indicates ending row 4 with P2, K2. However, row 4 on my piece ends with P2 and 3 remaining stitches. I have looked at the previous comments regarding the 43 stitches, but it doesn't make sense.

02.11.2016 - 14:12

DROPS Design answered:

Dear Margaret, when working A.3 you will work the white squares in stocking st = K from RS and P from WS and the black dot in reverse stocking st = P from RS and K from WS. 1st row in A.3 is worked from WS = P from Ws, then row 2 = K from RS, row 3 P from WS, row4: K2,P2,K2,P2 ..., row5: K over K and P over P, row 6: P2,K2... Row 7: K over K and P over P etc... Happy knitting!

02.11.2016 - 15:49

country flag Margaret wrote:

Thank you so much, I can stop practising now. It makes perfect sense. I'm learning all the time.
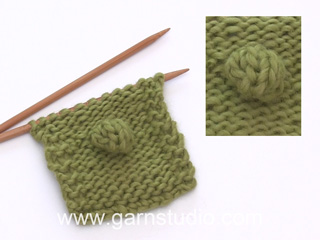
01.11.2016 - 10:05

country flag Margaret wrote:

Hello! Please help me with the 'Bobble' stitch in A3. (i) Do I work the 4 stitches into a purl or knit stitch? I assume it is a purl stitch. (ii) If there is a yarn over between each loop, that is effectively increasing the number of stitches, so how many stitches should there be on the needle? The diagram explanations refer to only 4 stitches. I can achieve 4 stitches if I don't include the 'yarn over'. (iii) What does 'reverse stocking stitch' mean? Thank you, Margaret

31.10.2016 - 16:07

DROPS Design answered:

Dear Margaret, the video below shows how to work A.3, ie from time code 10:00 how to work the bobble. You will work 4 times same st, work front and back loop of same st 2 times in total = 4 sts in one. Then work 4 rows stocking st on these 4 sts and psso the 3 sts one by one until 1 st remain. Happy knitting!

31.10.2016 - 16:33

country flag Maj-britt wrote:

Jeg har problemer med diagram A2, man skal starte med 5 masker, men hvordan får jeg det til at gå op med de to slå om huller der skal være, det ender med jeg har et ulige antal på hver side af hullerne ?

06.01.2016 - 20:34

DROPS Design answered:

Hej. På rad två stickar du: rm, rm, slå om, rm, slå om, rm, rm. Lycka till!

13.01.2016 - 08:27

country flag Carine wrote:

Bonjour, je suis débutante en knitting et j'ai un peu de mal avec le diagramme A2. Je l'avais presque terminer quand je me suis rendu compte que les trous des jetés de droite était plus grosse que celle de gauche. *comment faire une jeté en envers et comment savoir si au rang suivant je dois tricoter la jeté en l'endroit ou à l'envers. *serait-il possible d'avoir une explication m.end m.env des rangs 6 à 10 du diagramme ? ex: rang1: 5env

25.01.2015 - 03:10

DROPS Design answered:

Bonjour Carine, vous pouvez vous exercer sur un échantillon - les trous formés par les jetés sont atténués en les tricotant torse au rang suivant et au blocage (1er lavage). Un carré noir dans le diag = 1 m end sur l'env (cf légende), au 1er rang de A.2 (= Sur l'env), on tricote 5 m end, au rang 2: 2 m end, 1 jeté, 1 m end, 1 jeté, 2 m end et ainsi de suite. Pour toute assistance individuelle, merci de bien vouloir vous adresser à votre magasin DROPS ou au forum DROPS. Bon tricot!

26.01.2015 - 10:10

country flag Louise wrote:

Voor de muts en het patroon (A1). Leest men voor de eerste ronde vanonder rechts naar links. De tweede ronde, leest men dan van links naar rechts, of van rechts naar links?

30.11.2014 - 20:20

DROPS Design answered:

Hoi Louise. Je breit in de rondte, dus elke rij lees je van rechts naar links. Je begint rechtsonder. Je kan hier ook lezen hoe je onze telpatronen moet lezen.

01.12.2014 - 14:48

Angela Martinez wrote:

En el diagrama A3 hay un pto que dice que pasar un pto por encima,que trabajar en un solo pto,no entiendo ese pedacito,me podria decir si hay un video en donde pueda ver ese ejemplo

21.12.2013 - 05:04

DROPS Design answered:

Hola Angela. Aquí tienes el video:

04.01.2014 - 18:04

country flag Gracia wrote:

El diagrama muestra las vueltas impares,el lado derecho las pares o sea el reves se hacen segun se presentan los puntos

12.12.2013 - 17:15

DROPS Design answered:

Hola Gracia! El diagrama muestra todas las filas/vueltas. Se lee de diferente manera si se trata de la bufanda o del gorro, el gorro se trabaja en redondo y solo se trabaja por el lado derecho. La bufanda (de ida y vuelta) se trabaja una fila por el lado derecho y una fila por el lado revés. Cómo trabajar cada punto (cuadrado en el diagrama) se explica antes del diagrama.

17.12.2013 - 11:10

country flag S G wrote:

Det kan virke som om det er noe galt med oppskriften. Både lue, skjerf og votter passer bedre til barn enn voksne fordi det blir så smått.

02.11.2013 - 17:55

DROPS Design answered:

Sørg for at du har 18 m på 10 cm til lue og votter. Til skjerfet må du ha 16 m på 10 cm. Hvis strikkefastheden overholdes får du samme mål som i oppskriften.

04.11.2013 - 11:34

country flag Ashley wrote:

Can you please clarify A3? I don't understand how repeating the first stitch solves the additional stitch issue. When I repeat the first stitch, my "blocks" (first pattern of A3) do not line up because you repeat the first stich at the end on every row which means the following row moves by one stich. Thank you.

29.10.2013 - 04:30

DROPS Design answered:

Dear Ashley, seen from RS, you will finish row with 1st st in A.3 (1st "line" at the right of the diag), from WS, start with that line before reading next repeat starting from the left towards the right. Happy knitting!

29.10.2013 - 09:30