
Popular categories
Looking for a yarn?


|
|||||||||||||||||||
Eva Luna |
|||||||||||||||||||
|
|
|||||||||||||||||||
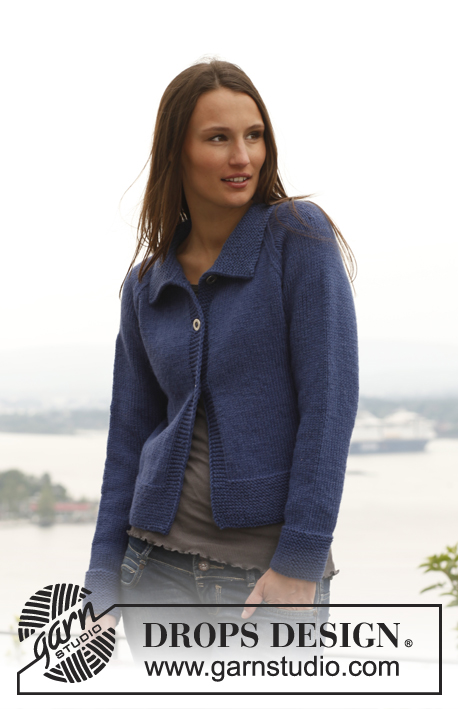
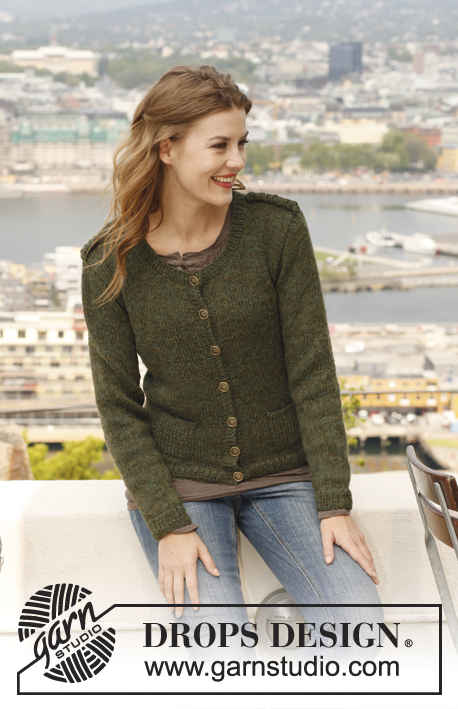
Knitted DROPS fitted jacket with lace pattern and shawl collar in ”Karisma”. Size: XS - XXXL.
DROPS 141-6 |
|||||||||||||||||||
|
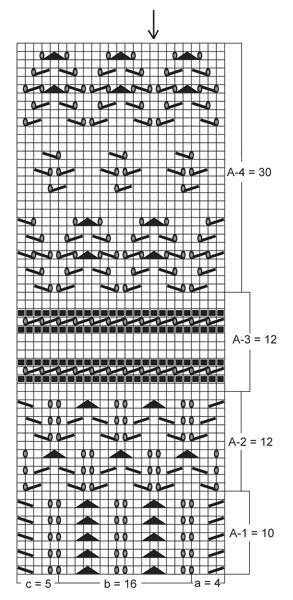
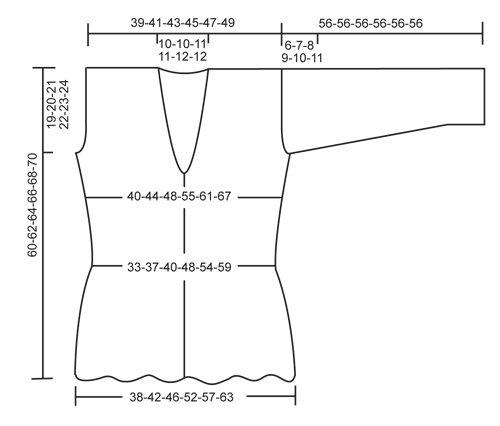
GARTER ST (back and forth on needle): K sts on all rows. BUTTONHOLES: Bind off for buttonholes on right band. 1 buttonhole = K tog third and fourth st from mid front and make 1 YO. Bind off for buttonholes when piece measures: SIZE XS/S: 6, 13, 20, 27, 34 and 40 cm / 2⅜",5⅛",8",10⅝",13⅜" and 15¾". SIZE M: 6, 13, 20, 27, 34 and 41 cm / 2⅜",5⅛",8",10⅝",13⅜" and 16⅛". SIZE L: 6, 14, 21, 28, 35 and 42 cm / 2⅜",5½",8¼",11",13¾" and 16½". SIZE XL: 6, 14, 22, 29, 36 and 43 cm / 2⅜",5½",8¾",11⅜",14¼" and 17". SIZE XXL: 6, 14, 22, 30, 37 and 44 cm / 2⅜",5½",8¾",11¾",14½" and 17¼". SIZE XXXL: 6, 14, 22, 30, 38 and 45 cm / 2⅜",5½",8¾",11¾",15" and 17¾". PATTERN: See diagrams A-1 to A-4. Diagrams show all rows seen from RS. DECREASE TIP (applies to neck): Dec from RS inside all sts in garter st, i.e. band + the sts inc for collar. Dec as follows on the left side, before all sts in garter st: K 2 tog. Dec as follows on the right side, after all sts in garter st: Slip 1 st as if to K, K 1, psso. ---------------------------------------------------------- BODY: Worked back and forth on circular needle from mid front. Loosely cast on 211-231-251-281-311-341 sts (includes 5 band sts in each side towards mid front) on circular needle size 4 mm / US 6 with Karisma. Work first row as follows (= WS): K 5, K 2 tog, * K 7, slip 1 st as if to K, K 2 tog, psso *, repeat from *-* until 14 sts remain, K 7, K 2 twisted tog, K 5 = 171-187-203-227-251-275 sts. K 2 rows over all sts. Insert 2 markers in the piece; 45-49-53-59-65-71 sts in from each side (= 81-89-97-109-121-133 sts between markers on back piece). Continue as follows: 5 band sts in GARTER ST (see explanation above), work diagram A-1 as follows: Diagram a over 4 sts, diagram b over 152-168-184-208-232-256 sts and diagram c over 5 sts, then 5 band sts in garter st. Work A-1 one time vertically. AT THE SAME TIME when piece measures 6 cm / 2⅜", beg to bind off for BUTTONHOLES – see explanation above! REMEMBER THE GAUGE! Then work diagram A-2 the same way (bands are worked in garter st the entire time), repeat A-2 a total of 3 times vertically. Continue with diagram A-3 – AT THE SAME TIME on 1st row dec 12-12-12-8-8-8 sts evenly (dec 6-6-6-4-4-4 sts over back piece and 3-3-3-2-2-2 sts over each front piece, do not dec over bands) = 159-175-191-219-243-267 sts, also dec 12-12-12-8-8-8 sts evenly on last row in A-3 - distribute the dec the same way as previous dec = 147-163-179-211-235-259 sts. When A-3 has been worked 1 time vertically, work A-4 1 time vertically. After A-4, piece measures approx. 32 cm / 12½". Continue with A-3 – AT THE SAME TIME on 1st row inc 16 sts evenly (8 sts over back piece and 4 sts over each front piece) = 163-179-195-227-251-275 sts. Also inc the same way on last row in A.3 = 179-195-211-243-267-291 sts. When A-3 has been worked one time, continue with A-2 (inc for collar will beg before A-2 is done – read explanation below). COLLAR: At the same time when piece measures 39-40-41-42-43-44 cm / 15¼"-15¾"-16⅛"-16½"-17"-17¼", beg inc for collar in each side towards mid front. Inc by making 1 YO inside outermost sts in garter st in each side - on next row K YO twisted to avoid holes. Repeat inc every other row until 15-15-15-18-18-18 sts have been inc in each side, i.e. there are a total of 20-20-20-23-23-23 sts in garter st in each side. Work A-2 until piece measures approx. 41-42-43-44-45-46 cm / 16⅛"-16½"-17"-17¼"-17¾"-18" - stop after one full repetition. Then work first row in A-3 as follows: Inc for collar and work band as before, dec 1 st for neck – SEE DECREASE TIP, work until 2-3-3-4-4-5 sts remain before marker in the side, bind off 4-6-6-8-8-10 sts for armhole, work until 2-3-3-4-4-5 sts remain before next marker, bind off 4-6-6-8-8-10 sts for armhole, work until 2 sts remain before band, dec 1 st for neck – SEE DECREASE TIP, work band and inc for collar as before. Finish each part separately. LEFT FRONT PIECE: Read all of the following section before continuing! PATTERN: Continue with A-3 until diagram has been worked 1 time vertically, then work A-4 one time (work the sts that do not fit up towards neck when dec for neck are worked in stockinette st), then work A-3 one more time and then work in stockinette st until finished measurements - 1 st at the edge towards armhole is worked in garter st the entire time. ARMHOLE: At the same time bind off for armhole at beg of every row from the side as follows: 2 sts 0-0-0-2-3-4 times and then 1 st 0-0-2-3-5-6 times. COLLAR AND NECK: Continue inc for collar, repeat dec for neck every other row 4 more times and then every 4th row 5-5-6-6-7-7 times. After inc for collar and dec for neck, there are 50-53-54-59-60-62 sts on needle. When piece measures 60-62-64-66-68-70 cm / 23⅝"-24⅜"-25¼"-26"-26¾"-27½", bind off the first 30-33-34-36-37-39 sts from RS for shoulder, work the rest of row (= 20-20-20-23-23-23 sts remain for collar). Then work in garter st over collar as follows: * 2 rows over only the outermost 15-15-15-18-18-18 sts (towards mid front), 2 rows over all sts *, repeat from *-* until collar measures approx. 5½-5½-6-6-6½-6½ cm / 2¼"-2¼"-2⅜"-2⅜"-2½"-2½" on inside along the shortest side (it will then measure the double in the outer side), slip sts on a stitch holder. RIGHT FRONT PIECE: Work as left front piece but reversed. When casting/binding off the shoulder sts, this is done from WS to avoid cutting the thread to work the collar. BACK PIECE: = 81-87-95-109-121-131 sts. Bind off for armholes in each side as on front piece = 81-87-91-95-99-103 sts. AT THE SAME TIME finish A-3 with outermost sts in each side in garter st, continue with A-4 one time vertically (count outwards so that st marked with 1 arrow in diagram is mid back, work the sts in each side that do not fit the pattern in stockinette st). Then work A-3 one more time before continuing in stockinette st until finished measurements. When piece measures 58-60-62-64-66-68 cm / 22¾"-23⅝"-24⅜"-25¼"-26"-26¾", bind off the middle 19-19-21-21-23-23 sts for neck and finish each shoulder separately. Bind off 1 st on next row from neck = 30-33-34-36-37-39 sts remain on each shoulder. Bind off when piece measures 60-62-64-66-68-70 cm / 23⅝"-24⅜"-25¼"-26"-26¾"-27½". SLEEVE: Worked back and forth on needle. Loosely cast on 63-63-63-73-73-73 sts (incl 1 edge st in each side) on needle size 4 mm / US 6 with Karisma. Work first row as follows (= WS): K 1, K 2 tog, * K 7, slip 1 st as if to K, K 2 tog, psso *, repeat from *-* until 10 sts remain, K 7, K 2 twisted tog, K 1 = 51-51-51-59-59-59 sts. K 2 rows over all sts. Work as follows (1st row = RS): 1 edge st in garter st, work diagram A-1 as follows: Diagram a over 4 sts, diagram b over 40-40-40-48-48-48 sts and diagram c over 5 sts, finish with 1 edge st in garter st. Work A-1 one time vertically. READ ALL OF THE FOLLOWING SECTION BEFORE CONTINUING! PATTERN: Continue with A-2 the same way four times vertically, then work A-3 one time, A-4 one time (count outwards so that st marked with 1 arrow in diagram is on the middle of sleeve), A-3 one time and then A-2 until finished measurements. INCREASE: At the same time when piece measures 12-12-14-14-16-16 cm / 4¾"-4¾"-5½"-5½"-6¼"-6¼", inc 1 st in each side. Repeat inc every 4½-3½-2½-2½-2-1½ cm / 1¾"-1¼"-⅞"-⅞"-¾"-½" 8-10-12-11-14-17 more times = 69-73-77-83-89-95 sts – work the inc sts in stockinette st until they fit the pattern. SLEEVE CAP: When piece measures 50-49-48-47-46-45 cm / 19¾"-19¼"-19"-18½"-18"-17¾" (shorter measurements in the larger sizes because of longer sleeve cap and wider shoulders), bind off for sleeve cap at beg of every row in each side: 4 sts 1 time, then 2 sts in each side until piece measures 55 cm / 21½"" in all sizes (make sure that the pattern is not displaced when binding off, work the sts that do not fit in stockinette st), finally bind off 3 sts 1 time in each side before binding off the remaining sts. The piece now measures approx. 56 cm / 22" in all sizes. ASSEMBLY: Sew the shoulder seams. Sew the collar tog mid back with grafting/kitchener sts and sew it to the back piece. Sew sleeve seams inside 1 edge st and sew in the sleeves. Sew on buttons. |
|||||||||||||||||||
Diagram explanations |
|||||||||||||||||||
|
|||||||||||||||||||
|
|||||||||||||||||||
|
|||||||||||||||||||
|
Have you made this or any other of our designs? Tag your pictures in social media with #dropsdesign so we can see them! Do you need help with this pattern?You'll find tutorial videos, a Comments/Questions area and more by visiting the pattern on garnstudio.com. © 1982-2024 DROPS Design A/S. We reserve all rights. This document, including all its sub-sections, has copyrights. Read more about what you can do with our patterns at the bottom of each pattern on our site. |
|||||||||||||||||||


With over 40 years in knitting and crochet design, DROPS Design offers one of the most extensive collections of free patterns on the internet - translated to 17 languages. As of today we count 304 catalogs and 11422 patterns - 11417 of which are translated into English (US/in).
We work hard to bring you the best knitting and crochet have to offer, inspiration and advice as well as great quality yarns at incredible prices! Would you like to use our patterns for other than personal use? You can read what you are allowed to do in the Copyright text at the bottom of all our patterns. Happy crafting!
Comments / Questions (167)
Danke für die schnelle Antwort. Leider ist bei mir noch eine Frage aufgetaucht: Ein paar Kommentare weiter unten habe ich einen Beitrag gelesen, in dem steht, dass das gesamte Diagramm nach a, b, c aufgeteilt ist. Ist das richtig, oder gilt diese Aufteilung nur für das Muster A1? Danke nochmals!
14.05.2014 - 09:06DROPS Design answered:
Liebe Maria, ja, alle Muster sind in a, b und c aufgeteilt, Sie stricken jedes Muster wie A.1, also nach den Blenden-M die nächsten 4 M der R in a, dann b bis noch 5 M für das Muster + die Blenden-M übrig sind, dann diese 5 M in c und zuletzt die Blenden-M. Dies wird gemacht, damit Anfang und Ende des Musters symmetrisch werden. Für die Loch-R in A.3 können Sie sich aber einfach merken, dass Sie durchweg 2 M re zusammen + 1 Umschl. stricken und die R mit 1 M re beenden.
14.05.2014 - 09:31Hallo, ich habe eine Frage zu den Diagrammen. Ich lese diese von links nach rechts, oder? Die erste Reihe des Musters beginnt ja mit A1-a, Teil c kommt zum Schluss. Kann ich dann davon ausgehen, dass das gesamte Diagramm von links nach rechts gestrickt werden muss? Herzlichen Dank!!
13.05.2014 - 20:05DROPS Design answered:
Liebe Maria, grundsätzlich gilt für unsere Diagramme, dass sie in unterschiedlichen Richtungen gelesen werden: Die Hin-R lesen Sie von rechts nach links (d.h. alle ungeraden R, also die 1., 3., 5., 7. R usw.), die Rück-R (d.h. die geraden R, also die 2., 4., 6., 8. R usw.) lesen Sie von links nach rechts. In den Rück-R müssen Sie in diesem Fall aber gar nicht viel lesen, da es immer nur linke M sind - bis auf A-3, da stricken Sie in der 2., 4., 8. und 10. R von A-3 jeweils rechte M.
14.05.2014 - 00:15Maar nogmaals hou houd je de markeerders op hun plaats, bij dit ajourpatroon valt de markeerder soms midden in bijvoorbeeld 1 st afhalen, 2 st samenbr. afgeh.steek overhalen, en dan twee toeren verder hier weer een omslag maken, dan is de markeerder toch niet meer op de juiste plaats?
09.04.2014 - 17:02DROPS Design answered:
Hoi Rianne. Je weet hoeveel steken er moet zijn voor het voor- en achterpand. Dus plaats de markeerder terug in de nld erna zodat hij weer goed staat.
11.04.2014 - 13:48Bij het begin worden markeerders geplaatst. Maar hoe houd je die op hun juiste plaats bij het maken van omslagen en het samen breien en overhalen van steken in ajourpatroon. Is het niet beter om als je bij de armsgaten bent dán de steken uit te tellen? En dit dus in het patroon aan te geven. Mvg Rianne
04.04.2014 - 10:11DROPS Design answered:
Wij vinden het prettig om markeerders te gebruiken en ze steeds te verplaatsen, ook bij de kantpatronen. Als u het prettiger vindt om een andere methode toe te passen, staat u dat natuurlijk vrij - iedereen heeft zo zijn eigen voorkeuren.
07.04.2014 - 19:11Bonjour pourquoi aux emmanchures il faut faire 0 fois 2m et 0 fois 1m
04.01.2014 - 15:44DROPS Design answered:
Bonjour Mme Chevassus, pour les 2 premières tailles (XS/S et M), on ne diminue pas de mailles pour les emmanchures après les mailles rabattues entre le dos et chaque devant. Bon tricot!
06.01.2014 - 09:16Kan ikke lese i mønsteret hvordan kragen skal strikkes på bakstykket, regner med det skal strikkes riller på de utfelte maskene fra nakke samme lengde som fremme??
26.11.2013 - 22:12DROPS Design answered:
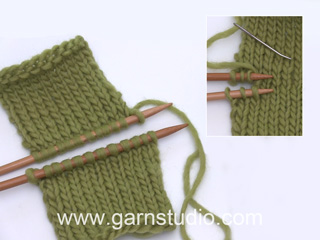
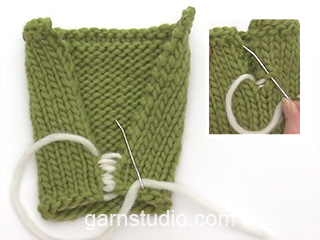
Således strikker du (husk forkortede pinde ifølge opskriften):
Easy shawl collar from Garnstudio Drops design on Vimeo.
27.11.2013 - 11:30Hallo, eine wahrscheinlich dumme Frage, Eure Anleitungen (Muster) zeigen immer nur die Hinreihe, richtig? Ich gehe davon aus, dass die Rückreihe immer links gestrickt wird (wenn Hinreihe rechts) außer es ist explizit erwähnt, richtig? Bitte um kurze Bestätigung. Danke
22.11.2013 - 08:19Ich möchte diese wunderschöne Jacke stricken, aber die Maße für Größe S erscheinen mir sehr schmal. ich habe sonst immer Taillenmaß 43 cm und unten 46 cm gestrickt.Ist das denn so richtig in der Beschreibung?
14.10.2013 - 17:10DROPS Design answered:
Liebe Renate, diese Jacke ist tatsächlich recht eng geschnitten. Orientieren Sie sich in jedem Fall an der Schnittübersicht und wählen danach die Grösse.
15.10.2013 - 13:10Hej.. jeg er ved at strikke den og er nået til udtagning til krave ,skal der tages ud helt ud før kant eller der hvor mønstret slutte og ret beg. håber du forstår mit spørgsmål.
07.10.2013 - 12:09DROPS Design answered:
Hej Marianne. Du skal tage ud ved siden af den første ret kantmaske (dvs de 5 kantmasker langs din forkant.
07.10.2013 - 20:59Skal jeg strikke et omslag sidst i A-1 (b)eller skal omslaget med i A-1 (c)?
19.08.2013 - 06:49DROPS Design answered:
Du strikker det med sidst i A.1B. A.1B skal gaa over 16 masker og A.1C over 5.
19.08.2013 - 10:30