
Popular categories
Looking for a yarn?


|
|||||||||||||||||||
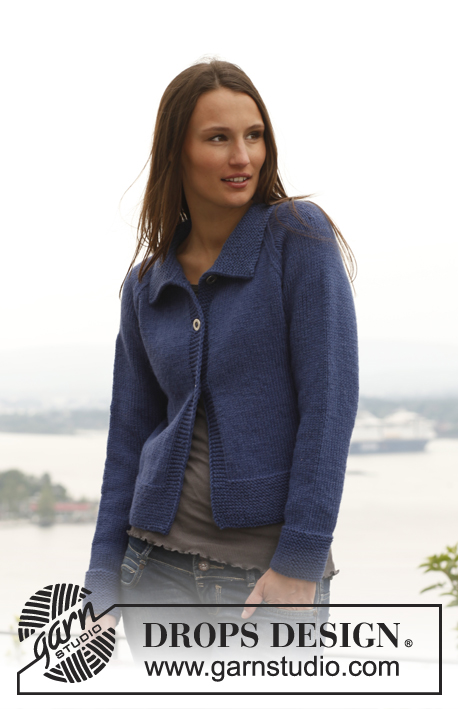
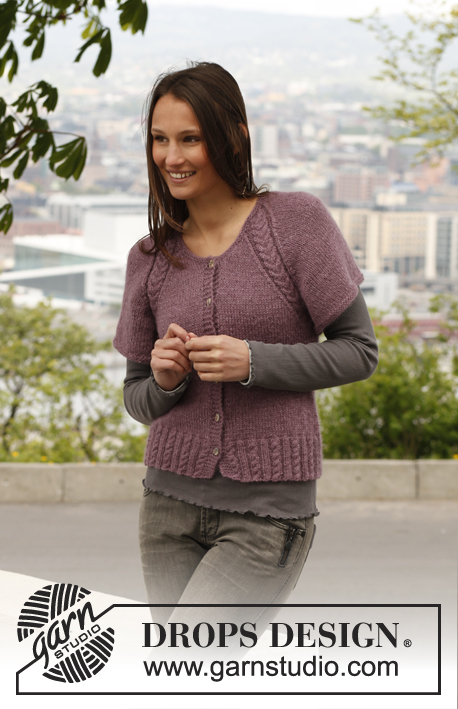
Eva Luna |
|||||||||||||||||||
|
|
|||||||||||||||||||
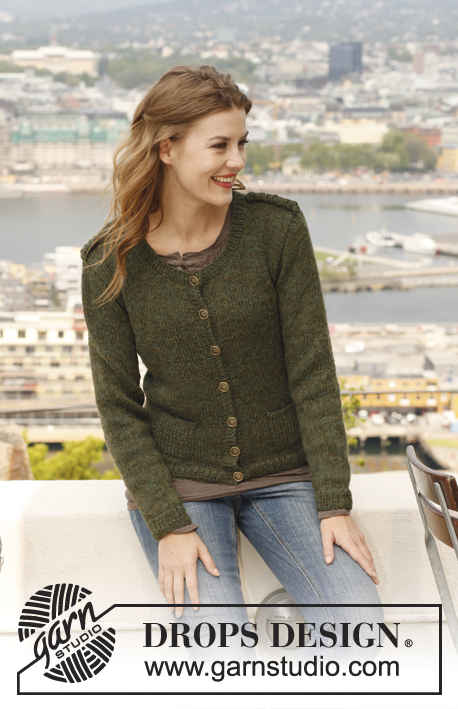
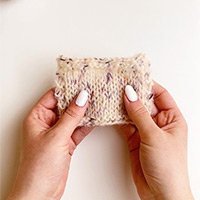
Knitted DROPS fitted jacket with lace pattern and shawl collar in ”Karisma”. Size: XS - XXXL.
DROPS 141-6 |
|||||||||||||||||||
|
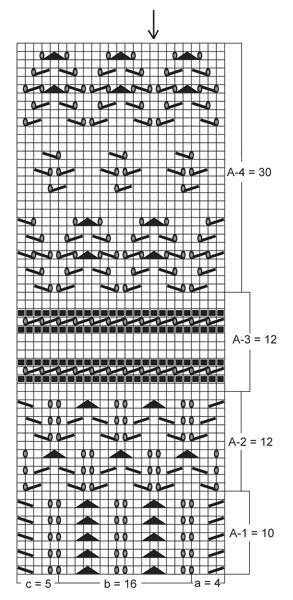
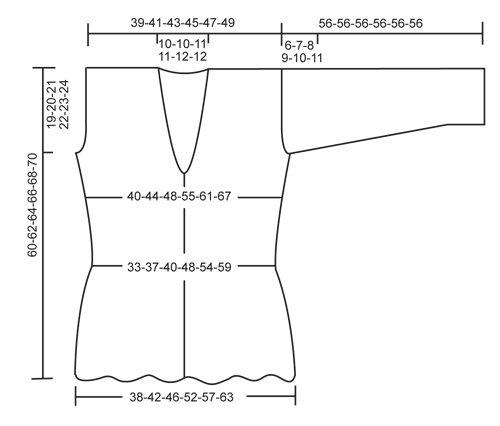
GARTER ST (back and forth on needle): K all rows. 1 ridge = 2 rows K. BUTTONHOLES: Cast off for buttonholes on right band. 1 buttonhole = K tog third and fourth st from mid front and make 1 YO. Cast off for buttonholes when piece measures: SIZE XS/S: 6, 13, 20, 27, 34 and 40 cm. SIZE M: 6, 13, 20, 27, 34 and 41 cm. SIZE L: 6, 14, 21, 28, 35 and 42 cm. SIZE XL: 6, 14, 22, 29, 36 and 43 cm. SIZE XXL: 6, 14, 22, 30, 37 and 44 cm. SIZE XXXL: 6, 14, 22, 30, 38 and 45 cm. PATTERN: See diagrams A-1 to A-4. Diagrams show all rows seen from RS. DECREASE TIP (applies to neck): Dec from RS inside all sts in garter st, i.e. band + the sts inc for collar. Dec as follows on the left side, before all sts in garter st: K 2 tog. Dec as follows on the right side, after all sts in garter st: Slip 1 st as if to K, K 1, psso. ---------------------------------------------------------- BODY: Worked back and forth on circular needle from mid front. Loosely cast on 211-231-251-281-311-341 sts (incl 5 band sts in each side towards mid front) on circular needle size 4 mm with Karisma. Work first row as follows (= WS): K 5, K 2 tog, * K 7, slip 1 st as if to K, K 2 tog, psso *, repeat from *-* until 14 sts remain, K 7, K 2 twisted tog, K 5 = 171-187-203-227-251-275 sts. K 2 rows over all sts. Insert 2 markers in the piece; 45-49-53-59-65-71 sts in from each side (= 81-89-97-109-121-133 sts between markers on back piece). Continue as follows: 5 band sts in GARTER ST (see explanation above), work diagram A-1 as follows: Diagram a over 4 sts, diagram b over 152-168-184-208-232-256 sts and diagram c over 5 sts, then 5 band sts in garter st. Work A-1 one time vertically. AT THE SAME TIME when piece measures 6 cm, beg to cast off for BUTTONHOLES – see explanation above! REMEMBER THE KNITTING TENSION! Then work diagram A-2 the same way (bands are worked in garter st the entire time), repeat A-2 a total of 3 times vertically. Continue with diagram A-3 – AT THE SAME TIME on 1st row dec 12-12-12-8-8-8 sts evenly (dec 6-6-6-4-4-4 sts over back piece and 3-3-3-2-2-2 sts over each front piece, do not dec over bands) = 159-175-191-219-243-267 sts, also dec 12-12-12-8-8-8 sts evenly on last row in A-3 - distribute the dec the same way as previous dec = 147-163-179-211-235-259 sts. When A-3 has been worked 1 time vertically, work A-4 1 time vertically. After A-4, piece measures approx. 32 cm. Continue with A-3 – AT THE SAME TIME on 1st row inc 16 sts evenly (8 sts over back piece and 4 sts over each front piece) = 163-179-195-227-251-275 sts. Also inc the same way on last row in A.3 = 179-195-211-243-267-291 sts. When A-3 has been worked one time, continue with A-2 (inc for collar will beg before A-2 is done – read explanation below). COLLAR: At the same time when piece measures 39-40-41-42-43-44 cm, beg inc for collar in each side towards mid front. Inc by making 1 YO inside outermost sts in garter st in each side - on next row K YO twisted to avoid holes. Repeat inc every other row until 15-15-15-18-18-18 sts have been inc in each side, i.e. there are a total of 20-20-20-23-23-23 sts in garter st in each side. Work A-2 until piece measures approx. 41-42-43-44-45-46 cm - adjust after one whole repetition. Then work first row in A-3 as follows: Inc for collar and work band as before, dec 1 st for neck – SEE DECREASE TIP, work until 2-3-3-4-4-5 sts remain before marker in the side, cast off 4-6-6-8-8-10 sts for armhole, work until 2-3-3-4-4-5 sts remain before next marker, cast off 4-6-6-8-8-10 sts for armhole, work until 2 sts remain before band, dec 1 st for neck – SEE DECREASE TIP, work band and inc for collar as before. Finish each part separately. LEFT FRONT PIECE: Read all of the following section before continuing! PATTERN: Continue with A-3 until diagram has been worked 1 time vertically, then work A-4 one time (work the sts that do not fit up towards neck when dec for neck are worked in stocking st), then work A-3 one more time and then work in stocking st until finished measurements - 1 st at the edge towards armhole is worked in garter st the entire time. ARMHOLE: At the same time cast off for armhole at beg of every row from the side as follows: 2 sts 0-0-0-2-3-4 times and then 1 st 0-0-2-3-5-6 times. COLLAR AND NECK: Continue inc for collar, repeat dec for neck every other row 4 more times and then every 4th row 5-5-6-6-7-7 times. After inc for collar and dec for neck, there are 50-53-54-59-60-62 sts on needle. When piece measures 60-62-64-66-68-70 cm, cast off the first 30-33-34-36-37-39 sts from RS for shoulder, work the rest of row (= 20-20-20-23-23-23 sts remain for collar). Then work in garter st over collar as follows: * 2 rows over only the outermost 15-15-15-18-18-18 sts (towards mid front), 2 rows over all sts *, repeat from *-* until collar measures approx. 5½-5½-6-6-6½-6½ cm on inside along the shortest side (it will then measure the double in the outer side), slip sts on a stitch holder. RIGHT FRONT PIECE: Work as left front piece but reversed. When casting off the shoulder sts, this is done from WS to avoid cutting the thread to work the collar. BACK PIECE: = 81-87-95-109-121-131 sts. Cast off for armholes in each side as on front piece = 81-87-91-95-99-103 sts. AT THE SAME TIME finish A-3 with outermost sts in each side in garter st, continue with A-4 one time vertically (count outwards so that st marked with 1 arrow in diagram is mid back, work the sts in each side that do not fit the pattern in stocking st). Then work A-3 one more time before continuing in stocking st until finished measurements. When piece measures 58-60-62-64-66-68 cm, cast off the middle 19-19-21-21-23-23 sts for neck and finish each shoulder separately. Cast off 1 st on next row from neck = 30-33-34-36-37-39 sts remain on each shoulder. Cast off when piece measures 60-62-64-66-68-70 cm. SLEEVE: Worked back and forth on needle. Loosely cast on 63-63-63-73-73-73 sts (incl 1 edge st in each side) on needle size 4 mm with Karisma. Work first row as follows (= WS): K 1, K 2 tog, * K 7, slip 1 st as if to K, K 2 tog, psso *, repeat from *-* until 10 sts remain, K 7, K 2 twisted tog, K 1 = 51-51-51-59-59-59 sts. K 2 rows over all sts. Work as follows (1st row = RS): 1 edge st in garter st, work diagram A-1 as follows: Diagram a over 4 sts, diagram b over 40-40-40-48-48-48 sts and diagram c over 5 sts, finish with 1 edge st in garter st. Work A-1 one time vertically. READ ALL OF THE FOLLOWING SECTION BEFORE CONTINUING! PATTERN: Continue with A-2 the same way four times vertically, then work A-3 one time, A-4 one time (count outwards so that st marked with 1 arrow in diagram is on the middle of sleeve), A-3 one time and then A-2 until finished measurements. INCREASE: At the same time when piece measures 12-12-14-14-16-16 cm, inc 1 st in each side. Repeat inc every 4½-3½-2½-2½-2-1½ cm 8-10-12-11-14-17 more times = 69-73-77-83-89-95 sts – work the inc sts in stocking st until they fit the pattern. SLEEVE CAP: When piece measures 50-49-48-47-46-45 cm (shorter measurements in the larger sizes because of longer sleeve cap and broader shoulder width), cast off for sleeve cap at beg of every row in each side: 4 sts 1 time, then 2 sts in each side until piece measures 55 cm in all sizes (make sure that the pattern is not displaced when casting off, work the sts that do not fit in stocking st), finally cast off 3 sts 1 time in each side before casting off the remaining sts. The piece now measures approx. 56 cm in all sizes. ASSEMBLY: Sew the shoulder seams. Sew the collar tog mid back with grafting/kitchener sts and sew it to the back piece. Sew sleeve seams inside 1 edge st and sew in the sleeves. Sew on buttons. |
|||||||||||||||||||
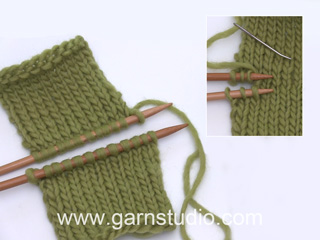
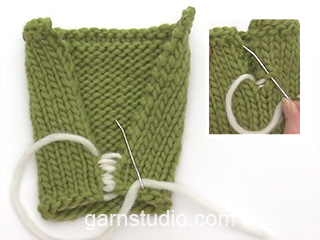
Diagram explanations |
|||||||||||||||||||
|
|||||||||||||||||||
|
|||||||||||||||||||
|
|||||||||||||||||||
|
Have you made this or any other of our designs? Tag your pictures in social media with #dropsdesign so we can see them! Do you need help with this pattern?You'll find tutorial videos, a Comments/Questions area and more by visiting the pattern on garnstudio.com. © 1982-2024 DROPS Design A/S. We reserve all rights. This document, including all its sub-sections, has copyrights. Read more about what you can do with our patterns at the bottom of each pattern on our site. |
|||||||||||||||||||


With over 40 years in knitting and crochet design, DROPS Design offers one of the most extensive collections of free patterns on the internet - translated to 17 languages. As of today we count 304 catalogues and 11422 patterns - 11422 of which are translated into English (UK/cm).
We work hard to bring you the best knitting and crochet have to offer, inspiration and advice as well as great quality yarns at incredible prices! Would you like to use our patterns for other than personal use? You can read what you are allowed to do in the Copyright text at the bottom of all our patterns. Happy crafting!
Comments / Questions (167)
Je fais la grandeur médium et pour le dos et devant, je suis rendue aux diminutions. Si j'ai bien compris, une fois les augmentations complétées je fais les diminutions dans le point mousse correspondant à l'encolure, 1 maille à la fois de chaque côté jusqu'à ce qu'il reste 2 mailles et ensuite une autre diminution pour arriver à 1 maille. Est-ce exact? Pour les emmanchures ça va.
02.01.2018 - 20:11DROPS Design answered:
Bonjour Mme Guy, en taille M, vous commencez à augmenter pour le col à 40 cm de hauteur totale, et à 42 cm de hauteur totale, vous tricotez le rang indiqué, soit augmentez pour le col et diminuez pour l'encolure, en même temps, vous rabattez 6 m sur les côtés pour les emmanchures. Bon tricot!
03.01.2018 - 14:01Bonjour, pour le dos et devant, rendu à 42 cm. Je comprends difficilement ce que je dois faire au niveau des diminutions que ce soit pour les emmanchures, etc... pourriez-vous m'expliquer s.v.p. . Merci.
29.12.2017 - 19:27DROPS Design answered:
Bonjour Mme Guy, en taille XL, on commence à augmenter pour le col à 42 cm (= 1 m de chaque côté à 1 m du bord). En même temps, tricotez A.2 jusqu'à environ 44 cm (assurez-vous qu'un motif de A.2 soit terminé en hauteur), tricotez ensuite le 1er rang de A.3 et en même temps: augmentez pour le col comme avant, diminuez pour l'encolure (cf DIMINUTIONS) et rabattez les mailles indiqué pour les emmanchures. Terminez ensuite chaque partie (chaque devant et le dos) séparément. Bon tricot!
02.01.2018 - 10:16Bonjour, je ne comprends pas la partie A-1 du diagramme pour la partie b) où je dois tricoter 16 mailles à répéter sur 168 mailles. Hors le 168 mailles n'est pas un multiple de 16. Pourriez-vous me dire ce que je dois faire car vraisemblablement je n'ai pas compris? Merci
11.12.2017 - 15:25DROPS Design answered:
Bonjour Mme Guy, vous allez tricoter 10 fois la partie b, soit 10 x 16 = 160 m puis tricoter les 8 premières mailles de la partie b (la moitié du motif) = 168 m. Bon tricot!
11.12.2017 - 16:40Bonsoir, pour les manches il est écrit pour la taille XS diminuer 1X4m puis 2m jusqu'à ce que l'ouvrage mesure 55 cm. Mais pouvez-vous me dire combien de fois il faut diminuer 2m ? et combien a-t-on de mailles restantes pour terminer. Merci
10.08.2017 - 21:09DROPS Design answered:
Bonjour Danielle, le nombre de mailles restant dépendra de votre tension en hauteur, rabattez 2 m au début de chaque rang de chaque côté jusqu'à ce que la manche mesure 55 cm (c'est la hauteur qui compte ici davantage que le nombre de fois que l'on va rabattre) et rabattez ensuite 1 x 3 m de chaque côté, puis rabattez les mailles restantes. Bon tricot!
11.08.2017 - 09:36Hallo Zusammen, in Muster C=5 heißt es 1 Umschlag zwischen 2 Maschen, 1 Umschlag zwischen 2 Maschen, 2 Maschen rechts stricken, 2 Maschen rechts zusammen stricken. Ich komm da immer auf 6 Maschen am Ende und nicht auf 5 wie angegeben. Somit nehme ich immer 1 Masche zu. Das Muster soll 5 mal hochgestrickt werden (plus die Rückreihen). Am Ende habe ich dann 5 Maschen zugenommen. Ist das so korrekt? Vielen Dank Agnes
05.05.2017 - 07:50DROPS Design answered:
Liebe Frau Von der Goltz, der 1. Umschlag den Sie beschrieben gehört zu Muster B, im C sollen Sie nur 5 Maschen haben: 1 Masche rechts, 1 Umschlag, 2 Maschen rechts, 2 Maschen rechts zusammen. Viel Spaß beim stricken!
05.05.2017 - 09:46Bonjour sur le diagramme A1 au niveau de la partie b on tricote sur 16 mailles soit 1jete 1menv 1 jete 2m env 2 m end ensemble .... 2 m end ensemble 1 jete et ensuite on reprend 1 ou 2 jete ? je ne sais pas si je me fais bien comprendre mais je veux savoir s'il faut avoir 3 jetes lorsque l'on reprend le début de la partie b du diagramme
20.04.2017 - 16:59DROPS Design answered:
Bonjour Bibiclaude, tricotez A.1 ainsi: A.1a sur 4 m = 2 m ens à l'end, 2 m end, 1 jeté - A.1b= *1 m end, 1 jeté, 2 m end, glissez 1 m à l'end, 2 m ens à l'end, passez la m glissée par-dessus la m tricotée, 2 m end, 1 jeté, 1 m end, 1 jeté, 2 m end, glissez 1 m à l'end, 2 m ens à l'end, passez la m glissée par-dessus la m tricotée, 2 m end, 1 jeté*, répétez ces 16 m de *-* - A.1c = 5 m: 1 m end, 1 jeté, 2 m end, glissez 1 m à l'end, 1 m end, passez la m glissée par-dessus la m tricotée. Bon tricot!
21.04.2017 - 08:51Karen Telling wrote:
I'm loving knitting this garment but am a bit confused with the collar increases. I've increased to the required number of stitches and continued now on the left front. It says to carry on with the collar increases but at the end I will have too many stitches?
10.02.2017 - 16:42DROPS Design answered:
Dear Mrs Telling, inc for collar start when you are working body, and continue on left front piece, ie you will have 20-23 sts (see size) in garter st for collar on each front piece. Happy knitting!
13.02.2017 - 08:58Hej. Jeg er nu færdig med at strikke blusen, men har maskerne fra begge krave stykker på en tråd. Hvad gør jeg med dem? Skal der strikkes yderligere, så de kan nå sammen? Og skal de så strikkes sammen? Håber det giver mening
24.11.2014 - 21:14DROPS Design answered:
Hej Katja, Hvis du har strikker de to stykker til krave som er beskrevet under forstykkerne, så skal de kunne nå sammen midt bagpå og så skal de bare syes sammen som der står under montering. God fornøjelse!
28.11.2014 - 15:47Really disappointed with this pattern. I have had to abandon it and use the wool for something else as it came out incredibly small- suitable for an 11 year old! My tension was Ok- I checked this but when I had knitted about 35cm and checked the size it was absolutely tiny- even taking into account the need to press when finished. Lovely pattern though- but get the measurements right so it is wearable. I knitted the XS/S and am a UK size 8
02.11.2014 - 10:05DROPS Design answered:
Dear Mrs Barker, to find out the matching size, the best is to compare a similar garment you have and like the shape to the measurements in chart (measures are in cm, taken flat from side to side). If your tension match, and if you keep the same tension while working, you should then get the result as in the chart. Happy knitting!
03.11.2014 - 09:47Bij lijf staat:'herhaal A2 in totaal 3 X' herhalen is de eerste keer nadoen, en dan kom je op 4 X. Voor mij was dit verwarrend. Door de foto te bestuderen kwam ik achter het juiste aantal. Dus voorstel: herhaal telpatroon A2 2 X tot een totaal van 3. Groetjes Trudy
10.09.2014 - 09:11