
Popular categories
Looking for a yarn?


|
||||||||||||||||
Delilah |
||||||||||||||||
 |
 |
|||||||||||||||
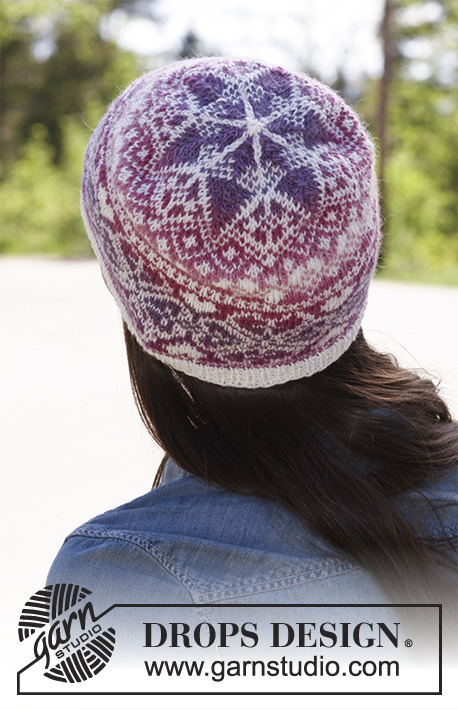
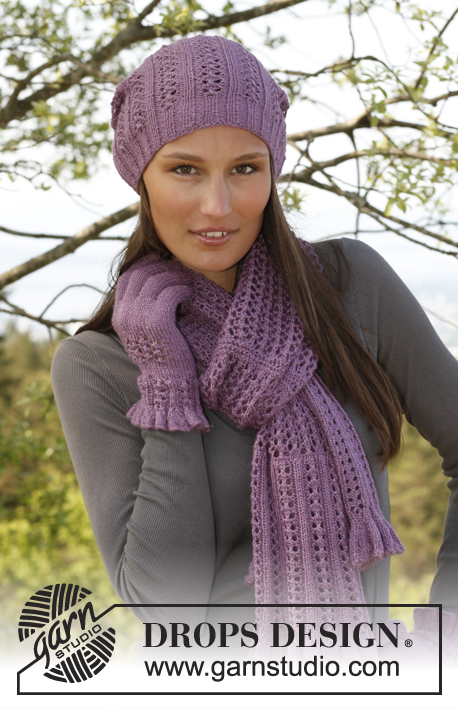
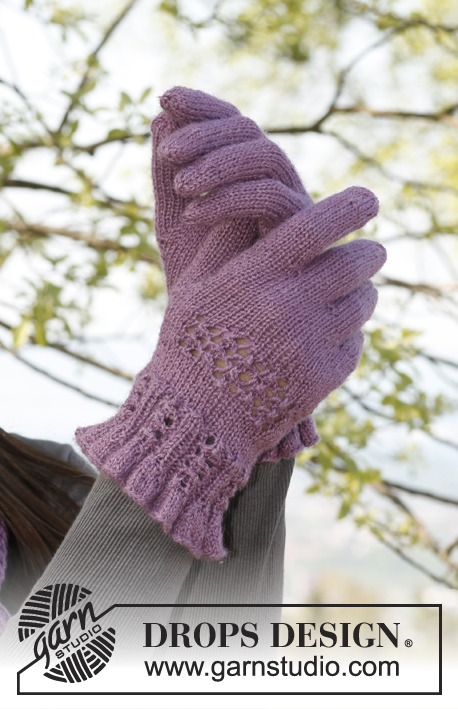
Knitted DROPS hat and scarf and gloves with lace pattern in ”BabyAlpaca Silk”.
DROPS 142-3 |
||||||||||||||||
|
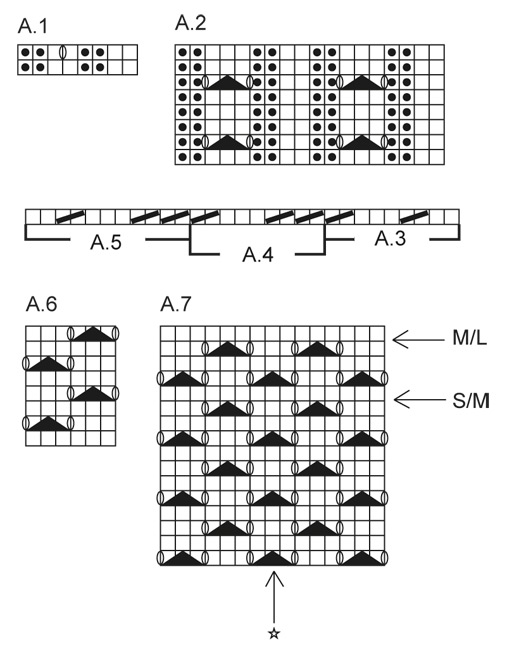
HAT AND SCARF: PATTERN: See diagrams A.1 to A.6. Diagrams show pattern from RS. GARTER ST (back and forth on needle): K all rows. ---------------------------------------------------------- HAT: Worked in the round on circular needle. Cast on 104-112 sts on circular needle size 2.5 mm with BabyAlpaca Silk. K 1 round, then work rib (= K 2/P 2). When piece measures 4-5 cm, work next round as last round in diagram A.1 = 117-126 sts on needle. Switch to circular needle size 3 mm and work PATTERN according to diagram A.2 until piece measures 22-23 cm. Work next round as follows: * K 2, P 2 tog, slip 1 st as if to K, K 2 tog, psso, P the next 2 tog *, repeat from *-* the entire round = 65-70 sts remain on needle (switch to double pointed needles when needed). * Work 2 cm in stocking st, K all sts tog 2 by 2 *, repeat from *-* 1 more time = 17-18 sts remain on needle. Cut the thread and pull it through the remaining sts, tighten tog and fasten. SCARF: The scarf consist of 2 equal parts that are sewn together in the middle at the end. Cast on 258 sts on needle size 3 mm with BabyAlpaca Silk. P 1 row from WS. Then work next row as follows from RS: 4 edge sts in GARTER ST - see explanation above - * K 8, P 3 *, repeat from *-* until 12 sts remain and finish with K 8 and 4 edge sts in GARTER ST. Continue rib like this with 4 edge sts in garter st in each side until piece measures 3 cm. On next row from RS dec 1 st on each side of every K-section by working all K 8 sts as follows (P 3 as before): Slip 1 st as if to K, K 1, psso, K until 2 sts remain, K 2 tog. Repeat dec on every row from RS 2 more times = 120 sts (all K 8 sts are now dec to K 2). Continue with K over K and P over P. AT THE SAME TIME on next row from RS dec all 3 P sts to 2 P sts (P tog the first 2 sts) = 98 sts. On next row from RS inc as shown on last row in diagram A.1 = 109 sts. Then work PATTERN according to diagram A.2 - beg from WS as follows: 4 edge sts as before, P 2, work A.2 until 4 sts remain and finish with 4 edge sts as before. When piece measures approx. 22 cm – adjust after 1st or 5th row in diagram – work next row as follows from RS: 4 edge sts as before, work A.3 one time, then work A.4 until 15 sts remain on row, finish with A.5 and then 4 edge sts as before = 77 sts remain on needle. Then work A.6 with 4 edge sts in each side as before until piece measures approx. 80 cm – adjust so that next row is from RS. K 1 row while AT THE SAME TIME dec 5 sts evenly = 72 sts on needle. K 1 row from WS and then loosely cast off with K from RS. Knit another part the same way. ASSEMBLY: Sew the two parts tog in front loop of outermost st along cast off edge. Scarf measures approx. 160 cm in length. ---------------------------------------------------------- GLOVES: PATTERN: See diagrams A.1, A.2 and A.7. INCREASE TIP: Inc 1 st by making 1 YO. To avoid holes K YO twisted on next round. ---------------------------------------------------------- LEFT GLOVE: Worked in the round on double pointed needles. Cast on 110-132 sts on double pointed needles size 2.5 mm with BabyAlpaca Silk. K 1 round. Work next round as follows: * K 8, P 3 *, repeat from *-* the entire round. Continue rib like this until rib measures 1 cm. On next round dec 1 st on each side of every K-section by working all K 8 sts as follows (P 3 as before): Slip 1 st as if to K, K 1, psso, K until 2 sts remain, K 2 tog. Repeat dec on every other round 2 more times = 50-60 sts (all K 8 sts are now dec to K 2). Work 1 round with K over K and P over P. On next round dec all 3 P sts to 2 P sts (P tog the first 2 sts) = 40-48 sts. Work 1 round with K over K and P over P, then inc as shown on last round in diagram A.1 = 45-54 sts. Then work PATTERN according to diagram A.2. When piece measures 6-7 cm – adjust after 2nd, 6th, 10th or 14th round in diagram, K 1 round while AT THE SAME TIME inc 3 sts evenly in Size S/M (do not inc in Size M/L) = 48-54 sts. Insert a marker in the 12th-13th st on round - NOW MEASURE PIECE FROM HERE. READ ALL OF THE FOLLOWING SECTION BEFORE CONTINUING! When piece measures 2 cm, beg inc for thumb gusset. Inc 1 st on each side of next to last st on round (i.e. inside hand) – READ INCREASE TIP. Repeat inc on each side of the inc sts on every 3rd round 4-5 more times = 11-13 thumb sts and 58-66 sts in total. AT THE SAME TIME when piece measures 3 cm, work PATTERN according to diagram A.7 mid on top of hand (st with marker should fit with st marked with arrow and star in diagram). When A.7 has been worked one time vertically (stop at arrow for your size), continue in stocking st in the round over all sts. AT THE SAME TIME when piece measures 6-7 cm, slip thumb sts + 1 st on each side (= 13-15 sts) on a stitch holder. Cast on 3 new sts behind the thumb = 48-54 sts. Continue in stocking st in the round until piece measures 10-11 cm. Now slip the first 19-21 sts on top of hand on a stitch holder, keep the next 11-12 sts on needle and slip the last 18-21 sts inside the hand on another stitch holder. LITTLE FINGER: = 11-12 sts, cast on 1 new st towards sts on stitch holders = 12-13 sts. Work in stocking st in the round for approx. 5½-6½ cm, then work all sts tog 2 by 2. Cut the thread and pull it through the remaining sts, tighten tog and fasten. HAND: Slip sts from stitch holders back on the needles, knit in addition up 2 sts towards the little finger = 39-44 sts. Work 2 rounds in stocking st. Keep the 2 sts that were knit up towards the little finger + 6-6 sts on top of hand and 5-6 sts inside the hand on the needle. Slip the remaining sts back on the stitch holders (= 13-15 sts on top of hand and 13-15 sts inside the hand). RING FINGER: = 13-14 sts, cast on 1 new st towards sts on stitch holders = 14-15 sts. Work in stocking st in the round for approx. 7-8 cm, then work all sts tog 2 by 2. Cut the thread and pull it through the remaining sts, tighten tog and fasten. MIDDLE FINGER: Slip 6-7 sts from each stitch holder back on needle, knit in addition up 2 sts towards the ring finger and cast on 1 new st towards sts on stitch holders = 15-17 sts. Work in stocking st in the round for approx. 7½-8½ cm, then work all sts tog 2 by 2. Cut the thread and pull it through the remaining sts, tighten tog and fasten. INDEX FINGER: Slip the remaining 14-16 sts from stitch holders back on needles, knit in addition up 2 sts towards the middle finger = 16-18 sts. Work in stocking st in the round for approx. 6½-7½ cm, then work all sts tog 2 by 2. Cut the thread and pull it through the remaining sts, tighten tog and fasten. THUMB: Slip the sts over thumb gusset on the needles and knit in addition up 3 sts along the edge behind the thumb sts = 16-18 sts. Work in stocking st in the round for approx. 5½-6 cm, then work all sts tog 2 by 2. Cut the thread and pull it through the remaining sts, tighten tog and fasten. RIGHT GLOVE: Work as left glove but reversed, i.e. insert a marker in the 37th-42nd st on round (instead of the 12th-13th st) and inc for thumb gusset on each side of second st on round instead of next to last st on round. |
||||||||||||||||
Diagram explanations |
||||||||||||||||
|
||||||||||||||||
|
||||||||||||||||
|
Have you made this or any other of our designs? Tag your pictures in social media with #dropsdesign so we can see them! Do you need help with this pattern?You'll find tutorial videos, a Comments/Questions area and more by visiting the pattern on garnstudio.com. © 1982-2024 DROPS Design A/S. We reserve all rights. This document, including all its sub-sections, has copyrights. Read more about what you can do with our patterns at the bottom of each pattern on our site. |
||||||||||||||||


With over 40 years in knitting and crochet design, DROPS Design offers one of the most extensive collections of free patterns on the internet - translated to 17 languages. As of today we count 304 catalogues and 11422 patterns - 11422 of which are translated into English (UK/cm).
We work hard to bring you the best knitting and crochet have to offer, inspiration and advice as well as great quality yarns at incredible prices! Would you like to use our patterns for other than personal use? You can read what you are allowed to do in the Copyright text at the bottom of all our patterns. Happy crafting!
Comments / Questions (28)
Die Maschenanzahl von 104, dh 117 nach letzter Rd von A.1, geht mit dem Muster A.2 nicht auf.
17.11.2013 - 16:28DROPS Design answered:
Liebe Mirjana, die 117 M haben Sie, nachdem Sie die Rd gestrickt haben, es ist mit dem Umschlägen. Somit geht alles auf.
18.11.2013 - 15:07Grazie mille... Allora come deve essere interpretato il diagramma per il lavoro sui ferri circolari?
27.01.2013 - 21:10DROPS Design answered:
Buongiorno, il diagramma per la lavorazione in tondo va interpretato così come si vede, è come se si lavorasse sempre sul diritto del lavoro.
14.02.2013 - 12:53Qualcuna sa dirmi cosa si intende con "lavorare 1 maglia a diritto sul diritto del lavoro, 1 maglia a rovescio sul rovescio del lavoro" riferendoci ai guanti lavorati in tondo sui ferri circolari? Mi risulta non ci sia un diritto ed un rovescio del lavoro, essendo in circolare il lavoro è sempre sul diritto... Grazie per un aiuto da chi è più esperta di me...
24.01.2013 - 11:52DROPS Design answered:
Ha ragione che si lavora in tondo quindi c'è solo il diritto del lavoro, ma i diagrammi valgono anche per la sciarpa che si lavora avanti e indietro, quindi ci sarà anche il rovescio del lavoro.
27.01.2013 - 16:06Michelle wrote:
Pragtig!
21.08.2012 - 01:17Vasileia wrote:
Very very nice!!!
19.07.2012 - 19:21Freu mich schon auf die Anleitung, ein super Set.
16.07.2012 - 16:26Angelika wrote:
Ein besonders hübsches Ensemble! Ich warte schon ganz ungeduldig auf die Anleitung...
08.07.2012 - 21:19Vind deze heel mooi, hoop dat die op de site komt
05.07.2012 - 13:27Ensemble très classe superbe
29.06.2012 - 07:22Heel mooi! Moet echt gepubliceerd worden, die wil ik maken.
27.06.2012 - 12:44