DROPS Nepal
DROPS Nepal
65% Wool, 35% Alpaca
from 1.70 £ /50g
Get the yarn to make this pattern from 23.80£.

The yarn cost is calculated from the pattern’s smallest size and the yarn’s cheapest product type. Looking for an even better price? You might find it on the DROPS Deals!

DROPS Super Sale

Cacao

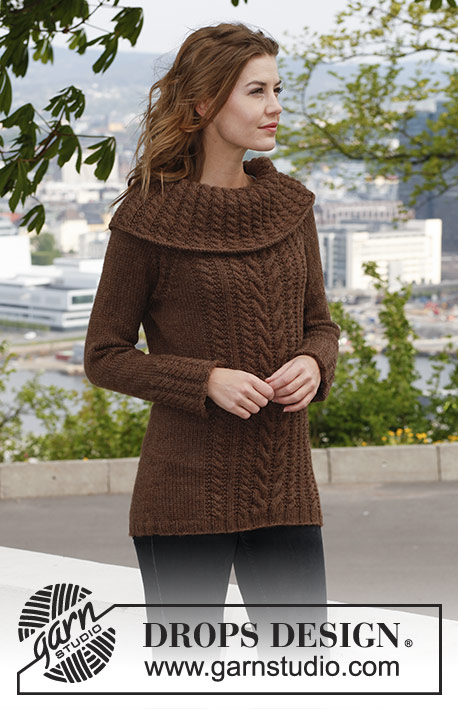
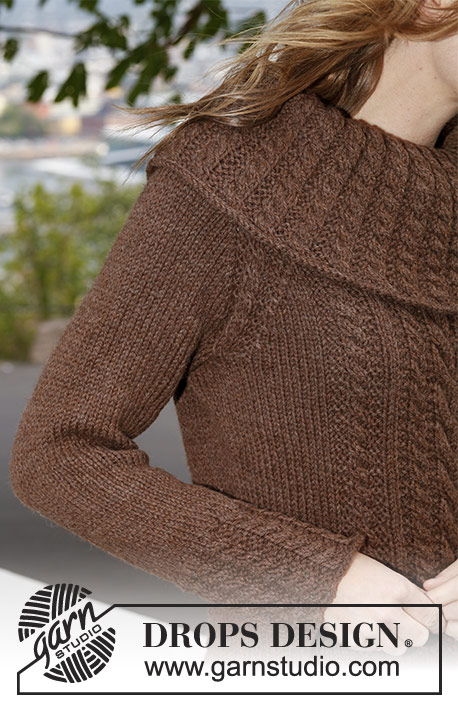
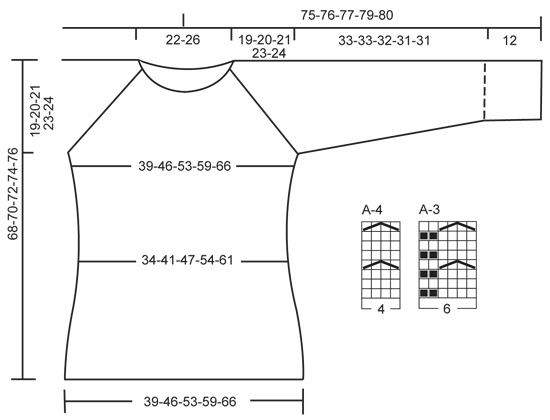
Knitted DROPS jumper with cables, raglan dec and large neck in ”Nepal”. Size: XS - XXXL.

DROPS 143-2
DROPS design: Pattern no ne-091
Yarn group C
-----------------------------------------------------------
Size: XS/S - M - L/XL - XXL - XXXL
Materials:
DROPS NEPAL from Garnstudio
Colour no 0612, medium brown:
700-800-900-1050-1200 g

DROPS DOUBLE POINTED NEEDLES and CIRCULAR NEEDLE (80 cm) SIZE 6 mm - or size needed to get 15 sts x 19 rows in stocking st = 10 x 10 cm.
DROPS DOUBLE POINTED NEEDLES and CIRCULAR NEEDLE (80 cm) SIZE 5 mm - for rib.

-------------------------------------------------------

Alternative Yarn – See how to change yarns here
Yarn Groups A to F – Use the same pattern and change the yarn here
Yarn usage using an alternative yarn – Use our yarn converter here

-------------------------------------------------------

DROPS Nepal
DROPS Nepal
65% Wool, 35% Alpaca
from 1.70 £ /50g
Get the yarn to make this pattern from 23.80£.

The yarn cost is calculated from the pattern’s smallest size and the yarn’s cheapest product type. Looking for an even better price? You might find it on the DROPS Deals!

Pattern instructions

NOTE: This pattern is written in British English. All measurements in charts are in cm. For conversion from cm to inches - click here. There are different terms for crocheting in British and American English. If this pattern includes crochet, click for "crochet terms" here. For this pattern in American English, please click here.
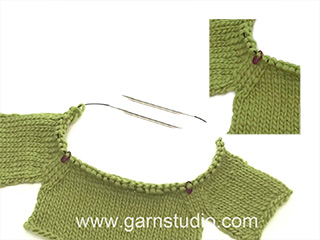
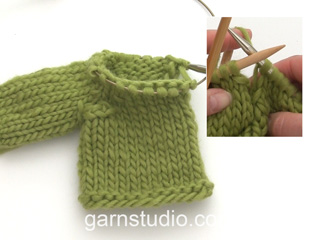
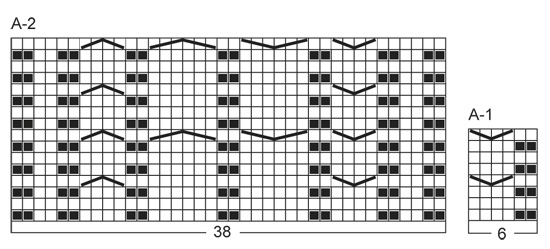
GARTER ST (in the round on circular needle):
* K 1 round and P 1 round *, repeat from *-*.

PATTERN:
See diagrams A-1 to A-4. Diagrams show 1 repetition of patterns in width.

DECREASE TIP:
Dec on each side of st with marker in the sides.
Dec as follows BEFORE st with marker: K 2 tog.
Dec as follows AFTER st with marker: K 2 twisted tog.

RAGLAN:
Dec on each side of the 8 raglan sts (= 2 sts in garter st + diagram A-4 + 2 sts in garter st).
Dec as follows when 2 sts remain BEFORE the 8 raglan sts: Slip 1 st as if to K, K 1, psso
Dec as follows AFTER the 8 raglan sts: K 2 tog.
----------------------------------------------------------

BODY:
Worked in the round on circular needle.
Cast on 126-146-166-186-206 sts on circular needle size 5 mm with Nepal. Work rib as follows: [K 2, insert 1 marker in the first st (= in the side), * P 2, K 3 *, repeat from *-* a total of 3-4-5-6-7 times, P 2, K 2, repeat from *-* 4 times, P 2, K 2, repeat from *-* 3-4-5-6-7 times, P 2, K 1], repeat from [-] 1 more time.
Continue rib like this for 6 rounds in total.
Work next round as follows: [K 12-17-22-27-32, P 2, K 1, K 2 in next st, K 1 (i.e. 3 K become 4 K), P 2, K 2, P 2, K 1, K 2 in next st, K 1, * P 2, K 2 in each of the next 3 sts (i.e. 3 K becomes 6 K) *, repeat from *-* 1 more time, P 2, K 1, K 2 in next st, K 1, P 2, K 2, P 2, K 1, K 2 in next st, K 1, P 2, K 11-16-21-26-31], repeat from [-] 1 more time.
There are now 146-166-186-206-226 sts on needle.
Switch to circular needle size 6 mm and continue as follows: [K 12-17-22-27-32, diagram A-1 (= 6 sts), diagram A-2 (= 38 sts), diagram A-3 (= 6 sts), K 11-16-21-26-31], repeat from [-] 1 more time. Continue pattern like this upwards.
REMEMBER THE KNITTING TENSION!
AT THE SAME TIME when piece measures 10 cm, dec 1 st on each side of st with marker in the side - READ DECREASE TIP! Repeat dec every 5 cm 3 more times = 130-150-170-190-210 sts. When piece measures 30 cm, inc 1 st on each side of st with marker in each side by making 1 YO which is K twisted on next round. Repeat inc every 5 cm 3 more times = 146-166-186-206-226 sts. When piece measures 49-50-51-51-52 cm, cast off st with marker + 3 sts on each side of this st in each side (i.e. 7 sts in each side). 132-152-172-192-212 sts remain on needle.
Put piece aside and work the sleeves.

SLEEVE:
Worked in the round on double pointed needles.
Cast on 54-54-54-60-60 sts on double pointed needles size 5 mm and work diagram A-3 (9-9-9-10-10 repetitions on round). When piece measures 12 cm (adjust so that 2 or 3 rounds have been worked after 1 cable), switch to double pointed needles size 6 mm. Continue in stocking st over all sts while at the same time dec 15-13-11-13-11 sts evenly on first round = 39-41-43-47-49 sts. Insert 1 marker in the first st on round (= mid under sleeve). AT THE SAME TIME when piece measures 20 cm, inc 1 st on each side of st with marker - inc by making 1 YO which is K twisted on next round to avoid holes. Repeat inc every 4½-4½-4-3½-3½ cm 5-5-5-6-6 more times = 51-53-55-61-63 sts. When piece measures 45-45-44-43-43 cm (shorter measurements in the larger sizes because of broader shoulder width), cast off st with marker + 3 sts on each side of this st (= 7 sts mid under sleeve) = 44-46-48-54-56 sts remain on needle.
Put piece aside and knit another sleeve.

YOKE:
Slip sleeves on to same circular needle size 6 mm as body = 220-244-268-300-324 sts. Insert 1 marker in all transitions between sleeves and body. Continue pattern at the front and back as before and in stocking st over sleeves, but work the 4 sts on each side of raglan markers as follows: 2 sts in GARTER ST – see explanation above, diagram A-4 and 2 sts in garter st. AT THE SAME TIME on 4th round, beg RAGLAN DEC – see explanation above! Repeat dec every 4th round 3-2-1-0-0 more times and then every other round 10-13-16-20-22 times. After all dec, 108-116-124-132-140 sts remain on needle.
On next round K tog sts over all cables 2 by 2 – in size L/XL half the sts in cable in diagram A-1 and A-3 have been dec in raglan, the 2 sts that remain are worked K tog (i.e. dec 28-28-32-36-36 sts) = 80-88-92-96-104 sts remain on needle. Switch to circular needle size 5 mm, P 1 round, K 1 round, P 1 round and K 1 round – AT THE SAME TIME on last round inc 32-28-28-28-24 sts evenly = 112-116-120-124-128 sts.

NECK:
Turn the piece inside out, then work from WS (so that pattern on neck is the right way up when folding the neck down). Work rib = K 2/P 2 for 6 cm. On next round inc all 2 K sts to 4 K sts by working 2 sts in every K st = 168-174-180-186-192 sts. Switch to circular needle size 6 mm and continue as follows: * diagram A-4, P 2 *, repeat from *-*, work like this for 6 cm. Then work all 2 P sts in garter st for approx. 12-12-13-13-14 cm (adjust so that 3 rounds have been worked after one cable), then cast off with K over all sts. The entire neck piece measures approx. 24-24-25-25-26 cm.

ASSEMBLY:
Turn the piece with RS outwards again and sew the openings under the sleeves.


Diagram

symbols = K
symbols = P
symbols = slip 2 sts on cable needle behind piece, K 2, K 2 from cable needle
symbols = slip 2 sts on cable needle in front of piece, K 2, K 2 from cable needle
symbols = slip 3 sts on cable needle behind piece, K 3, K 3 from cable needle
symbols = slip 3 sts on cable needle in front of piece, K 3, K 3 from cable needle
diagram
diagram
Do you have a question? See a list of frequently asked questions (FAQ)

Knitting tension is what determines the final measurements of your work, and is usually measured per 10 x 10 cm. It is provided like so: number of stitches in width x number of rows in height - eg: 19 stitches x 26 rows = 10 x 10 cm.

The knitting tension is very individual; some people knit/crochet loosely while others work tightly. You adjust the knitting tension with the needle size, which is why the suggested needle size is only meant as a guide! You need to adjust this (up or down) to ensure that YOUR knitting tension matches the knitting tension provided in the pattern. If you work with a different knitting tension than provided you will have a different yarn consumption, and your work will have different measurements than what the pattern suggests.

The knitting tension also determines which yarns can replace each other. As long as you achieve the same knitting tension you can replace one yarn with another.

See DROPS lesson: How to measure your tension/gauge

See DROPS video: How to make a gauge tension swatch

The required amount of yarn is provided in grams, eg: 450 g. To calculate how many balls you’ll need you first need to know how many grams are in 1 ball (25g, 50g or 100g). This information is available if you click on the individual yarn quality on our pages. Divide the amount required with the amount of each ball. For example, if each ball is 50g (the most common amount), the calculation will be as follows: 450 / 50 = 9 balls.

The important thing when changing from one yarn to another is that the knitting/crochet tension remains the same. This is so that the measurements of the finished piece will be the same as on the sketch provided. It is easier to achieve the same knitting tension using yarns from the same yarn group. It is also possible to work with multiple strands of a thinner yarn to achieve the knitting tension of a thicker one. Please try our yarn converter. We recommend you to always work a test swatch.

Please NOTE: when changing yarn the garment might have a different look and feel to the garment in the photo, due to individual properties and qualities of each yarn.

See DROPS lesson: Can I use a different yarn than the one mentioned in the pattern?

All our yarns are categorised into yarn groups (from A to F) according to thickness and knitting tension – group A contains the thinnest yarns and group F the thickest. This makes it easier for you to find alternative yarns to our patterns, should you wish to switch yarn. All yarns within the same group have a similar knitting tension and can easily replace each other. However, different yarn qualities have different structures and properties which will give the finished work a unique look and feel.

Click here for an overview of the yarns in each yarn group

At the top of all our patterns you’ll find a link to our yarn calculator, which is a helpful tool should you wish to use a different yarn than suggested. By filling in the yarn quality you wish to replace, the amount (in your size) and number of strands, the calculator will present good alternative yarns with the same knitting tension. Additionally it will tell you how much you’ll require in the new qualities and whether you’ll need to work with multiple strands. Most skeins are 50g (some are 25g or 100g).

If the pattern is worked with multiple colours, every colour will have to be calculated separately. Similarly, if the pattern is worked with several strands of different yarns (for example 1 strand Alpaca and 1 strand Kid-Silk) you will have to find alternatives for each, individually.

Click here to see our yarn calculator

Since different yarns have different qualities and textures we have chosen to keep the original yarn in our patterns. However, you can easily find options among our available qualities by using our yarn calculator, or simply pick a yarn from the same yarn group.

It is possible that some retailers still have discontinued yarns in stock, or that someone has a few skeins at home that they would like to find patterns for.

The yarn calculator will provide both alternative yarn as well as required amount in the new quality.

If you think it's hard to decide what size to make, it can be a good idea to measure a garment you own already and like the size of. Then you can pick the size by comparing those measures with the ones available in the pattern's size chart.

You'll find the size chart at the bottom of the pattern.

See DROPS lesson: How to read size chart

The needle size provided in the pattern serves only as a guide, the important thing is to follow the knitting tension. And since knitting tension is very individual, you will have to adjust the needle size to ensure that YOUR tension is the same as in the pattern – maybe you’ll have to adjust 1, or even 2 needle sizes, up or down to achieve the correct tension. For this, we recommend that you work test swatches.

Should you work with a different knitting tension than the one provided, the measurements of the finished garment might deviate from the measurement sketch.

See DROPS lesson: How to measure your tension/gauge

See DROPS video: How to make a tension/gauge swatch

Working a garment top-down provides more flexibility and room for personal adjustment. For example it is easier to try the garment on while working, as well as making adjustments to length of yoke and shoulder caps.

The instructions are carefully explaining every step, in the correct order. Diagrams are adjusted to the knitting direction and are worked as usual.

The diagram depicts all rows/rounds, and every stitch seen from the right side. It is read from bottom to top, from right to left. 1 square = 1 stitch.

When working back and forth, every other row is worked from the right side and every other row is worked from the wrong side. When working from the wrong side, the diagram will have to be worked reversed: from left to right, knit stitches are purled, purl stitches are knit etc.

When working in the round every round is worked from the right side and the diagram are worked from right to left on all rounds.

See DROPS lesson: How to read knitting diagrams

The diagram depicts all rows/rounds, and every stitch seen from the right side. It is worked from bottom to top, from right to left.

When working back and forth every other row is worked from the right side: from right to left and every other row is worked from the wrong side: from left to right.

When working in the round, every row in the diagram are worked from the right side, from right to left.

When working a circular diagram you start in the middle and work your way outwards, counter clockwise, row by row.

The rows usually start with a given number of chain stitches (equivalent to the height of the following stitch), this will either be depicted in the diagram or explained in the pattern.

See DROPS lesson: How to read crochet diagrams

Instructions for working several diagrams after each other on the same row/round, will often be written like so: “work A.1, A.2, A.3 a total of 0-0-2-3-4 times". This means you work A.1 once, then A.2 is worked once, and A.3 is repeated (in width) the number of times provided for your size – in this case like so: S = 0 times, M = 0 times, L=2 times, XL= 3 times and XXL = 4 times.

The diagrams are worked as usual: begin with the first row in A.1, then work the first row in A.2 etc.

See DROPS lesson: How to read knitting diagrams

See DROPS lesson: How to read crochet diagrams

The total width of the garment (from wrist-to-wrist) will be larger in the larger sizes, despite the actual sleeves being shorter. The larger sizes have longer sleeve caps and wider shoulders, so there will be a good fit in all sizes.

The measurement sketch/schematic drawing provides information regarding the full length of the garment. If it’s a jumper or a jacket the length is measured from the highest point on the shoulder closest to the neckline, and straight down to the bottom of the garment. It is NOT measured from the tip of shoulder. Similarly, the length of yoke is measured from the highest point on the shoulder and down to where yoke is split into body and sleeves.

On a jacket measures are never taken along bands, unless specifically stated. Always measure inside band stitches when measuring the length.

See DROPS lesson: How to read a schematic drawing

Diagrams are often repeated on the round or in height. 1 repeat is the diagram the way it appears in the pattern. If it says to work 5 repeats of A.1 in the round, then you work A.1 a total of 5 times after/next to each other in the round. If it says to work 2 repeats of A.1 vertically/in height you work the entire diagram once, then begin again at the start and work the entire diagram one more time.

Chain stitches are slightly narrower than other stitches and to avoid working the cast-on edge too tight, we simply chain more stitches to begin with. The stitch count will be adjusted on the following row to fit the pattern and measurement sketch.

The rib edge is more elastic and will contract slightly compared to, for example, stocking stitch. By increasing before the rib edge, you avoid a visible difference in width between the rib edge and the rest of the body.

It’s very easy to cast off too tightly, and by making yarn overs while casting off (and simultaneously casting these off) you avoid a too tight cast off edge.

See DROPS video: How to bind off with yarn overs (yo)

To achieve an even increase (or decrease) you can increase on, for example: every 3rd and 4th row alternately, like so: work 2 rows and increase on the 3rd row, work 3 rows and increase on the 4th. Repeat this until the increase is complete.

See DROPS lesson: Increase or decrease 1 st on every 3rd and 4th row alternately

Should you prefer to work in the round instead of back and forth, you may of course adjust the pattern. You’ll need to add steeks mid-front (usually 5 stitches), and follow the instructions. When you would normally turn and work from the wrong side, simply work across the steek and continue in the round. At the end you’ll cut the piece open, pick up stitches to work bands, and cover the cut edges.

See DROPS video: How to knit steeks and cut open

Should you prefer to work back and forth instead of in the round, you may of course adjust the pattern so you work the pieces separately and then assemble them at the end. Divide the stitches for the body in 2, add 1 edge stitch in each side (for sewing) and work the front and back pieces separately.

See DROPS lesson: Can I adapt a pattern for circular needles into straight needles?

Pattern repeats can vary slightly in the different sizes, in order to get the correct proportions. If you’re not working the exact same size as the garment in the photo, yours might deviate slightly. This has been carefully developed and adjusted so that the complete impression of the garment is the same in all sizes.

Make sure to follow instructions and diagrams for your size!

If you have found a pattern you like which is available in women’s size it’s not very difficult to convert it to men’s size. The biggest difference will be the length of sleeves and body. Start working on the women size that you think would fit across the chest. The additional length will be worked right before you cast off for the armhole/sleeve cap. If the pattern is worked top-down you can add the length right after the armhole or before the first decrease on sleeve.

Regarding additional yarn amount, this will depend on how much length you add, but it is better with a skein too many than too few.

All yarns will have excess fibres (from production) that might come off as lint or shedding. Brushed yarns (ie hairier yarns) have more of these loose, excess fibres, causing more shedding.

Shedding also depends on what is worn under or over the garment, and whether this pulls at the yarn fibres. It’s therefore not possible to guarantee that there will be no shedding

Below are some tips on how to get the best result when working with hairier yarns:

1. When the garment is finished (before you wash it) shake it vigorously so the looser hairs come off. NOTE: do NOT use a lint roller, brush or any method that pulls at the yarn.

2. Place the garment in a plastic bag and put it in your freezer - the temperature will cause the fibres to become less attached to each other, and excess fibres will come off easier.

3. Leave in the freezer for a few hours before taking it out and shaking it again.

4. Wash the garment according to the instructions on the yarn label.

Pilling is a natural process that happens to even the most exclusive of fibers. It's a natural sign of wear and tear that is hard to avoid, and that is most visible in high friction areas of your garment like a sweater's arms and cuffs.

You can make your garment look as new by removing the pilling, using a fabric comb or a pill/lint remover.

Still can't find the answer you need? Then scroll down and leave your question so one of our experts can try to help you. This will be done normally within 5 to 10 working days.
In the meantime, you can read the questions and answers that others have left to this pattern or join the DROPS Workshop on Facebook to get help from fellow knitters/crocheters!

You might also like...

Post a comment to pattern DROPS 143-2

We would love to hear what you have to say about this pattern!

If you want to leave a question, please make sure you select the correct category in the form below, to speed up the answering process. Required fields are marked *.

Comments / Questions (98)

country flag Mariann Levisen wrote:

Hvor skal markør sættes i den anden side, har kun sat en i starten

14.12.2015 - 16:09

DROPS Design answered:

Hej Mariann. Du skal saette to maerker her i starten: Strik Rib således: [2 r, sæt 1 mærke i den første m (= i siden), * 2 vr, 3 r *, gentag fra *-* totalt 3-4-5-6-7 gange, 2 vr, 2 r, gentag fra *-* 4 gange, 2 vr, 2 r, gentag fra *-* 3-4-5-6-7 gange, 2 vr, 1 r], gentag fra [-] 1 gang til. . Dvs, naar du strikker [-] anden gang saetter du ogsaa en markör.

15.12.2015 - 16:00

country flag Kaja wrote:

Hei! Jeg sliter med å forstå vr.borden nederst på bolen. Hvis jeg strikker slik det står blir det 57 m før jeg gjentar det som står i klammer, til sammen blir det 114 m. Jeg har jo lagt opp 146 m, så jeg forstår ikke hva som blir riktig å gjøre.

04.09.2015 - 22:44

DROPS Design answered:

Hej Kaja, Jo du strikker 2r, (2vr,3r)=5x4, 2vr,2r, (2vr,3r)=5x4, 2vr,2r, (2vr,3r)=5x4, 2vr,1r = 73m gentag så får du 146m. God fornøjelse!

06.10.2015 - 15:24

country flag Marieke wrote:

Ik ben nog maar een beginneling met breien maar tot nog toe gaat het goed;-) Ik vraag mij alleen af of als er staat 'bij een hoogte van 10 cm' bedoeld wordt vanaf het begin van het breiwerk of vanaf waar de boord ophoudt het patroon begonnen is?

13.02.2015 - 16:38

DROPS Design answered:

Hoi Marieke. Dan meet je vanaf het begin van het breiwerk (als anders wordt het altijd aangegeven in het patroon).

13.02.2015 - 17:02

country flag Danis Yvette wrote:

TOUJOURS DES MODELES SUPERS .DOMMAGE JE NE VOIS AUCUN COMMENTAIRES EN FRANCAIS

01.02.2015 - 15:39

country flag Karen wrote:

Jeg tror at der er en fejl ved instrukser til størrelsen M. Antal af masker lige før man skifter til rundp. 6 y Ryk og forstykke er ikke 166 men 164. Er det korrekt? mvh karen

18.01.2015 - 11:58

DROPS Design answered:

Hej Karen, hvis du følger opskriften har du 20 udtagninger som du lægger til de 146 = 166 m God fornøjelse!

04.02.2015 - 11:18

Karen wrote:

Hola! Estoy tejiendo en el tamaño mediano (M) y luego de los aumentos (de 146 debo terminar con 166 puntos. La suma de todos los puntos que se deben tener (según la larga explicación de como hacer los aumentos) no da 166 sino 164? Hay algun error en las instrucciones de aumentos? Muchas gracias

15.01.2015 - 18:35

DROPS Design answered:

Hola Karen. Parece que hubo un error de conexión y no se guardó la respuesta a tu pregunta. Los cálculos están correctos, es decir: CUERPO: .. Tejer la vta sig ...... 2d en el pt sig, ......2d en el pt sig,.......*.....2d en cada uno de los 3 pts sig ......... *, repetir de *a* 1 vez más,(10 aum totales) .......2d en el pt sig,.........2d en el pt sig,........., repetir de [a] 1 vez más. ( Un total de 10 aum repetidos 2 vcs). Hay ahora 146-166-186-206-226 pts en la ag.

22.01.2015 - 23:40

country flag Hennie Meijer wrote:

Goede avond, Ik ben verleden jaar met deze trui begonnen heb het meerdere keren uit moeten halen omdat ik mat de opzet de fout in gaat ik zie /begrijp niet wanneer ik de steken moet herhalen zie wel sterretjes staan maar dan zegt het patroon dat ik bij een - moet beginnen vind het erg jammer want de steken kan ik wel maar dit patroon met * en *-* en (-) niet lezen kunt u het me uitleggen ? Heel erg bedankt

07.01.2015 - 18:29

DROPS Design answered:

Hoi Hennie. De sterretjes betekent dat u de werkwijze hiertussen moeten herhalen. Dus staat er: [12-17-22-27-32 st r, 2 st av, 1 st r, 2 st r in de volgende st, 1 st r (dus 3 st r worden 4 st r), 2 st av, 2 st r, 2 st av, 1 st r, 2 st r in de volgende st, 1 st r, * 2 st av, 2 st r in elke van de volgende 3 st (dus 3 st r worden 6 st r) *, herhaal van *-* nog 1 keer = dan herhaalt u de werkwijze tussen * en * nog één keer, 2 st av, 1 st r, 2 st r in de volgende st, 1 st r, 2 st av, 2 st r, 2 st av, 1 st r, 2 st r in de volgende st, 1 st r, 2 st av, 11-16-21-26-31 st r], herhaal van [-] nog 1 keer = herhaal de hele werkwijze tussen de haakjes nog één keer.

08.01.2015 - 15:41

country flag Carmen Arrias wrote:

Ik heb per ongeluk mijn 2 vragen bij de opmerkingen gezet. Hopelijk geeft dit geen problemen. Vriendelijke groet Carmen

13.09.2014 - 00:14

DROPS Design answered:

Hoi Carmen. Bijna alle typen wol zal na loop der tijd wel gaan pluizen (door wrijven/slijten). Ik kan niet voor jou beoordelen of de wol kriebelt - het is heel verschillend hoe dit aanvoelt; ben je gevoelig voor wol of niet. Je kan hiervoor het beste naar een winkel gaan om te zien en voelen. Zie mijn antwoord op je vraag over de mouw hieronder.

17.09.2014 - 15:31

country flag Carmen Arrias wrote:

De mouw wordt op een rondbreinaald gemaakt. Hoe kan je de mouw later meebreien met het voor en rugpand als de zijnaden van de mouw dicht zijn?

12.09.2014 - 11:12

DROPS Design answered:

Hoi Carmen. Je breit de pas op de rondbreinaald. Door alle st op één naald te plaatsen en verder breien over de pas zoals beschreven vorm je de pas/schouder. Uiteindelijk heb je alleen een gaatje onder de mouw (in de oksel) waar je de mouw op de nld hebt geplaatst samen met het lijf. Heel belangrijk bij breien van raglan/ronde pas: zorg ervoor dat de stekenverhouding aangegeven in het patroon klopt! Veel breiplezier.

17.09.2014 - 15:38

country flag Carmen Arrias wrote:

Goedemorgen, Deze mooie trui wil ik graag breien.Wat mij opvalt is dat deze trui op de foto totaal geen pluisjes heeft,maar wel als ik naar de bol wol zelf kijk op uw site.Kriebelt deze wol? verder zal ik mijn volgende vraag apart stellen.

12.09.2014 - 11:10