
Popular categories
Looking for a yarn?


|
||||||||||
Loreen |
||||||||||
 |
 |
|||||||||
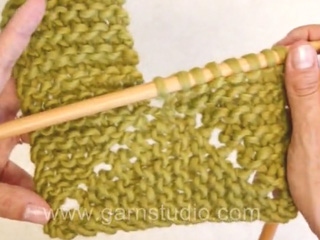
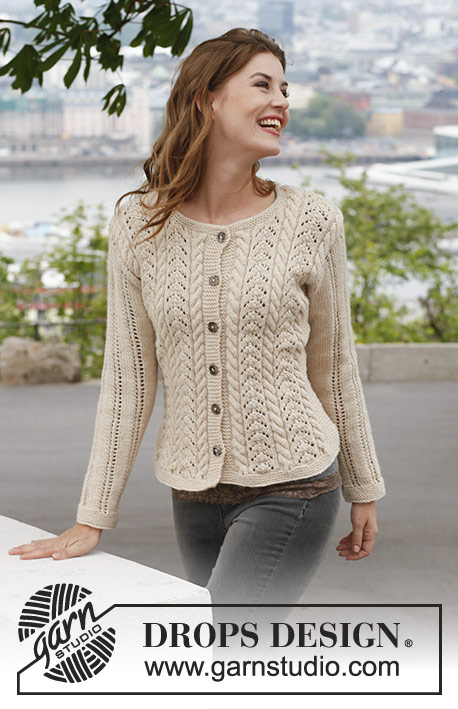
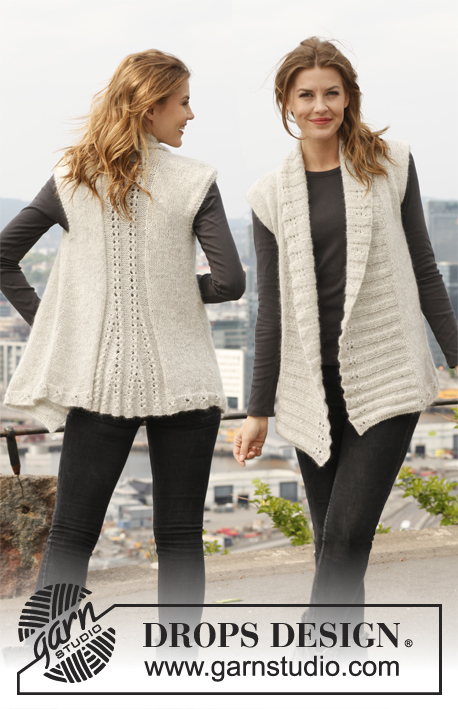
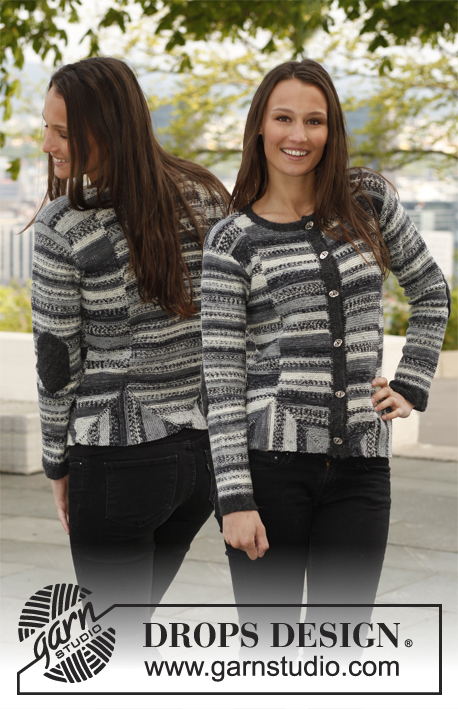
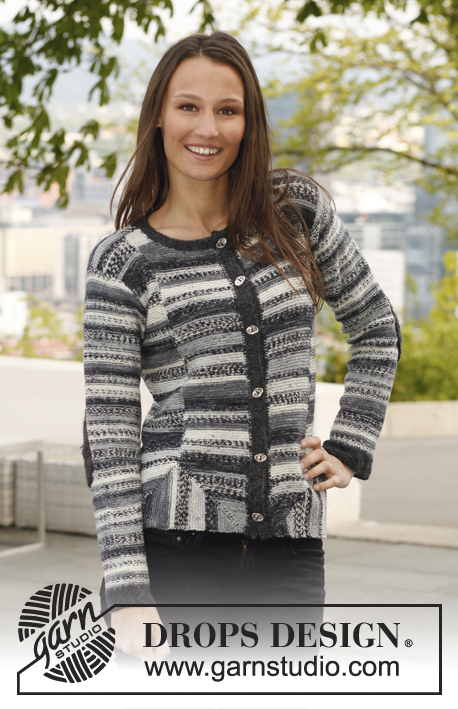
Knitted DROPS jacket with short rows in "Fabel".
DROPS 140-4 |
||||||||||
|
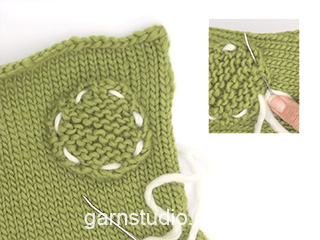
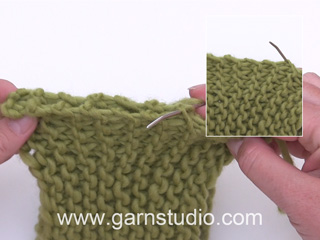
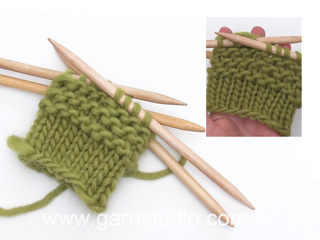
GARTER ST (back and forth on needle): K all rows. 1 ridge = 2 K rows. GARTER ST (in the round on circular needle): * K 1 round and P 1 round *, repeat from *-*. 1 ridge = 2 rounds. SHORT ROWS: Work 1 row over the first 26-28-30-33-37-41 sts, turn and work back. Work 1 row over the first 25-27-29-32-36-40 sts, turn and work back. Continue with short rows, work one st less every time until two rows have been worked only over the first st. Then work 1 row over the first 2 sts, turn and work back, 1 row over the first 3 sts, turn and work back. Continue with short rows, work one st more every time, until 1 row has been worked over all sts, turn and work back. 1 repetition with short rows = 104-112-120-132-148-164 rows. BUTTONHOLES: Bind off for buttonholes on right band from RS. 1 buttonhole = K tog 3rd and 4th st from mid front, then make 1 YO. Bind off for buttonholes when piece measures: SIZE S: 3, 12, 21, 30, 39 and 48 cm / 1⅛",4¾",8¼",11¾",15¼" and 19". SIZE M: 3, 10, 18, 26, 34, 42 and 50 cm / 1⅛",4",7",10¼",13⅜",16½" and 19¾". SIZE L: 3, 11, 19, 27, 35, 43 and 52 cm / 1⅛",4⅜",7½",10⅝",13¾",17" and 20½". SIZE XL: 3, 11, 19, 27, 36, 45 and 54 cm / 1⅛",4⅜",7½",10⅝",14¼",17¾" and 21¼". SIZE XXL: 3, 11, 20, 29, 38, 47 and 56 cm / 1⅛",4⅜",8",11⅜",15",18½" and 22". SIZE XXXL: 3, 10, 18, 26, 34, 42, 50 and 58 cm / 1⅛",4",7",10¼",13⅜",16½",19¾" and 22¾". (NOTE: Work last buttonhole when 1 cm / ⅜" remains on neck edge.) ---------------------------------------------------------- LEFT FRONT PIECE: The entire piece is worked in GARTER ST - see explanation above. Work piece from shoulder down to bottom edge, then from bottom edge and back to shoulder. Cast on 8-9-10-12-15-18 sts on needles size 3 mm / US 2.5 with Fabel. Work in garter st for 5 cm / 2", then cast on new sts at the end of every row from WS as follows: 1 st 3 times, 2 sts 3 times and 10-11-12-13-14-15 sts 1 time = 27-29-31-34-38-42 sts. Continue in garter st until piece measures 45-46-47-47-48-49 cm / 17¾"-18"-18½"-18½"-19"-19¼". Work 2 repetitions with short rows – see explanation above, first row = from RS. AT THE SAME TIME when piece measures 6 cm / 2⅜" from bottom on front piece (measured up along the side), K tog the first 2 sts on row (from RS), repeat dec every 3 cm / 1⅛" 4 more times = 22-24-26-29-33-37 sts. When short rows have been worked, work in garter st over all sts. AT THE SAME TIME work the two stripes tog as follows - beg from WS: Pick up the outermost st in front loop from previous stripe, work first st from left needle, pass the new st over, work the rest of row. Repeat these two rows upwards until 1 st has been knitted up in every ridge along the entire side of previous stripe. AT THE SAME TIME when piece measures 22 cm / 8¾"" from bottom edge, work 2 sts in first st on row (from RS), repeat inc every 2½-3-3-3½-3½-4 cm / ⅞"-1⅛"-1⅛"-1¼"-1¼"-1½" 4 more times = 27-29-31-34-38-42 sts. When piece measures 36-37-38-39-40-41 cm / 14¼"-14½"-15"-14¼"-15¾"-16⅛" from bottom edge, bind off for armholes at the beg of every row from RS as follows: 3 sts 1-1-1-2-2-2 times, 2 sts 2-3-4-5-7-9 times and 1 st 3-3-4-4-7-10 times = 17-17-16-14-11-8 sts. Work until piece measures 56-58-60-62-64-66 cm / 22"-22¾"-23⅝"-24⅜"-25¼"-26", bind off. RIGHT FRONT PIECE: The entire piece is worked in garter st. Work piece from shoulder down to bottom edge, then from bottom edge and back to shoulder. Cast on 8-9-10-12-15-18 sts on needles size 3 mm / US 2.5 with Fabel. Work in garter st for 5 cm / 2", then cast on new sts at the end of every row from RS as follows: 1 st 3 times, 2 sts 3 times and 10-11-12-13-14-15 sts 1 time = 27-29-31-34-38-42 sts. Continue in garter st until piece measures 45-46-47-47-48-49 cm / 17¾"-18"-18½"-18½"-19"-19¼". Work 2 repetitions with short rows – see explanation above, first row = from WS. AT THE SAME TIME when piece measures 6 cm / 2½" from bottom on front piece (measured up along the side), K tog the last 2 sts on row (from RS), repeat dec every 3 cm / 1⅛" 4 more times = 22-24-26-29-33-37 sts. When short rows have been worked, work in garter st over all sts. AT THE SAME TIME work the two stripes tog as follows - beg from RS: Pick up the outermost st in front loop from previous stripe, work first st from left needle, pass the new st over, work the rest of row. Repeat these two rows upwards until 1 st has been knitted up in every ridge along the entire side of previous stripe. AT THE SAME TIME when piece measures 22 cm / 8¾" from bottom edge, work 2 sts in last st on row (from RS), repeat inc every 2½-3-3-3½-3½-4 cm / ⅞"-1⅛"-1⅛"-1¼"-1¼"-1½" 4 more times = 27-29-31-34-38-42 sts. When piece measures 36-37-38-39-40-41 cm / 14¼"-14½"-15"-14¼"-15¾"-16⅛" / 14¼"-14½"-15"-14¼"-15¾"-16⅛", bind off for armholes at the beg of every row from WS as follows: 3 sts 1-1-1-2-2-2 times, 2 sts 2-3-4-5-7-9 times and 1 st 3-3-4-4-7-10 times = 17-17-16-14-11-8 sts. Work until piece measures 56-58-60-62-64-66 cm / 22"-22¾"-23⅝"-24⅜"-25¼"-26", bind off. BACK PIECE: The entire piece is worked in garter st. Work piece from shoulder down to bottom edge, then from bottom edge and back to shoulder. RIGHT SHOULDER: Cast on 8-9-10-12-15-18 sts on needles size 3 mm / US 2.5 with Fabel. Work in garter st for 2 cm / ¾". Put piece aside. Work left shoulder the same way, keep sts on needle, cast on 38-40-42-44-46-48 new sts, and work sts from right shoulder back on needle = 54-58-62-68-76-84 sts. Work in garter st until piece measures 45-46-47-47-48-49 cm / 17¾"-18"-18½"-18½"-19"-19¼". Continue in garter st, AT THE SAME TIME on every other row slip 1 st in each side on a stitch holder. Continue until 2 sts remain on needle = 26-28-30-33-37-41 sts on each stitch holder. Slip the left of the 2 sts on stitch holder, then finish the right side of back piece. RIGHT SIDE OF BACK PIECE: = 1 st on needle. Continue in garter st, AT THE SAME TIME at the end of every row from RS work 1 st from stitch holder back on needle. Continue like this until all the sts have been worked back on to needle = 27-29-31-34-38-42 sts. Work 1 repetition with short rows – see explanation above, first row = from RS. AT THE SAME TIME when piece measures 6 cm / 2½" from bottom on back piece (measured up along the side), K tog the first 2 sts on row (from RS), repeat dec every 3 cm / 1⅛" 4 more times = 22-24-26-29-33-37 sts. When short rows have been worked, work in garter st over all sts. AT THE SAME TIME work the two stripes tog as follows - beg from WS: Pick up the outermost st in front loop from previous stripe, work first st from left needle, pass the new st over, work the rest of row. Repeat these two rows upwards until 1 st has been knitted up in every ridge along the entire side of previous stripe. AT THE SAME TIME when piece measures 22 cm / 8¾", continue inc in the side and bind off for armhole as explained on left front piece. Work until piece measures 56-58-60-62-64-66 cm / 22"-22¾"-23⅝"-24⅜"-25¼"-26", bind off. LEFT SIDE OF BACK PIECE: Slip last st slipped on stitch holder back on needle size 3 mm / US 2.5 = 1 st on needle. Continue in garter st, AT THE SAME TIME at the end of every row from WS work 1 st from stitch holder back on needle. Continue like this until all the sts have been worked back on to needle = 27-29-31-34-38-42 sts. Work 1 repetition with short rows – see explanation above, first row = from WS. AT THE SAME TIME when piece measures 6 cm / 2½" from bottom on back piece (measured up along the side), K tog the last 2 sts on row (from RS), repeat dec every 3 cm / 1⅛" 4 more times = 22-24-26-29-33-37 sts. When short rows have been worked, work in garter st over all sts. AT THE SAME TIME work the two stripes tog as follows - beg from RS: Pick up the outermost st in front loop from previous stripe, work first st from left needle, pass the new st over, work the rest of row. Repeat these two rows upwards until 1 st has been knitted up in every ridge along the entire side of previous stripe. AT THE SAME TIME when piece measures 22 cm / 8¾", continue inc in the side and bind off for armhole as explained on right front piece. Work until piece measures 56-58-60-62-64-66 cm / 22"-22¾"-23⅝"-24⅜"-25¼"-26", bind off. SLEEVE: Worked in the round on double pointed needles. Cast on 56-58-60-62-64-68 sts on double pointed needles size 3 mm / US 2.5 with Alpaca. Work in GARTER ST for 4 cm / 1½" - see explanation above. Switch to Fabel, then work in stockinette st (sleeve is sewn on with WS outwards). Insert 1 marker at the beg of round. When piece measures 8-8-8-8-6-6 cm / 3"-3"-3"-3"-2½"-2½", inc 1 st in each side of marker, repeat inc every 2½-2-2-1½-1½-1½ cm / ⅞"-¾"-¾"-½"-½"-½" 14-16-18-20-22-23 more times = 86-92-98-104-110-116 sts. When piece measures 47-47-47-46-45-43 cm / 18½"-18½"-18½"-18"-17¾"-17" (shorter measurements in the larger sizes because of longer sleeve cap and wider shoulders), bind off 6 sts mid under sleeve (= 3 sts on each side of marker). Then work back and forth and bind off for sleeve cap. Bind off at beg of every row in each side: 3 sts 1 time, 2 sts 5-6-6-6-6-6 times and 1 st 1-1-2-4-7-10 times, then bind off 2 sts in each side until piece measures 54-55-56-56-57-57 cm / 21¼"-21⅝"-22"-22"-22½"-22½", then bind off 3 sts 1 time in each side. Bind off the remaining sts, piece measures approx. 55-56-57-57-58-58 cm / 21⅝"-22"-22½"-22½"-22¾"-22¾" in all sizes. LEFT BAND: Cast on 6 sts on needle size 3 mm / US 2.5 with Alpaca. Work in garter st back and forth AT THE SAME TIME work them tog with front piece as follows - beg from RS: Pick up the outermost st in front loop from bottom of front piece, work first st from left needle, pass the new st over, work the rest of row. Repeat these two rows upwards until 1 st has been knitted up in every ridge along the entire front piece. Repeat on right front piece, first row = from WS. Bind off for BUTTONHOLES on right band - see explanation above. ASSEMBLY: Sew the shoulder seams. Sew side seams. Sew in sleeves, with WS outwards. NECK EDGE: Pick up approx. 120-130 sts around neck edge (also over bands) with Alpaca. Work in garter st for 2 cm / ¾", bind off. ELBOW PATCH: Work piece back and forth. Cast on 20 sts on needle size 3 mm / US 2.5 with Alpaca. Work as follows: Row 1: K all sts. Row 2: K 1, 1 YO, K 1, 1 YO, K 6, 1 YO, K 1, 1 YO, K 2, 1 YO, K 1, 1 YO, K 6, 1 YO, K 1, 1 YO, K 1 = 28 sts. Row 3: K over all sts, K YO twisted. Row 4: K 1, 1 YO, K 2, 1 YO, K 8, 1 YO, K 2, 1 YO, K 2, 1 YO, K 2, 1 YO, K 8, 1 YO, K 2, 1 YO, K 1 = 36 sts. Row 5: K over all sts, K YO twisted. Row 6: K 1, 1 YO, K 3, 1 YO, K 10, 1 YO, K 3, 1 YO, K 2, 1 YO, K 3, 1 YO, K 10, 1 YO, K 3, 1 YO, K 1 = 44 sts. Row 7: K over all sts, K YO twisted. Row 8: K 1, 1 YO, K 4, 1 YO, K 12, 1 YO, K 4, 1 YO, K 2, 1 YO, K 4, 1 YO, K 12, 1 YO, K 4, 1 YO, K 1 = 52 sts. Row 9: K over all sts, K YO twisted. Row 10: K 1, 1 YO, K 5, 1 YO, K 14, 1 YO, K 5, 1 YO, K 2, 1 YO, K 5, 1 YO, K 14, 1 YO, K 5, 1 YO, K 1 = 60 sts. Row 11: K over all sts, K YO twisted. Row 12: K 1, 1 YO, K 6, 1 YO, K 16, 1 YO, K 6, 1 YO, K 2, 1 YO, K 6, 1 YO, K 16, 1 YO, K 6, 1 YO, K 1 = 68 sts. Row 13: K over all sts, K YO twisted. Row 14: K 1, 1 YO, K 7, 1 YO, K 18, 1 YO, K 7, 1 YO, K 2, 1 YO, K 7, 1 YO, K 18, 1 YO, K 7, 1 YO, K 1 = 76 sts. Row 15: K over all sts, K YO twisted. Row 16: K 1, 1 YO, K 8, 1 YO, K 20, 1 YO, K 8, 1 YO, K 2, 1 YO, K 8, 1 YO, K 20, 1 YO, K 8, 1 YO, K 1 = 84 sts. Row 17: Bind off all sts. Sew the elbow patch tog in the middle with neat little stitches. Knit another elbow patch. Sew an elbow patch at the back of each sleeve with stitches (try the jacket on for correct placing). |
||||||||||
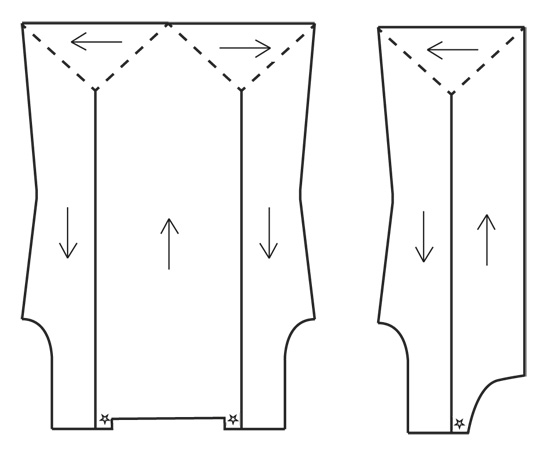
Diagram explanations |
||||||||||
|
||||||||||
|
||||||||||

|
||||||||||
|
Have you made this or any other of our designs? Tag your pictures in social media with #dropsdesign so we can see them! Do you need help with this pattern?You'll find tutorial videos, a Comments/Questions area and more by visiting the pattern on garnstudio.com. © 1982-2024 DROPS Design A/S. We reserve all rights. This document, including all its sub-sections, has copyrights. Read more about what you can do with our patterns at the bottom of each pattern on our site. |
||||||||||


With over 40 years in knitting and crochet design, DROPS Design offers one of the most extensive collections of free patterns on the internet - translated to 17 languages. As of today we count 304 catalogs and 11422 patterns - 11417 of which are translated into English (US/in).
We work hard to bring you the best knitting and crochet have to offer, inspiration and advice as well as great quality yarns at incredible prices! Would you like to use our patterns for other than personal use? You can read what you are allowed to do in the Copyright text at the bottom of all our patterns. Happy crafting!
Comments / Questions (80)
Jag vill ha hjälp med mönster vänster framstycke
11.12.2013 - 08:58Noch eine Frage: wo sind bei der linken seite die Abmessungen (f. Zunahme und Armkugel-Abketten) vorzunehmen - von ganz unten (also unterster Punkt des verkürzte-Reihen-Bogens)?
02.04.2013 - 00:37DROPS Design answered:
Liebe Andrea, ganz unten an der Anleitung finden Sie eine Schnittübersicht.
05.04.2013 - 09:13Ich habe schon ein Problem beim linken Vorderteil: innerhalb der verkürzten Reihen sollen 5x 2M zusammen gestrickt werden, und zwar nach 6 cm vom Vorderteil unten gemessen. Wenn ich von ganz unten messen soll, dann müsste ich ja schon viel zu weit gestrickt haben. aber sicher verstehe ich das falsch. muss ich tatsächlich vom unteren Teil des "Bogens" messen und dann alles wieder auftrennen um die Abnahmen zu machen? Sorry, aber ich scheine auf dem Schlauch zu stehen :(
01.04.2013 - 22:23DROPS Design answered:
Hallo Andrea, ich verstehe Ihre Frage nicht ganz. Haben Sie gesehen, dass da Vorderteil zunächst von oben nach unten gestrickt wird? Und haben Sie alle verlinkten Videos zu diesem Modell angeschaut? (zum Thema Bänder mit Richtungswechsel zusammen stricken und verkürzte Reihen)?
05.04.2013 - 09:12Jeg forstå ikke helt skal den strikkes på rundpind? eller skal det forståes at der strikkes ret på alle pinde og glat på ærmer
22.02.2013 - 14:23DROPS Design answered:
Nej, du skal strikke den her på almindelige pinde og strømpepinde (til ærmerne). Rygstykke og forstykker bliver strikket i retstrik (ret på alle pinde) og ærmerne bliver strikket i glat
22.02.2013 - 17:11Förstår inte va jag ska maska av när arbetet mäter 6 cm? Har även varit i kontakt med min återförsäljare, som inte heller kunde lösa problemet. Skulle nu vilja ha uppritat precis var jag ska minska.
30.01.2013 - 22:28DROPS Design answered:
Det blir dina minskningar i sidan. Se även flera frågor och svar här i bloggen.
12.02.2013 - 12:21Rörig beskrivning.Denna kunde varit mer utförlig gjord.
08.01.2013 - 17:18Undre mig over at ærmet skal strikkes i glat, for det kommer ikke til at ligne for- og bagstykkerne. Kan det være rigtigt?
07.01.2013 - 22:01DROPS Design answered:
Ja, det stemmer. For- og bagstykkerne strikkes ret, men aermet skal strikkes i glat og derefter monteres med vrangen ud (dvs, vrangen af glatstrikken kommer til at vaere paa retten)
11.01.2013 - 13:29Trine Larsen wrote:
Undre mig over at ærmet skal strikkes i glat, da det ikke kom til at se ens ud med for og bagstykket som er strikket i retstrikning?
01.01.2013 - 21:10Ik heb een fout geconstateerd in het rechter voorpand. Bij de 3e regel staat nieuwe steken bijmaken als volgt: 3 keer 1, 3 keer 2 en 10 keer 5 steken. Deze 5 is van 10-11-12-13-14-15, daar staat 11 in plaats van 15, want het totaal aan steken is 27-20 etc.
05.12.2012 - 21:41DROPS Design answered:
Hoi Marlen. Je hebt gelijk. Wij hebben het patroon aangepast. Bedankt voor de reactie.
12.12.2012 - 11:17Hei har strikket modellen den er dårlig forklart,jeg strikket hele lengden ned og målte 6cm etterpå når jeg strikket oppover
02.10.2012 - 23:31