Clicking the ORDER button will redirect you to Saules siulas website
The yarn cost is calculated from the pattern’s smallest size and the yarn’s cheapest product type. Looking for an even better price? You might find it on the DROPS Deals!
-------------------------------------------------------
Alternative Yarn – See how to change yarns here
Yarn Groups A to F – Use the same pattern and change the yarn here
Yarn usage using an alternative yarn – Use our yarn converter here
-------------------------------------------------------
Clicking the ORDER button will redirect you to Saules siulas website
The yarn cost is calculated from the pattern’s smallest size and the yarn’s cheapest product type. Looking for an even better price? You might find it on the DROPS Deals!
= beige brown | |
= denim blue | |
= medium pink | |
= dark old rose | |
= forest green | |
= worked in dark old rose, embroidered over with denim blue | |
= worked in beige brown, embroidered over with dark old rose | |
= K 2 tog from RS and P 2 tog from WS |
Each of our patterns has specific tutorial videos to help you.
These step-by-step tutorials might also help you:
Why is the knitting/crochet tension so important?
Knitting tension is what determines the final measurements of your work, and is usually measured per 10 x 10 cm. It is provided like so: number of stitches in width x number of rows in height - eg: 19 stitches x 26 rows = 10 x 10 cm.
The knitting tension is very individual; some people knit/crochet loosely while others work tightly. You adjust the knitting tension with the needle size, which is why the suggested needle size is only meant as a guide! You need to adjust this (up or down) to ensure that YOUR knitting tension matches the knitting tension provided in the pattern. If you work with a different knitting tension than provided you will have a different yarn consumption, and your work will have different measurements than what the pattern suggests.
The knitting tension also determines which yarns can replace each other. As long as you achieve the same knitting tension you can replace one yarn with another.
See DROPS lesson: How to measure your tension/gauge
See DROPS video: How to make a gauge tension swatch
How do I know how many balls of yarn I need?
The required amount of yarn is provided in grams, eg: 450 g. To calculate how many balls you’ll need you first need to know how many grams are in 1 ball (25g, 50g or 100g). This information is available if you click on the individual yarn quality on our pages. Divide the amount required with the amount of each ball. For example, if each ball is 50g (the most common amount), the calculation will be as follows: 450 / 50 = 9 balls.
Can I use a different yarn than what the pattern suggests?
The important thing when changing from one yarn to another is that the knitting/crochet tension remains the same. This is so that the measurements of the finished piece will be the same as on the sketch provided. It is easier to achieve the same knitting tension using yarns from the same yarn group. It is also possible to work with multiple strands of a thinner yarn to achieve the knitting tension of a thicker one. Please try our yarn converter. We recommend you to always work a test swatch.
Please NOTE: when changing yarn the garment might have a different look and feel to the garment in the photo, due to individual properties and qualities of each yarn.
See DROPS lesson: Can I use a different yarn than the one mentioned in the pattern?
What are the yarn groups?
All our yarns are categorised into yarn groups (from A to F) according to thickness and knitting tension – group A contains the thinnest yarns and group F the thickest. This makes it easier for you to find alternative yarns to our patterns, should you wish to switch yarn. All yarns within the same group have a similar knitting tension and can easily replace each other. However, different yarn qualities have different structures and properties which will give the finished work a unique look and feel.
How do I use the yarn calculator?
At the top of all our patterns you’ll find a link to our yarn calculator, which is a helpful tool should you wish to use a different yarn than suggested. By filling in the yarn quality you wish to replace, the amount (in your size) and number of strands, the calculator will present good alternative yarns with the same knitting tension. Additionally it will tell you how much you’ll require in the new qualities and whether you’ll need to work with multiple strands. Most skeins are 50g (some are 25g or 100g).
If the pattern is worked with multiple colours, every colour will have to be calculated separately. Similarly, if the pattern is worked with several strands of different yarns (for example 1 strand Alpaca and 1 strand Kid-Silk) you will have to find alternatives for each, individually.
Why do you show discontinued yarns in the patterns?
Since different yarns have different qualities and textures we have chosen to keep the original yarn in our patterns. However, you can easily find options among our available qualities by using our yarn calculator, or simply pick a yarn from the same yarn group.
It is possible that some retailers still have discontinued yarns in stock, or that someone has a few skeins at home that they would like to find patterns for.
The yarn calculator will provide both alternative yarn as well as required amount in the new quality.
What size should I knit?
If you think it's hard to decide what size to make, it can be a good idea to measure a garment you own already and like the size of. Then you can pick the size by comparing those measures with the ones available in the pattern's size chart.
You'll find the size chart at the bottom of the pattern.
See DROPS lesson: How to read size chart
Why do I get the wrong knitting tension with the suggested needle size?
The needle size provided in the pattern serves only as a guide, the important thing is to follow the knitting tension. And since knitting tension is very individual, you will have to adjust the needle size to ensure that YOUR tension is the same as in the pattern – maybe you’ll have to adjust 1, or even 2 needle sizes, up or down to achieve the correct tension. For this, we recommend that you work test swatches.
Should you work with a different knitting tension than the one provided, the measurements of the finished garment might deviate from the measurement sketch.
See DROPS lesson: How to measure your tension/gauge
See DROPS video: How to make a tension/gauge swatch
Why is the pattern worked top-down?
Working a garment top-down provides more flexibility and room for personal adjustment. For example it is easier to try the garment on while working, as well as making adjustments to length of yoke and shoulder caps.
The instructions are carefully explaining every step, in the correct order. Diagrams are adjusted to the knitting direction and are worked as usual.
How do I work according to a knitting diagram?
The diagram depicts all rows/rounds, and every stitch seen from the right side. It is read from bottom to top, from right to left. 1 square = 1 stitch.
When working back and forth, every other row is worked from the right side and every other row is worked from the wrong side. When working from the wrong side, the diagram will have to be worked reversed: from left to right, knit stitches are purled, purl stitches are knit etc.
When working in the round every round is worked from the right side and the diagram are worked from right to left on all rounds.
See DROPS lesson: How to read knitting diagrams
How do I work according to a crochet diagram?
The diagram depicts all rows/rounds, and every stitch seen from the right side. It is worked from bottom to top, from right to left.
When working back and forth every other row is worked from the right side: from right to left and every other row is worked from the wrong side: from left to right.
When working in the round, every row in the diagram are worked from the right side, from right to left.
When working a circular diagram you start in the middle and work your way outwards, counter clockwise, row by row.
The rows usually start with a given number of chain stitches (equivalent to the height of the following stitch), this will either be depicted in the diagram or explained in the pattern.
See DROPS lesson: How to read crochet diagrams
How do I work several diagrams simultaneously on the same row/round?
Instructions for working several diagrams after each other on the same row/round, will often be written like so: “work A.1, A.2, A.3 a total of 0-0-2-3-4 times". This means you work A.1 once, then A.2 is worked once, and A.3 is repeated (in width) the number of times provided for your size – in this case like so: S = 0 times, M = 0 times, L=2 times, XL= 3 times and XXL = 4 times.
The diagrams are worked as usual: begin with the first row in A.1, then work the first row in A.2 etc.
See DROPS lesson: How to read knitting diagrams
See DROPS lesson: How to read crochet diagrams
Why are the sleeves shorter in larger sizes?
The total width of the garment (from wrist-to-wrist) will be larger in the larger sizes, despite the actual sleeves being shorter. The larger sizes have longer sleeve caps and wider shoulders, so there will be a good fit in all sizes.
Where on the garment is the length measured?
The measurement sketch/schematic drawing provides information regarding the full length of the garment. If it’s a jumper or a jacket the length is measured from the highest point on the shoulder closest to the neckline, and straight down to the bottom of the garment. It is NOT measured from the tip of shoulder. Similarly, the length of yoke is measured from the highest point on the shoulder and down to where yoke is split into body and sleeves.
On a jacket measures are never taken along bands, unless specifically stated. Always measure inside band stitches when measuring the length.
See DROPS lesson: How to read a schematic drawing
What is a repeat?
Diagrams are often repeated on the round or in height. 1 repeat is the diagram the way it appears in the pattern. If it says to work 5 repeats of A.1 in the round, then you work A.1 a total of 5 times after/next to each other in the round. If it says to work 2 repeats of A.1 vertically/in height you work the entire diagram once, then begin again at the start and work the entire diagram one more time.
Why does the piece start with more chain stitches than it’s worked with?
Chain stitches are slightly narrower than other stitches and to avoid working the cast-on edge too tight, we simply chain more stitches to begin with. The stitch count will be adjusted on the following row to fit the pattern and measurement sketch.
Why increase before the rib edge when the piece is worked top-down?
The rib edge is more elastic and will contract slightly compared to, for example, stocking stitch. By increasing before the rib edge, you avoid a visible difference in width between the rib edge and the rest of the body.
Why increase in the cast-off edge?
It’s very easy to cast off too tightly, and by making yarn overs while casting off (and simultaneously casting these off) you avoid a too tight cast off edge.
See DROPS video: How to bind off with yarn overs (yo)
How do I increase/decrease on every 3rd and 4th row/round alternately?
To achieve an even increase (or decrease) you can increase on, for example: every 3rd and 4th row alternately, like so: work 2 rows and increase on the 3rd row, work 3 rows and increase on the 4th. Repeat this until the increase is complete.
See DROPS lesson: Increase or decrease 1 st on every 3rd and 4th row alternately
How can I work a jacket in the round instead of back and forth?
Should you prefer to work in the round instead of back and forth, you may of course adjust the pattern. You’ll need to add steeks mid-front (usually 5 stitches), and follow the instructions. When you would normally turn and work from the wrong side, simply work across the steek and continue in the round. At the end you’ll cut the piece open, pick up stitches to work bands, and cover the cut edges.
See DROPS video: How to knit steeks and cut open
Can I work a jumper back and forth instead of in the round?
Should you prefer to work back and forth instead of in the round, you may of course adjust the pattern so you work the pieces separately and then assemble them at the end. Divide the stitches for the body in 2, add 1 edge stitch in each side (for sewing) and work the front and back pieces separately.
See DROPS lesson: Can I adapt a pattern for circular needles into straight needles?
Why is the pattern slightly different than what I see in the photo?
Pattern repeats can vary slightly in the different sizes, in order to get the correct proportions. If you’re not working the exact same size as the garment in the photo, yours might deviate slightly. This has been carefully developed and adjusted so that the complete impression of the garment is the same in all sizes.
Make sure to follow instructions and diagrams for your size!
How do I make a women’s size garment into a men’s size one?
If you have found a pattern you like which is available in women’s size it’s not very difficult to convert it to men’s size. The biggest difference will be the length of sleeves and body. Start working on the women size that you think would fit across the chest. The additional length will be worked right before you cast off for the armhole/sleeve cap. If the pattern is worked top-down you can add the length right after the armhole or before the first decrease on sleeve.
Regarding additional yarn amount, this will depend on how much length you add, but it is better with a skein too many than too few.
How do I prevent a hairy garment from shedding?
All yarns will have excess fibres (from production) that might come off as lint or shedding. Brushed yarns (ie hairier yarns) have more of these loose, excess fibres, causing more shedding.
Shedding also depends on what is worn under or over the garment, and whether this pulls at the yarn fibres. It’s therefore not possible to guarantee that there will be no shedding
Below are some tips on how to get the best result when working with hairier yarns:
1. When the garment is finished (before you wash it) shake it vigorously so the looser hairs come off. NOTE: do NOT use a lint roller, brush or any method that pulls at the yarn.
2. Place the garment in a plastic bag and put it in your freezer - the temperature will cause the fibres to become less attached to each other, and excess fibres will come off easier.
3. Leave in the freezer for a few hours before taking it out and shaking it again.
4. Wash the garment according to the instructions on the yarn label.
Why does my garment pill?
Pilling is a natural process that happens to even the most exclusive of fibers. It's a natural sign of wear and tear that is hard to avoid, and that is most visible in high friction areas of your garment like a sweater's arms and cuffs.
You can make your garment look as new by removing the pilling, using a fabric comb or a pill/lint remover.
Martha |
|||||||||||||||||||||||||
|
|
||||||||||||||||||||||||
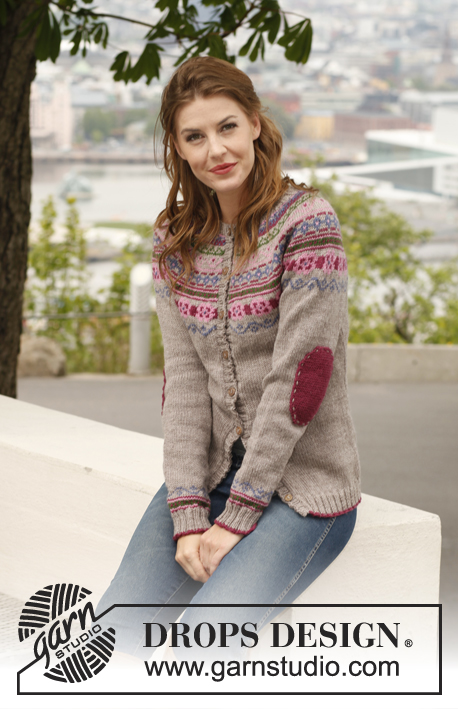
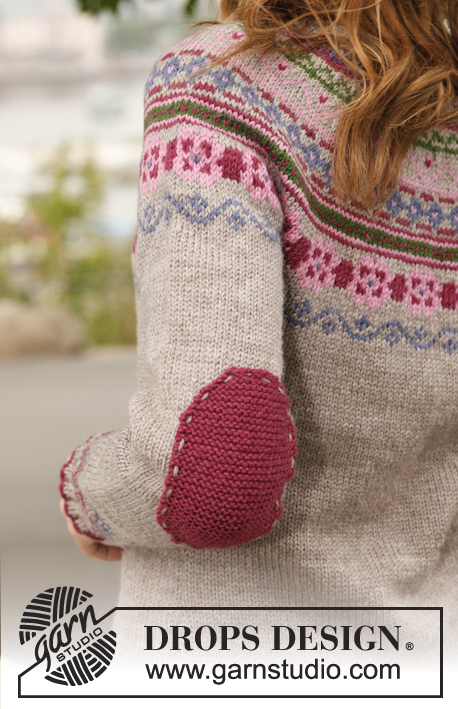
Knitted DROPS jacket with round yoke, pattern and sewn on elbow patches in "Karisma". Size S-XXXL
DROPS 143-11 |
|||||||||||||||||||||||||
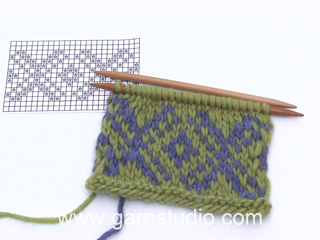
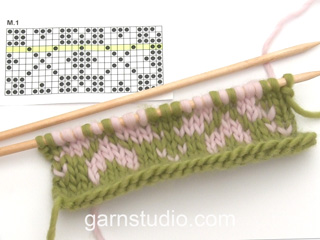
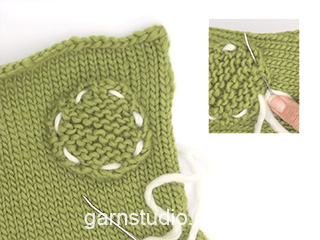
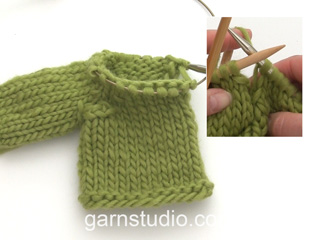
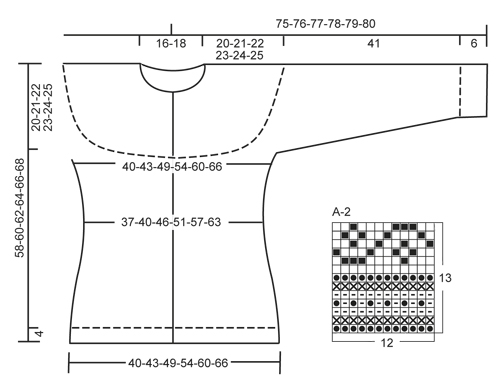
GARTER ST (back and forth on circular needle): K all rows. PATTERN: See diagrams A-1 and A-2. Diagrams are worked in stocking st and show 1 repetition of patterns. ---------------------------------------------------------- BODY: Worked back and forth on circular needle from mid front. Cast on 192-208-232-260-284-312 sts on circular needle size 3 mm with dark old rose. Work 1 row rib as follows (1st row = RS): 1 edge st in GARTER ST - see explanation above - * K 2/P 2 *, repeat from *-* until 3 sts remain, K 2 and 1 edge st in garter st. When 1 row with dark old rose has been worked, switch to beige brown. Continue rib until it measures 4 cm. Switch to circular needle size 4 mm and work 1 row in stocking st while at the same time dec 22-26-26-30-30-34 sts evenly = 170-182-206-230-254-278 sts. Insert 2 markers in the piece; 43-46-52-58-64-70 sts in from each side (= 84-90-102-114-126-138 sts between markers on back piece). Continue in stocking st with beige brown. REMEMBER THE KNITTING TENSION! When piece measures approx. 10 cm, dec 1 st on each side of markers in the sides. Repeat dec every 4 cm 2 more times = 158-170-194-218-242-266 sts. When piece measures 22-23-24-25-26-27 cm, inc 1 st on each side of both markers. Repeat inc every 5 cm 2 more times = 170-182-206-230-254-278 sts. When piece measures 38-39-40-41-42-43 cm, cast off 10 sts in each side for armholes on next row from RS (i.e. 5 sts on each side of markers in the sides) = 150-162-186-210-234-258 sts. Put piece aside and knit the sleeves. SLEEVE: Worked in the round on double pointed needles. Cast on 52-56-56-60-64-64 sts with dark old rose on double pointed needles size 3 mm. Work 1 round in rib = K 2/P 2. Switch to beige brown, continue rib until piece measures 6 cm. Switch to double pointed needles size 4 mm, work 1 round in stocking st while at the same time dec 4-8-8-0-4-4 sts evenly = 48-48-48-60-60-60 sts. Insert 1 marker at beg of round = mid under sleeve. Continue with diagram A-2, then continue sleeve with beige brown. When piece measures 10-10-12-10-10-12 cm, inc 1 st on each side of marker mid under sleeve. Repeat inc every 3-2½-2-3-2½-2 cm 11-13-15-11-13-15 more times = 72-76-80-84-88-92 sts. When piece measures 47 cm in all sizes, cast off 10 sts mid under sleeve, i.e. 5 sts on each side of marker = 62-66-70-74-78-82 sts. Put piece aside and knit another sleeve. YOKE: Slip sleeves on to same circular needle size 4 mm as body = 274-294-326-358-390-422 sts (do not work them when slipping them on to needle). P 1 row from WS with beige brown while at the same time dec 8-4-12-8-4-12 sts evenly = 266-290-314-350-386-410 sts. Work 0-2-4-2-4-8 more rows in stocking st with beige brown, before continuing with diagram A-1 (1st row = RS) with 1 edge st in garter st in each side – see diagram for your size. After all dec there are 90-98-106-118-130-138 sts on needle and piece measures approx. 58-60-62-64-66-68 cm up to shoulder. Then work an elevation at the back with beige brown as follows: K 52-56-60-66-72-76, turn, P 14, turn, K 21, turn, P 28. Continue like this by working 7 sts more on every turn until a total of 70-70-84-84-98-98 sts have been worked, turn and work the rest of row. Now P 1 row from WS over all sts while at the same time dec 6-10-14-22-30-34 sts evenly = 84-88-92-96-100-104 sts. Insert 1 marker, neck edge is worked after bands. LEFT BAND: Worked back and forth on circular needle size 3 mm. Knit up approx. 144 to 168 sts (divisible by 4) inside 1 edge st along left band with beige brown. Work rib as follows from WS: 1 st in garter st, * P 2, K 2 *, repeat from *-*, finish with P 2 and 1 st in garter st. From RS beg and end rib with K 2 and 1 st in garter st. Continue with K over K and P over P until rib measures 3 cm, cast off with K over K and P over P. RIGHT BAND: Work as left band but after 1 cm, cast off for 7 buttonholes evenly (buttonholes are cast off in P-sections seen from RS). 1 BUTTONHOLE = P 2 tog and make 1 YO – top buttonhole should be approx. 6-7 cm from the top (there should also be 1 buttonhole on neck edge) and bottom hole approx. 5-6 cm from bottom edge. NECK EDGE: Worked back and forth with beige brown on circular needle size 3 mm as follows: Knit up 6 sts over right band (inside 1 edge st), work the 84-88-92-96-100-104 sts from stitch holder around the neck on to needle and knit up 6 sts over left band = 96-100-104-108-112-116 sts. Work rib as follows (1st row = WS): 1 st in garter st, * P 2, K 2 *, repeat from *-*, finish with P 2 and 1 st in garter st. Continue with K over K and P over P with 1 st in garter st in each side. When neck edge measures 1 cm, cast off for 1 buttonhole over the other holes on right band. Continue rib until neck edge measures 3 cm, cast off with K over K and P over P. ELBOW PATCH: Patch is worked in garter st back and forth with dark old rose on 2 double pointed needles size 3 mm. Cast on 10 sts. K 1 row, on next row inc 1 st in each side by making 1 YO inside outermost st, on next row K YOs twisted to avoid holes. Repeat inc every other row 3 more times and then every 4th row 2 times = 22 sts. Work until piece measures 12 cm, now dec 1 st in each side by K tog 2 sts before last st. Repeat dec every 4th row 1 more time and then every other row 4 times = 10 sts remain. Cast off, patch measures approx. 15 cm vertically and 10 cm in width. ASSEMBLY: Sew tog the openings under the sleeves and sew on buttons. Sew elbow patches on to sleeves with beige brown and stitches inside outermost st. Patches are sewn on approx. 21 cm from bottom edge and approx. 2-3 cm from marker mid under sleeve and towards the back of sleeve. Fasten the patches with pins to see if they are placed correctly before sewing them on. |
|||||||||||||||||||||||||
Diagram explanations |
|||||||||||||||||||||||||
|
|||||||||||||||||||||||||
Have you made this or any other of our designs? Tag your pictures in social media with #dropsdesign so we can see them! Do you need help with this pattern?You'll find tutorial videos, a Comments/Questions area and more by visiting the pattern on garnstudio.com. © 1982-2024 DROPS Design A/S. We reserve all rights. This document, including all its sub-sections, has copyrights. Read more about what you can do with our patterns at the bottom of each pattern on our site. |
With over 40 years in knitting and crochet design, DROPS Design offers one of the most extensive collections of free patterns on the internet - translated to 17 languages. As of today we count 304 catalogues and 11422 patterns - 11422 of which are translated into English (UK/cm).
We work hard to bring you the best knitting and crochet have to offer, inspiration and advice as well as great quality yarns at incredible prices! Would you like to use our patterns for other than personal use? You can read what you are allowed to do in the Copyright text at the bottom of all our patterns. Happy crafting!
Comments / Questions (76)
Andrea wrote:
Zur Frage: es war das erste "Drops-Modell" und zudem mein erstes Norwegermuster. Ich bezahle Lehrgeld: Die Maschenprobe ergab mit Lima und 4-er Nadel 12x15,5 cm, dann ist auch klar, weshalb die Jacke groß ausfällt:-( Ich habe ausgemessen:Länge 72 statt 60,Passe 30 statt 21 usw. restl. Ärmellänge ungefähr identisch
09.10.2013 - 22:37Indenken wrote:
Ik vind dit vestje geweldig maar helaas kan ik niet breien. heeft iemand zin om dit voor mij te doen?
09.10.2013 - 12:26Andrea wrote:
Hallo, habe meine Jacke fertig, wunderschön! Ich verwendete statt Karisma Lima (noch weicher), Anleitung sehr gut verständlich. Ich habe M gestrickt, schließe mich an, fällt groß aus. Um die optimale Größe zu bekommen, müsste man viell. Passe oben abkürzen und das Abnehmen entsprechend verändern.
07.10.2013 - 11:00DROPS Design answered:
Liebe Andrea, schreiben Sie uns bitte noch, ob die fertigen Maße denen in der Schnittzeichnung entsprechen (und Sie den Schnitt für zu leger halten) oder ob Sie ein grösseres Resultat erhielten. Stimmt Ihre Maschenprobe genau mit unseren Angaben überein?
07.10.2013 - 13:48Susanne wrote:
Wunderschöne Jacke. habe sie gestrickt. Anleitung sehr gut, habe Größe M gestrickt. Fällt eher groß aus. Farbkombi ist auch sehr schön. ist jetzt schon eins meiner Lieblingsstücke.
12.03.2013 - 22:45Güttler wrote:
Habe gerade die Jacke für die Tochter einer Freundin gestrickt. Leider ist die Grundfarbe beige/braun sehr dunkel ausgefallen. Leider kommt dadurch das Muster nicht so zur Geltung wie es sein sollte. Das altrosa fällt eher wie burgund aus. Alles in allem entspricht die Abbildung nicht dem Ergebnis, schade. Nächstes Mal besser eine Wolle wählen die man sich anschauen kann. Abbildung und Ergebnis gehen zu weit auseinander. MfG Güttler
12.03.2013 - 15:46Marita wrote:
Eine tolle Jacke, ich stricke sie gerade mit Karisma, alles genau wie angegeben, und obwohl ich fest stricke, fällt sie eine Nummer größer aus. Meine Karisma in Farbe 54 sieht viel dunkler aus als auf dem Foto, deshalb ist der Kontrast zum jeansblau schwächer. Ich würde vielleicht beim nächsten Mal eher zu Farbe 55 greifen.
11.10.2012 - 23:27Anna wrote:
Mein Lieblingsmodell! Welche Größe trägt das Model? (Zum Abschätzen der richtigen Größe)
27.09.2012 - 10:22DROPS Design answered:
Hallo Anna, um Ihre Größe herauszufinden orientieren Sie sich am besten an der Schnittübersicht ganz unten auf der Seite, nach der geschriebenen Anleitung. Viel Spaß beim Stricken!
28.09.2012 - 09:51Charlotte wrote:
Virkelig smuk trøje. Vil straks igang med at strikke den :-)
20.06.2012 - 18:48Marise wrote:
Tres chique!
19.06.2012 - 15:41Lara wrote:
Väga ilus!
18.06.2012 - 18:33