
Popular categories
Looking for a yarn?


|
|||||||||||||||||||||||||
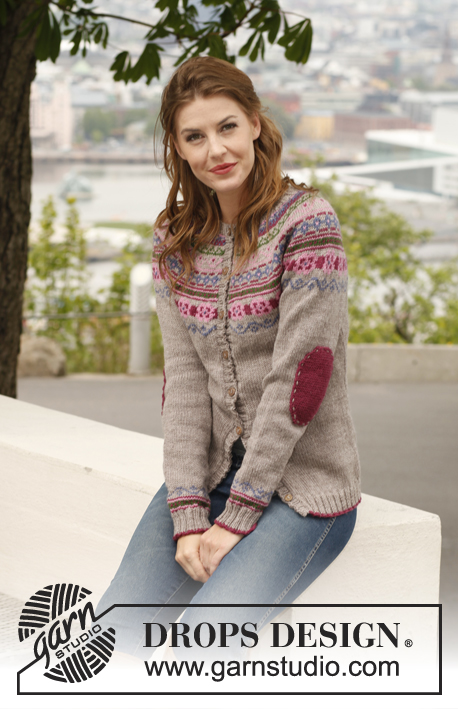
Martha |
|||||||||||||||||||||||||
 |
 |
||||||||||||||||||||||||
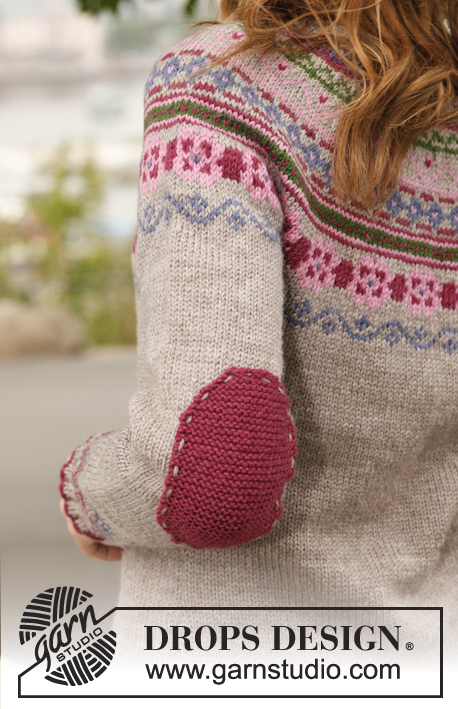
Knitted DROPS jacket with round yoke, pattern and sewn on elbow patches in "Karisma". Size S-XXXL
DROPS 143-11 |
|||||||||||||||||||||||||
|
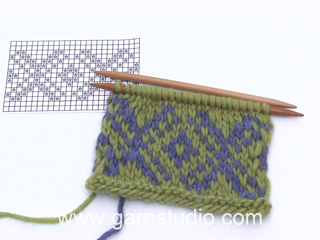
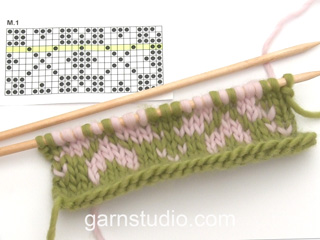
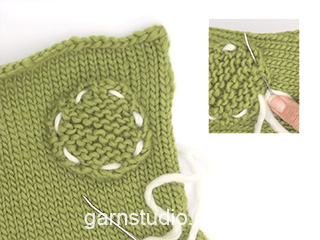
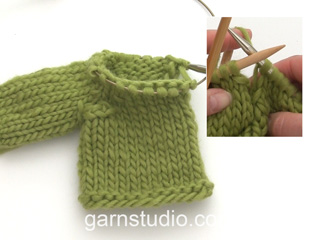
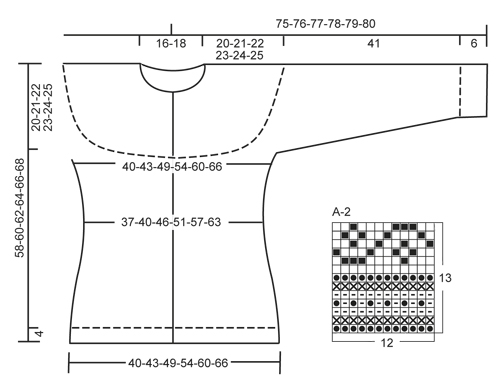
GARTER ST (back and forth on circular needle): K all rows. PATTERN: See diagrams A-1 and A-2. Diagrams are worked in stocking st and show 1 repetition of patterns. ---------------------------------------------------------- BODY: Worked back and forth on circular needle from mid front. Cast on 192-208-232-260-284-312 sts on circular needle size 3 mm with dark old rose. Work 1 row rib as follows (1st row = RS): 1 edge st in GARTER ST - see explanation above - * K 2/P 2 *, repeat from *-* until 3 sts remain, K 2 and 1 edge st in garter st. When 1 row with dark old rose has been worked, switch to beige brown. Continue rib until it measures 4 cm. Switch to circular needle size 4 mm and work 1 row in stocking st while at the same time dec 22-26-26-30-30-34 sts evenly = 170-182-206-230-254-278 sts. Insert 2 markers in the piece; 43-46-52-58-64-70 sts in from each side (= 84-90-102-114-126-138 sts between markers on back piece). Continue in stocking st with beige brown. REMEMBER THE KNITTING TENSION! When piece measures approx. 10 cm, dec 1 st on each side of markers in the sides. Repeat dec every 4 cm 2 more times = 158-170-194-218-242-266 sts. When piece measures 22-23-24-25-26-27 cm, inc 1 st on each side of both markers. Repeat inc every 5 cm 2 more times = 170-182-206-230-254-278 sts. When piece measures 38-39-40-41-42-43 cm, cast off 10 sts in each side for armholes on next row from RS (i.e. 5 sts on each side of markers in the sides) = 150-162-186-210-234-258 sts. Put piece aside and knit the sleeves. SLEEVE: Worked in the round on double pointed needles. Cast on 52-56-56-60-64-64 sts with dark old rose on double pointed needles size 3 mm. Work 1 round in rib = K 2/P 2. Switch to beige brown, continue rib until piece measures 6 cm. Switch to double pointed needles size 4 mm, work 1 round in stocking st while at the same time dec 4-8-8-0-4-4 sts evenly = 48-48-48-60-60-60 sts. Insert 1 marker at beg of round = mid under sleeve. Continue with diagram A-2, then continue sleeve with beige brown. When piece measures 10-10-12-10-10-12 cm, inc 1 st on each side of marker mid under sleeve. Repeat inc every 3-2½-2-3-2½-2 cm 11-13-15-11-13-15 more times = 72-76-80-84-88-92 sts. When piece measures 47 cm in all sizes, cast off 10 sts mid under sleeve, i.e. 5 sts on each side of marker = 62-66-70-74-78-82 sts. Put piece aside and knit another sleeve. YOKE: Slip sleeves on to same circular needle size 4 mm as body = 274-294-326-358-390-422 sts (do not work them when slipping them on to needle). P 1 row from WS with beige brown while at the same time dec 8-4-12-8-4-12 sts evenly = 266-290-314-350-386-410 sts. Work 0-2-4-2-4-8 more rows in stocking st with beige brown, before continuing with diagram A-1 (1st row = RS) with 1 edge st in garter st in each side – see diagram for your size. After all dec there are 90-98-106-118-130-138 sts on needle and piece measures approx. 58-60-62-64-66-68 cm up to shoulder. Then work an elevation at the back with beige brown as follows: K 52-56-60-66-72-76, turn, P 14, turn, K 21, turn, P 28. Continue like this by working 7 sts more on every turn until a total of 70-70-84-84-98-98 sts have been worked, turn and work the rest of row. Now P 1 row from WS over all sts while at the same time dec 6-10-14-22-30-34 sts evenly = 84-88-92-96-100-104 sts. Insert 1 marker, neck edge is worked after bands. LEFT BAND: Worked back and forth on circular needle size 3 mm. Knit up approx. 144 to 168 sts (divisible by 4) inside 1 edge st along left band with beige brown. Work rib as follows from WS: 1 st in garter st, * P 2, K 2 *, repeat from *-*, finish with P 2 and 1 st in garter st. From RS beg and end rib with K 2 and 1 st in garter st. Continue with K over K and P over P until rib measures 3 cm, cast off with K over K and P over P. RIGHT BAND: Work as left band but after 1 cm, cast off for 7 buttonholes evenly (buttonholes are cast off in P-sections seen from RS). 1 BUTTONHOLE = P 2 tog and make 1 YO – top buttonhole should be approx. 6-7 cm from the top (there should also be 1 buttonhole on neck edge) and bottom hole approx. 5-6 cm from bottom edge. NECK EDGE: Worked back and forth with beige brown on circular needle size 3 mm as follows: Knit up 6 sts over right band (inside 1 edge st), work the 84-88-92-96-100-104 sts from stitch holder around the neck on to needle and knit up 6 sts over left band = 96-100-104-108-112-116 sts. Work rib as follows (1st row = WS): 1 st in garter st, * P 2, K 2 *, repeat from *-*, finish with P 2 and 1 st in garter st. Continue with K over K and P over P with 1 st in garter st in each side. When neck edge measures 1 cm, cast off for 1 buttonhole over the other holes on right band. Continue rib until neck edge measures 3 cm, cast off with K over K and P over P. ELBOW PATCH: Patch is worked in garter st back and forth with dark old rose on 2 double pointed needles size 3 mm. Cast on 10 sts. K 1 row, on next row inc 1 st in each side by making 1 YO inside outermost st, on next row K YOs twisted to avoid holes. Repeat inc every other row 3 more times and then every 4th row 2 times = 22 sts. Work until piece measures 12 cm, now dec 1 st in each side by K tog 2 sts before last st. Repeat dec every 4th row 1 more time and then every other row 4 times = 10 sts remain. Cast off, patch measures approx. 15 cm vertically and 10 cm in width. ASSEMBLY: Sew tog the openings under the sleeves and sew on buttons. Sew elbow patches on to sleeves with beige brown and stitches inside outermost st. Patches are sewn on approx. 21 cm from bottom edge and approx. 2-3 cm from marker mid under sleeve and towards the back of sleeve. Fasten the patches with pins to see if they are placed correctly before sewing them on. |
|||||||||||||||||||||||||
Diagram explanations |
|||||||||||||||||||||||||
|
|||||||||||||||||||||||||

|
|||||||||||||||||||||||||
|
|||||||||||||||||||||||||
|
Have you made this or any other of our designs? Tag your pictures in social media with #dropsdesign so we can see them! Do you need help with this pattern?You'll find tutorial videos, a Comments/Questions area and more by visiting the pattern on garnstudio.com. © 1982-2024 DROPS Design A/S. We reserve all rights. This document, including all its sub-sections, has copyrights. Read more about what you can do with our patterns at the bottom of each pattern on our site. |
|||||||||||||||||||||||||


With over 40 years in knitting and crochet design, DROPS Design offers one of the most extensive collections of free patterns on the internet - translated to 17 languages. As of today we count 304 catalogues and 11422 patterns - 11422 of which are translated into English (UK/cm).
We work hard to bring you the best knitting and crochet have to offer, inspiration and advice as well as great quality yarns at incredible prices! Would you like to use our patterns for other than personal use? You can read what you are allowed to do in the Copyright text at the bottom of all our patterns. Happy crafting!
Comments / Questions (76)
I mönstret står det att man ska sticka på rundsticka fram och tillbaka, att alla maskor ska stickas räta, jag kan inte få ihop det hela. Om man ska sticka runt borde det ju stå att man ska klippa upp, dela på arbetet någon stans, men icke. För att få slätstickning måste man sticka aviga maskor på rundsticka om man ska sticka fram och tillbaka. Hur gör jag. Fråga 2 : är storlekarna små börja jag sticka en storlek L om personen i fråga normalt har storlek M Med vänlig hälsning Eva
16.12.2014 - 11:18DROPS Design answered:
Hej På fram- och bakstycket ska du sticka fram och tillbaka på rundsticka. Det står att när du ska sticka rätstickning ska du sticka alla varv räta. När du stickar slätstickning stickar du som vanligt vartannat varv räta och vartannat avigt när du stickar fram och tillbaka. Längst ner på mönstret finns det en måttskiss, där kan du se vilken storlek som passar. Lycka till!
15.05.2015 - 10:49Hei. Jeg holder på med jakka, og er akkurat begynt på mønster på bærestykke. Har rett maskeantall i forhold til oppskrifta, men da får jeg ikke hel rapport på siste? Strikker den rundt, med 5m vrang til oppklipp, for å slippe strikke annenhver omg vrang.
26.10.2014 - 17:25DROPS Design answered:
Hej Randi, Husker du også at trække de 2 kantm fra som vi har med hvis man strikker frem og tilbage? S 266 - 2 = 264 / 12 = 22 gange strikkes diagrammet i small.
28.10.2014 - 09:07Superfin mönster. Började i Cotton Merino men upptäckte att det inte stämmer med måtten (sticker ganska fast) - att byta till stickor 4,5 blev inte snyggt, så jag repade upp och började följa ett M-mönster för att få S-bredd. Hittills ser det ut som om det fungerar.
24.08.2014 - 14:04Da bin ich ja wirklich froh, dass ich nicht alles wieder auftrennen muss ;-) Herzlichen Dank für die Hilfe! Anja
01.07.2014 - 11:40Den Rumpfteil der Jacke habe ich natürlich am vorderen Rand begonnen. In der Anleitung für die Ärmel steht jedoch:"Zu Beginn der Rd 1 Markierer anbringen (= untere Ärmelmitte)", d.h., dass auch dort die Maschen abgekettet werden und damit ist man zwischen zwei Runden. Anders kann ich das nicht verstehen. Können Sie es bitte noch einmal erklären? Lieben Dank! Anja
01.07.2014 - 08:35DROPS Design answered:
Liebe Anja, ja, es stimmt, es wird am Übergang der Rd abgekettet. Sie können die ersten 5 M abketten, die Rd stricken und die letzten 5 M abketten, oder Sie ketten die letzten 5 M der Rd ab, dann die ersten 5 M und stricken die Rd noch zu Ende.
01.07.2014 - 09:46Da unten an der Ärmelmitte meine Runde beginnt, kette ich also bevor ich den Ärmel stillege "zwischen" zwei Runden ab (5 Maschen am Ende der einen, 5 Maschen am Beginn der anderen Runde). Stricke ich dann die zweite Runde noch zu Ende, bis ich wieder beim Beginn des Abkettens angekommen bin oder lege ich die Maschen direkt nach dem Abketten still? Danke! Anja
24.06.2014 - 11:10DROPS Design answered:
Liebe Anja, bei der Jacke haben Sie ja am vorderen Rand begonnen und können daher eigentlich keinen Beginn unter dem Arm haben... für einen Pulli gilt, dass Sie die Rd beenden können, wenn Sie für beide Armausschnitte abgekettet haben. Ansonsten würden Sie ja nur bis zum nächsten Armausschnitt stricken können und hätten dann am Vorder- oder Rückenteil 1 R mehr.
29.06.2014 - 14:29Hi please i can not understand the inc in the patch how can i make making 1 YO inside outermost st,?? thanks
04.02.2014 - 10:02DROPS Design answered:
Dear Mrs Mervat, you will inc after 1st st at beg of row and before last st at end of row with 1 yo as shown in the video below. Happy knitting!
04.02.2014 - 14:30Hallo, ich bin gerade dabei diese Jacke zu stricken. Allerdings kommt mir etwas komisch vor. Und zwar soll man im Rumpf Teil (Größe S) für beide Vorderteile 43M und 86M für den Rücken nehmen. Aber zwischen die Vorderteile kommt doch noch das Bund von 3cm. Meiner Ansicht nach müsste das doch im Rückenteil berücksichtigt werden, damit sich die Seitennaht nicht nach Hinten verzieht. Oder habe ich hier einen Denkfehler?
30.12.2013 - 19:00DROPS Design answered:
Liebe Sandra, das können Sie so arbeiten wie beschrieben, es zieht nicht nach hinten, bei Jacken hat man oftmals vorne geringfügig mehr Weite als hinten (durch die Blende).
01.01.2014 - 17:01Mein Lieblingsmodell auf Garnstudio.com wurde dieses Jahr vollendet. Tolles Ergebnis, auch dank Maritas Tipp Farbe 55 statt 54 zu verwenden. Falls man etwas großzügiger abmisst- so wie ich- sollte man ggf. eine graue Wolle mehr bestellen.
05.11.2013 - 21:10Hab das Jäckchen in Gr L gestrickt. Eins meiner Lieblingsteile. Tolle Farbkombi und schöne Passform. Ein dickes Lob an das Team.
12.10.2013 - 11:05