The yarn cost is calculated from the pattern’s smallest size and the yarn’s cheapest product type. Looking for an even better price? You might find it on the DROPS Deals!
-------------------------------------------------------
Alternative Yarn – See how to change yarns here
Yarn Groups A to F – Use the same pattern and change the yarn here
Yarn usage using an alternative yarn – Use our yarn converter here
-------------------------------------------------------
The yarn cost is calculated from the pattern’s smallest size and the yarn’s cheapest product type. Looking for an even better price? You might find it on the DROPS Deals!
All measurements in charts are in cm.
= off white | |
= light gray | |
= medium gray | |
= heather |
Each of our patterns has specific tutorial videos to help you.
These step-by-step tutorials might also help you:
Why is the knitting/crochet tension so important?
Knitting tension is what determines the final measurements of your work, and is usually measured per 10 x 10 cm. It is provided like so: number of stitches in width x number of rows in height - eg: 19 stitches x 26 rows = 10 x 10 cm.
The knitting tension is very individual; some people knit/crochet loosely while others work tightly. You adjust the knitting tension with the needle size, which is why the suggested needle size only serve as a guide! You need to adjust this (up or down) to ensure that YOUR knitting tension matches the knitting tension provided in the pattern. If you work with a different knitting tension than provided you will have a different yarn consumption, and your work will have different measurements than what the pattern suggests.
The knitting tension also determines which yarns can replace each other. As long as you achieve the same knitting tension you can replace one yarn with another.
See DROPS lesson: How to measure your tension/gauge
See DROPS video: How to make a gauge tension swatch
How do I know how many balls of yarn I need?
The required amount of yarn is provided in grams, eg: 450 g. To calculate how many balls you’ll need you first need to know how many grams are in 1 ball (25g, 50g or 100g). This information is available if you click on the individual yarn quality on our pages. Divide the amount required with the amount of each ball. For example, if each ball is 50g (the most common amount), the calculation will be as follows: 450 / 50 = 9 balls.
Can I use a different yarn than what the pattern suggests?
The important thing when changing from one yarn to another is that the knitting/crochet tension remains the same. This is so that the measurements of the finished piece will be the same as on the sketch provided. It is easier to achieve the same knitting tension using yarns from the same yarn group. It is also possible to work with multiple strands of a thinner yarn to achieve the knitting tension of a thicker one. Please try our yarn converter. We recommend you to always work a test swatch.
Please NOTE: when changing yarn the garment might have a different look and feel to the garment in the photo, due to individual properties and qualities of each yarn.
See DROPS lesson: Can I use a different yarn than the one mentioned in the pattern?
What are the yarn groups?
All our yarns are categorised into yarn groups (from A to F) according to thickness and knitting tension – group A contains the thinnest yarns and group F the thickest. This makes it easier for you to find alternative yarns to our patterns, should you wish to switch yarn. All yarns within the same group have a similar knitting tension and can easily replace each other. However, different yarn qualities have different structures and properties which will give the finished work a unique look and feel.
How do I use the yarn converter?
At the top of all our patterns you’ll find a link to our yarn converter, which is a helpful tool should you wish to use a different yarn than suggested. By filling in the yarn quality you wish to replace, the amount (in your size) and number of strands, the converter will present good alternative yarns with the same knitting tension. Additionally it will tell you how much you’ll require in the new qualities and whether you’ll need to work with multiple strands. Most skeins are 50g (some are 25g or 100g).
If the pattern is worked with multiple colours, every colour will have to be converted separately. Similarly, if the pattern is worked with several strands of different yarns (for example 1 strand Alpaca and 1 strand Kid-Silk) you will have to find alternatives for each, individually.
Why do you show discontinued yarns in the patterns?
Since different yarns have different qualities and textures we have chosen to keep the original yarn in our patterns. However, you can easily find options among our available qualities by using our yarn converter, or simply pick a yarn from the same yarn group.
It is possible that some retailers still have discontinued yarns in stock, or that someone has a few skeins at home that they would like to find patterns for.
The yarn converter will provide both alternative yarn as well as required amount in the new quality.
What size should I knit?
If you think it's hard to decide what size to make, it can be a good idea to measure a garment you own already and like the size of. Then you can pick the size by comparing those measures with the ones available in the pattern's size chart.
You'll find the size chart at the bottom of the pattern.
See DROPS lesson: How to read size chart
Why do I get the wrong knitting tension with the suggested needle size?
The needle size provided in the pattern serves only as a guide, the important thing is to follow the knitting tension. And since knitting tension is very individual, you will have to adjust the needle size to ensure that YOUR tension is the same as in the pattern – maybe you’ll have to adjust 1, or even 2 needle sizes, up or down to achieve the correct tension. For this, we recommend that you work test swatches.
Should you work with a different knitting tension than the one provided, the measurements of the finished garment might deviate from the measurement sketch.
See DROPS lesson: How to measure your tension/gauge
See DROPS video: How to make a gauge tension swatch
Why is the pattern worked top-down?
Working a garment top-down provides more flexibility and room for personal adjustment. For example it is easier to try the garment on while working, as well as making adjustments to length of yoke and shoulder caps.
The instructions are carefully explaining every step, in the correct order. Diagrams are adjusted to the knitting direction and are worked as usual.
How do I work according to a knitting diagram?
The diagram depicts all rows/rounds, and every stitch seen from the right side. It is read from bottom to top, from right to left. 1 square = 1 stitch.
When working back and forth, every other row is worked from the right side and every other row is worked from the wrong side. When working from the wrong side, the diagram will have to be worked reversed: from left to right, knit stitches are purled, purl stitches are knit etc.
When working in the round every round is worked from the right side and the diagram are worked from right to left on all rounds.
See DROPS lesson: How to read knitting diagrams
How do I work according to a crochet diagram?
The diagram depicts all rows/rounds, and every stitch seen from the right side. It is worked from bottom to top, from right to left.
When working back and forth every other row is worked from the right side: from right to left and every other row is worked from the wrong side: from left to right.
When working in the round, every row in the diagram are worked from the right side, from right to left.
When working a circular diagram you start in the middle and work your way outwards, counter clockwise, row by row.
The rows usually start with a given number of chain stitches (equivalent to the height of the following stitch), this will either be depicted in the diagram or explained in the pattern.
See DROPS lesson: How to read crochet diagrams
How do I work several diagrams simultaneously on the same row/round?
Instructions for working several diagrams after each other on the same row/round, will often be written like so: “work A.1, A.2, A.3 a total of 0-0-2-3-4 times". This means you work A.1 once, then A.2 is worked once, and A.3 is repeated (in width) the number of times provided for your size – in this case like so: S = 0 times, M = 0 times, L=2 times, XL= 3 times and XXL = 4 times.
The diagrams are worked as usual: begin with the first row in A.1, then work the first row in A.2 etc.
See DROPS lesson: How to read knitting diagrams
See DROPS lesson: How to read crochet diagrams
Why are the sleeves shorter in larger sizes?
The total width of the garment (from wrist-to-wrist) will be larger in the larger sizes, despite the actual sleeves being shorter. The larger sizes have longer sleeve caps and wider shoulders, so there will be a good fit in all sizes.
Where on the garment is the length measured?
The measurement sketch/schematic drawing provides information regarding the full length of the garment. If it’s a jumper or a jacket the length is measured from the highest point on the shoulder (usually closest to the neckline), and straight down to the bottom of the garment. It is NOT measured from the tip of shoulder. Similarly, the length of yoke is measured from the highest point on the shoulder and down to where yoke is split into body and sleeves.
See DROPS lesson: How to read a schematic drawing
What is a repeat?
Diagrams are often repeated on the round or in height. 1 repeat is the diagram the way it appears in the pattern. If it says to work 5 repeats of A.1 in the round, then you work A.1 a total of 5 times after/next to each other in the round. If it says to work 2 repeats of A.1 vertically/in height you work the entire diagram once, then begin again at the start and work the entire diagram one more time.
Why does the piece start with more chain stitches than it’s worked with?
Chain stitches are slightly narrower than other stitches and to avoid working the cast-on edge too tight, we simply chain more stitches to begin with. The stitch count will be adjusted on the following row to fit the pattern and measurement sketch.
Why increase before the rib edge when the piece is worked top-down?
The rib edge is more elastic and will contract slightly compared to, for example, stocking stitch. By increasing before the rib edge, you avoid a visible difference in width between the rib edge and the rest of the body.
Why increase in the cast-off edge?
It’s very easy to cast off too tightly, and by making yarn overs while casting off (and simultaneously casting these off) you avoid a too tight cast off edge.
See DROPS video: How to bind off with yarn overs (yo)
How do I increase/decrease on every 3rd and 4th row/round alternately?
To achieve an even increase (or decrease) you can increase on, for example: every 3rd and 4th row alternately, like so: work 2 rows and increase on the 3rd row, work 3 rows and increase on the 4th. Repeat this until the increase is complete.
See DROPS lesson: Increase or decrease 1 st on every 3rd and 4th row alternately
How can I work a jacket in the round instead of back and forth?
Should you prefer to work in the round instead of back and forth, you may of course adjust the pattern. You’ll need to add steeks mid-front (usually 5 stitches), and follow the instructions. When you would normally turn and work from the wrong side, simply work across the steek and continue in the round. At the end you’ll cut the piece open, pick up stitches to work bands, and cover the cut edges.
See DROPS video: How to knit steeks and cut open
Can I work a jumper back and forth instead of in the round?
Should you prefer to work back and forth instead of in the round, you may of course adjust the pattern so you work the pieces separately and then assemble them at the end. Divide the stitches for the body in 2, add 1 edge stitch in each side (for sewing) and work the front and back pieces separately.
See DROPS lesson: Can I adapt a pattern for circular needles into straight needles?
Why is the pattern slightly different than what I see in the photo?
Pattern repeats can vary slightly in the different sizes, in order to get the correct proportions. If you’re not working the exact same size as the garment in the photo, yours might deviate slightly. This has been carefully developed and adjusted so that the complete impression of the garment is the same in all sizes.
Make sure to follow instructions and diagrams for your size!
How do I make a women’s size garment into a men’s size one?
If you have found a pattern you like which is available in women’s size it’s not very difficult to convert it to men’s size. The biggest difference will be the length of sleeves and body. Start working on the women size that you think would fit across the chest. The additional length will be worked right before you cast off for the armhole/sleeve cap. If the pattern is worked top-down you can add the length right after the armhole or before the first decrease on sleeve.
Regarding additional yarn amount, this will depend on how much length you add, but it is better with a skein too many than too few.
How do I prevent a hairy garment from shedding?
All yarns will have excess fibres (from production) that might come off as lint or shedding. Brushed yarns (ie hairier yarns) have more of these loose, excess fibres, causing more shedding.
Shedding also depends on what is worn under or over the garment, and whether this pulls at the yarn fibres. It’s therefore not possible to guarantee that there will be no shedding
Below are some tips on how to get the best result when working with hairier yarns:
1. When the garment is finished (before you wash it) shake it vigorously so the looser hairs come off. NOTE: do NOT use a lint roller, brush or any method that pulls at the yarn.
2. Place the garment in a plastic bag and put it in your freezer - the temperature will cause the fibres to become less attached to each other, and excess fibres will come off easier.
3. Leave in the freezer for a few hours before taking it out and shaking it again.
4. Wash the garment according to the instructions on the yarn label.
Why does my garment pill?
Pilling is a natural process that happens to even the most exclusive of fibers. It's a natural sign of wear and tear that is hard to avoid, and that is most visible in high friction areas of your garment like a sweater's arms and cuffs.
You can make your garment look as new by removing the pilling, using a fabric comb or a pill/lint remover.
Diamond Rose |
|||||||||||||
|
|
||||||||||||
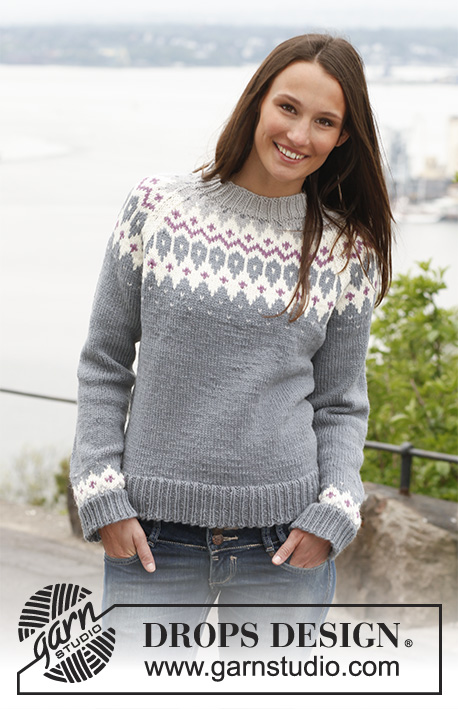
Knitted DROPS jumper with raglan and pattern in "Lima". Size: S - XXXL.
DROPS 141-41 |
|||||||||||||
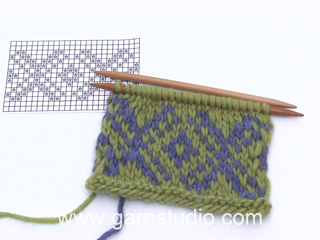
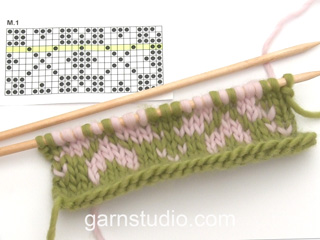
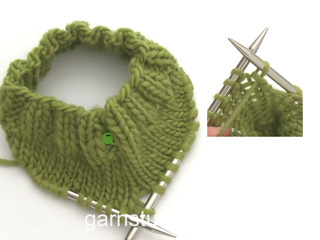
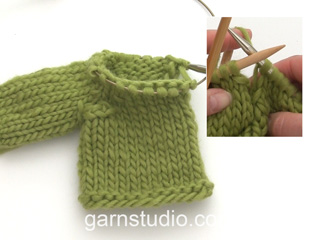
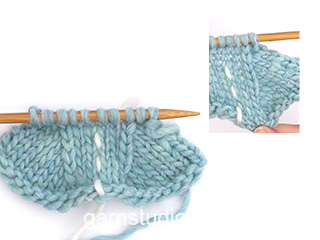
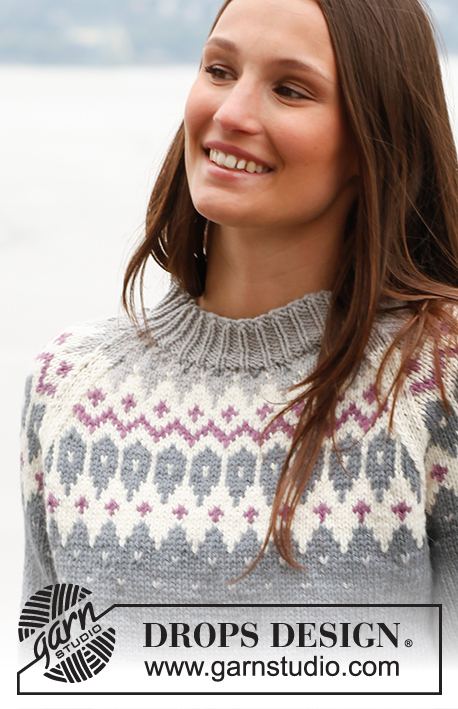
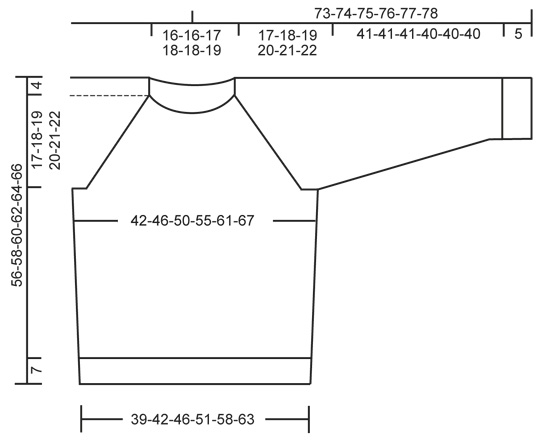
PATTERN: See diagrams A.1 and A.2. Work entire pattern in stockinette st. PATTERN TIP: The 4 sts in each raglan line are worked in the base color in which A.2 is worked, i.e. first medium gray, then off white and finally light gray (see picture). DECREASE TIP (applies to raglan): From RS: Dec as follows after marker: K 1, slip 1 st as if to K, K 1, psso. Dec as follows 3 sts before marker: K 2 tog and K 1. From WS: Dec as follows after marker: P 1 and P 2 tog. Dec as follows 3 sts before marker: P 2 twisted tog and P 1. KNITTING TIP: If knitting gauge is incorrect in height and the knitting is too tight, the raglan dec will be too short and the armholes too small. This can be adjusted by working 1 extra row without dec evenly spaced between dec. If the piece is worked too loosely, dec more often than written in pattern. ---------------------------------------------------------- BODY: Cast on 195-213-234-258-291-321 sts on circular needle size 3 mm / US 2.5 with medium gray. K 1 round, then work rib (= K 1/P 2). When rib measures 7 cm / 2¾", switch to circular needle size 4 mm / US 6. Continue in stockinette st while AT THE SAME TIME dec 33-35-40-44-49-55 sts evenly on 1st round = 162-178-194-214-242-266 sts. Insert 1 marker in each side (= 81-89-97-107-121-133 sts between markers on front and back piece). When piece measures 9-9-10-10-10-10 cm / 3½"-3½"-4"-4"-4"-4", inc 1 st on each side of both markers (= 4 sts inc). Repeat inc every 7-7-7-8-8-8 cm / 2¾"-2¾"-2¾"-3⅛"- 3⅛"- 3⅛" 3 more times = 178-194-210-230-258-282 sts. When piece measures 35-36-37-38-39-40 cm / 13¾"-14¼"-14½"-15"-15¼"-15¾", bind off 8-8-8-10-10-10 sts in each side for armholes (i.e. 4-4-4-5-5-5 sts on each side of both markers) = 81-89-97-105-119-131 sts remain on front and back piece. Put piece aside and knit the sleeves. SLEEVE: Cast on 51-54-54-57-60-63 sts on double pointed needles size 3 mm / US 2.5 with medium gray. K 1 round, then work rib (= K 1/P 2). When rib measures 5 cm / 2", switch to double pointed needles size 4 mm / US 6. K 1 round while AT THE SAME TIME dec 9-12-6-9-6-9 sts evenly = 42-42-48-48-54-54 sts. Insert 1 marker at beg of round (= mid under sleeve). Now work PATTERN according to diagram A.1. After A.1 work with medium gray. AT THE SAME TIME on 1st round after A.1, inc 1-3-1-3-1-1 st evenly = 43-45-49-51-55-55 sts. When piece measures 11-12-12-11-13-11 cm / 4½"-4¾"-4¾"-4½"-5"-4½", inc 1 st on each side of marker mid under sleeve. Repeat inc every 3-2½-2½-2½-2-2 cm / 1"-⅞"-⅞"-⅞"-¾"-¾" 11-12-12-13-14-16 more times = 67-71-75-79-85-89 sts. When piece measures 46-46-46-45-45-45 cm / 18"-18"-18"-17¾"-17¾"-17¾", bind off 8-8-8-10-10-10 sts mid under sleeve (i.e. 4-4-4-5-5-5 sts on each side of marker) = 59-63-67-69-75-79 sts. Insert 1 marker in the middle st on round (= mid on top of sleeve). Put piece aside and knit another sleeve. YOKE: Slip sleeves on to same circular needle as body where armholes were bind off = 280-304-328-348-388-420 sts. Now insert 1 marker in every transition between sleeves and body (= 4 markers). In addition insert 1 marker in the middle st on front and back piece (sleeves already have 1 marker in the middle st). READ ALL OF THE FOLLOWING SECTION BEFORE CONTINUING: Now work PATTERN according to diagram A.2 – READ PATTERN TIP. NOTE: St with marker on front and back piece and on sleeves should fit st with arrow in diagram. Count out towards the side (i.e. pattern will not fit in transitions between body and sleeves). AT THE SAME TIME dec for raglan in every transition between body and sleeves as follows - READ DECREASE TIP and KNITTING TIP: ON SLEEVE: Work 1-1-0-1-0-1 round before dec beg. Now dec every 4th round a total of 4-3-3-3-2-0 times and then every other round a total of 17-20-22-23-27-31 times (= 17 sts remain on sleeve in all sizes). ON BODY: Work 1-1-0-1-0-1 round before dec beg. Now dec every 4th round a total of 4-3-0-0-0-0 times, every other round a total of 17-20-27-28-25-23 times and then every round/row a total of 0-0-0-0-10-16 times. AT THE SAME TIME when piece measures 50-52-54-56-58-60 cm / 19¾"-20½"-21¼"-22"-22¾"-23⅝", slip the middle 25-29-29-35-35-39 sts on a stitch holder for neck and work piece back and forth on needle. Then bind off for neck at beg of row in each side as follows: bind off 2 sts 1 time and then 1 st until raglan dec is done. After all dec for raglan and bind off for neck approx. 79-83-83-89-89-93 sts remain on the needle and piece measures approx. 56-58-60-62-64-66 cm / 22"-22¾"-23⅝"-24⅜"-25¼"-26" from shoulder and down. ELEVATION IN BACK OF NECK: Beg mid back and work around the neck on circular needle size 4 mm / US 6 with light gray, AT THE SAME TIME pick up new sts on each side of sts on stitch holder at the front and slip the 25-29-29-35-35-39 sts on stitch holder back on needle so that there are approx. 112-120-120-132-132-140 sts on needle. Insert 1 marker mid front. Work in stockinette st while AT THE SAME TIME dec evenly to 80-82-84-88-90-92 sts on 1st round. Then work back and forth while AT THE SAME TIME working an elevation at the back of neck as follows - NOTE: On every turn, slip 1st st, tighten thread and then work: Beg mid back and work until 12-13-14-15-16-17 sts remain before marker mid front, turn, tighten thread and work until 12-13-14-15-16-17 sts remain before marker in the other side. Turn, tighten thread and work until 19-20-21-22-23-24 sts remain before marker, turn, tighten thread and work until 19-20-21-22-23-24 sts remain before marker in the other side. Turn and work until 26-27-28-29-30-31 sts remain before marker, turn, tighten thread and work until 26-27-28-29-30-31 sts remain in the other side. Turn, tighten thread and work until 33-34-35-36-37-38 sts remain before marker, turn, tighten thread and work until 33-34-35-36-37-38 sts remain before marker in the other side. Turn, tighten thread and work until mid back. NECK EDGE: Switch to circular needle size 3 mm / US 2.5 and K 1 round (in the round over all sts) while AT THE SAME TIME inc evenly 96-99-102-105-108-111 sts. Work rib (= K 1/P 2) until rib measures 4 cm / 1½". Then loosely bind off with K over K and P over P. ASSEMBLY: Sew the openings under the sleeves. |
|||||||||||||
Diagram explanations |
|||||||||||||
|
|||||||||||||
Have you made this or any other of our designs? Tag your pictures in social media with #dropsdesign so we can see them! Do you need help with this pattern?You'll find tutorial videos, a Comments/Questions area and more by visiting the pattern on garnstudio.com. © 1982-2024 DROPS Design A/S. We reserve all rights. This document, including all its sub-sections, has copyrights. Read more about what you can do with our patterns at the bottom of each pattern on our site. |
With over 40 years in knitting and crochet design, DROPS Design offers one of the most extensive collections of free patterns on the internet - translated to 17 languages. As of today we count 304 catalogs and 11422 patterns - 11417 of which are translated into English (US/in).
We work hard to bring you the best knitting and crochet have to offer, inspiration and advice as well as great quality yarns at incredible prices! Would you like to use our patterns for other than personal use? You can read what you are allowed to do in the Copyright text at the bottom of all our patterns. Happy crafting!
Comments / Questions (93)
Veronica wrote:
Hej! Hur är denna tröja i modellen/storleken? Jag är bredare över höfterna, säg M/L och överkropp S. Vilken storlek kan jag välja? I A-formade klänningar väljer jag S. En annan fråga, kan jag ändra från raglanärm till "vanlig" där oket går i ett? Tycker det är fint när mönstret hänger ihop. Vad är enklast att sticka? Jag är nybörjare på tröjor. Hälsningar Veronica
24.03.2022 - 10:57DROPS Design answered:
Hej Veronica: Se på måttskissen längst ner på mönstret och välj den storlek du tycker passar bäst utifrån de måtten. Du kan göra om mönstret och sticka "vanlig ärm" men det kräver att du gör om mönstret själv så det enklaste är att bara följa mönstret som det står med raglanärm. Mvh DROPS Design
25.03.2022 - 14:25Noora wrote:
Täytyykö korotus niskassa tehdä? Jos haluaa jättää sen tekemättä niin vaikuttaako se esimerkiksi kaula-aukon tiukkuuteen?
07.03.2022 - 11:44Gabriela wrote:
Hola! Una aclaración por favor: cuando dice “disminuir a cada 4ta vuelta” ¿significa que hay que tejer 3 vueltas y disminuir en la 4ta? O tejer 4 vueltas y disminuir en la siguiente? Gracias!
19.02.2022 - 23:52DROPS Design answered:
Hola Gabriela, hay que tejer 3 vueltas y disminuir en la 4ta. Saludos!
20.02.2022 - 18:59Corell Anki wrote:
Diamond Rose (li-018) Förstår inte riktigt hur jag ska minska i oket? Jag är van att man brukar se det på mönstret. Kan jag få hjälp? Tack
06.02.2022 - 08:53DROPS Design answered:
Hej, du minskar på vart annat varv i varje RAGLAN-övergång mellam ärm och bol, se hur du gör i MINSKNINGSTIPS (RAGLAN) i början på mönstret, precis under INSTRUKTIONER - lycka till :)
08.02.2022 - 11:33Elisabeth Depuiset wrote:
Bonjour, suite à votre réponse du 1-11, pouvez vous m'aider pour les diminutions raglan de la taille M Merci pour votre réponse
12.11.2021 - 19:31DROPS Design answered:
Bonjour Mme Depuiset, en taille M vous allez diminuer pour le raglan au même rythme pour les manches et le dos /devant, autrement dit, vous diminuez 8 mailles à chaque fois soit: 3 fois tous les 4 tours puis 20 fois tous les 2 tours. Bon tricot!
15.11.2021 - 08:58Elisabeth Depuiset wrote:
Bonjour, Je suis en difficulté pour les diminutions du pull Diamond Rose... En effet, j'ai bien compris où se situent les diminutions des manches, de chaque côté des marqueurs à savoir 4 diminutions à chaque fois puisqu'il y a 2 diminutions à chaque manches, mais je ne comprends pas où se trouvent les diminutions dos et devant ? Merci beaucoup pour votre aide. Très cordialement
28.10.2021 - 13:41DROPS Design answered:
Bonjour Mme Depuiset, vous avez 4 lignes du raglan. On diminue 1 maille de chaque cote de cette ligne. A chaque fois 1 diminution appartient a la manche et la deuxieme au dos ou au devant. Vous diminuez au total 8 mailles par tour. Les diminutions pour les reglans sont fait a une frequence differente sur les manches et sur le dos et devant. Si vous avez un probleme, dites-moi votre taille. Bon tricot!
01.11.2021 - 17:57Susanne wrote:
Hej. Jeg har fundet en opskrift som jeg godt vil strikke. Er det muligt at købe alt det man skal bruge her altså pinde, garn ol. Sådan man har det hele på en gang. Vh Susanne
08.10.2021 - 09:38DROPS Design answered:
Hej Susanne. Du köper garnet via en forhandler , och gör du det i en webshop så får du lägga allt du trenger i handekurven. Du kan också ringa en forhandler och beställa om du hellre vill det. Mvh DROPS Design
08.10.2021 - 11:27Aranzazu Sánchez Martínez wrote:
Acabo de leer su respuesta y sigo sin entender. Si dejo los 35 apartados y hago las disminuciones para el escote al recuperar los 35 me quedan 2 enormes agujeros en el delantero, entonces ,¿como se hace.?
09.05.2021 - 22:01DROPS Design answered:
Hola Aranzazu. Los agujeros se forman porque la tensión de los hilos entre los puntos en espera y primeros disminuciones es demasiado floja. Se puede solucionar con un par de puntadas por el lado revés de la labor o trabajando las partes de las uniones más tenso.
16.05.2021 - 18:02Arancha Sánchez wrote:
Hola Buenos días.Tengo prácticamente hecho el jersey pero tengo un problema. Cuando dice al llegar a 56cm deslizar 35 pos,serían 35 para delantero y 35 para espalda? Estos puntos se tejen o se dejan apartados?no entiendo como hacer los remates del escote si los puntos los tengo en otra aguja. Y tampoco entiendo lo de la elevación del escote de la espalda. Podrían ayudarme? Me parece un jersey divino y me da rabia no saber seguir. Gracias.
04.05.2021 - 06:30DROPS Design answered:
Hola Arancha, se deslizan los 35 puntos centrales para el delantero. Estos puntos se dejan en espera hasta trabajar la cenefa del cuello. Tienes un vídeo explicativo bajo el patrón sobre como trabajar la elevación del escote en la espalda.
09.05.2021 - 20:08Katja wrote:
Toinen kysymys, tuossa aikaisemmin olikin kysytty raglankavennuksista L koossa. Itse teen XL. Eli jos ne täytyy tehdä samoilla kerroksilla niin hihassa on ensin joka 4.krs yhteensä 3 x mutta etu/takakappaleessa tämä on 0 kertaa. Eli aloitetaanko hihoissa ensin joka 4 kerros sen kolme kertaa ja muualla aloitetaan suoraan tuolla joka 2 kerros kavennuksella? Hihoissa tehdään kavennus yhteensä 26 kertaa ja etu/takakappaleessa 28 kertaa. Eikö niitä pitäisi olla yhtä paljon?
18.02.2021 - 13:19DROPS Design answered:
Koossa XL teet hihan kavennukset ja samalla aloitat etu-/takakappaleen kavennukset, ja teet ne heti joka 2.kerros. Miehustassa ja hihoissa kavennetaan eri määrä silmukoita.
05.05.2021 - 16:49