
Popular categories
Looking for a yarn?


|
||||||||||||||||
Buttercup |
||||||||||||||||
 |
 |
|||||||||||||||
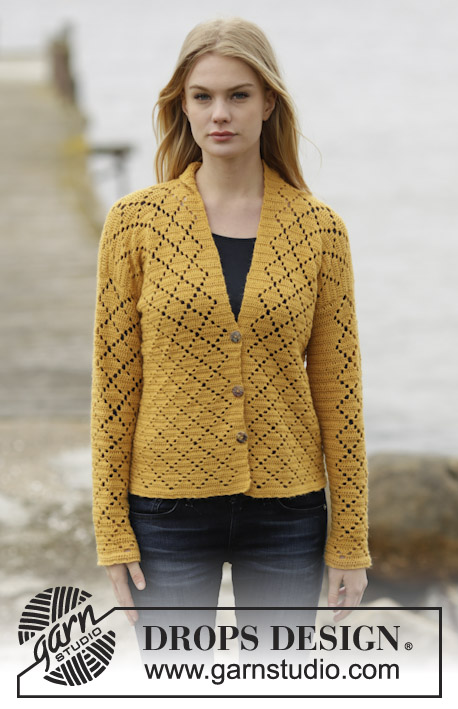
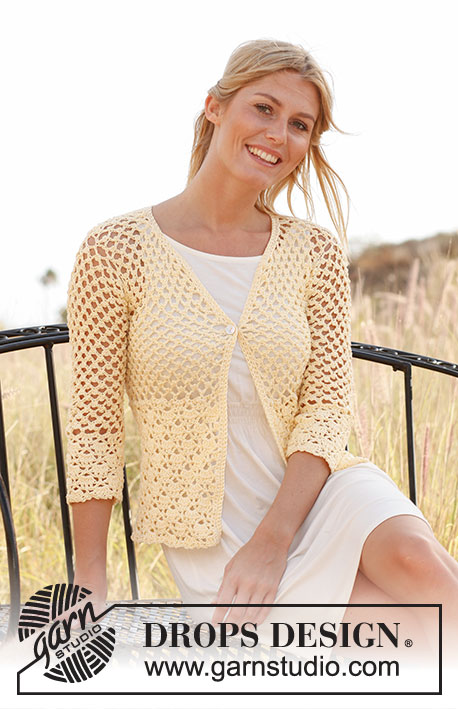
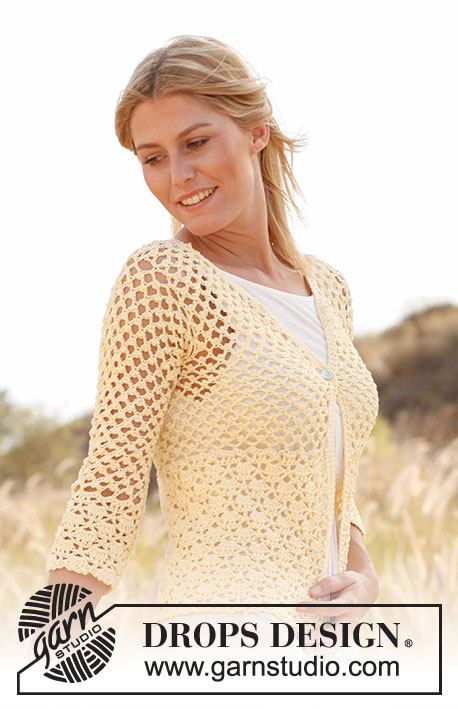
Crochet DROPS jacket in ”Muskat”. Size: XS - XXXL.
DROPS 136-30 |
||||||||||||||||
|
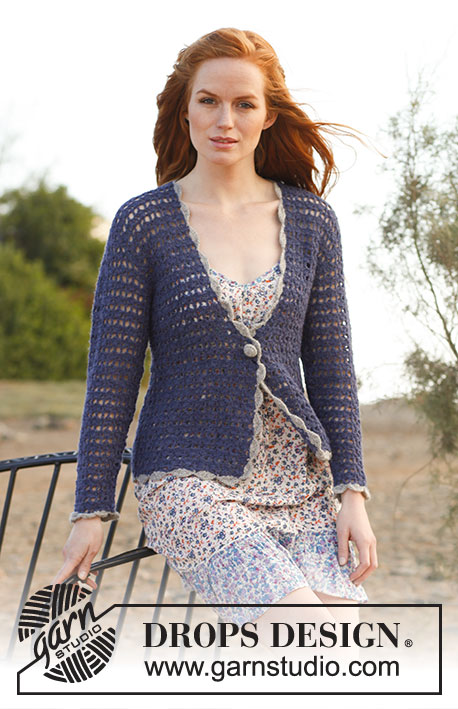
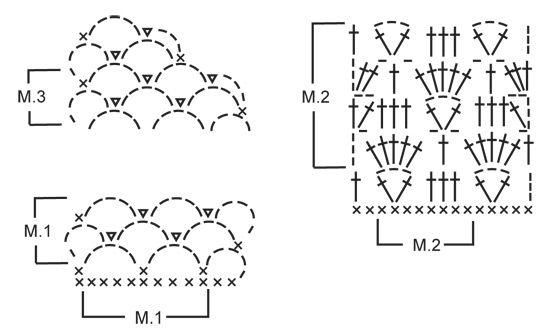
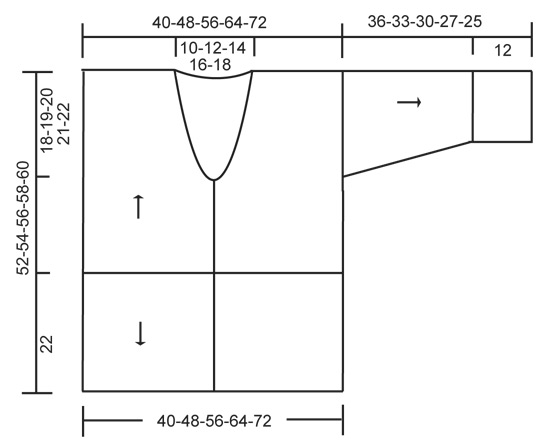
PATTERN 1 (also see diagram M.1): ROW 1: See explanation in pattern. ROW 2: 5 ch, 1 dc in middle ch on first ch-loop, 2 ch, 1 sl st in same ch, * 5 ch, 1 dc in middle ch on next ch-loop, 2 ch, 1 sl st in same ch *, repeat from *-* until 1 ch-loop remains, 5 ch, 1 dc in middle ch on last ch-loop, turn piece. Repeat 2nd row upwards. PATTERN 2 (also see diagram M.2): ROW 1: See explanation in pattern. ROW 2: 4 ch, * 5 tr in ch-loop, 1 ch, skip 2 tr, 1 tr in next tr, 1 ch, skip 2 tr *, repeat from *-* until 1 ch-loop remains, work 5 tr in this ch-loop, 1 ch and 1 tr in 3rd ch from beg of row, turn piece. ROW 3: 5 ch, 1 tr in first tr, * skip 1 tr, 1 tr in each of the next 3 tr, skip 1 tr, in next tr work 1 tr + 3 ch + 1 tr *, repeat from *-* until 5 tr remain, skip 1 tr, 1 tr in each of the next 3 tr, skip 1 tr, 1 tr + 2 ch + 1 tr in 3rd ch from beg of previous row, turn piece. ROW 4: 3 ch, 2 tr in first ch-loop, * 1 ch, skip 2 tr, 1 tr in next tr, 1 ch, skip 2 tr, in next ch-loop work 5 tr *, repeat from *-* until 5 tr remain, 1 ch, skip 2 tr, 1 tr in next tr, 1 ch, skip 2 tr, in last ch-loop work 3 tr, turn piece. ROW 5: 3 ch, skip 2 tr, *in next tr work 1 tr + 3 ch + 1 tr, skip 1 tr, 1 tr in each of the next 3 tr, skip 1 tr *, repeat from *-* until 4 tr remain, in next tr work 1 tr + 3 ch + 1 tr, skip 2 tr, 1 tr in 3rd ch from beg of previous row. Repeat rows 2 to 5. -------------------------------------------------------- JACKET: Worked back and forth from mid front. First work PATTERN 1 up to shoulder, then work PATTERN 2 from cast on edge and down. The sleeves are worked from armholes and down. Work 187-224-262-298-335 ch on hook size 4.5 mm with Muskat. Turn, work 1 dc in 2nd ch from hook, then work 1 dc in each of the next 3-5-1-2-4 ch, * skip 1 ch, work 1 dc in each of the next 6 ch *, repeat from *-* the rest of row = 160-192-224-255-287 dc. Work next row as follows: 5 ch, skip the first 2 dc, 1 dc in next dc, * 5 ch, skip 3 dc, 1 dc in next dc, 5 ch, skip 4 dc, 1 dc in next dc *, repeat from *-* until 4-0-5-0-5 dc remain. Sizes M and XXL are done. SIZE XS/S: 5 ch, skip 3 dc, 1 dc in last dc. SIZE L/XL and XXXL: 5 ch, skip 4 dc, 1 dc in last dc. Turn piece (= 35-42-49-56-63 large ch-loops + loop used when turning at beg of row). Continue PATTERN 1 (beg on 2nd row) – see explanation above! REMEMBER THE CROCHET TENSION! When piece measures approx. 12-13-14-15-16 cm, divide for armholes and finish each part separately. RIGHT FRONT PIECE: Work diagram M.1 back and forth over the first 9-11-12-14-16 large ch-loops - AT THE SAME TIME next time 3rd row in diagram is worked, dec for neck according to diagram M.3. Repeat dec until 6-7-9-10-11 large ch-loops remain on shoulder. Continue to work diagram M.1 until piece measures approx. 29-31-33-35-37 cm – work last row as follows: 5 ch, 1 dc in middle ch on first ch-loop from previous row, * 5 ch, 1 dc in middle ch on next ch-loop *, repeat from *-* the rest of row, cut the thread. LEFT FRONT PIECE: Work as right front piece but reversed. BACK PIECE: Work back and forth over the middle 17-20-25-28-31 large ch-loops. When piece measures approx. 29-31-33-35-37 cm (count so that no of ch-loops vertically on front piece is the same as on back piece), work 1 last row over 6-7-9-10-11 ch-loops in each side as on front piece (the 5-6-7-8-9 middle ch-loops = neck). EDGE AT THE BOTTOM: Work down from cast on edge as follows (beg from WS): 1 sl st in first dc, then 3 ch, skip 2 dc, in next dc work 1 tr + 3 ch + 1 tr, * skip 2 dc, work 1 tr in each of the next 3 dc, skip 2 dc, in next dc work 1 tr + 3 ch + 1 tr *, repeat from *-* until 4-4-4-3-3 dc remain, skip 3-3-3-2-2 dc and work 1 tr in last dc, turn piece. Continue PATTERN 2 (beg on 2nd row) – see explanation above! There will be a total of 20-24-28-32-36 repetitions on row. Work diagram M.2 for approx. 22 cm, finish after 2nd or 4th row in pattern. Work last row as follows: * 3 ch, skip 1 st (either 1 tr or 1 ch), 1 dc in next tr *, repeat from *-* the rest of row, cut the thread. The entire body measures approx. 52-54-56-58-60 cm vertically. ASSEMBLY: Crochet the shoulders tog as follows: * 1 dc in first large ch-loop on front piece, 2 ch, 1 dc in first large ch-loop on back piece, 2 ch *, repeat from *-* on both shoulders. SLEEVE: Worked back and forth from armhole and down. Work 1 dc in first ch-loop at the bottom of armhole, * 5 ch, skip approx. 2 cm, fasten with 1 dc *, repeat from *-* until bottom of other side of armhole, there should be 18-19-20-21-22 ch-loops in total. Turn and continue with 2ND ROW in PATTERN 1 (= 17-18-19-20-21 large ch-loops on row + ch-loop used when turning). When piece measures 2 cm, dec 1 large ch-loop at the end of next row, this is done by working until 2 large ch-loops remain, work 5 ch, skip first ch-loop and work 1 dc in middle ch on last ch-loop. Repeat dec every 4-3-3-2-2 cm (dec alternately in the right and left side) until 11-11-13-13-15 large ch-loops remain + ch-loop used when turning. When sleeve measures 24-21-18-15-13 cm (shorter measurements in the larger sizes because of broader shoulder width), work next row as follows: 5 ch, 1 dc in middle ch on first ch-loop, * 5 ch, 1 dc in middle ch on next ch-loop *, repeat from *-* the rest of row. Work next row as follows: 4 dc in every ch-loop and 3 dc in last ch-loop on row = 47-47-55-55-63 dc. Work next row as follows: 3 ch, skip the first 2 dc, in next dc work 1 tr + 3 ch + 1 tr, * skip 2 dc, work 1 tr in each of the next 3 dc, skip 2 dc, in next dc work 1 tr + 3 ch + 1 tr *, repeat from *-* until 4 dc remain, skip 3 dc and work 1 tr in last dc, turn piece. Continue PATTERN 2 (beg on 2nd row) – see explanation above! There will be a total of 6-6-7-7-8 repetitions on row. When diagram M.2 has been worked for approx. 12 cm (finish after 2nd or 4th row in pattern), work next row as follows: * 3 ch, skip 1 st (either 1 tr or 1 ch), 1 dc in next tr *, repeat from *-* the rest of row, cut the thread. ASSEMBLY: Work sleeve seams tog the same way as on shoulders. BANDS AND NECK EDGE: Work 1 dc row up along right band, around the neck and down along left band - make sure that dc row neither tightens nor widens the edges. There should be approx. 16 dc on 10 cm. Turn and work 1 row with 1 dc in every dc - when finished around the neck and beg down right front piece work as follows: 1 dc in first dc, 2 ch, skip 2 dc (= button hole), continue with dc down along the rest of front piece. Turn and work 1 dc row – work 2 dc in ch-loop. Cut and fasten the thread. Sew on button. |
||||||||||||||||
Diagram explanations |
||||||||||||||||
|
||||||||||||||||
|
||||||||||||||||
|
||||||||||||||||
|
Have you made this or any other of our designs? Tag your pictures in social media with #dropsdesign so we can see them! Do you need help with this pattern?You'll find tutorial videos, a Comments/Questions area and more by visiting the pattern on garnstudio.com. © 1982-2024 DROPS Design A/S. We reserve all rights. This document, including all its sub-sections, has copyrights. Read more about what you can do with our patterns at the bottom of each pattern on our site. |
||||||||||||||||


With over 40 years in knitting and crochet design, DROPS Design offers one of the most extensive collections of free patterns on the internet - translated to 17 languages. As of today we count 304 catalogues and 11422 patterns - 11422 of which are translated into English (UK/cm).
We work hard to bring you the best knitting and crochet have to offer, inspiration and advice as well as great quality yarns at incredible prices! Would you like to use our patterns for other than personal use? You can read what you are allowed to do in the Copyright text at the bottom of all our patterns. Happy crafting!
Comments / Questions (138)
Jeg har heklet prøvelapp med nål Nr 3 og får fremdeles ikke 5 store lm-buer innenfor 10 cm. Jeg får ikke 4 lm-buer innenfor engang. Det må vel være feil i oppskriften? Jeg hekler ikke løst.
25.06.2018 - 14:42DROPS Design answered:
Hei Johanne. Vi har nå for orden skyld heklet M.1 som anvist (5 lm, hopp over 3 lm, 1 fm osv), og får da 5 luftmaskebuer på 10 cm, så det er ingen feil i oppskriften. Heklefastheten er veldig individuell og det er helt normalt å måtte endre på nåltykkelsen for å få det til å stemme. Det viktige er at du finner en nål som gir den riktige heklefastheten, men så lenge det er i orden blir i plagget riktige mål. God fornøyelse
27.06.2018 - 11:13Bin jetzt beim Beenden der Vorderteilen. Aber habe jetzt was bemerkt: die beiden Teile, vorne, also wo der Knopf hinkommt, sind nicht gleich/symmetrisch. Also die Löcher am Rand von linken und rechten Seite stimmen nicht überein (sind nicht gleich). Hab ich da was falsch gemacht? Und noch eine Frage, was macht man mit den Garnspitzen die da herumhängen? Wie versteckt man die?
20.06.2018 - 23:40DROPS Design answered:
Liebe Ines, es kann sein, daß die beiden Seiten von M.1 nicht genau symetrisch sein (siehe Diagram), aber solange Ihre Arbeit wie M.1 aussieht, stimmt es schon - gerne können Sie aber Ihre Arbeit Ihren Laden zeigen (auch im Foto und per Mail). Am Ende häkeln Sie noch die Blende. Dieses Video zeigt, wie man Baumwolle vernäht. Viel Spaß beim häkeln!
21.06.2018 - 08:20PONTO FANTASIA 1 CARREIRA 2 : 5 pc, 1 pb no pc a meio do 1.º aro, 2 pc, 1 mc no mesmo pc, *5 pc, 1 pb no pc a meio do aro seguinte, 2 pc, 1 pbx no mesmo pc... 1 mc ou será 1 pc no mesmo pc ? Ou é como na repetição 1 pbx?
13.06.2018 - 23:10DROPS Design answered:
Bom dia, O "mc" era uma gralha que já foi corrigida. Muito obrigada pela chamada de atenção! Efectivamente, é 1 pbx!
14.06.2018 - 11:51What size cotton do you use for the 4.5mm crochet hook. As the 'Wendy Suptrme cotton DK here in England says use a 4mm hook. Can I still use this cotton but case on less chain. I just Love your patterns.
26.04.2018 - 18:26DROPS Design answered:
Dear Mrs Butler, We are able to provide free patterns thanks to our yarns sold throughout the world. You will therefore understand that we can only recomand you to contact our DROPS Store for any further help & assistance. Thank you for your comprehension.
27.04.2018 - 08:45Buonasera, non riesco a capire come fare le diminuzioni per il davanti destro/sinistro. Io ho capito cosi: dopo aver lavorato i primi 9 occhielli, alla terza riga del diagramma M1 procedo con le diminuzioni fin quando ne rimangono 6 e poi proseguo fino alla spalla. Ma cosi facendo risulta uno scollo squadrato...dove sbaglio? Grazie
15.02.2018 - 18:29Bonjour ! Je ne comprend pas bien à quelle moment je dois faire les diminution. Dois je diminuer comme sur le diagramme tout le long des rang ?
18.11.2017 - 16:06DROPS Design answered:
Bonjour Léa, pouvez-vous indiquer à quel niveau vous en êtes et quelle taille vous réalisez? Merci!
20.11.2017 - 09:01I was going to begin this pattern, but how many do I chain to begin the first row?? The diagram does NOT tell me this, it only tells me to see "explanation in pattern." Huh?? I don't understand what I'm missing!
23.09.2017 - 22:50DROPS Design answered:
Dear Carolyn, when you start crocheting the body, you should - as the pattern says - to beginn, crochet 187-224-262-298-335 ch on hook size 4.5 mm with Muskat. I hope this helps. Happy Crocheting!
24.09.2017 - 23:53Hej, jag tänkte göra strl M och har precis gjort klart första varvet efter de 224 luftmaskorna. Nu är arbetet ca 130 cm långt, kan detta stämma? Gjorde testet för virkfastheten och det verkade stämma men detta känns tokigt.
24.07.2017 - 21:40DROPS Design answered:
Det är viktigt att kontrollera virkfastheten innan du börjar virka själva arbetet. Gör en provlapp och kontrollera att du får den virkfasthet som anges i mönstret. Vid behov ska du byta till tunnare eller grövre virknål.
08.08.2017 - 13:45I've just completed your "Buttercup" summer jacket. I selected Muskat "Ice Blue" and used US size 5 hook and directions for size Medium. Perfect! I've just received the Cotton Viscose in "Rust" to crochet your "Florette" top. Truly, this color should be renamed "Liquid Sunset" Thank you for these beautiful FREE patterns and your extrodinary yarns!
23.05.2017 - 00:01Quando inizio a dividere per il davanti destro e lavoro il diagramma m1 nei primi 16occhielli grandi di catenelle cosa lavoro sull'ultimo occhiello?il solito pippiolino sulla catenella centrale o solo una maglia bassa? E quando giro il lavoro per la seconda riga come mi comporto?
17.03.2017 - 06:01DROPS Design answered:
Buongiorno Roberta. Finisce la riga con 1 m.b nella cat centrale dell'ultimo occhiello. Inizia la riga successiva con: 5 catenelle, 1 m.b. nella catenella centrale del 1° occhiello di catenelle, 2 catenelle, 1 m.bss. nella stessa catenella . Buon lavoro!
17.03.2017 - 07:08