Ocean Waves

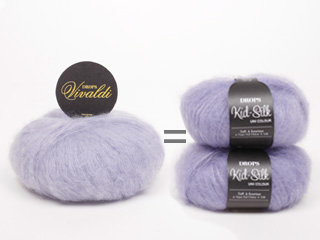
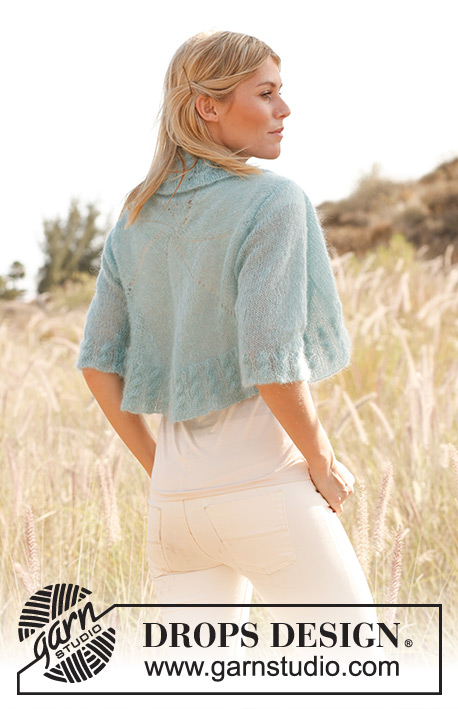
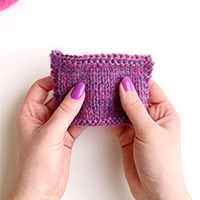
Knitted DROPS bolero with ¾ sleeves and cable edges in ”Vivaldi”. SIZE S - XXXL

DROPS 138-24
DROPS design: Pattern no OO-087
Yarn group C
--------------------------------------------------------
Size: S/M - L/XL - XXL/XXXL
Chest measurements: 82/90 - 94/100 - 106/120 cm / 32¼"/35½" - 37"/39½" - 41¾"/47¼"

Materials: DROPS VIVALDI from Garnstudio
150-150-200 g color no 22, light turquoise

DROPS DOUBLE POINTED NEEDLES AND CIRCULAR NEEDLE (40 and 80 cm / 16" and 32") SIZE 4 mm/US 6 - or size needed to get 19 sts x 26 rows in stockinette st = 10 x 10 cm / 4" x 4".

-------------------------------------------------------

Alternative Yarn – See how to change yarns here
Yarn Groups A to F – Use the same pattern and change the yarn here
Yarn usage using an alternative yarn – Use our yarn converter here

-------------------------------------------------------

DROPS Vivaldi
DROPS Vivaldi
56% Mohair, 30% Polyamide, 14% Wool
Discontinued
find alternatives

Pattern instructions

NOTE: This pattern is written in American English. All measurements in charts are in cm. For conversion from inches to cm - click here. There are different terms for crocheting in American and British English. If this pattern includes crochet, click for "crochet terms" here. For this pattern in British English, please click here.
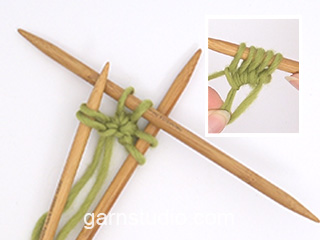
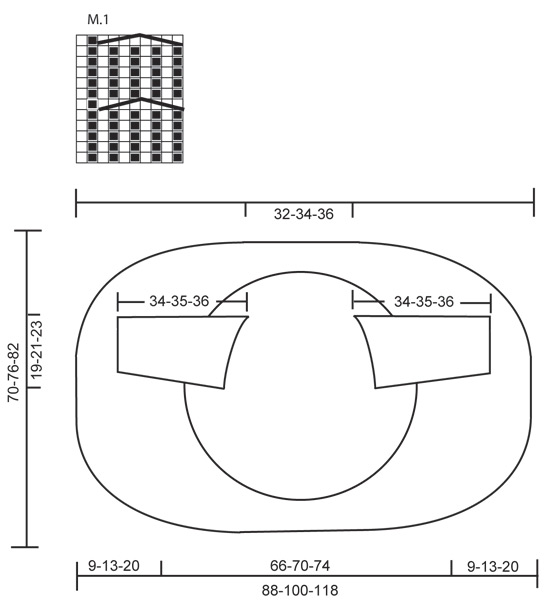
BOLERO:
Worked in the round in a circle from mid back.
All measurements should be done when piece is flat.

Cast on 8 sts with Vivaldi and divide them on 4 double pointed needles size 4 mm / US 6 (= 2 sts on every needle). Insert a marker at beg of round = mid up towards neck.
ROUND 1: * K 1, 1 YO, P 1, 1 YO *, repeat from *-* 4 times = 16 sts.
ROUND 2: * K 2, P 2 *, repeat from *-* the entire round.
ROUND 3: * K 2, 1 YO, P 2, 1 YO *, repeat from *-* the entire round = 24 sts.
ROUND 4: * K 3, P 3 *, repeat from *-* the entire round.
ROUND 5: * K 3, 1 YO, P 3, 1 YO *, repeat from *-* the entire round = 32 sts.
ROUND 6: * K 4, P 4 *, repeat from *-* the entire round.
Continue to inc the same way every other round (= 8 inc). For every inc there will be 1 st more between every inc. Switch to circular needle when needed.
REMEMBER THE GAUGE!
When piece measures 19-21-23 cm / 7½"-8¼"-9" from the middle (there are approx. 200-224-240 sts on needle), work next round as follows (this must be a round without inc): Work 30-32-34 sts, bind off 36-40-44 sts (= armhole), work until 66-72-78 sts remain, bind off 36-40-44 sts (= armhole), work the last 30-32-34 sts on round.
On next round cast on the same no of new sts over each armhole as was bind off + sts which are to be inc over the armhole on this round. Continue to work with inc until piece measures 25-28-31 cm / 9¾"-11"-12¼" from the middle (= approx. 264-296-328 sts on needle).
On next round work as follows (this must be a round without inc): Slip the last 33-37-41 sts that were worked on a stitch holder, work the first 33-37-41 sts on round and then slip them on to same stitch holder (= up towards neck), work 66-74-82 sts and slip them on another stitch holder (= left front piece), work 66-74-82 sts and slip them on a third stitch holder (= bottom mid back), work the last 66-74-82 sts (= right front piece).

RIGHT FRONT PIECE:
Continue to work back and forth over the 66-74-82 sts on needle as before – NOTE: Inc are now done – AT THE SAME TIME slip the last 2-2-1 sts on every row on to the same stitch holder where sts towards neck and towards mid back are. This is done 12-16-26 times in each side (= 24-32-26 sts in each side). Finally slip the remaining sts on to one of the stitch holders.

LEFT FRONT PIECE:
Slip the 66-74-82 sts from stitch holder in the left side back on needle. Work as right side.

EDGE:
Slip all sts back on circular needle size 4 mm / US 6. K 1 round while AT THE SAME TIME making 1 YO between approx. every st – adjust so that total no of sts is divisible by 10.
On next round work P 1/K 1 (work YOs twisted to avoid holes, i.e. work in back loop of st). Then work diagram M.1 for 8 cm / 3⅛" (make sure that P and K sts fit over each other from first round), continue with P 1/K 1 for 5 rounds after last cable, then bind off with P over P and K over K.

SLEEVE:
Worked in the round on double pointed needles.
Cast on 80-90-100 sts on double pointed needles size 4 mm / US 6 with Vivaldi. Insert a marker at beg of round (= mid under sleeve). Work diagram M.1 one time vertically + the first 4 rounds one more time. Work next round as follows: * K 1, K 2 tog *, repeat from *-* until 2-0-1 st remains, K this/these st(s) = 54-60-67 sts. Continue in stockinette st.
When piece measures 8 cm / 3⅛", inc 1 st on each side of marker mid under sleeve. Repeat inc every 3 cm / 1⅛" a total of 6 times = 66-72-79 sts. When piece measures 25 cm / 9¾", bind off 6 sts mid under sleeve (i.e. Bind off 3 sts on each side of marker) and work back and forth on needle until finished measurements.
Then bind off for sleeve cap at beg of every row in each side: 2 sts 3 times and 1 st 4-5-6 times, then bind off 2 sts in each side until piece measures 33-34-35 cm / 13"-13½"-13¾"", then bind off 3 sts 1 time in each side.
Bind off the remaining sts, piece measures approx. 34-35-36 cm / 13½"-14"-14¼".

ASSEMBLY:
Sew in the sleeves so that middle of sleeve cap is placed where armholes are the closest tog (i.e. where 1st st was bound off for first armhole and where last st was bound off on second armhole).

Diagram

All measurements in charts are in cm.

symbols = P
symbols = K
symbols = slip 4 sts on cable needle behind piece, P 1, K 1, P 1, K 1, then P 1, K 1, P 1, K 1 from cable needle
diagram
Do you have a question? See a list of frequently asked questions (FAQ)

Knitting tension is what determines the final measurements of your work, and is usually measured per 10 x 10 cm. It is provided like so: number of stitches in width x number of rows in height - eg: 19 stitches x 26 rows = 10 x 10 cm.

The knitting tension is very individual; some people knit/crochet loosely while others work tightly. You adjust the knitting tension with the needle size, which is why the suggested needle size only serve as a guide! You need to adjust this (up or down) to ensure that YOUR knitting tension matches the knitting tension provided in the pattern. If you work with a different knitting tension than provided you will have a different yarn consumption, and your work will have different measurements than what the pattern suggests.

The knitting tension also determines which yarns can replace each other. As long as you achieve the same knitting tension you can replace one yarn with another.

See DROPS lesson: How to measure your tension/gauge

See DROPS video: How to make a gauge tension swatch

The required amount of yarn is provided in grams, eg: 450 g. To calculate how many balls you’ll need you first need to know how many grams are in 1 ball (25g, 50g or 100g). This information is available if you click on the individual yarn quality on our pages. Divide the amount required with the amount of each ball. For example, if each ball is 50g (the most common amount), the calculation will be as follows: 450 / 50 = 9 balls.

The important thing when changing from one yarn to another is that the knitting/crochet tension remains the same. This is so that the measurements of the finished piece will be the same as on the sketch provided. It is easier to achieve the same knitting tension using yarns from the same yarn group. It is also possible to work with multiple strands of a thinner yarn to achieve the knitting tension of a thicker one. Please try our yarn converter. We recommend you to always work a test swatch.

Please NOTE: when changing yarn the garment might have a different look and feel to the garment in the photo, due to individual properties and qualities of each yarn.

See DROPS lesson: Can I use a different yarn than the one mentioned in the pattern?

All our yarns are categorised into yarn groups (from A to F) according to thickness and knitting tension – group A contains the thinnest yarns and group F the thickest. This makes it easier for you to find alternative yarns to our patterns, should you wish to switch yarn. All yarns within the same group have a similar knitting tension and can easily replace each other. However, different yarn qualities have different structures and properties which will give the finished work a unique look and feel.

Click here for an overview of the yarns in each yarn group

At the top of all our patterns you’ll find a link to our yarn converter, which is a helpful tool should you wish to use a different yarn than suggested. By filling in the yarn quality you wish to replace, the amount (in your size) and number of strands, the converter will present good alternative yarns with the same knitting tension. Additionally it will tell you how much you’ll require in the new qualities and whether you’ll need to work with multiple strands. Most skeins are 50g (some are 25g or 100g).

If the pattern is worked with multiple colours, every colour will have to be converted separately. Similarly, if the pattern is worked with several strands of different yarns (for example 1 strand Alpaca and 1 strand Kid-Silk) you will have to find alternatives for each, individually.

Click here to see our yarn converter

Since different yarns have different qualities and textures we have chosen to keep the original yarn in our patterns. However, you can easily find options among our available qualities by using our yarn converter, or simply pick a yarn from the same yarn group.

It is possible that some retailers still have discontinued yarns in stock, or that someone has a few skeins at home that they would like to find patterns for.

The yarn converter will provide both alternative yarn as well as required amount in the new quality.

If you think it's hard to decide what size to make, it can be a good idea to measure a garment you own already and like the size of. Then you can pick the size by comparing those measures with the ones available in the pattern's size chart.

You'll find the size chart at the bottom of the pattern.

See DROPS lesson: How to read size chart

The needle size provided in the pattern serves only as a guide, the important thing is to follow the knitting tension. And since knitting tension is very individual, you will have to adjust the needle size to ensure that YOUR tension is the same as in the pattern – maybe you’ll have to adjust 1, or even 2 needle sizes, up or down to achieve the correct tension. For this, we recommend that you work test swatches.

Should you work with a different knitting tension than the one provided, the measurements of the finished garment might deviate from the measurement sketch.

See DROPS lesson: How to measure your tension/gauge

See DROPS video: How to make a gauge tension swatch

Working a garment top-down provides more flexibility and room for personal adjustment. For example it is easier to try the garment on while working, as well as making adjustments to length of yoke and shoulder caps.

The instructions are carefully explaining every step, in the correct order. Diagrams are adjusted to the knitting direction and are worked as usual.

The diagram depicts all rows/rounds, and every stitch seen from the right side. It is read from bottom to top, from right to left. 1 square = 1 stitch.

When working back and forth, every other row is worked from the right side and every other row is worked from the wrong side. When working from the wrong side, the diagram will have to be worked reversed: from left to right, knit stitches are purled, purl stitches are knit etc.

When working in the round every round is worked from the right side and the diagram are worked from right to left on all rounds.

See DROPS lesson: How to read knitting diagrams

The diagram depicts all rows/rounds, and every stitch seen from the right side. It is worked from bottom to top, from right to left.

When working back and forth every other row is worked from the right side: from right to left and every other row is worked from the wrong side: from left to right.

When working in the round, every row in the diagram are worked from the right side, from right to left.

When working a circular diagram you start in the middle and work your way outwards, counter clockwise, row by row.

The rows usually start with a given number of chain stitches (equivalent to the height of the following stitch), this will either be depicted in the diagram or explained in the pattern.

See DROPS lesson: How to read crochet diagrams

Instructions for working several diagrams after each other on the same row/round, will often be written like so: “work A.1, A.2, A.3 a total of 0-0-2-3-4 times". This means you work A.1 once, then A.2 is worked once, and A.3 is repeated (in width) the number of times provided for your size – in this case like so: S = 0 times, M = 0 times, L=2 times, XL= 3 times and XXL = 4 times.

The diagrams are worked as usual: begin with the first row in A.1, then work the first row in A.2 etc.

See DROPS lesson: How to read knitting diagrams

See DROPS lesson: How to read crochet diagrams

The total width of the garment (from wrist-to-wrist) will be larger in the larger sizes, despite the actual sleeves being shorter. The larger sizes have longer sleeve caps and wider shoulders, so there will be a good fit in all sizes.

The measurement sketch/schematic drawing provides information regarding the full length of the garment. If it’s a jumper or a jacket the length is measured from the highest point on the shoulder (usually closest to the neckline), and straight down to the bottom of the garment. It is NOT measured from the tip of shoulder. Similarly, the length of yoke is measured from the highest point on the shoulder and down to where yoke is split into body and sleeves.

See DROPS lesson: How to read a schematic drawing

Diagrams are often repeated on the round or in height. 1 repeat is the diagram the way it appears in the pattern. If it says to work 5 repeats of A.1 in the round, then you work A.1 a total of 5 times after/next to each other in the round. If it says to work 2 repeats of A.1 vertically/in height you work the entire diagram once, then begin again at the start and work the entire diagram one more time.

Chain stitches are slightly narrower than other stitches and to avoid working the cast-on edge too tight, we simply chain more stitches to begin with. The stitch count will be adjusted on the following row to fit the pattern and measurement sketch.

The rib edge is more elastic and will contract slightly compared to, for example, stocking stitch. By increasing before the rib edge, you avoid a visible difference in width between the rib edge and the rest of the body.

It’s very easy to cast off too tightly, and by making yarn overs while casting off (and simultaneously casting these off) you avoid a too tight cast off edge.

See DROPS video: How to bind off with yarn overs (yo)

To achieve an even increase (or decrease) you can increase on, for example: every 3rd and 4th row alternately, like so: work 2 rows and increase on the 3rd row, work 3 rows and increase on the 4th. Repeat this until the increase is complete.

See DROPS lesson: Increase or decrease 1 st on every 3rd and 4th row alternately

Should you prefer to work in the round instead of back and forth, you may of course adjust the pattern. You’ll need to add steeks mid-front (usually 5 stitches), and follow the instructions. When you would normally turn and work from the wrong side, simply work across the steek and continue in the round. At the end you’ll cut the piece open, pick up stitches to work bands, and cover the cut edges.

See DROPS video: How to knit steeks and cut open

Should you prefer to work back and forth instead of in the round, you may of course adjust the pattern so you work the pieces separately and then assemble them at the end. Divide the stitches for the body in 2, add 1 edge stitch in each side (for sewing) and work the front and back pieces separately.

See DROPS lesson: Can I adapt a pattern for circular needles into straight needles?

Pattern repeats can vary slightly in the different sizes, in order to get the correct proportions. If you’re not working the exact same size as the garment in the photo, yours might deviate slightly. This has been carefully developed and adjusted so that the complete impression of the garment is the same in all sizes.

Make sure to follow instructions and diagrams for your size!

If you have found a pattern you like which is available in women’s size it’s not very difficult to convert it to men’s size. The biggest difference will be the length of sleeves and body. Start working on the women size that you think would fit across the chest. The additional length will be worked right before you cast off for the armhole/sleeve cap. If the pattern is worked top-down you can add the length right after the armhole or before the first decrease on sleeve.

Regarding additional yarn amount, this will depend on how much length you add, but it is better with a skein too many than too few.

All yarns will have excess fibres (from production) that might come off as lint or shedding. Brushed yarns (ie hairier yarns) have more of these loose, excess fibres, causing more shedding.

Shedding also depends on what is worn under or over the garment, and whether this pulls at the yarn fibres. It’s therefore not possible to guarantee that there will be no shedding

Below are some tips on how to get the best result when working with hairier yarns:

1. When the garment is finished (before you wash it) shake it vigorously so the looser hairs come off. NOTE: do NOT use a lint roller, brush or any method that pulls at the yarn.

2. Place the garment in a plastic bag and put it in your freezer - the temperature will cause the fibres to become less attached to each other, and excess fibres will come off easier.

3. Leave in the freezer for a few hours before taking it out and shaking it again.

4. Wash the garment according to the instructions on the yarn label.

Pilling is a natural process that happens to even the most exclusive of fibers. It's a natural sign of wear and tear that is hard to avoid, and that is most visible in high friction areas of your garment like a sweater's arms and cuffs.

You can make your garment look as new by removing the pilling, using a fabric comb or a pill/lint remover.

Still can't find the answer you need? Then scroll down and leave your question so one of our experts can try to help you. This will be done normally within 5 to 10 working days.
In the meantime, you can read the questions and answers that others have left to this pattern or join the DROPS Workshop on Facebook to get help from fellow knitters/crocheters!

Post a comment to pattern DROPS 138-24

We would love to hear what you have to say about this pattern!

If you want to leave a question, please make sure you select the correct category in the form below, to speed up the answering process. Required fields are marked *.

Comments / Questions (73)

Fatima Belem wrote:

3. The increases are made in alternative rows, right? One with increase, another without). 4. if I put the last 2 stch in the holder and turn (to continue back and forth) the yarn will behind my first stich to begin (sorry I cannot explain myself). Is There any video about this part?Thanks for help

12.02.2016 - 20:11

DROPS Design answered:

Dear Mrs Belem, the increase should be done when working back and forth over the 66-74-82 sts fo right & left front piece. The video below shows how to work short rows. Happy knitting!

15.02.2016 - 09:54

Fatima Belem wrote:

1. as I will work back and forth, that means that, finishing the separation before, I will have to "change" the sts method so continue the pattern (that is: if in round I would work purl, but as had to turn it will be knit). 2. The increases are made before the YO? if not it will change the pattern aspect.

12.02.2016 - 20:11

DROPS Design answered:

Dear Mrs Belem, you are correct, working stocking st in the round mean only K all sts, working back and forth you will have to P the sts from WS. Increase are done when working front pieces, so no increase anymore will be made.

15.02.2016 - 09:51

Fatima Belem wrote:

Hello, I'm making the projecto and I separeted all sts as indicated, I will start the Right Front piece. However I'm confuse.

12.02.2016 - 20:10

country flag Catherine Moklowicz wrote:

J'en suis au devant droit et je ne suis pas sûre pour les augmentations ? Il faut les continuer ? Si oui il faut alors glisser l'augmentation et la maille avant sur l'arrêt de maille ? Merci pour votre réponse et merci pour le partage de ce chouette modele

25.07.2015 - 15:55

DROPS Design answered:

Chère Madame Moklowicz, quand on fait le devant droit, les augmentations sont faites, on continue comme avant, mais en met en attente les 2-1 dernières m (cf taille) à la fin de chaque rang des 2 côtés (encolure et dos) 12-16-26 fois (24-32-26 m de chaque côté). Bon tricot!

27.07.2015 - 17:35

Ruzanne Gouws wrote:

Good Day, I would love to knit this top but find the instructions lacking. Does the patterns start centre back , the photo is not clear. Also is there a video tutorial on the flow of the project. Regards Ruzanne South Africa

21.07.2015 - 06:14

DROPS Design answered:

Dear Mrs Gouws, you are correct, you start with a circle on mid back then bind off sts for armholes, cast on new sts on next round and continue as stated. For any individual assistance, you are welcome to contact your DROPS store. Happy knitting!

27.07.2015 - 16:17

country flag M. Van Dijk wrote:

Hoi, Ik wil graag dit patroon breien. Op de foto lijkt het of alle kabels mooi zijn aan de binnen en aan de buitenkant. Maar in het patroon zie ik geen verandering. Is het vest op de foto anders gemaakt dan op de foto. Hoe krijg je anders de kabels aan beide kanten mooi? Mvgr, M. van Dijk

17.07.2015 - 20:09

DROPS Design answered:

Hoi. De kabels zijn niet gelijk aan de binnen en buitenkant.

29.07.2015 - 14:44

country flag Dorthe Sabroe wrote:

Jeg kan ikke finde ud af, hvor mange masker jeg skal slå op, efter jeg har lukket af til ærmegab. (På næste omg slåes der tilsvarende antal nye masker op over hvert ærmegab som det blev lukket af + m som skal tages ud over ærmegavet på denne omg) Det er det der står i parantesen jeg ikke helt forstår.

30.09.2014 - 16:16

DROPS Design answered:

Hej Dorthe. Du har lige lukket af for aermegabet: 36-40 eller 44 m afhaengig af str du strikker. Nu skal du slaa 36-40 eller 44 m op igen + de udtagninger som du har strikket indtil videre i hver 2. omg

30.09.2014 - 16:39

country flag Sybille wrote:

Wie stricke ich die aufgenommenen Maschen über dem Ärmelloch?

14.04.2014 - 21:50

DROPS Design answered:

Liebe Sybille, Sie stricken die Runde nach den Maschenanschlägen einfach wie zuvor weiter, also glatt rechts mit den Zunahmen an den entsprechenden Stellen. Gutes Gelingen!

17.04.2014 - 13:29

country flag Leverrier Thérèse wrote:

Sur le croquis s'agit il de centimètres ? pour la manche : tricoter 1 fois M1 puis les 4 premiers tours encore une fois,quels 4 premiers tours ? merci salutations.

02.10.2012 - 10:30

DROPS Design answered:

Bonjour Madame Leverrier. Les mesures du schéma en bas de page sont en cm. Pour la manche, vous tricotez 1 fois M1 en hauteur + les 4 premiers tours de M1. Bon tricot !

02.10.2012 - 11:07

country flag Leverrier Thérèse wrote:

Bonjour, qu'est-ce que vous appelez tricoter sur un arrêt de mailles ? merci, salutations.

25.09.2012 - 17:11

DROPS Design answered:

Bonjour Madame Leverrier. Un arrêt de mailles ressemble souvent à une grande épingle de sûreté où l'on peut glisser les mailles sans les perdre. Vous pouvez également glisser vos mailles sur un fil, cf vidéo intitulée "Mettre des mailles en attente sur un fil..." dans notre vidéothèque. Bon tricot !

26.09.2012 - 09:00