
Popular categories
Looking for a yarn?


|
|||||||||||||
Blueberry |
|||||||||||||
 |
 |
||||||||||||
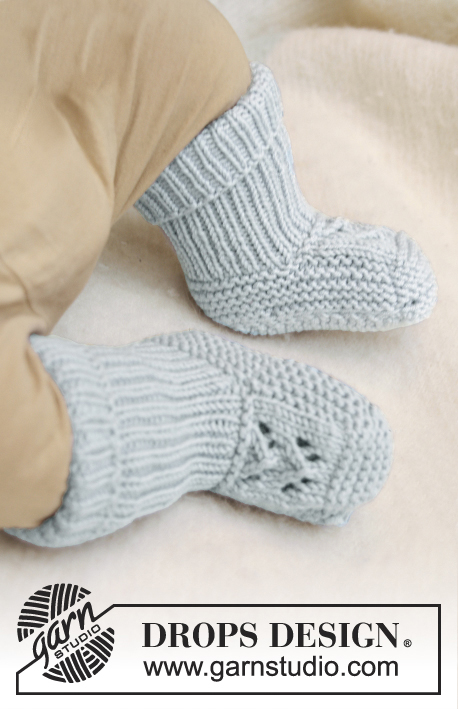
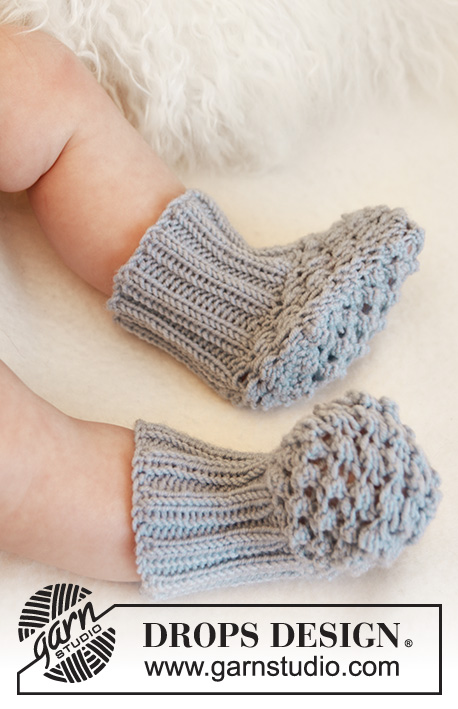
Set of knitted socks, pants and jacket with round yoke and blackberry pattern for baby and children in DROPS Alpaca
DROPS Baby 21-24 |
|||||||||||||
|
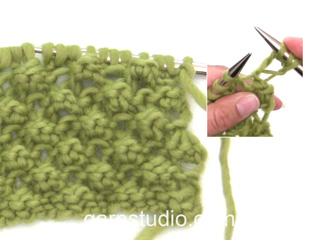
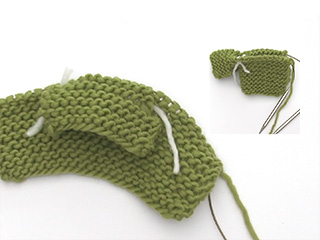
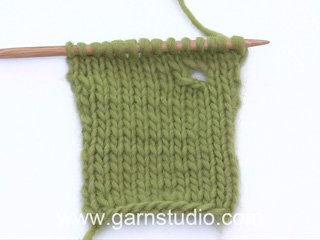
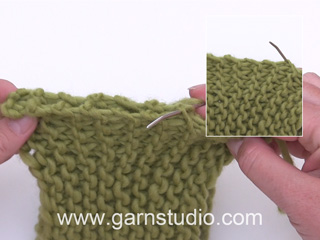
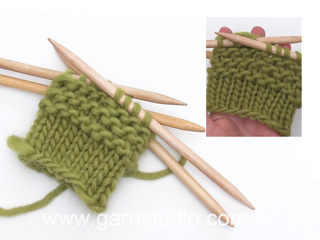
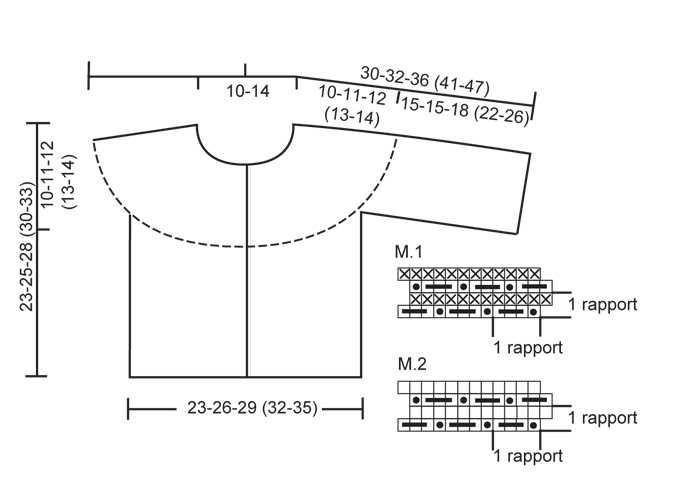
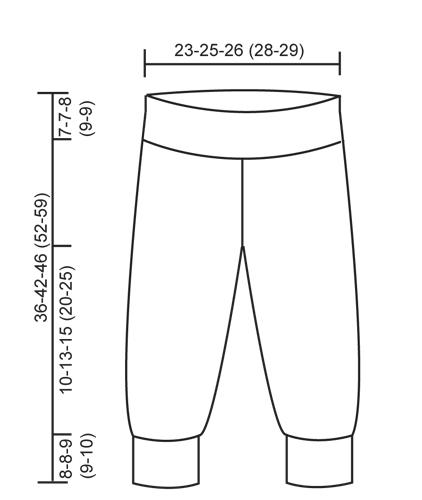
GARTER ST (back and forth on needle): K all rows. GARTER ST (in the round on double pointed needles/circular needle): * K 1 round and P 1 round *, repeat from *-*. PATTERN: See diagram M.1. The diagram shows the pattern from RS. 1st row = RS: DECREASE TIP: Dec as follows 3 sts before marker: K 2 tog, K 1. Dec as follows after marker: K 1, slip 1 st as if to K, K 1, psso. BUTTON HOLES: Cast off for button holes on right band. 1 button hole = cast off 3rd and 4th st from edge and cast on 2 new sts on next row over these sts. Cast off for button holes when piece measures: Size 1/3 months: 5, 10, 14, 19 and 23 cm Size 6/9 months: 5, 10, 15, 20 and 25 cm Size 12/18 months: 6, 12, 17, 23 and 28 cm Size 2 years: 6, 12, 18, 24 and 30 cm Size 3/4 years: 6, 13, 20, 27 and 33 cm NOTE: Cast off for last button hole when 2 rows in garter st on band remain before neck edge. ------------------------------------------------------- JACKET: BODY: Worked back and forth on circular needle from mid front. Cast on 120-134-150 (164-178) sts (incl 5 band sts in each side towards mid front) on circular needle size 3 mm with Alpaca. Work 4 rows in GARTER ST - see explanation above (1st row = RS). AT THE SAME TIME on last row, inc 18-20-24 (26-28) sts evenly = 138-154-174 (190-206) sts. Then work diagram M.1 with 5 band sts in garter st in each side. Remember BUTTON HOLES on right band - see explanation above. REMEMBER THE KNITTING TENSION! When piece measures approx. 13-14-16 (17-19) cm - adjust after 3rd row in diagram M.1 - work next row as follows from WS: Work 33-37-42 (46-50) sts (= left front piece), cast off 8 sts for armhole, work 56-64-74 (82-90) sts (= back piece), cast off 8 sts for armhole and work 33-37-42 (46-50) sts (= right front piece). Put piece aside and work the sleeves. SLEEVE: Worked back and forth on circular needle. Cast on 38-38-40 (42-45) sts (includes 1 edge st in each side) on needle size 3 mm with Alpaca. Work 8 rows in garter st (1st row = RS). AT THE SAME TIME on last row, inc 8-8-10 (8-9) sts evenly = 46-46-50 (50-54) sts. Then work diagram M.1 with 1 edge st in garter st in each side. AT THE SAME TIME when piece measures 4-4-5 (6-6) cm, inc 1 st in each side. Repeat inc every 3-2-1½ (1½-2) cm a total of 4-6-8 (10-10) times = 54-58-66 (70-74) sts – work the inc sts gradually in diagram M.1, work the sts that do not fit in pattern in garter st. When piece measures approx. 15-15-18 (22-26) cm - adjust after 3rd row in diagram M.1 - cast off 5 sts in each side (cast off at beg and end of row) = 44-48-56 (60-64) sts remain on needle. Put piece aside and knit another sleeve. YOKE: Slip sleeves on to same circular needle as body where armholes were cast off = 210-234-270 (294-318) sts. K 1 row from RS while AT THE SAME TIME dec 34-37-43 (46-49) sts evenly (do not dec over bands) = 176-197-227 (248-269) sts. K 1 row from WS. Then work in garter st back and forth over all sts while AT THE SAME TIME on 1st row dec 11-11-12 (12-13) sts evenly (do not dec over bands). Repeat dec every 6th row (from RS) a total of 8-9-10 (11-11) times = 88-98-107 (116-126) sts remain on needle. When piece measures approx. 23-25-28 (30-33) cm - adjust so that next row is worked from WS - dec 20-22-23 (24-34) sts evenly = 68-76-84 (92-92) sts remain on needle. NECK EDGE: Work as follows seen from from RS: 5 sts in garter st, * K 2, P 2 *, repeat from *-* and finish with K 2 and 5 sts in garter st. When neck edge measures 3-3-4 (4-4) cm, cast off with K over K and P over P. ASSEMBLY: Sew the sleeve seams inside 1 edge st. Sew the openings under the sleeves. Sew on buttons. ------------------------------------------------------------------- PANTS: LEG: Worked in the round on double pointed needles. LOOSELY cast on 56-60-64 (68-72) sts on double pointed needles size 2.5 mm with Alpaca. Insert a marker at beg of round = inside of leg. K 1 round, then work rib = K 2/P 2. When piece measures 8-8-9 (9-10) cm, switch to double pointed needles size 3 mm. K 1 round while AT THE SAME TIME dec 8-8-10 (12-12) sts evenly = 48-52-54 (56-60) sts. Then work in GARTER ST - see explanation above. When piece measures 9-9-10 (10-11) cm, inc 1 st on each side of marker. Repeat inc every 4th-6th-7th (10th-13th) round a total of 9 times = 66-70-72 (74-78) sts. Continue in garter st. When piece measures approx. 16-19-22 (27-33) cm (make sure all inc are finished), divide at inside of leg and finish the piece back and forth on needle (to make it easier to slip the legs on the same circular needle). Cast on 1 new st in each side for seam = 68-72-74 (76-80) sts. When piece measures 18-21-24 (29-35) cm, cast off 3 sts in each side = 62-66-68 (70-74) sts. Put piece aside and knit another leg the same way. PANTS: Slip both legs on the same circular needle size 3 mm = 124-132-136 (140-148) sts. Insert a marker mid front. Work in garter st in the round on needle – AT THE SAME TIME dec 1 st on each side of marker mid front – READ DECREASE TIP. Repeat dec on every other round a total of 6-6-6 (4-4) times = 112-120-124 (132-140) sts. When piece measures 29-35-38 (43-50) cm, K 1 round while AT THE SAME TIME inc 24-24-24 (28-28) sts evenly = 136-144-148 (160-168) sts. Switch to circular needle size 2.5 mm and work rib = K 2/P 2 for 7-7-8 (9-9) cm. LOOSELY cast off with K over K and P over P. Pants measures approx. 36-42-46 (52-59) cm. ASSEMBLY: Sew tog the opening between the legs. ------------------------------------------------------------------- SOCKS: PATTERN: See diagrams M.1 and M.2. The diagrams show the pattern from RS. SOCK: Worked in the round on double pointed needles. Cast on 40-44-44 (48-48) sts on double pointed needles size 3 mm with Alpaca. K 1 round, then work rib = K 2/P 2 for 6-7-7 (8-8) cm. K 1 round while AT THE SAME TIME dec 4 sts evenly = 36-40-40 (44-44) sts. Keep the middle 12 sts at the front of sock (= upper piece) on needle, slip the remaining 24-28-28 (32-32) sts on a stitch holder. Work diagram M.1 back and forth over the 12 sts on upper piece for approx. 3-3½-4 (5-6) cm – adjust after one whole repetition of diagram M.1 vertically. Cut the thread. Keep the 12 sts on needle, knit up 8-10-10 (12-16) sts along one side of upper piece, slip the 24-28-28 (32-32) sts from stitch holder back on needle and knit up 8-10-10 (12-16) sts along the other side over upper piece = 52-60-60 (68-76) sts – NOTE: This is done without working the sts. Start round mid back and work diagram M.2 in the round over all sts for approx. 1½-2-2½ (3-3½) cm – finish either after 1st or 3rd row in diagram M.2. P 1 round and then cast off all sts except the 12 sts on upper piece. Work diagram M.1 back and forth for sole over these sts for approx. 9-10-11 (13-15) cm – adjust after one whole repetition. Cast off and sew sole to sock - sew edge to edge to avoid a chunky seam. |
|||||||||||||
Diagram explanations |
|||||||||||||
|
|||||||||||||
|
|||||||||||||
|
|||||||||||||
|
Have you made this or any other of our designs? Tag your pictures in social media with #dropsdesign so we can see them! Do you need help with this pattern?You'll find tutorial videos, a Comments/Questions area and more by visiting the pattern on garnstudio.com. © 1982-2024 DROPS Design A/S. We reserve all rights. This document, including all its sub-sections, has copyrights. Read more about what you can do with our patterns at the bottom of each pattern on our site. |
|||||||||||||


With over 40 years in knitting and crochet design, DROPS Design offers one of the most extensive collections of free patterns on the internet - translated to 17 languages. As of today we count 304 catalogues and 11422 patterns - 11422 of which are translated into English (UK/cm).
We work hard to bring you the best knitting and crochet have to offer, inspiration and advice as well as great quality yarns at incredible prices! Would you like to use our patterns for other than personal use? You can read what you are allowed to do in the Copyright text at the bottom of all our patterns. Happy crafting!
Comments / Questions (68)
Hur beställer jag mönstret på ovanstående babyset.?
28.03.2018 - 17:21DROPS Design answered:
Hej, mönstret är gratis, bara att klicka på bilden.
03.04.2018 - 17:20Har inte provat mönstret än. Återkommer senare.
28.03.2018 - 17:05Onde encontro o vídeo de como fazer a calça?
17.03.2018 - 23:53DROPS Design answered:
Terá de ver cada um dos vídeos para as diferentes técnicas para poder fazer a calça. Bom tricô!
22.03.2018 - 12:31, ik snap het, goed uitgelegd, dank u wel. groet
04.03.2018 - 17:54Hoe kan ik volgens het telpatroon 3 steken in 1 steek breien als volgt: 1av./1omslag/1av. en dan 1 steek overhouden??
04.03.2018 - 10:25DROPS Design answered:
Hoi Duimelotje, Je breit 3 steken in 1 steek, door 1 averecht te breien, 1 omslag te maken en nog 1 averecht te breien in dezelfde steek. Hierdoor heb je 2 steken gemeerderd. (Bij het symbool met een horizontale streep over 3 steken, minder je weer 2 steken.) Wat bedoel je met 1 steek overhouden? Dat staat er niet bij, bij de telpatronen.
04.03.2018 - 16:47Agradecerles su contestación. No conseguía poder poner las dos piernas y con su consejo lo he logrado. Muchas gracias. Me gustan mucho los patrones y las tutoriales, no sabía hacer apenas puntos y nada de crochet y con sus tutoriales he conseguido ya muchas labores. Agradecida les saludo.
27.02.2018 - 22:14Estoy haciendo el pantalón. He terminado las piernas pero cuando las uno para continuar, una de las partes no me sale el punto bobo, sino punto de jersey y he probado de mil maneras, ¿me podrían indicar como seguir y donde está la clave? Espero su contestación. Reciban mi agradecimiento
08.02.2018 - 20:14DROPS Design answered:
Hola Nani. Tienes que prestar atención a cómo se ha trabajado la fila anterior. Tienes que terminar ambas piernas por el mismo lado. Por ejemplo, si en ambas piernas la última fila está en el lado revés, para unirlas hay que trabajar 1 fila de derecho por el lado derecho. Si la última fila trabajada está en el lado derecho, entonces hay que trabajar una fila de revés por el lado derecho para unir ambas piernas. Por tu descripción, entiendo que las piernas no se encuentran en el mismo lado en tu caso, por lo que una de las piernas debe tener 1 fila menos que la otra.
08.02.2018 - 21:14Ik vind de patronen leuk, maar hoe kan ik het patroon aanpassen. Ik wil bijvoorbeeld op 2 pennen breien en niet in de rondte?
20.12.2017 - 13:45DROPS Design answered:
Hoi H. Veenstra, Voor het vest kun je rechte naalden met knop gebruiken en verder de instructie volgen. Voor de broek zul je aanpassingen moeten doen, b.v. door de voorkant en achterkant apart van elkaar te breien en later in de zijnaden aan elkaar te naaien. Je ziet dan natuurlijk wel een naad. Via deze link vind je informatie over het aanpassen van een patroon zodat je deze met rechte naalden kunt breien.
21.12.2017 - 11:12Beim Ärmel habe ich nach der Aufnahme am Bündchen mit 46 Maschen M1 begonnen. Es folgt 1M auf jeder Seite nach 4cm insgesamt 4x alle 3cm. Habe bei 4cm, 7cm u. 10cm an beiden Seiten 1M aufgenommen und bin nun Musterbedingt schon bei 62M inkl. Randmaschen?!
17.12.2017 - 20:40DROPS Design answered:
Liebe Sabrina, es sind 46 M, dann nehmen Sie 2 Maschen (= 1 M auf beiden Seiten) nach 4 cm (= 46+2= 48 M), dann bei 7 cm (= 48+2= 50 M), bei 10 cm (= 50+2= 52 M) und endlich bei 13 cm (= 4 x alle 3 cm) (= 52+2 = 54 M). Viel Spaß beim stricken!
18.12.2017 - 09:04Avec ce point "astrakan" comment faire pour saisir 3 mailles en même temps, surtout avec de la laine layette assez fine ? Je n'arrive pas à saisir la 3ème maille sur l'aiguille ! Par quel point remplacer "astralan" de votre modèle ?
21.09.2017 - 14:59DROPS Design answered:
Bonjour Mme Giambiaggi, la vidéo ci-dessous montre comment tricoter le point d'astrakan et tricoter 3 m ensemble - aidez-vous éventuellement d'un crochet. Bon tricot!
21.09.2017 - 15:39