Clicking the ORDER button will redirect you to Saules siulas website
The yarn cost is calculated from the pattern’s smallest size and the yarn’s cheapest product type. Looking for an even better price? You might find it on the DROPS Deals!
-------------------------------------------------------
Alternative Yarn – See how to change yarns here
Yarn Groups A to F – Use the same pattern and change the yarn here
Yarn usage using an alternative yarn – Use our yarn converter here
-------------------------------------------------------
Clicking the ORDER button will redirect you to Saules siulas website
The yarn cost is calculated from the pattern’s smallest size and the yarn’s cheapest product type. Looking for an even better price? You might find it on the DROPS Deals!
This pattern has been corrected. Click here to see the correction/s.
Each of our patterns has specific tutorial videos to help you.
These step-by-step tutorials might also help you:
Why is the knitting/crochet tension so important?
Knitting tension is what determines the final measurements of your work, and is usually measured per 10 x 10 cm. It is provided like so: number of stitches in width x number of rows in height - eg: 19 stitches x 26 rows = 10 x 10 cm.
The knitting tension is very individual; some people knit/crochet loosely while others work tightly. You adjust the knitting tension with the needle size, which is why the suggested needle size is only meant as a guide! You need to adjust this (up or down) to ensure that YOUR knitting tension matches the knitting tension provided in the pattern. If you work with a different knitting tension than provided you will have a different yarn consumption, and your work will have different measurements than what the pattern suggests.
The knitting tension also determines which yarns can replace each other. As long as you achieve the same knitting tension you can replace one yarn with another.
See DROPS lesson: How to measure your tension/gauge
See DROPS video: How to make a gauge tension swatch
How do I know how many balls of yarn I need?
The required amount of yarn is provided in grams, eg: 450 g. To calculate how many balls you’ll need you first need to know how many grams are in 1 ball (25g, 50g or 100g). This information is available if you click on the individual yarn quality on our pages. Divide the amount required with the amount of each ball. For example, if each ball is 50g (the most common amount), the calculation will be as follows: 450 / 50 = 9 balls.
Can I use a different yarn than what the pattern suggests?
The important thing when changing from one yarn to another is that the knitting/crochet tension remains the same. This is so that the measurements of the finished piece will be the same as on the sketch provided. It is easier to achieve the same knitting tension using yarns from the same yarn group. It is also possible to work with multiple strands of a thinner yarn to achieve the knitting tension of a thicker one. Please try our yarn converter. We recommend you to always work a test swatch.
Please NOTE: when changing yarn the garment might have a different look and feel to the garment in the photo, due to individual properties and qualities of each yarn.
See DROPS lesson: Can I use a different yarn than the one mentioned in the pattern?
What are the yarn groups?
All our yarns are categorised into yarn groups (from A to F) according to thickness and knitting tension – group A contains the thinnest yarns and group F the thickest. This makes it easier for you to find alternative yarns to our patterns, should you wish to switch yarn. All yarns within the same group have a similar knitting tension and can easily replace each other. However, different yarn qualities have different structures and properties which will give the finished work a unique look and feel.
How do I use the yarn calculator?
At the top of all our patterns you’ll find a link to our yarn calculator, which is a helpful tool should you wish to use a different yarn than suggested. By filling in the yarn quality you wish to replace, the amount (in your size) and number of strands, the calculator will present good alternative yarns with the same knitting tension. Additionally it will tell you how much you’ll require in the new qualities and whether you’ll need to work with multiple strands. Most skeins are 50g (some are 25g or 100g).
If the pattern is worked with multiple colours, every colour will have to be calculated separately. Similarly, if the pattern is worked with several strands of different yarns (for example 1 strand Alpaca and 1 strand Kid-Silk) you will have to find alternatives for each, individually.
Why do you show discontinued yarns in the patterns?
Since different yarns have different qualities and textures we have chosen to keep the original yarn in our patterns. However, you can easily find options among our available qualities by using our yarn calculator, or simply pick a yarn from the same yarn group.
It is possible that some retailers still have discontinued yarns in stock, or that someone has a few skeins at home that they would like to find patterns for.
The yarn calculator will provide both alternative yarn as well as required amount in the new quality.
What size should I knit?
If you think it's hard to decide what size to make, it can be a good idea to measure a garment you own already and like the size of. Then you can pick the size by comparing those measures with the ones available in the pattern's size chart.
You'll find the size chart at the bottom of the pattern.
See DROPS lesson: How to read size chart
Why do I get the wrong knitting tension with the suggested needle size?
The needle size provided in the pattern serves only as a guide, the important thing is to follow the knitting tension. And since knitting tension is very individual, you will have to adjust the needle size to ensure that YOUR tension is the same as in the pattern – maybe you’ll have to adjust 1, or even 2 needle sizes, up or down to achieve the correct tension. For this, we recommend that you work test swatches.
Should you work with a different knitting tension than the one provided, the measurements of the finished garment might deviate from the measurement sketch.
See DROPS lesson: How to measure your tension/gauge
See DROPS video: How to make a tension/gauge swatch
Why is the pattern worked top-down?
Working a garment top-down provides more flexibility and room for personal adjustment. For example it is easier to try the garment on while working, as well as making adjustments to length of yoke and shoulder caps.
The instructions are carefully explaining every step, in the correct order. Diagrams are adjusted to the knitting direction and are worked as usual.
How do I work according to a knitting diagram?
The diagram depicts all rows/rounds, and every stitch seen from the right side. It is read from bottom to top, from right to left. 1 square = 1 stitch.
When working back and forth, every other row is worked from the right side and every other row is worked from the wrong side. When working from the wrong side, the diagram will have to be worked reversed: from left to right, knit stitches are purled, purl stitches are knit etc.
When working in the round every round is worked from the right side and the diagram are worked from right to left on all rounds.
See DROPS lesson: How to read knitting diagrams
How do I work according to a crochet diagram?
The diagram depicts all rows/rounds, and every stitch seen from the right side. It is worked from bottom to top, from right to left.
When working back and forth every other row is worked from the right side: from right to left and every other row is worked from the wrong side: from left to right.
When working in the round, every row in the diagram are worked from the right side, from right to left.
When working a circular diagram you start in the middle and work your way outwards, counter clockwise, row by row.
The rows usually start with a given number of chain stitches (equivalent to the height of the following stitch), this will either be depicted in the diagram or explained in the pattern.
See DROPS lesson: How to read crochet diagrams
How do I work several diagrams simultaneously on the same row/round?
Instructions for working several diagrams after each other on the same row/round, will often be written like so: “work A.1, A.2, A.3 a total of 0-0-2-3-4 times". This means you work A.1 once, then A.2 is worked once, and A.3 is repeated (in width) the number of times provided for your size – in this case like so: S = 0 times, M = 0 times, L=2 times, XL= 3 times and XXL = 4 times.
The diagrams are worked as usual: begin with the first row in A.1, then work the first row in A.2 etc.
See DROPS lesson: How to read knitting diagrams
See DROPS lesson: How to read crochet diagrams
Why are the sleeves shorter in larger sizes?
The total width of the garment (from wrist-to-wrist) will be larger in the larger sizes, despite the actual sleeves being shorter. The larger sizes have longer sleeve caps and wider shoulders, so there will be a good fit in all sizes.
Where on the garment is the length measured?
The measurement sketch/schematic drawing provides information regarding the full length of the garment. If it’s a jumper or a jacket the length is measured from the highest point on the shoulder closest to the neckline, and straight down to the bottom of the garment. It is NOT measured from the tip of shoulder. Similarly, the length of yoke is measured from the highest point on the shoulder and down to where yoke is split into body and sleeves.
On a jacket measures are never taken along bands, unless specifically stated. Always measure inside band stitches when measuring the length.
See DROPS lesson: How to read a schematic drawing
What is a repeat?
Diagrams are often repeated on the round or in height. 1 repeat is the diagram the way it appears in the pattern. If it says to work 5 repeats of A.1 in the round, then you work A.1 a total of 5 times after/next to each other in the round. If it says to work 2 repeats of A.1 vertically/in height you work the entire diagram once, then begin again at the start and work the entire diagram one more time.
Why does the piece start with more chain stitches than it’s worked with?
Chain stitches are slightly narrower than other stitches and to avoid working the cast-on edge too tight, we simply chain more stitches to begin with. The stitch count will be adjusted on the following row to fit the pattern and measurement sketch.
Why increase before the rib edge when the piece is worked top-down?
The rib edge is more elastic and will contract slightly compared to, for example, stocking stitch. By increasing before the rib edge, you avoid a visible difference in width between the rib edge and the rest of the body.
Why increase in the cast-off edge?
It’s very easy to cast off too tightly, and by making yarn overs while casting off (and simultaneously casting these off) you avoid a too tight cast off edge.
See DROPS video: How to bind off with yarn overs (yo)
How do I increase/decrease on every 3rd and 4th row/round alternately?
To achieve an even increase (or decrease) you can increase on, for example: every 3rd and 4th row alternately, like so: work 2 rows and increase on the 3rd row, work 3 rows and increase on the 4th. Repeat this until the increase is complete.
See DROPS lesson: Increase or decrease 1 st on every 3rd and 4th row alternately
How can I work a jacket in the round instead of back and forth?
Should you prefer to work in the round instead of back and forth, you may of course adjust the pattern. You’ll need to add steeks mid-front (usually 5 stitches), and follow the instructions. When you would normally turn and work from the wrong side, simply work across the steek and continue in the round. At the end you’ll cut the piece open, pick up stitches to work bands, and cover the cut edges.
See DROPS video: How to knit steeks and cut open
Can I work a jumper back and forth instead of in the round?
Should you prefer to work back and forth instead of in the round, you may of course adjust the pattern so you work the pieces separately and then assemble them at the end. Divide the stitches for the body in 2, add 1 edge stitch in each side (for sewing) and work the front and back pieces separately.
See DROPS lesson: Can I adapt a pattern for circular needles into straight needles?
Why is the pattern slightly different than what I see in the photo?
Pattern repeats can vary slightly in the different sizes, in order to get the correct proportions. If you’re not working the exact same size as the garment in the photo, yours might deviate slightly. This has been carefully developed and adjusted so that the complete impression of the garment is the same in all sizes.
Make sure to follow instructions and diagrams for your size!
How do I make a women’s size garment into a men’s size one?
If you have found a pattern you like which is available in women’s size it’s not very difficult to convert it to men’s size. The biggest difference will be the length of sleeves and body. Start working on the women size that you think would fit across the chest. The additional length will be worked right before you cast off for the armhole/sleeve cap. If the pattern is worked top-down you can add the length right after the armhole or before the first decrease on sleeve.
Regarding additional yarn amount, this will depend on how much length you add, but it is better with a skein too many than too few.
How do I prevent a hairy garment from shedding?
All yarns will have excess fibres (from production) that might come off as lint or shedding. Brushed yarns (ie hairier yarns) have more of these loose, excess fibres, causing more shedding.
Shedding also depends on what is worn under or over the garment, and whether this pulls at the yarn fibres. It’s therefore not possible to guarantee that there will be no shedding
Below are some tips on how to get the best result when working with hairier yarns:
1. When the garment is finished (before you wash it) shake it vigorously so the looser hairs come off. NOTE: do NOT use a lint roller, brush or any method that pulls at the yarn.
2. Place the garment in a plastic bag and put it in your freezer - the temperature will cause the fibres to become less attached to each other, and excess fibres will come off easier.
3. Leave in the freezer for a few hours before taking it out and shaking it again.
4. Wash the garment according to the instructions on the yarn label.
Why does my garment pill?
Pilling is a natural process that happens to even the most exclusive of fibers. It's a natural sign of wear and tear that is hard to avoid, and that is most visible in high friction areas of your garment like a sweater's arms and cuffs.
You can make your garment look as new by removing the pilling, using a fabric comb or a pill/lint remover.
Buttercup |
|
|
|
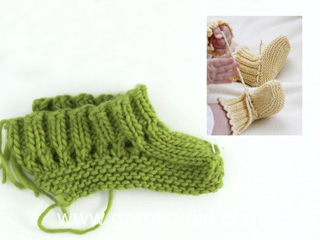
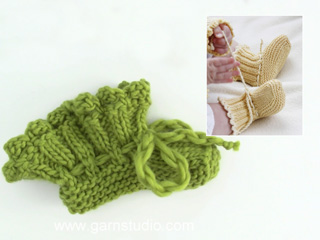
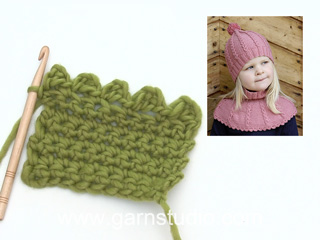
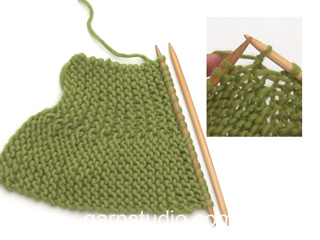
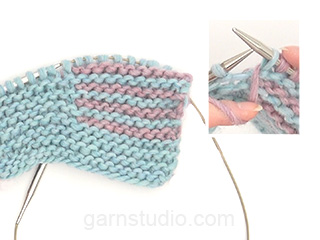
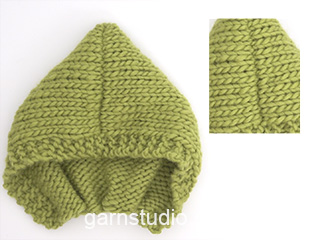
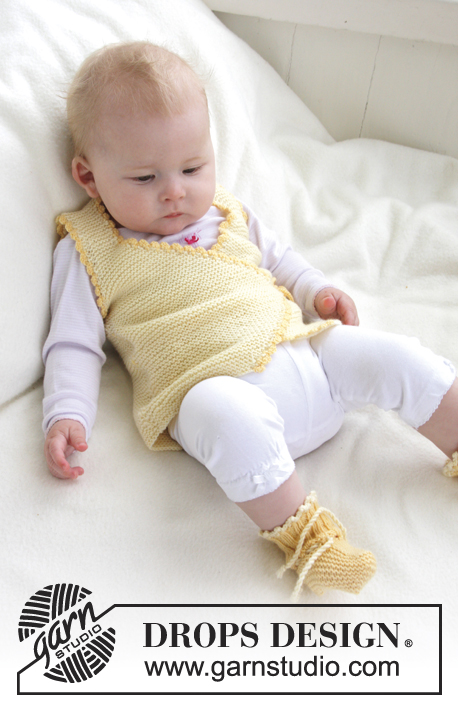
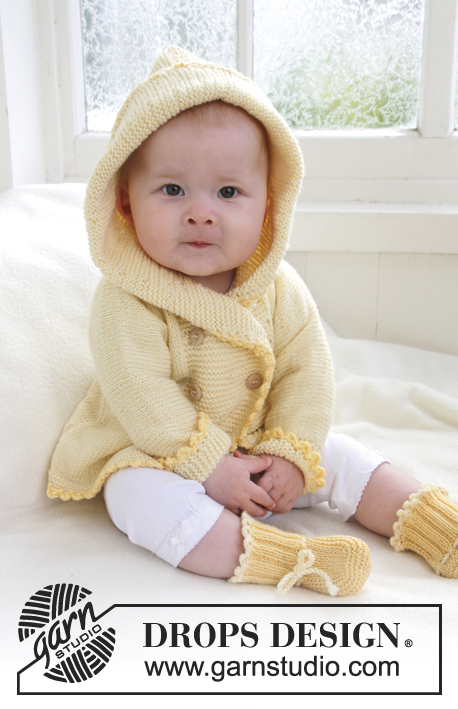
Knitted jacket with hood and slippers for baby and children in DROPS BabyMerino
DROPS Baby 21-1 |
|
GARTER ST (back and forth on needle): K all rows. SHORT ROWS: * Work 2 rows in garter st over the 24-24-26 (28-28) band sts, work 2 rows in garter st only over the outermost 12-12-13 (14-14) sts. NOTE: When turning mid piece, slip first st. Tighten thread and continue as before. This is done to avoid holes in the transitions *. BUTTON HOLES: The jacket is double-breasted. Cast off for 4 button holes on right band. 1 BUTTON HOLE = K tog fourth and fifth st from edge and make 1 YO. On same row also K tog fourth and fifth LAST st on band, make 1 YO. Cast off for 2 button holes when piece measures: SIZE 1/3 MONTHS: 14 and 19 cm SIZE 6/9 MONTHS: 16 and 21 cm SIZE 12/18 MONTHS: 18 and 24 cm SIZE 2 YEARS: 20 and 27 cm SIZE 3/4 YEARS: 22 and 30 cm ---------------------------------------------------------- JACKET: Worked back and forth on circular needle. Beg on front piece, cast on sts for sleeve and work up to the shoulder. Knit the other front piece, place both front pieces tog and work down the back piece. LEFT FRONT PIECE: Read all of the following section before continuing! Cast on 43-47-51 (56-59) sts (incl 1 edge st in the side and 24-24-26 (28-28) band sts towards mid front) on needle size 2.5 mm with Baby Merino. Work 6 rows in GARTER ST - see explanation above. Switch to circular needle size 3 mm and work in stocking st but continue to work the 24-24-26 (28-28) band sts towards mid front in Garter st. When piece measures 4 cm, work SHORT ROWS - see explanation above (1st row = from WS). Repeat from *-* 1 time every 4 cm until piece measures 19-21-24 (27-30) cm, then repeat from *-* 1 time every other cm until finished measurements. AT THE SAME TIME when piece measures 16-17-20 (23-25) cm, cast on new sts at the end of every row from WS (towards the side of sleeve): 6 sts 2-2-3 (3-3) times, 8 sts 1-1-1 (2-3) times and 21-22-22 (25-26) sts 1 time = 84-89-99 (115-127) sts for shoulder/sleeve. Work inc sts in stocking st. When all sts have been cast on, continue in stocking st and Garter st as before while AT THE SAME TIME also working the outermost 10 sts on sleeve in garter st. When piece measures 27-29-33 (37-40) cm, insert a marker = mid on top of shoulder. Now slip the 24-24-26 (28-28) band sts towards mid front on a stitch holder. Then cast on 2 new sts at the end of row from RS (towards neck), repeat inc on next row towards neck = 64-69-77 (91-103) sts on needle. Work 1 row from WS. Put all sts on a stitch holder. RIGHT FRONT PIECE: Cast on and work as left front piece but reversed. In addition cast off for BUTTON HOLES on band - see explanation above. NOTE! Slip sts on a stitch holder after the last row with inc (i.e. last row = from WS). BACK PIECE: Work left front piece on to circular needle, cast on 16-16-18 (20-20) new sts (= back of neck) and work right front piece on to circular needle = 144-154-172 (202-226) sts. NOW MEASURE PIECE FROM MARKERS ON SHOULDERS. Continue in stocking st and Garter st at the end on each sleeve back and forth on needle. When piece measures 8½-9½-10 (10-11) cm, beg to cast off sleeve sts. Cast off at beg of every row in each side as follows: 21-22-22 (25-26) sts 1 time, 8 sts 1-1-1 (2-3) times and 6 sts 2-2-3 (3-3) times = 62-70-76 (84-90) sts on needle. Continue in stocking st with 1 edge st in each side. When piece measures approx. 26-28-32 (36-39) cm – fold the piece double at the markers on shoulders and make sure that the back piece is as long as front piece down to rows in garter st, switch to needle size 2.5 mm and work 6 rows in garter st, then cast off. ASSEMBLY: Sew the sleeve and side seams inside 1 edge st. Sew on buttons. HOOD: Knit up approx. 102-106-112 (118-122) sts (incl sts from stitch holders at the front – NOTE: If more/fewer sts have been knitted up, dec/inc evenly on 1st row. Continue in garter st over all sts while AT THE SAME TIME working short rows in each side every other cm – SEE EXPLANATION ABOVE. Cast off when hood measures approx. 21-23-25 (27-28) cm. Sew hood neatly tog at the top - sew in front loop of outermost st to avoid a chunky seam. CROCHET BORDER: Crochet a border around the entire jacket. Beg at the bottom on right front piece and crochet with 2 threads yellow Baby Merino and hook size 3 mm as follows: Work 1 dc, * 3 ch, 1 tr in 1st ch, skip approx. ½ cm, 1 dc in next st *, repeat from *-*. Crochet the same way around the openings on sleeves. ----------------------------------------------------------------- SLIPPER: The slipper is worked back and forth from mid back. Cast on 48-52-56 (56) sts on needle size 2.5 mm with 2 threads yellow Baby Merino. Remove 1 thread and work rib (= K 2/P 2) for 5-6-6 (7) cm – adjust so that next row is worked from WS. P 1 row from WS while at the same time dec 14-14-18 (14) sts evenly = 34-38-38 (42) sts. On next row work eyelet holes as follows from RS: K 1, *K 2 tog, 1 YO *, repeat from *-* and finish with K 1. P 1 row from WS. Now slip the outermost 12-13-13 (15) sts in each side on a stitch holder. Work 4 - 4½ - 5½ (6½) cm in stocking st over the middle 10-12-12 (12) sts. Slip sts from stitch holders back on needle and knit up 10-11-13 (16) sts on each side of mid piece = 54-60-64 (74) sts on needle. K every row over all sts for 3-4-5 (5) cm while at the same time after 1½ - 2 - 2½ (3) cm, dec on every other row as follows until completed: Dec 1 st at the beg and the end of row and K 2 tog on each side of the 2 mid sts. Cast off and sew tog mid under foot and continue up mid back in front loop of outermost sts to avoid a chunky seam. Knit another slipper the same way. TIES: Cut 3 threads light yellow of approx. 1 metres, twine them tightly tog, fold them double and they will twine again, tie a knot in each end. Thread tie up and down through the eyelet holes on slipper. CROCHET BORDER: Crochet a border at the top of slipper on hook size 2 mm with light yellow as follows: 1 dc in first st, * 3 ch, 1 tr in 1st ch, skip approx. ½ cm, 1 dc in next st *, repeat from *-* and finish with 1 sl st in dc from beg of round. |
|
Have you made this or any other of our designs? Tag your pictures in social media with #dropsdesign so we can see them! Do you need help with this pattern?You'll find tutorial videos, a Comments/Questions area and more by visiting the pattern on garnstudio.com. © 1982-2024 DROPS Design A/S. We reserve all rights. This document, including all its sub-sections, has copyrights. Read more about what you can do with our patterns at the bottom of each pattern on our site. |
With over 40 years in knitting and crochet design, DROPS Design offers one of the most extensive collections of free patterns on the internet - translated to 17 languages. As of today we count 304 catalogues and 11422 patterns - 11422 of which are translated into English (UK/cm).
We work hard to bring you the best knitting and crochet have to offer, inspiration and advice as well as great quality yarns at incredible prices! Would you like to use our patterns for other than personal use? You can read what you are allowed to do in the Copyright text at the bottom of all our patterns. Happy crafting!
Comments / Questions (275)
SARA wrote:
Salve, dove esattamente andrebbe posizionato il marcapunti del centro in alto della spalla quando il lavoro misura 33 cm (taglia 12-18 mesi)?
05.11.2022 - 22:56DROPS Design answered:
Buongiorno Sara, è un segnapunti per prendere le misure, lo può inserire dove preferisce, l'importante è che sia a 33 cm. Buon lavoro!
06.11.2022 - 15:36Jolanda wrote:
Linkes Vorderteil Grösse 12/18 Monate: nachdem ich die 26 Blendenm auf den Hilfsfaden gelegt habe und ich je 2x 2 neue Maschen (gegen den Hals) angeschlagen habe sind bei mir 103 Maschen auf der Nadel und nicht 77. Diese sind zusammengsetzt wie folgt: 51 M + 3x6 M + 1x8 M + 1x22 + 2x2, Total = 51+18+8+22+4= 103. Wie komme ich auf die 77 M? Vielen Dank für Ihre Antwort. Feundlicher Gruss, Jolanda
27.09.2022 - 22:39DROPS Design answered:
Liebe Jolanda, ja korrekt aber in die 103 Maschen sind die 26 Blende-Maschen damit gezählt, und diese sind stillgelegt, so bleiben: 103-26=77 Maschen übrig. Viel Spaß beim stricken!
28.09.2022 - 08:53Anne wrote:
Hi, I am knitting the hood, and the pattern is unclear whether to measure at the middle where the hood is shortest, or at the edge where the hood is longer due to the extra rows. You have given conflicting advice on this: on page 5 of the comments, "Sara" posted this question on 02.05.2018 at 22.17 and was advised to measure at the shortest point, but on page 4 "Veronique" posted the same question on 29.07.2019 at 17.36 and was advised to measure at the edge. Please clarify. Thank you.
22.08.2022 - 12:38DROPS Design answered:
Dear Anne, measure the hood on the shortest (where there are no short rows). Happy knitting!
22.08.2022 - 16:24Gabriele Sabrina wrote:
Buongiorno, volevo sapere se il dietro si lavora orizzontale o verticale e le maniche dove hanno la cucitura. E come mai dite di utilizzare ferri circolari se il davanti e il dietro si lavorano divisi? Grazie
14.03.2022 - 14:31DROPS Design answered:
Buonasera Gabriele, il dietro è lavorato dall'alto in basso e la cucitura per le maniche è sotto la manica. I ferri circolari si possono utilizzare per qualsiasi progetto, anche se si lavora in piano. Buon lavoro!
15.03.2022 - 18:09Monica wrote:
Ho un piccolo dubbio, nei ferri accorciati dice di lavorare due f sulle prime 24 e poi due f sulle prime 12. Il mi dubbio è: devo lavorare i 4 f accorciati uno dopo l altro senza intervallati da l intero ferro di tutto le maglie? Grazie e complimenti per il lavoro , bellissimo!
03.02.2022 - 13:41DROPS Design answered:
Buonasera Monica, esatto, deve lavorare solo sulle maglie indicate, non su tutte le maglie del ferro. Buon lavoro!
05.02.2022 - 20:49Margaretha Jendmyr wrote:
Förstår inte. Lagt upp 47+24. Lägger till 2x6+1x8+1x22= 113-framkant 24=89m. Sätter 24 m på tråd = 89m på stickan. Lägger till 2x2m=93m men beskrivningen säger 69m på stickan??
19.12.2021 - 11:04DROPS Design answered:
Hej Margaretha. Du ska lägga upp totalt 47 m, de 24 framkantsmaskorna och kantmaskorna är inräknade i de 47 maskorna. Mvh DROPS Design
20.12.2021 - 08:47Ingrid Söderman wrote:
Ska man sticka in de 26 maskorna på framstyckena med rätstickning då man ska sticka bakstycket? Ska dessa stickas in först då huvan ska stickas?
13.10.2021 - 10:23DROPS Design answered:
Hej Ingrid. Framkantsmaskorna som du satt på tråd stickar du inte med när du ska sticka bakstycket, utan de stickas in först senare när du ska göra huvan. Mvh DROPS Design
13.10.2021 - 12:01Ingrid Söderman wrote:
När bakstycket ska stickas har jag många fler maskor än 172 (den storlek jag stickar efter) ska alla maskor stickas in från båda framstyckena?
12.10.2021 - 16:56DROPS Design answered:
Hej Ingrid, du har 77 m från varje framstyke + 18 nya m bak i nacken = 172 m :)
13.10.2021 - 09:49Jeanny wrote:
Wat een leuk patroon. En wat een antwoordservice. Ik ben onder de indruk maar ik heb ook een vraag. Het gaat over de capuchon. Jullie schrijven in antwoord op een vraag dat je de naad aan de bovenkant moet sluiten maar ik snap gewoon niet welke naad jullie bedoelen. Er is toch geen naad. Als jullie de omslag bedoelen vraag ik me af hoe breed die moet zijn. Ik kom namelijk garen tekort….
23.08.2021 - 22:43DROPS Design answered:
Dag Jeanny,
Voor de capuchon neem je steken op langs de panden/halslijn. Je breit de capuchon heen en weer naar boven toe. Na het afkanten vouw je de afkantrand samen en deze naai je dicht. Dus er zit wel een naad op de bovenkant van de capuchon. Als je ermee bezig bent dan wijst het zich waarschijnlijk vanzelf wel.
03.09.2021 - 09:59Janine wrote:
Wird die Jacke tatsächlich mit doppelten Faden umhäkelt?
02.08.2021 - 10:02DROPS Design answered:
Liebe Janine, die Jacke wird nur mit 1 Faden DROPS Baby Merino gestrickt (Maschenprobe = 24 M x 32 R glatt rechts = 10 x 10 cm). Viel Spaß beim stricken!
02.08.2021 - 10:37