DROPS Fabel uni colour 75% Wool, 25% Polyamide |
1.75 € /50g |
Order | |
DROPS Fabel 75% Wool, 25% Polyamide |
1.90 € /50g |
Order | |
DROPS Fabel long print 75% Wool, 25% Polyamide |
2.05 € /50g |
Order |
Clicking the ORDER button will redirect you to Mallia Kouvaria - pleko.gr. website
The yarn cost is calculated from the pattern’s smallest size and the yarn’s cheapest product type. Looking for an even better price? You might find it on the DROPS Deals!
-------------------------------------------------------
Alternative Yarn – See how to change yarns here
Yarn Groups A to F – Use the same pattern and change the yarn here
Yarn usage using an alternative yarn – Use our yarn converter here
-------------------------------------------------------
DROPS Fabel uni colour 75% Wool, 25% Polyamide 1.75 € /50g Order |
|
DROPS Fabel print 75% Wool, 25% Polyamide 1.90 € /50g Order |
|
DROPS Fabel long print 75% Wool, 25% Polyamide 2.05 € /50g Order |
Clicking the ORDER button will redirect you to Mallia Kouvaria - pleko.gr. website
The yarn cost is calculated from the pattern’s smallest size and the yarn’s cheapest product type. Looking for an even better price? You might find it on the DROPS Deals!
Each of our patterns has specific tutorial videos to help you.
These step-by-step tutorials might also help you:
Why is the knitting/crochet tension so important?
Knitting tension is what determines the final measurements of your work, and is usually measured per 10 x 10 cm. It is provided like so: number of stitches in width x number of rows in height - eg: 19 stitches x 26 rows = 10 x 10 cm.
The knitting tension is very individual; some people knit/crochet loosely while others work tightly. You adjust the knitting tension with the needle size, which is why the suggested needle size is only meant as a guide! You need to adjust this (up or down) to ensure that YOUR knitting tension matches the knitting tension provided in the pattern. If you work with a different knitting tension than provided you will have a different yarn consumption, and your work will have different measurements than what the pattern suggests.
The knitting tension also determines which yarns can replace each other. As long as you achieve the same knitting tension you can replace one yarn with another.
See DROPS lesson: How to measure your tension/gauge
See DROPS video: How to make a gauge tension swatch
How do I know how many balls of yarn I need?
The required amount of yarn is provided in grams, eg: 450 g. To calculate how many balls you’ll need you first need to know how many grams are in 1 ball (25g, 50g or 100g). This information is available if you click on the individual yarn quality on our pages. Divide the amount required with the amount of each ball. For example, if each ball is 50g (the most common amount), the calculation will be as follows: 450 / 50 = 9 balls.
Can I use a different yarn than what the pattern suggests?
The important thing when changing from one yarn to another is that the knitting/crochet tension remains the same. This is so that the measurements of the finished piece will be the same as on the sketch provided. It is easier to achieve the same knitting tension using yarns from the same yarn group. It is also possible to work with multiple strands of a thinner yarn to achieve the knitting tension of a thicker one. Please try our yarn converter. We recommend you to always work a test swatch.
Please NOTE: when changing yarn the garment might have a different look and feel to the garment in the photo, due to individual properties and qualities of each yarn.
See DROPS lesson: Can I use a different yarn than the one mentioned in the pattern?
What are the yarn groups?
All our yarns are categorised into yarn groups (from A to F) according to thickness and knitting tension – group A contains the thinnest yarns and group F the thickest. This makes it easier for you to find alternative yarns to our patterns, should you wish to switch yarn. All yarns within the same group have a similar knitting tension and can easily replace each other. However, different yarn qualities have different structures and properties which will give the finished work a unique look and feel.
How do I use the yarn calculator?
At the top of all our patterns you’ll find a link to our yarn calculator, which is a helpful tool should you wish to use a different yarn than suggested. By filling in the yarn quality you wish to replace, the amount (in your size) and number of strands, the calculator will present good alternative yarns with the same knitting tension. Additionally it will tell you how much you’ll require in the new qualities and whether you’ll need to work with multiple strands. Most skeins are 50g (some are 25g or 100g).
If the pattern is worked with multiple colours, every colour will have to be calculated separately. Similarly, if the pattern is worked with several strands of different yarns (for example 1 strand Alpaca and 1 strand Kid-Silk) you will have to find alternatives for each, individually.
Why do you show discontinued yarns in the patterns?
Since different yarns have different qualities and textures we have chosen to keep the original yarn in our patterns. However, you can easily find options among our available qualities by using our yarn calculator, or simply pick a yarn from the same yarn group.
It is possible that some retailers still have discontinued yarns in stock, or that someone has a few skeins at home that they would like to find patterns for.
The yarn calculator will provide both alternative yarn as well as required amount in the new quality.
What size should I knit?
If you think it's hard to decide what size to make, it can be a good idea to measure a garment you own already and like the size of. Then you can pick the size by comparing those measures with the ones available in the pattern's size chart.
You'll find the size chart at the bottom of the pattern.
See DROPS lesson: How to read size chart
Why do I get the wrong knitting tension with the suggested needle size?
The needle size provided in the pattern serves only as a guide, the important thing is to follow the knitting tension. And since knitting tension is very individual, you will have to adjust the needle size to ensure that YOUR tension is the same as in the pattern – maybe you’ll have to adjust 1, or even 2 needle sizes, up or down to achieve the correct tension. For this, we recommend that you work test swatches.
Should you work with a different knitting tension than the one provided, the measurements of the finished garment might deviate from the measurement sketch.
See DROPS lesson: How to measure your tension/gauge
See DROPS video: How to make a tension/gauge swatch
Why is the pattern worked top-down?
Working a garment top-down provides more flexibility and room for personal adjustment. For example it is easier to try the garment on while working, as well as making adjustments to length of yoke and shoulder caps.
The instructions are carefully explaining every step, in the correct order. Diagrams are adjusted to the knitting direction and are worked as usual.
How do I work according to a knitting diagram?
The diagram depicts all rows/rounds, and every stitch seen from the right side. It is read from bottom to top, from right to left. 1 square = 1 stitch.
When working back and forth, every other row is worked from the right side and every other row is worked from the wrong side. When working from the wrong side, the diagram will have to be worked reversed: from left to right, knit stitches are purled, purl stitches are knit etc.
When working in the round every round is worked from the right side and the diagram are worked from right to left on all rounds.
See DROPS lesson: How to read knitting diagrams
How do I work according to a crochet diagram?
The diagram depicts all rows/rounds, and every stitch seen from the right side. It is worked from bottom to top, from right to left.
When working back and forth every other row is worked from the right side: from right to left and every other row is worked from the wrong side: from left to right.
When working in the round, every row in the diagram are worked from the right side, from right to left.
When working a circular diagram you start in the middle and work your way outwards, counter clockwise, row by row.
The rows usually start with a given number of chain stitches (equivalent to the height of the following stitch), this will either be depicted in the diagram or explained in the pattern.
See DROPS lesson: How to read crochet diagrams
How do I work several diagrams simultaneously on the same row/round?
Instructions for working several diagrams after each other on the same row/round, will often be written like so: “work A.1, A.2, A.3 a total of 0-0-2-3-4 times". This means you work A.1 once, then A.2 is worked once, and A.3 is repeated (in width) the number of times provided for your size – in this case like so: S = 0 times, M = 0 times, L=2 times, XL= 3 times and XXL = 4 times.
The diagrams are worked as usual: begin with the first row in A.1, then work the first row in A.2 etc.
See DROPS lesson: How to read knitting diagrams
See DROPS lesson: How to read crochet diagrams
Why are the sleeves shorter in larger sizes?
The total width of the garment (from wrist-to-wrist) will be larger in the larger sizes, despite the actual sleeves being shorter. The larger sizes have longer sleeve caps and wider shoulders, so there will be a good fit in all sizes.
Where on the garment is the length measured?
The measurement sketch/schematic drawing provides information regarding the full length of the garment. If it’s a jumper or a jacket the length is measured from the highest point on the shoulder closest to the neckline, and straight down to the bottom of the garment. It is NOT measured from the tip of shoulder. Similarly, the length of yoke is measured from the highest point on the shoulder and down to where yoke is split into body and sleeves.
On a jacket measures are never taken along bands, unless specifically stated. Always measure inside band stitches when measuring the length.
See DROPS lesson: How to read a schematic drawing
What is a repeat?
Diagrams are often repeated on the round or in height. 1 repeat is the diagram the way it appears in the pattern. If it says to work 5 repeats of A.1 in the round, then you work A.1 a total of 5 times after/next to each other in the round. If it says to work 2 repeats of A.1 vertically/in height you work the entire diagram once, then begin again at the start and work the entire diagram one more time.
Why does the piece start with more chain stitches than it’s worked with?
Chain stitches are slightly narrower than other stitches and to avoid working the cast-on edge too tight, we simply chain more stitches to begin with. The stitch count will be adjusted on the following row to fit the pattern and measurement sketch.
Why increase before the rib edge when the piece is worked top-down?
The rib edge is more elastic and will contract slightly compared to, for example, stocking stitch. By increasing before the rib edge, you avoid a visible difference in width between the rib edge and the rest of the body.
Why increase in the cast-off edge?
It’s very easy to cast off too tightly, and by making yarn overs while casting off (and simultaneously casting these off) you avoid a too tight cast off edge.
See DROPS video: How to bind off with yarn overs (yo)
How do I increase/decrease on every 3rd and 4th row/round alternately?
To achieve an even increase (or decrease) you can increase on, for example: every 3rd and 4th row alternately, like so: work 2 rows and increase on the 3rd row, work 3 rows and increase on the 4th. Repeat this until the increase is complete.
See DROPS lesson: Increase or decrease 1 st on every 3rd and 4th row alternately
How can I work a jacket in the round instead of back and forth?
Should you prefer to work in the round instead of back and forth, you may of course adjust the pattern. You’ll need to add steeks mid-front (usually 5 stitches), and follow the instructions. When you would normally turn and work from the wrong side, simply work across the steek and continue in the round. At the end you’ll cut the piece open, pick up stitches to work bands, and cover the cut edges.
See DROPS video: How to knit steeks and cut open
Can I work a jumper back and forth instead of in the round?
Should you prefer to work back and forth instead of in the round, you may of course adjust the pattern so you work the pieces separately and then assemble them at the end. Divide the stitches for the body in 2, add 1 edge stitch in each side (for sewing) and work the front and back pieces separately.
See DROPS lesson: Can I adapt a pattern for circular needles into straight needles?
Why is the pattern slightly different than what I see in the photo?
Pattern repeats can vary slightly in the different sizes, in order to get the correct proportions. If you’re not working the exact same size as the garment in the photo, yours might deviate slightly. This has been carefully developed and adjusted so that the complete impression of the garment is the same in all sizes.
Make sure to follow instructions and diagrams for your size!
How do I make a women’s size garment into a men’s size one?
If you have found a pattern you like which is available in women’s size it’s not very difficult to convert it to men’s size. The biggest difference will be the length of sleeves and body. Start working on the women size that you think would fit across the chest. The additional length will be worked right before you cast off for the armhole/sleeve cap. If the pattern is worked top-down you can add the length right after the armhole or before the first decrease on sleeve.
Regarding additional yarn amount, this will depend on how much length you add, but it is better with a skein too many than too few.
How do I prevent a hairy garment from shedding?
All yarns will have excess fibres (from production) that might come off as lint or shedding. Brushed yarns (ie hairier yarns) have more of these loose, excess fibres, causing more shedding.
Shedding also depends on what is worn under or over the garment, and whether this pulls at the yarn fibres. It’s therefore not possible to guarantee that there will be no shedding
Below are some tips on how to get the best result when working with hairier yarns:
1. When the garment is finished (before you wash it) shake it vigorously so the looser hairs come off. NOTE: do NOT use a lint roller, brush or any method that pulls at the yarn.
2. Place the garment in a plastic bag and put it in your freezer - the temperature will cause the fibres to become less attached to each other, and excess fibres will come off easier.
3. Leave in the freezer for a few hours before taking it out and shaking it again.
4. Wash the garment according to the instructions on the yarn label.
Why does my garment pill?
Pilling is a natural process that happens to even the most exclusive of fibers. It's a natural sign of wear and tear that is hard to avoid, and that is most visible in high friction areas of your garment like a sweater's arms and cuffs.
You can make your garment look as new by removing the pilling, using a fabric comb or a pill/lint remover.
Tilda |
|
|
|
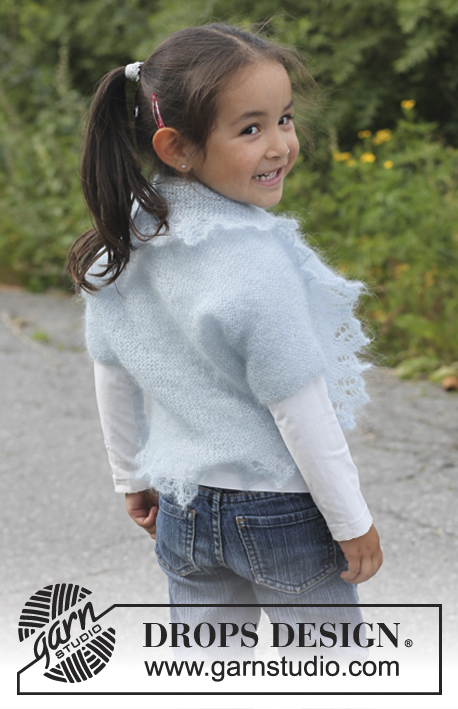
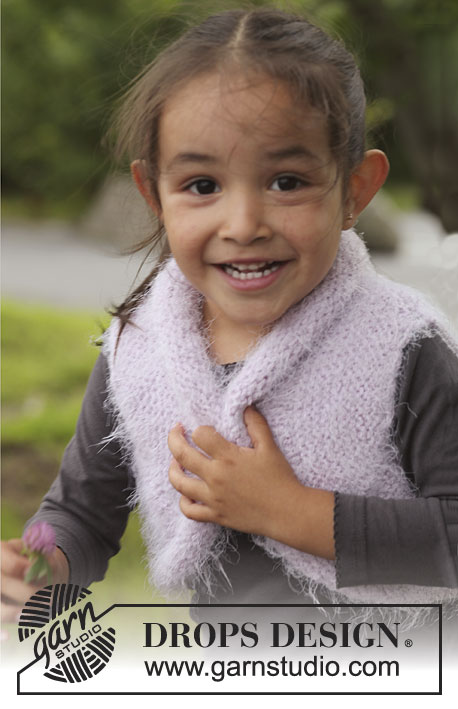
Crochet DROPS bolero in "Fabel". Size 3 - 12 years.
DROPS Children 22-29 |
|
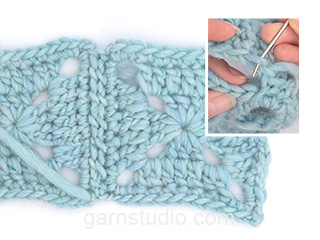
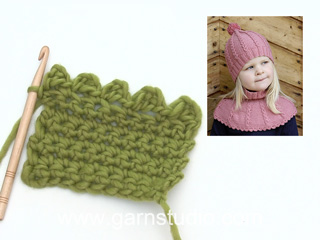
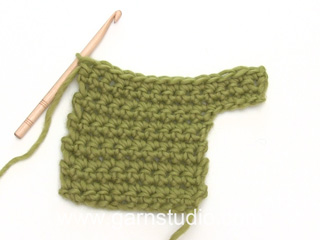
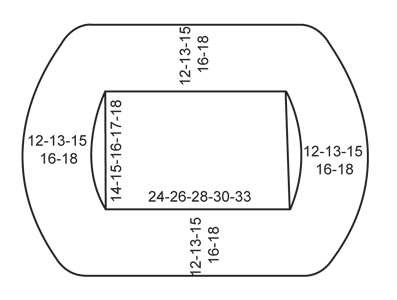
CROCHET INFO: Replace first tr on every row/round with 3 ch. Finish every round with 1 sl st in 3rd ch from beg of round. INCREASE TIP: Inc by working 2 tr in 1 st. --------------------------------------------------------- BACK PIECE: Worked back and forth - SEE CROCHET INFO! Work 67-73-79-85-91 loose ch on hook size 3 mm with Fabel. Work 1 tr in 4th ch from hook, 1 tr in each of the next 3 ch, * skip 1 ch, 1 tr in each of the next 5 ch *, repeat from *-* the rest of the row = 55-60-65-70-75 tr. Then work 1 tr in every tr back and forth until piece measures 14-15-16-17-18 cm. EDGE PIECE: Work 1 tr in each of the 55-60-65-70-75 tr at the top along back piece, then work 39-42-44-46-49 ch (= armhole), 1 tr in each of the 55-60-65-70-75 tr at the bottom along back piece and then 39-42-44-46-49 ch (= armhole), finish with 1 sl st in first tr on round. On next round work 1 tr in every tr at the top and at the bottom of back and in every ch-loop work 33-35-37-39-41 tr = 176-190-204-218-232 tr in total. Continue in the round as follows: ROUND 1: 1 tr in first tr (replaced with 3 ch), * 1 ch, skip 1 tr, 1 tr in next tr *, repeat from *-* and finish with 1 ch, skip 1 tr and 1 sl st in 3rd ch from beg of round. ROUND 2: 1 tr in every tr and 1 tr in every ch. Repeat these 2 rounds upwards - AT THE SAME TIME when edge measures approx. 3-3-3-4-4 cm (adjust so that next round is a round with tr only), inc 16-20-24-29-34 tr evenly - READ INCREASE TIP - repeat inc when piece measures approx. 5-6-7-7-8 cm = 208-230-252-276-300 tr. Work until edge measures approx. 7-8-10-11-13 cm. Put piece aside. CROCHET SQUARE: Work 4 ch on hook size 3 mm with Fabel, form a ring with 1 sl st in first ch. ROUND 1: 8 dc in ch-ring, finish with 1 sl st in first dc from beg of round. ROUND 2: 1 sl st in first dc, * 3 ch, in same dc as sl st work 2 tr but wait with last pull through on each tr until both have been worked, make 1 YO and pull thread through all 3 loops on hook, 3 ch, 1 sl st in same dc as both tr were worked, 1 sl st in next dc *, repeat from *-* until 1 dc remains, work as follows in this dc: 1 sl st, 3 ch, then 3 tr but wait with last pull through on each tr until all 3 have been worked, make 1 YO and pull thread through all 4 loops on hook (= 8 leaves). ROUND 3: * 4 ch, at the top of next leaf work 1 tr + 2 ch + 1 tr (= corner), 5 ch, 1 dc at the top of next leaf, 5 ch, at the top of next leaf work 1 tr + 2 ch + 1 tr (= corner), 4 ch, 1 dc at the top of next leaf, 4 ch, at the top of next leaf work 1 tr + 2 ch + 1 tr (= corner), 3 ch, 1 dc at the top of next leaf, 3 ch, at the top of next leaf work 1 tr + 2 ch + 1 tr (= corner), 4 ch, 1 sl st in first ch from beg of round. ROUND 4: In the 4-ch-loops work 4 dc, in the 5-ch-loops work 5 dc, in the 3-ch-loops work 3 dc and in the 2-ch-loops in every corner work 1 dc, 3 ch, 1 dc = a total of 40 dc around the square, finish with 1 sl st in first dc, cut the thread. Two of the sides are the same width - approx. 5 cm, 1 side is narrower - approx. 4½ cm and 1 side is wider - approx. 5½ cm. Work 20-22-24-26-30 squares. Sew the squares tog in one long strip – sew edge to edge – make sure that the shorter sides are placed against the same side and that the longer sides are placed against the opposite side so that the strip is curved. Begin by fastening the 2 middle squares on the strip mid back at the top of edge piece – sew edge to edge along the shortest side on the squares. Continue to sew down the one side and until mid back at the bottom of edge piece, then sew the other side of the strip on – make sure not sew too tightly when sewing on the strip. If more or less squares are needed this must be adjusted before the last 2 squares are sewn tog mid back. PICOT BORDER: Work on hook size 3 mm with Fabel at the edge around the entire strip of crochet squares. Beg in the first square that was sewn on at the back of neck and work as follows: 1 dc in the second st on square, * 1 picot (= 3 ch, 1 dc in first ch), skip 1 dc, 1 dc in next dc *, repeat from *-* (there should be approx. 5 picots along every square + 1 in the transition to next square), finish with 1 sl st in first dc from beg of round. Work picot border the same way around the armholes. |
|
Have you made this or any other of our designs? Tag your pictures in social media with #dropsdesign so we can see them! Do you need help with this pattern?You'll find tutorial videos, a Comments/Questions area and more by visiting the pattern on garnstudio.com. © 1982-2024 DROPS Design A/S. We reserve all rights. This document, including all its sub-sections, has copyrights. Read more about what you can do with our patterns at the bottom of each pattern on our site. |
With over 40 years in knitting and crochet design, DROPS Design offers one of the most extensive collections of free patterns on the internet - translated to 17 languages. As of today we count 304 catalogues and 11422 patterns - 11422 of which are translated into English (UK/cm).
We work hard to bring you the best knitting and crochet have to offer, inspiration and advice as well as great quality yarns at incredible prices! Would you like to use our patterns for other than personal use? You can read what you are allowed to do in the Copyright text at the bottom of all our patterns. Happy crafting!
Comments / Questions (35)
Silke wrote:
Hallo Ich habe nun das Rückenteil und die Lm für die Armĺöcher gehäkelt.Und nun weiss ich nicht weiter, in der Anleitung steht oben und unten am Rückenteil Stäbchen häkeln...ok aber was wird mit den Seiten gemeint...in die Lm von den Armlöchern oder wirklich die Seiten? Da es ja für Größe 128 zb 44 Lm sind, pro Armloch, aber man dann weniger Stäbchen in die Seite häkeln soll. Wenn die Lm gemeint sind..wie häkel ich denn dann ?
09.11.2014 - 09:07DROPS Design answered:
Sie haben ja oben am Rückenteil 65 Stb gehäkelt, dann den 44-Lm-Bogen über die Seite des Rückenteils (= Armausschnitt), dann am unteren Rand des Rückenteils wieder 65 Stb, dann den 44-Lm-Bogen über die andere Seite wieder nach oben. Nun häkeln Sie wieder über den oberen Rand 65 Stb wie zuvor, dann UM den Lm-Bogen 37 Stb (nicht in die einzelnen Lm, sondern um die Lm herum), dann am unteren Rand 65 Stb und um den anderen Lm-Bogen auch 37 Stb. Dann häkeln Sie wie beschrieben weiter.
09.11.2014 - 23:03Marjorie wrote:
Ik begin het aardig door te krijgen, dank voor de hulp! Ik vraag me alleen af van waaraf moet ik meten tot ik tot 4cm rand ben? Vanaf het achterpand dat 17 cm meet Of vanaf toer 1 van het rand van het werk? Bedankt weer, groet
08.09.2014 - 12:42DROPS Design answered:
Hoi Marjorie. Je meet vanaf waar je bent begonnen met de rand. Je kan meten aan de kant van het armsgat, of plaats een markeerder op het achterpand (17 cm) waar je bent begonnen met de rand.
08.09.2014 - 14:14Marjorie wrote:
Ik heb dezelfde vraag als Darije. Ik ben bij de rand van het werk. De boven en onderkant begrijp ik, en aan de zijkanten de lossen voor de armsgaten. Maar wat is een l-lus, is dat een losse? Ik heb 46 losse gehaakt. Ik kan toch niet 39 stk in 1 losse doen. En hoe kom je dan tot het totaal van 218?
28.08.2014 - 20:36DROPS Design answered:
l-lus is de afkorting voor een lossenlus, dus een lus van lossen. U haakt de stokjes allemaal om deze lange lus van lossen heen.
01.09.2014 - 17:41Darije wrote:
Ik ben net begonnen aan toer 2(rand van het haakwerk). Moet ik eerst alleen de bovenkant (60 stokjes (de maat 110 die ik haak ) twee toeren van maken? Dus niet overgaan op de armsgaten? En ik moet dan ook gelijk dat stukje meerderen? Naar hoeveel stokjes dan? klopt dit wat ik zeg? En wat dan? Dan moet ik wat gaan meerderen? weer de bovenkant? En met hoeveel? Voor mij graag een nog betere beschrijving graag, want ik kom hier niet uit. Wie kan mij hierbij helpen??????
26.07.2014 - 20:13DROPS Design answered:
U haakt gewoon verder in de rondte, maar er staat uitgelegd hoe te haken aan de boven- en onderkant en hoe over de lussen met lossen voor de armsgaten. U vraagt naar het aantal stokjes, dat staat in het patroon: Haak in de volgende toer 1 stk in ieder stk aan de bovenkant en aan de onderkant van het achterpand en haak in iedere l-lus 33-35-37-39-41 stk = 176-190-204-218-232 stk in totaal.
28.07.2014 - 09:45Maartjenowee wrote:
Als ik het rugpand opzet begrijp ik niet goed zijn het 5 stokjes en dan een losse en weer 5 stokjes dit tot ,de volgende toer ,deze helemaal stokjes ,en dan weer een toer met gaatjes,Op de foto lijkt het wel 3 toeren met gaatjes,of is dat later met de picotrand.
18.06.2014 - 22:38DROPS Design answered:
Hoi Maartjenowee. Het rugpand is de vierkant in het midden (voor de rand van vierkantjes en de picotrand). Je haakt dus eigenlijk een vierkante lap van stokjes. Je haakt 1 stk in de 4e van de haak, 1 stk in de volgende 3 l (= 3 stk) en dan herhaal je steeds: 1 losse overslaan en 1 stk in de volgende 5 l (dwz, 5 stk over 6 l). Ga dan door met 1 stk in elk stokje tot de vermelde afmeting.
19.06.2014 - 12:38Doris wrote:
Die Maschenprobe ist bei der deutschen Version anscheinend falsch. Hier 23 Stb x 10 Reihen, aber in der norwegischen Anleitung 23 Stb x 12 Reihen.
09.04.2014 - 16:06DROPS Design answered:
Liebe Doris, vielen Dank für den Hinweis, wir werden das gleich korrigieren.
11.04.2014 - 07:43Alix Friedrichs wrote:
Ich bitte um Angabe der Farbnummern für die verschiedenen Fabel-Garne für das Kinderbolero. Vielen Dank im voraus.
04.02.2014 - 16:36DROPS Design answered:
Liebe Alix, es ist nur Farbe 911, fun lila, wie in der Anleitung angegeben.
05.02.2014 - 10:11Marlene wrote:
Is this pattern available in adult sizes? Thanks!
15.10.2013 - 06:26DROPS Design answered:
Dear Marlene, please click here to find the adult Bolero, pattern DROPS 126-8. Happy crocheting!
15.10.2013 - 08:51Holly wrote:
Best way to sew the patches on? Having trouble with that Everthing else turn out good love the pattern
25.07.2013 - 12:54DROPS Design answered:
Dear Holly, place squares as stated in pattern and sew them together as shown in video below. Happy crocheting!
25.07.2013 - 15:42NettyHermans wrote:
Als ik 49 losse heb voor het armsgat,hoe kan ik daar dan 41stokjes haken ????
10.07.2013 - 07:52DROPS Design answered:
Hoi Netty, je slaat 8 l gelijkmatig over zodat je 41 stk hebt bij elk armsgat.
11.07.2013 - 13:24