
Popular categories
Looking for a yarn?


|
|
Firefly |
|
 |
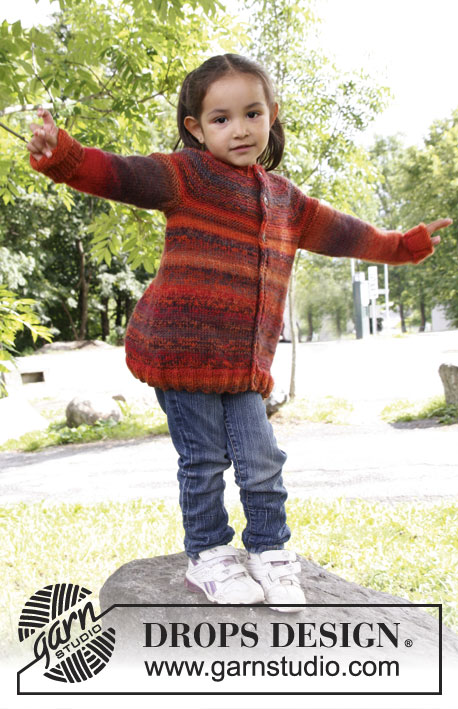 |
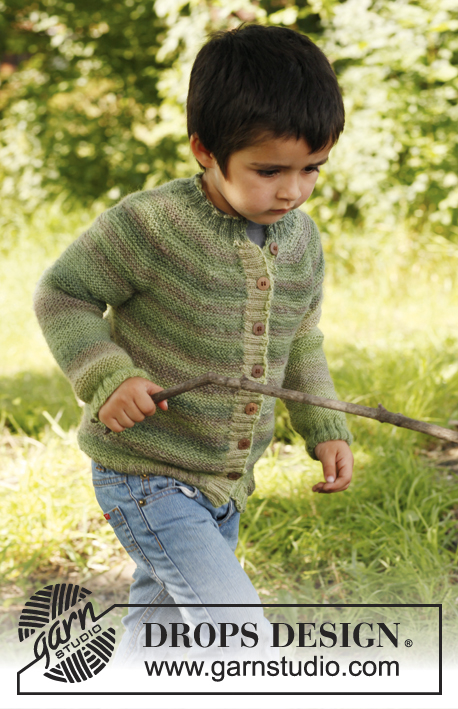
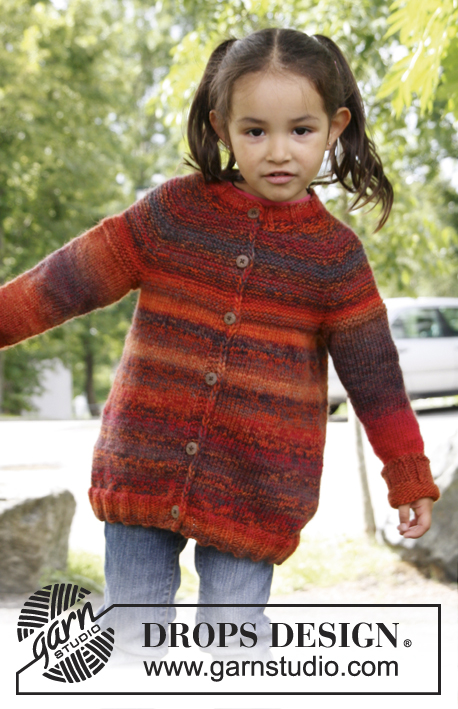
Knitted jacket with raglan in 2 strands DROPS Delight. Size children 3 to 12 years.
DROPS Children 22-14 |
|
|
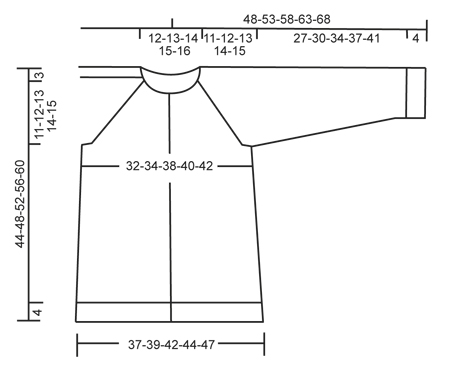
FRONT BANDS: K band sts on all rows (= garter st) but slip first st as if to K at beg of every row from mid front. GARTER ST (back and forth on needle): K all rows. BUTTON HOLES: Bind off for button holes on right band. 1 BUTTON HOLE = K tog 2nd and 3rd st from edge and make 1 YO. Bind off for button holes when piece measures: SIZE 3/4 years: 2, 10, 17, 25 and 32 cm / ¾",4",6¾",9¾" and 12½". SIZE 5/6 years: 2, 9, 16, 23, 30 and 37 cm / ¾",3½",6¼",9",11¾" and 14½". SIZE 7/8 years: 2, 10, 17, 25, 32 and 40 cm / ¾",4",6¾",9¾",12½" and 15¾". SIZE 9/10 years: 2, 9, 16, 23, 30, 37 and 44 cm / ¾",3½",6¼",9",11¾",14½" and 17¼". SIZE 11/12 years: 2, 10, 17, 25, 32, 40 and 48 cm / ¾",4",6¾",9¾",12½",15¾" and 19". NOTE: bind off 1 button hole on neck edge (piece will then measure approx. 40-44-48-52-56 cm / 15¾"-17¼"-19"-20½"-22"). DECREASE TIP (applies to raglan): All dec are done from RS! Dec as follows in every transition between sleeve and body (beg 3 sts before marker): K 2 tog, K 2 (marker is between these 2 sts), slip 1 st as if to K, K 1, psso. -------------------------------------------------------- BODY: Worked back and forth on circular needle from mid front. Cast on 162-174-186-198-210 sts (includes 5 band sts in each side towards mid front) on circular needle size 4 mm / US 6 with 2 strands Delight. P 1 row from WS, then work next row as follows from RS: 5 band sts - see explanation above, * K 2, P 4 *, repeat from *-* and finish with K 2 and 5 band sts - see explanation above. Continue like this for 4 cm / 1½" – AT THE SAME TIME after 2 cm / ¾", beg bind offs for BUTTON HOLES on right band -see explanation above! When rib measures 4 cm / 1½", switch to circular needle size 4.5 mm / US 7, K 1 row from RS while at the same time dec 20-24-24-28-32 sts evenly (do not dec over bands) = 142-150-162-170-178 sts. Insert 2 markers in the piece; 38-40-43-45-47 sts in from each side (= 66-70-76-80-84 sts between markers on back piece). Continue in stockinette st. When piece measures 8 cm / 3", dec 1 st on each side of both markers by K 2 tog from RS. Repeat dec every 5-5-6-6-7 cm / 2"-2"-2⅜"-2⅜"-2¾" a total of 4 times = 126-134-146-154-162 sts. When piece measures approx. 29-32-35-38-41 cm / 11⅜"-12½"-13¾"-15"-16⅛" (adjust so that next row is worked from WS), switch to circular needle size 4 mm / US 6. K 3 rows over all sts. On next row bind off 8 sts in each side for armholes (i.e. bind off 4 sts on each side of markers) = 110-118-130-138-146 sts remain on needle. Put piece aside and knit the sleeves. SLEEVE: Worked in the round on double pointed needles. Cast on 36-36-42-42-42 sts on double pointed needles size 4 mm / US 6 with 2 strands Delight. K 1 round, continue in rib = K 2/P 4 for 4 cm / 1½". Switch to double pointed needles size 4.5 mm / US 7 and continue in stockinette st – AT THE SAME TIME on 1st round dec 4-2-4-2-0 sts evenly = 32-34-38-40-42 sts. Insert a marker at beg of round (= mid under sleeve). When piece measures 8 cm / 3", inc 1 st on each side of marker mid under sleeve. Repeat inc every 3½-4-4½-5-5 cm / 1¼"-1½"-1¾"-2"-2" a total of 7-7-7-7-8 times = 46-48-52-54-58 sts. When piece measures 30-33-37-40-44 cm / 11¾"-13"-14½"-15¾"-17¼", switch to double pointed needles size 4 mm / US 6. P 1 round, K 1 round and P 1 round, then K 1 round while AT THE SAME TIME binding off 8 sts mid under sleeve (i.e. 4 sts on each side of marker) = 38-40-44-46-50 sts remain on needle. Put piece aside and knit another sleeve. YOKE: Slip sleeves on to same circular needle size 4 mm / US 6 as body where armholes were bound off = 186-198-218-230-246 sts. Insert a marker in all transitions between sleeves and body piece (= 4 markers). READ ALL OF THE FOLLOWING SECTION BEFORE CONTINUING! Continue in garter st (work 1st row K from WS) – AT THE SAME TIME on 2nd row beg dec for RAGLAN – see explanation above. Repeat dec every 4th row a total of 9-10-9-10-10 times and then every other row: 4-4-7-7-9 times. AT THE SAME TIME when piece measures 39-43-47-51-55 cm / 15¼"-17"-18½"-20"-21⅝", slip the 10-10-12-12-12 outermost sts in each side towards mid front on a stitch holder for neck. Then bind off at beg of every row from mid front: 2 sts 2 times each side and 1 st 2 times in each side. After all dec for raglan and bind offs for neck, 50-54-54-58-58 sts remain on needle and piece measures approx. 44-48-52-56-60 cm / 17¼"-19"-20½"-22"-23½" up to shoulder. Continue with neck edge. NECK EDGE: Pick up approx. 16 to 20 sts on each side of neck (including sts on stitch holder) = approx. 82 to 98 sts in total. K 1 row from WS, then K 1 row from RS while AT THE SAME TIME dec evenly to 66-72-72-78-84 sts. Continue to work rib as follows (1st row = WS): 5 band sts as before, * P 2, K 4 *, repeat from *-* and finish with P 2 and 5 band sts as before (from RS there are 5 band sts and 2 K sts in each side towards mid front). After 1 cm / ⅜" bind off for 1 button hole over the other holes on right band. When rib measures 2-2-3-3-3 cm / ¾"-¾"-1"-1"-1", loosely bind off with K over K and P over P. ASSEMBLY: Sew the openings under the sleeves. Sew on buttons. |
|
|
|
|
Have you made this or any other of our designs? Tag your pictures in social media with #dropsdesign so we can see them! Do you need help with this pattern?You'll find tutorial videos, a Comments/Questions area and more by visiting the pattern on garnstudio.com. © 1982-2024 DROPS Design A/S. We reserve all rights. This document, including all its sub-sections, has copyrights. Read more about what you can do with our patterns at the bottom of each pattern on our site. |
|


With over 40 years in knitting and crochet design, DROPS Design offers one of the most extensive collections of free patterns on the internet - translated to 17 languages. As of today we count 304 catalogs and 11422 patterns - 11417 of which are translated into English (US/in).
We work hard to bring you the best knitting and crochet have to offer, inspiration and advice as well as great quality yarns at incredible prices! Would you like to use our patterns for other than personal use? You can read what you are allowed to do in the Copyright text at the bottom of all our patterns. Happy crafting!
Comments / Questions (42)
Danke schön für die schnelle Antwort aber ich verstehe es nicht ganz in dem Video für die Raglan Abnahme sind es insgesamt 4 Maschen und nicht 8 Maschen was ist denn jetzt richtig? LG Annette
22.07.2020 - 11:46DROPS Design answered:
Liebe Frau Gehrke, das Video ist eine allgemeine Erklärung der Raglanabnahmen und zeigt nur einen Teil einer Jacke (Ärmel - Rückenteil - Ärmel) . Ausschlaggebend ist, was in der Anleitung steht - in diesem Fall nehmen Sie an allen 4 Markierern jeweils 2 Maschen ab - 1 Masche vor dem Markierer und 1 Masche nach dem Markierer, das macht dann insgesamt 8 abgenommene Maschen. Die Abnahmen machen Sie wie unter TIPP ZUM ABNEHMEN (gilt für die Raglanpasse) in der Anleitung erklärt. Gutes Gelingen! - PS: Die Anleitung wurde gerade zum besseren Verständnis sprachlich noch mal überarbeitet.
22.07.2020 - 14:34Hallo ich stricke die Jacke in Größe 146/152 und bin bei der Passe.246 Maschen habe ich auf der Nadel,dann erfolgen die Abnahmen, aber nach meiner Rechnung hätte ich noch 136 Maschen auf der Nadel.In der Anleitung steht man hätte noch 58 Maschen drauf bitte um Hilfe. LG Annette
21.07.2020 - 16:20DROPS Design answered:
Liebe Frau Gehrke, Sie nehmen insgesamt 152 Maschen für die Raglanabnahmen ab (19 x 8 Maschen pro Abnahme-Reihe), es werden an beiden Seiten je 12 Maschen für den Halsausschnitt stillgelegt (= 24 Maschen insgesamt) und es werden an jeder Seite je 6 Maschen abgekettet (= 12 Maschen insgesamt), d.h. 246 minus 152 minus 24 minus 12 = 58 Maschen übrig. Viel Spaß beim Weiterstricken!
22.07.2020 - 10:40Hallo ich habe eine Frage bei der Abnahme nach 8cm werden die Maschen nach der Markierung zusammen gestrickt ?
21.03.2020 - 17:47DROPS Design answered:
Liebe Annette, in diesem Modell werden die Abnahmen beidseitig von der Markierungen zusammen gestrickt. Viel Spaß beim stricken!
23.03.2020 - 09:33Hallo, ich bin bei der Passe angekommen und bin nicht sicher, ab wann man mit der Abnahme am Anfang der Reihe beginnen soll. Direkt von Anfang an oder nach 47 cm? Wie genau wird am Anfang der Reihe abgekettet? Wird bei der Hin- und Rückreihe abgekettet? Wird die Blende schräg? Danke schon mal für die Antwort.
13.01.2020 - 21:52DROPS Design answered:
Liebe Kathi, die erste Reihe bei der Passe ist eine Rückreihe, dann beginnen die Raglanabnahmen ab der nächsten Hinreihe - siehe RAGLANABNAHMEN, und gleichzeitig, nach 47 cm wird es für den Halsausschnitt abgekettet, 12 Maschen werden zuerst beidseitig stillgelegt (=einschl. BlendeMaschen) und dann wird es abgekettet. Wenn Sie dann die Halskante stricken, fassen Sie diese Maschen auf. Viel Spaß beim stricken!
14.01.2020 - 08:00When I slip the 10 stitches on to a holder and then proceed to do the decreases required, 6 rows I believe in total, when I put them back together I have a big hole where 10 stitches meet the worked body. What am I doing wrong?
30.11.2019 - 05:35DROPS Design answered:
Dear Tammy, most probably you are not doing anything wrong, It is kind of natural to have that hole. However, you can help it, either by wrapping a yarn around teh last stitch before you turn your work, and then, when you are putting back the stitches, lift the wrap above the stitch and knit them together. Or you can lift up the thread between the two stitches, put it on the needle twosted, and knit together with the first stitch after turning. I hope these tricks are helpful. Happy Knitting!
30.11.2019 - 13:26Ich bin bei der Halskante angelangt. Bedeutet die maschenzahl von 82 auf 66 anpassen, daß idh 16 Maschenabnehmen muss? Ixch möchte noch eine 2. Jacke stricken.Die 1. Masche jeder Nadel wird nur abgehoben, wie bei einer linken oder rechten Masche?
14.10.2019 - 18:52DROPS Design answered:
Liebe Frau Schilling, bei der Halskante nehmen Sie ja 16 Maschen regelmäßig ab, so haben Sie 82 - 16 = 66 Maschen. Die erste Masche der Blende wird in jeder Reihe rechts abgehoben. Viel Spaß beim stricken!
15.10.2019 - 09:46Ich bin bei der Halskante angelangt und habe 82 Maschen.Bei der Reihe auf der Vorderseite soll die Maschenzahl auf 66 angepaßt werden, d.h. doch daß ich 16 Maschen abnehmen muß? Noch eine 2. Frage, da ich nochmals diesselbe Jacke stricke . Die 1. Masche wird immer abgehoben, wie bei einer linken oderbei einer rechten Masche? Im voraus vielen Dank.
14.10.2019 - 18:45Bonjour, je ne comprends pas pour l'empiècement : Reprendre les manches sur la même aiguille circulaire 4 que le dos et les devants," au-dessus des mailles rabattues pour les emmanchures" Faut il recréer des mailles sur les mailles rabattues ? Merci de votre réponse Marie
18.09.2019 - 21:40DROPS Design answered:
Bonjour Mme Thouvenin, les manches vont venir se placer juste au-dessus des 8 mailles rabattues pour les emmanchures à la fin du dos/des devants, vous placez les mailles des manches ainsi: glissez les mailles du 1er devant, ajoutez celles de la 1ère manche (= au-dessus des 8 m rabattues), glissez les mailles du dos, ajoutez celles de la 2ème manche (= au-dessus des 8 m rabattues) et glissez les mailles du 2ème devant. Cette vidéo vous montre comment procéder. Bon tricot!
19.09.2019 - 09:36Bei dieser Jacke werden die Blenden mit Krausrippe gestrickt , 5 Blendenmaschen am Anfang und Ende der Nadel, die 1. Masche jeder Nadel wird abgehoben. Was geschieht am Ende der Nadel mit der Krausrippe (Blende) und auf der Rückseite ? wird hier auch die 1. Masche abgehoben und 4 Maschen Krausrippe gestrickt und was geschieht mit der Blende am Ende derNadel?\\r\\n\\r\\nSeiten
12.09.2019 - 20:26DROPS Design answered:
Liebe Frau Schilling, am Anfang jeder Reihe wird die erste Masche abgehoben, am Ende jeder Reihe wird die letzte Masche rechts gestrickt. Viel Spaß beim stricken!
13.09.2019 - 08:01In what colour is this pattren please. Becouse coulor 13 does'nt exist! And i love it in welke kleur is dit patroon gebreid aub? Want kleur 13 bestaat niet! En ik vind deze prachtig
03.05.2019 - 10:14DROPS Design answered:
Dear Plompen Ina, this cardigan is made from DROPS Delight nr.13, which is orange/red/grey color and we have it still in our shadecard - please see shadecard for Delight here. I am sure that your DROPS retailer will have it stock or could order this colour for you. Happy knitting!
03.05.2019 - 10:56