
Popular categories
Looking for a yarn?


|
|
Sheer Comfort |
|
|
|
|
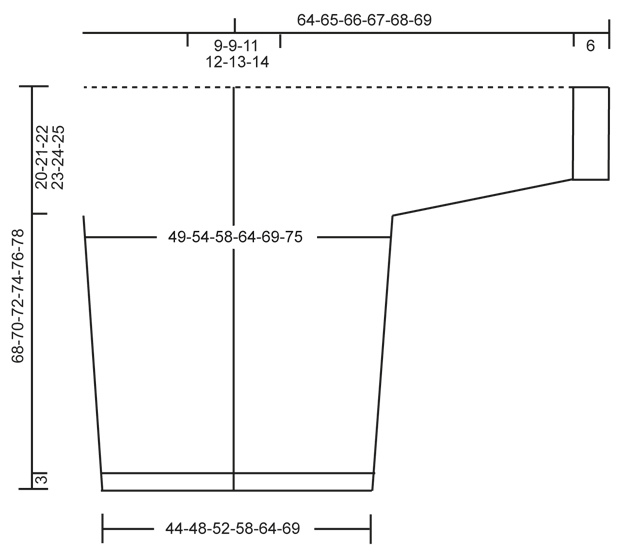
Knitted DROPS wide jacket in seed st in ”Lima”. Size: S - XXXL
DROPS 132-31 |
|
|
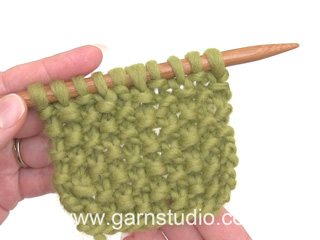
SEED ST: 1st row: * K 1, P 1 *, repeat from *-*. 2nd row: K over P and P over K. Repeat 2nd row. -------------------------------------------------------- RIGHT FRONT PIECE + SLEEVE: Worked back and forth on a circular needle to make room for all the sts. Cast on 45-49-51-55-61-65 sts (includes 1 edge st in the side) on circular needle size 5 mm / US 8 with Lima. Work rib as follows from mid front (1st row = RS): K 1 edge st on all rows, * K 1, P 1 *, repeat from *-* and finish with K 1 and K 1 edge st on all rows. When rib measures 3 cm / 1⅛", K 1 row from WS, then continue in SEED ST over all sts – see explanation above! REMEMBER THE GAUGE! When piece measures 10 cm / 4", inc 1 st in the side. Repeat inc every 8-8-8-9-9-9 cm / 3⅛"-3⅛"-3⅛"-3½"-3½"-3½" a total of 5 times. When piece measures 34-35-36-37-38-39 cm / 13⅜"-13¾"-14¼"-14½"-15"-15¼", bind off for 1 button hole as follows from RS: Work 3 sts as before, K 2 tog, make 1 YO, work the rest of row. Repeat bind off for button hole 2 more times 5 cm / 2" apart. Size XXL + XXXL: At the same time when piece measures approx. 40 cm / 15¾", dec 1 st for neck by K tog the outermost 2 sts towards mid front. Repeat dec when piece measures 55 cm / 21½". ALL SIZES: When piece measures 48-49-50-51-52-53 cm / 19"-19¼"-19¾"-20"-20½"-21", beg to cast on new sts for sleeve. Cast on sts at the end of every row from RS: 5 sts 7 times and 22-19-18-15-11-8 sts 1 time. When inc for sleeve are done, insert 1 marker - NOW MEASURE PIECE FROM HERE! Work until piece measures approx. 13-14-15-16-17-18 cm / 5⅛"-5½"-6"-6¼"-6¾"-7" from marker (adjust so that next row is worked from RS). When all dec and inc are done, there are 107-108-109-110-110-111 sts on needle. Work the outermost 15 sts towards mid front, and then slip them on a stitch holder = 92-93-94-95-95-96 sts remain on needle. Insert a new marker (= mid on top of shoulder) – NOW MEASURE PIECE FROM HERE! Work 2 cm / ¾" back and forth over all sts on needle, and then slip them on a new stitch holder. LEFT FRONT PIECE + SLEEVE: Work as right front piece but reversed. Work the outermost 15 sts at the top by shoulder towards mid front from WS before slipping them on a stitch holder. Work 2 cm / ¾" back and forth over the remaining sts, finish after 1 row from WS. Continue with back piece without slipping sts on a stitch holder. BACK PIECE: Work sts from left front piece + sleeve, cast on 16-16-18-20-22-24 new sts (= back of neck) and work right front piece + sleeve on to circular needle = 200-202-206-210-212-216 sts. Continue in seed st until piece measures 13-14-15-16-17-18 cm / 5⅛"-5½"-6"-6¼"-6¾"-7" from marker. Now bind off at beg of every row in each side: 22-19-18-15-11-8 sts 1 time and 5 sts 7 times = 86-94-100-110-120-130 sts. Insert a marker – NOW MEASURE PIECE FROM HERE! Work 6-7-8-5-6-7 cm / 2⅜"-2¾"-3⅛"-2"-2⅜"-2¾" from marker. Now dec 1 st in each side, repeat dec every 8-8-8-9-9-9 cm / 3⅛"-3⅛"-3⅛"-3½"-3½"-3½" a total of 5 times = 76-84-90-100-110-120 sts. When piece measures 45-46-47-48-49-50 cm / 17¾"-18"-18½"-19"-19¼"-19¾" from marker, K 1 row from WS while at the same time inc 1 st = 77-85-91-101-111-121 sts. Then continue in rib as follows (from RS): K 1 edge st on all rows, * P 1, K 1 *, repeat with *-* and finish with P 1 and K 1 edge st on all rows. When rib measures approx. 3 cm / 1⅛" (adjust according to front piece), bind off with K over K and P over P. COLLAR: Slip the 15 sts from stitch holder on right front piece back on circular needle. Cast on 1 new st towards the shoulder = 16 sts. K all rows - AT THE SAME TIME work short rows as follows (from mid front): * Work 2 rows over all sts, work 2 rows over the outermost 10 sts towards mid front *, repeat from *-* until piece measures approx. 5-5-6-6-7-7 cm / 2"-2"-2⅜"-2⅜"-2¾"-2¾" in the shorter side. Bind off. Work the same way over sts from stitch holder on left front piece. Sew collar parts tog mid back, and sew collar to back of neck inside edge st. RIB ON SLEEVE: Worked back and forth on circular needle. Knit up from RS inside 1 edge st at the bottom of one sleeve: 48-52-56-58-64-66 sts on circular needle size 5 mm / US 8 with Lima. K 1 row from WS. Then work rib = K 1/P 1 with 1 edge st in each side which is K on all rows. When rib measures approx. 6 cm / 2⅜", bind off with K over K and P over P. Repeat on the edge of the other sleeve. ASSEMBLY: Sew the side and sleeve seams inside 1 edge st. Sew on buttons. |
|
|
|
|
Have you made this or any other of our designs? Tag your pictures in social media with #dropsdesign so we can see them! Do you need help with this pattern?You'll find tutorial videos, a Comments/Questions area and more by visiting the pattern on garnstudio.com. © 1982-2024 DROPS Design A/S. We reserve all rights. This document, including all its sub-sections, has copyrights. Read more about what you can do with our patterns at the bottom of each pattern on our site. |


With over 40 years in knitting and crochet design, DROPS Design offers one of the most extensive collections of free patterns on the internet - translated to 17 languages. As of today we count 304 catalogs and 11422 patterns - 11417 of which are translated into English (US/in).
We work hard to bring you the best knitting and crochet have to offer, inspiration and advice as well as great quality yarns at incredible prices! Would you like to use our patterns for other than personal use? You can read what you are allowed to do in the Copyright text at the bottom of all our patterns. Happy crafting!
Comments / Questions (59)
Bonsoir, Je désire réaliser se modèle mais je trouve étrange le mombres de mailles au départ pour une taille xl juste 61 mailles? Merci
13.12.2014 - 19:44DROPS Design answered:
Bonjour Nadia, en taille XL, on monte 55 m et 61 m en taille XXL - cette veste est en forme de V, on va augmenter sur les côtés à partir de 10 cm de hauteur totale - pensez à bien vérifier votre échantillon (17 m x 28 rangs au point de riz = 10 x 10 cm) et à vérifier les mesures pour votre taille dans le schéma en bas de page. Bon tricot!
14.12.2014 - 16:27Oeps, sorry. Verkeerd gelezen; ik zie dat de mindering bij de hals alleen voor de grotere maten is. Mijn excuses!
08.12.2014 - 19:16Volgens mij klopt de telling van totaal aantal steken niet. Ik brei maat S en heb 45 steken opgezet. Daarna 5x1 steek meerderen = 50. Minderen: 2x1 steek voor de hals = 48. Verderop 7x5 steken meerderen + nog eens 22 steken meerderen. Mijn totaal plaatje wordt dan: 45+5-2+35+22 = 105 steken. Terwijl het patroon zegt dat ik 107 steken moet hebben. Waar zit de telfout?
08.12.2014 - 15:37DROPS Design answered:
Hoi Janneke. Ik zie dat je eruit bent. Goed om te horen.
09.12.2014 - 16:45Hallo! Mag ik vragen wat de maat is van de trui die de vrouw op de foto draagt? Want ik zou graag zo'n mooi, groot vest breien, maar welke maat moet ik nemen voor het effect van de foto? (Ik draag zelf S)
02.09.2014 - 21:31DROPS Design answered:
De modellen dragen meestal maat S. Om het effect te beoordelen voor uw persoonlijke maten, kunt u de maten van de tekening onderaan het patroon bekijken en eventueel vergelijken met een shirt of trui van uzelf met ongeveer deze pasvorm.
03.09.2014 - 10:52Hallo! Mag ik vragen wat de maat is van de trui die de vrouw op de foto draagt? Want ik zou graag zo'n mooi, groot vest breien, maar welke maat moet ik nemen voor het effect van de foto? (Ik draag zelf S)
02.09.2014 - 21:30DROPS Design answered:
De modellen dragen meestal maat S. Om het effect te beoordelen voor uw persoonlijke maten, kunt u de maten van de tekening onderaan het patroon bekijken en eventueel vergelijken met een shirt of trui van uzelf met ongeveer deze pasvorm.
03.09.2014 - 15:05På trods af nøje overholdt strikkefasthed, så bliver resultatet ikke særlig godt i størrelse XL. Mon ikke bare det er en størrelse M, der er lagt til? Ærmerne er ekstremt smalle og meget korte - og vidden på kroppen er heller ikke imponerende. Jeg har strikket et bånd, som jeg syr ind hele vejen under armen og ned langs siden - det redder det store arbejde, men ærgerligt alligevel. Ærmelængden er der så ikke så meget at gøre ved, for 15 cm rib vil nok se mærkeligt ud...
26.05.2014 - 10:19DROPS Design answered:
Hej Tine. Det er aergeligt at du ikke er tilfreds, det forstaar jeg godt. Men jeg har regnet mönstret igennem. Og med den rette strikkefasthed saa skulle alle maal stemme med maalskitsen nederst. Det er altid en god ide at tjekke maalene först med dine egne maal for at vaere sikker paa du har den rette str.
27.05.2014 - 11:39I am working on this sweater and am worried that the sleeves will not be long enough - they look very short. According to the diagram, the distance from the centre back of the neck to the bottom of the sleeve is 64 cm for size S. This is about 10 cm shorter than I would have expected for long sleeves. Is this correct?
19.04.2014 - 08:08DROPS Design answered:
Dear Cindy, that's correct, from mid back to bottom sleeve pattern measures 64 cm including rib edge on bottom of sleeve. Happy knitting!
19.04.2014 - 10:15Jeg kan ikke finde et sted, hvor jeg kan se målene på det færdige arbejde? Det gør det svært for mig at vurdere, om jeg skal strikke en XXL eller en XXXL...
29.01.2014 - 08:59DROPS Design answered:
Hej Tine. Nederst paa mönstret finder du en maalskitse med alle maalene i cm per str.
29.01.2014 - 10:18Volgensmij klopt de armlengte niet. Hij lijkt veel te kort. Ik brei maat s. Daarom vraag ik me af: Zijn de steken voor de mouwen bij het patroon er echt genoeg om lange mouwen te krijgen?
25.01.2014 - 12:45DROPS Design answered:
Hoi Anna. Het patroon zou moeten kloppen als je de juiste stekenverhouding hebt. Voor maat S zou de nieuwe st (57) ca 34 cm lang zijn - dus tot aan het "armsgat". Je breit ook 6 cm boordsteek aan het eind van de mouw als het vest klaar is (Zie onder BOORDSTEEK LANGS DE MOUW)
29.01.2014 - 10:50Hi, I just started to knit this sweater. Instruction says: Size XXL+XXXL dec. 1st. for neck... Did this means other sizes do not need decreasing for neck? Thank you, Lana
18.09.2013 - 22:01DROPS Design answered:
Dear Lana, you are correct, these dec apply only for these both sizes, there is no dec for the other sizes. Happy knitting!
19.09.2013 - 09:14