
Categorie popolari
State cercando un filato?


Lasciare un commento sul modello DROPS 134-55
Noi saremmo felici di ricevere i tuoi commenti e opinioni su questo modello!
Se vuoi fare una domanda, fai per favore attenzione a selezionare la categoria corretta nella casella qui sotto per velocizzare il processo di risposta. I campi richiesti sono indicati da *.
|
|||||||||||||||||||||||||
Chocolate Passion |
|||||||||||||||||||||||||
 |
 |
||||||||||||||||||||||||
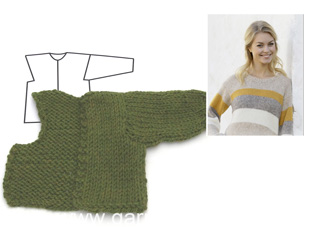
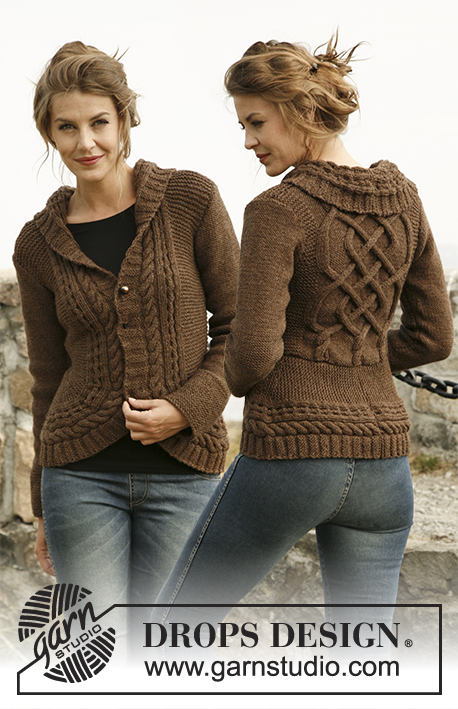
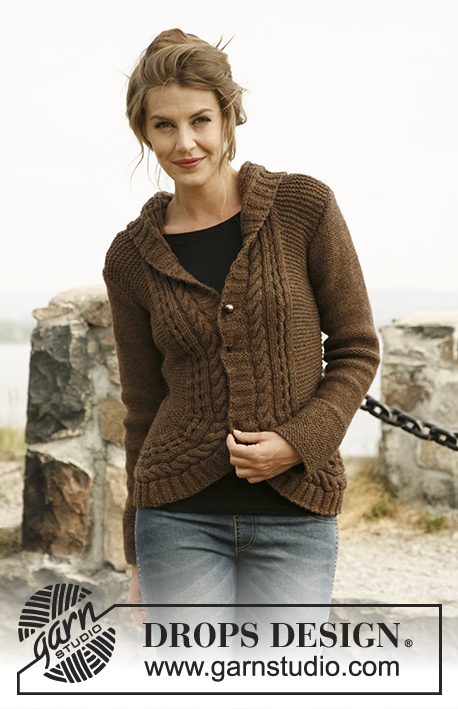
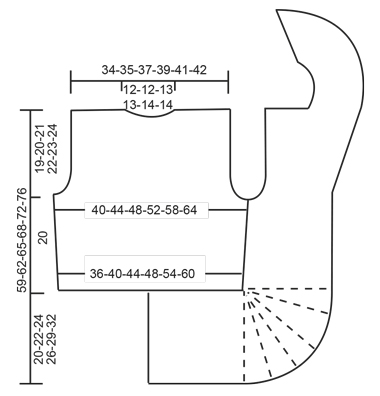
Giacchino DROPS con davanti arrotondato e trecce in "Alaska".
DROPS 134-55 |
|||||||||||||||||||||||||
|
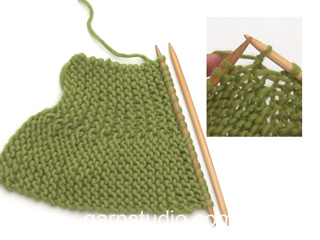
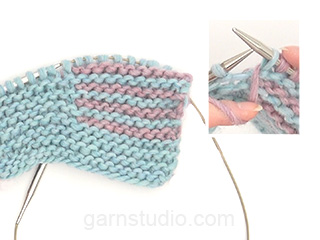
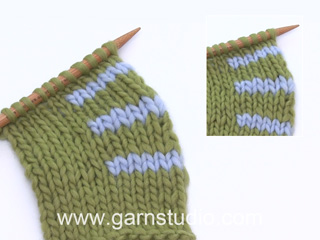
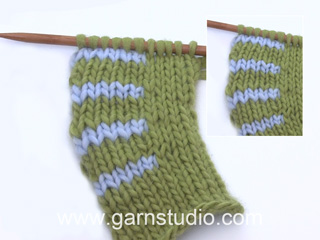
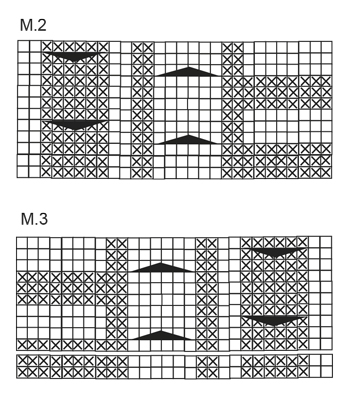
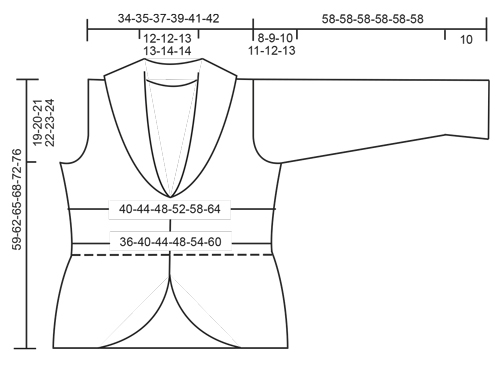
MAGLIA A LEGACCIO (avanti e indietro sui ferri): lavorare a dir. tutte le righe. MOTIVO: Vedere i diagrammi M.1, M.2 e M.3 – i diagrammi mostrano lo schema sul diritto del lavoro. Il 1° ferro nei diagrammi è lavorata sul rovescio del lavoro. SUGGERIMENTO PER LE DIMINUZIONI (applicato agli scalfi): Diminuire sul diritto del lavoro all’interno di 3 m.. Diminuire DOPO 3 m. come segue: lavorare 2 m. insieme a dir.. Diminuire PRIMA di 3 m. come segue: lavorare 2 m. insieme a dir. ritorto. FERRI ACCORCIATI: Lavorare i ferri accorciati sul davanti per ottenere un bordo arrotondato sul lavoro. Lavorare a ferri accorciati anche tra le trecce nello schema. Questo può rendere difficile la lettura del diagramma – assicuratevi di lavorare 5 righe tra ogni treccia. Lavorare a ferri accorciati come segue: Ferro 1 e 2: Lavorare 10 m. in tutte le taglie, girare il lavoro e tornare indietro. Ferro 3 e 4: Lavorare 16 m. in tutte le taglie, girare il lavoro e tornare indietro. Ferro 5 e 6: Lavorare 20 m. in tutte le taglie, girare il lavoro e tornare indietro. Ferro 7 e 8: Lavorare 26 m. in tutte le taglie, girare il lavoro e tornare indietro. Ferro 9 e 10: Lavorare 28-28-29-29-31-30 m., girare il lavoro e tornare indietro. Ferro 11 e 12: Lavorare 31-31-32-32-34-33 10 m., girare il lavoro e tornare indietro. Continuare a lavorare 3 m. in più ad ogni giro fino a quando sono state lavorate tutte le m.. Sono state lavorate 18-20-22-24-26-30 righe a m. legaccio al lato più esterno e 2 righe a m. legaccio all’interno. Ripetere dal 1° ferro per un totale di 5 volte. Il bordo arrotondato ora misura circa 28-31-34-37-41-46 cm all’esterno e 3 cm all’interno. -------------------------------------------------------- -------------------------------------------------------- DIETRO: Lavorato avanti e indietro sui ferri. Con i ferri misura 5 mm e il filato Alaska avviare 68-74-80-88-98-108 m.. Lavorare 1 ferro a dir. dal rovescio del lavoro. Lavorare il ferro successivo sul diritto del lavoro come segue: 10-13-16-20-25-30 m. a M. LEGACCIO – vedere la spiegazione sopra, * 6 rov., lavorare 2 dir. in ognuna delle 4 m. successive (= 8 dir.), 6 rov. *, ripetere da *-* per un totale di 3 volte, 10-13-16-20-25-30 m. a legaccio. Ora ci sono 80-86-92-100-110-120 m. sul ferro. Quindi lavorare come segue (1° ferro = rovescio del lavoro): 10-13-16-20-25-30 m. a legaccio, diagramma M.1A (= 60 m.) e 10-13-16-20-25-30 m. a legaccio. FARE ATTENZIONE ALLA TENSIONE DEL LAVORO! Quando il lavoro misura 7 cm, aumentare 1 m. per ogni lato lavorando 1 gettato all’interno della m. più esterna – sul ferro successivo lavorare il gettato a dir. ritorto (cioè lavorarlo nel filo dietro anziché in quello davanti) per evitare buchi. Ripetere gli aumenti ogni 5 cm per un totale di 3 volte = 86-92-98-106-116-126 m.. Quando il lavoro misura 20 cm per tutte le taglie, intrecciare 3-4-5-6-7-8 m. all’inizio delle 2 righe successive per gli scalfi. Quindi diminuire su ogni ferro sul diritto del lavoro: 1 m. 2-3-4-5-7-10 volte per ogni lato – VEDERE IL SUGGERIMENTO PER LE DIMINUZIONI! Ora ci sono 76-78-80-84-88-90 m. sul ferro. Quando è stato lavorato il diagramma M.1A, continuare con il diagramma M.1B fino alla lunghezza finale. Quando il lavoro misura 37-38-39-41-42-43 cm, lavorare le 8 m. sulla treccia centrale insieme 2 a 2. Sul ferro successivo intrecciare le 20-20-22-22-24-24 m. centrali per il collo = 26-27-27-29-30-31 m. rimaste per ogni spalla. Quindi lavorare 3 ferri su queste m. come prima, sul ferro successivo lavorare le 8 m. sulla treccia insieme 2 a 2 = 22-23-23-25-26-27 m.. Quindi intrecciare tutte le m. sul ferro successivo. Il lavoro misura circa 39-40-41-42-43-44 cm in verticale. BORDO/DAVANTI DX.: Tutte le misurazioni dovrebbero essere fatte dal lato più corto! Con i ferri misura 5 mm e il filato Alaska avviare 34-37-41-44-49-54 m.. Lavorare 1 ferro a dir. sul rovescio del lavoro. Lavorare il ferro successivo sul diritto del lavoro come segue: 8 dir., 2 rov., 2 dir. in ognuna delle 3 m. seguenti (= 6 dir.), 2 rov., 2 dir., 2 rov. in ognuna delle 3 m. successive (= 6 rov.), 2 dir., 12-15-19-22-27-32 m. a legaccio. Ora ci sono 40-43-47-50-55-60 m. sul ferro. Continuare il questo modo: 12-15-19-22-27-32 m. a legaccio e diagramma M.2 (= 28 m.) – 1° ferro = rovescio del lavoro. Quando il lavoro misura 17-19-21-23-26-29 cm, lavorare a FERRI ACCORCIATI – vedere la spiegazione sopra – il 1° ferro è lavorato sul diritto del lavoro! Quando sono stati lavorati tutti i ferri accorciati, inserire un segnapunti. ORA MISURARE IL LAVORO DA QUI! Continuare a lavorare su tutte le m. come prima. Quando il lavoro misura 7 cm, iniziare ad aumentare a lato come per il dietro (cioè il lato più corto). Dopo tutti gli aumenti, ci sono 43-46-50-53-58-63 m. sul ferro. Quando il lavoro misura 20 cm, intrecciare e diminuire per gli scalfi a lato come per il dietro (intrecciare e diminuire nello stesso lato degli aumenti). Allo stesso tempo, quando il lavoro misura 23 cm, iniziare ad aumentare per il colletto. Aumentare all’interno del diagramma M.2 facendo 1 gettato, sul ferro successivo lavorare il gettato a dir. ritorto (cioè lavorare nel filo dietro anziché in quello davanti) per evitare buchi. Ripetere gli aumenti a ferri alterni per un totale di 10-10-12-13-14-14 volte – lavorare gli aumenti a m. legaccio. Dopo tutti gli intrecci e le diminuzioni per gli scalfi e gli aumenti per il colletto, ci sono 48-49-53-55-58-59 m. sul ferro. Quando il lavoro misura circa 39-40-41-42-43-44 cm, aggiustare in modo che il ferro successivo sia lavorato sul rovescio del lavoro, intrecciare le prime 22-23-23-25-26-27 m. a legaccio = 26-26-30-30-32-32 m. rimaste sul ferro per il colletto. Continuare a lavorare come segue: * Lavorare 2 ferri su tutte le m., lavorare 2 ferri solo sulle 18-18-20-20-26-26 m. più esterne *, ripetere da *-* fino a quando il colletto misura circa 7-7-7½-7½-8-8 cm all’interno (sarà 2 volte più lungo dell’esterno). Sul ferro successivo lavorare tutte le 6 m. su entrambe le trecce insieme 2 a 2 = 20-20-24-24-26-26 m.. Intrecciare. BORDO/DAVANTI SX.: Avviare e lavorare come per il davanti dx. ma al contrario. Cioè lavorare il 2° ferro come segue: 12-15-19-22-27-32 m. a m. legaccio, 2 dir., 2 rov. in ognuna delle 3 m. successive (= 6 rov.), 2 dir., 2 rov., 2 dir. in ognuna delle 3 m. successive (= 6 dir.), 2 rov. e 8 dir.. Ora ci sono 40-43-47-50-55-60 m. sul ferro. Continuare come segue (1° ferro = rovescio del lavoro): diagramma M.3 (= 28 m.), 12-15-19-22-27-32 m. a legaccio. Continuare come per il davanti dx. ma quando si lavorano i ferri accorciati, lavorare il 1° ferro dal rovescio del lavoro! Intrecciare le m. delle spalle sul diritto del lavoro per evitare di tagliare il filo per lavorare il colletto. MANICA: Lavorata avanti e indietro sul ferro. Con i ferri misura 5 mm e il filato Alaska avviare 42-42-44-44-46-48 m. (compresa 1 m. di vivagno per lato). Lavorare 10 cm a m. legaccio. Continuare a m. rasata. Quando il lavoro misura 15 cm, aumentare 1 m. per ogni lato. Ripetere gli aumenti ogni 4-3-3-2½-2-2 cm per un totale di 9-11-11-13-14-15 volte = 60-64-66-70-74-78 m.. Quando il lavoro misura 50-49-48-47-46-45 cm (Le misure sono più corte per le taglie grandi a causa dell’aletta più’ lunga e della lunghezza delle spalle più’ ampia) intrecciare per l’aletta all’inizio di ogni ferro per ogni lato: 3 m. 1 volta, 2 m. 3 volte e 1 m. 1-2-3-4-5-6 volte, quindi intrecciare 2 m. da ogni lato fino a quando la manica misura 57 cm, quindi intrecciare 3 m. 1 volta per ogni lato, intrecciare le m. rimaste. Il lavoro misura circa 58 cm. CONFEZIONE: Cucire il bordo d’avvio sul bordo al centro dietro – cucire margine a margine per evitare una cucitura spessa. Quindi cucire il bordo a bordo inferiore del dietro. Cucire i margini delle spalle. Cucire i margine bordo a bordo. Cucire il colletto al centro dietro e cucirlo alla scollatura. Cucire i bordi delle maniche all’interno della m. di vivagno – cucire in modo che il dietro del lavoro sia verso l’esterno e cucire le maniche al corpo. Chiudere il giacchino con una spilla o qualcosa di simile. |
|||||||||||||||||||||||||
Spiegazioni del diagramma |
|||||||||||||||||||||||||
|
|||||||||||||||||||||||||

|
|||||||||||||||||||||||||
|
|||||||||||||||||||||||||
|
|||||||||||||||||||||||||
|
|||||||||||||||||||||||||
|
Avete realizzato questo o un altro dei nostri modelli? Taggate le vostre foto nei social media con #dropsdesign in modo che possiamo vederle! Avete bisogno di aiuto con questo modello?Troverete video tutorial, una sezione per i commenti/domande e molto altro guardando il modello su www.garnstudio.com © 1982-2024 DROPS Design A/S. Ci riserviamo tutti i diritti. Questo documento, compreso tutte le sue sotto-sezioni, è protetto dalle leggi sul copyright. Potete leggere quello che potete fare con i nostri modelli alla fine di ogni modello sul nostro sito. |
|||||||||||||||||||||||||


Con oltre 40 anni di esperienza nel design di modelli di maglia e uncinetto, DROPS Design offre la più estesa collezione di modelli gratuiti su internet - tradotti in 17 lingue. Ad oggi vi possiamo fornire 304 cataloghi e 11422 modelli - 8666 dei quali sono tradotti in Italiano.
Ci stiamo impegnando molto per darvi il meglio che vi possiamo offrire in termini di maglia e uncinetto, ispirazioni e consigli così come filati di grande qualità ad un prezzo incredibile! Volete utilizzare i nostri modelli per qualcosa d'altro oltre al vostro uso personale? Potete leggere tutto ciò che è consentito nel testo sul Copyright in basso su tutte le pagine dei nostri modelli. Buon lavoro!
Commenti / Domande (291)
Bonjour,n auriez vous pas oublié d indiquer les boutonnieres???
30.10.2017 - 08:21DROPS Design answered:
Bonjour Mme Olive, il n'y a pas de boutonnières, la veste se ferme avec une épingle ou une broche. Bon tricot!
30.10.2017 - 10:44Hylari wrote:
I saw those instructions but didn't see how they could work because the sleeve cap would be so short. I tried them anyway and it works! I should have trusted your pattern in the first place! Jacket looks great, thank you!
25.08.2017 - 19:51Hylari wrote:
Those instructions you give are for sleeve shaping, not underarm shaping. That always starts with a decrease on both sides, the same number of stitches as the underarm decrease in the back and front. There is then a steady decrease to give a sleeve cap considerably longer than the measurements you give in the pattern.
20.08.2017 - 20:21DROPS Design answered:
Dear Hilari. For the underarm shaping, cast off 3 sts on each side and then, for the sleeve cap cast off 2 sts 3 times and 1 st 1-2-3-4-5-6 times, then cast off 2 sts in each side until sleeve measures 57 cm, then cast off 3 sts 1 time in each side, cast off remaining sts. The piece measures approx. 58 cm. However, you should give more importance to the measure of the sleeve and not the number of decreases, since you may need to do less depending on the tension of the piece.
20.08.2017 - 21:31Hylari wrote:
I've just started the sleeves on this jacket and I notice there is no underarm shaping. Is this right? Never knitted a fitted sleeve before without underarm shaping. Please explain. Thank you!
18.08.2017 - 17:09DROPS Design answered:
Hi Hylari. There is underarm shaping in the pattern, in these lines: When piece measures 15 cm, inc 1 st in each side. Repeat inc every 4-3-3-2½-2-2 cm a total of 9-11-11-13-14-15 times = 60-64-66-70-74-78 sts.
20.08.2017 - 12:46I'm trying to increase for the collar and have already undone it once. Now I still haven't got it right. Your instructions say to increase inside M2. But where in M2? It actually makes a great deal of difference.
04.05.2017 - 21:46DROPS Design answered:
Dear Hylari, M.2 is worked at the beg of row from RS on right front piece, you will increase after M.2 from RS for collar. Happy knitting!
05.05.2017 - 09:19I am baffled by the instruction s on the very first line of this pattern. I have 80 stitches on my needle. If i follow your increase instructions i can only finish with 80 stitches. 16+6+8+6+8+6+8+6+16=80. Help! If i can't get past the first line I'm in trouble.
15.03.2017 - 17:29DROPS Design answered:
Dear Hylari, when working 1st row, you will have: K16, *P6, K8,P6*, repeat from *-* a total of 3 times = 20 sts x 3 = 60 sts, K16 = 16+60+16= 92 sts. Happy knitting!
16.03.2017 - 08:23Do the measurements on the diagram refer to the size of the finished garment or the size of the person?
09.03.2017 - 05:59DROPS Design answered:
Dear Hylari, measurements in chart give measurements of finished piece in each size, in cm, taken flat from side to side, read more about sizes here. Happy knitting!
09.03.2017 - 08:58I'm starting to work on the back and when I was reading the finished measurements before the armhole, I got confused. The pattern (working on XL) states the first inc at 2 3/4", then again every 2" three more times. This would add to 8 3/4" but you start binding off for armholes at 8". Where am I wrong in reading this pattern. Thanks for the help!
03.03.2017 - 19:31DROPS Design answered:
Dear Kelsey, you inc first time when piece measures 2 3/4", then 2 more times every 2", ie when piece measures 4 3/4" then when it measures 6 3/4" (= 3 times in total). The 3 inc will be worked when you have to cast off on each side at 8". Happy knitting!
06.03.2017 - 08:53In the first few lines of instructions for knitting the back piece in XL size where I am to cast on 88 stitches and increase to 100, it appears to me that there would be 18 stitches left unworked on the needle after working 20 knit stitches, increasing 4 stitches into 8 stitches and purling 6 stitches - repeating this three times, and then knitting 20 stitches. I would still have 18 stitches left on my left needle.. Can you help?
28.12.2016 - 00:36DROPS Design answered:
Dear Dianna, you are working as follows: 20 sts in garter st, * P 6, K 2 sts in each of the next 4 sts (= K 8), P 6 * (= 20 sts), repeat from *-* a total of 3 times, 20 sts in garter st= 100 sts. Happy knitting!
29.12.2016 - 15:11Hej, Hur många gånger ska varv 1-12 stickas för vändningarna? Det står först hur det ska stickas, sen en uppmaning att upprepa 5 gånger. Avser det 5 eller 6 gånger? När man sen tittar på diagrammet är det 5 gånger. Tack på förhand! Med vänlig hälsning Anna-Karin
14.11.2016 - 18:27DROPS Design answered:
Hej Anna-Karin. Hvis der staar du skal gentage 5 ganger, saa er det 5 ganger
15.11.2016 - 14:53