
Popular categories
Looking for a yarn?


|
||||||||||
Mandy |
||||||||||
|
|
||||||||||
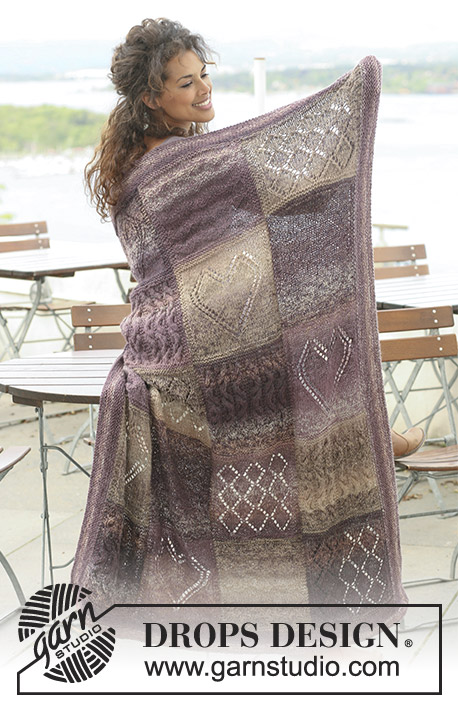
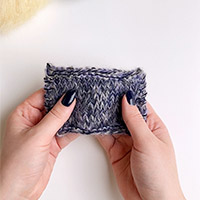
Knitted DROPS jacket with textured pattern and pockets in ”Nepal”. Sizes S to XXXL
DROPS 124-4 |
||||||||||
|
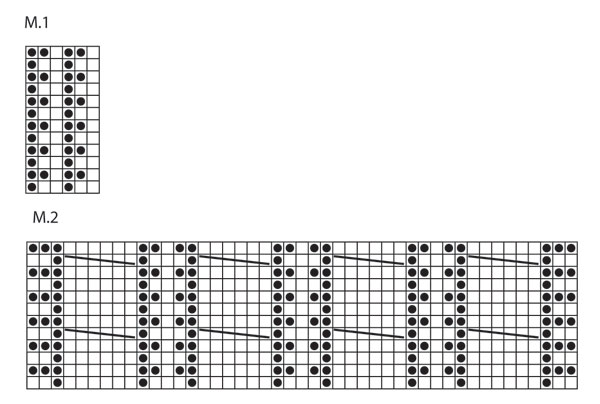
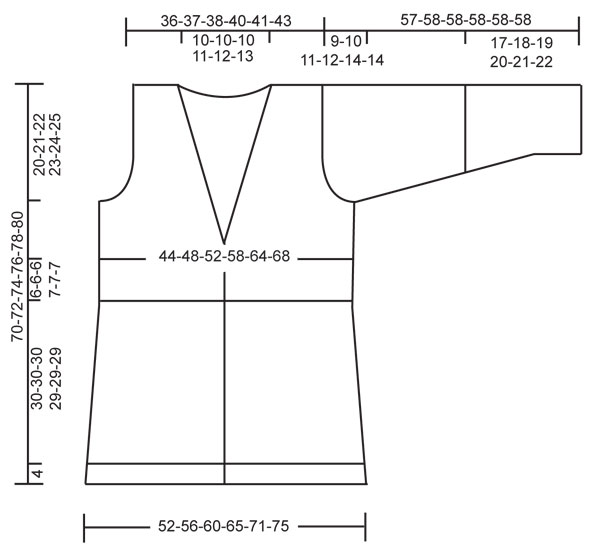
PATTERN: See diagram M.1 and M.2. Diagram shows the pattern from RS. GARTER ST (back and forth on needle): K all rows. MEASUREMENT TIP: Due to the weight of the yarn all measurements should be made whilst the garment is hanging, otherwise it will be too long when worn. BUTTONHOLES: Make buttonholes on right front band. 1 buttonhole = K tog 3rd and 4th st from the edge and make 1 YO. Make buttonholes when piece measures: SIZE S: 12, 20, 28, 36 and 44 cm / 4¾", 8", 11", 14¼" and 17¼". SIZE M: 13, 21, 29, 37 and 45 cm / 5⅛", 8¼", 11⅜", 14½" and 17¾". SIZE L: 14, 22, 30, 38 and 46 cm / 5½", 8¾",11¾", 15" and 18". SIZE XL: 12, 19, 26, 33, 40 and 47 cm / 4¾", 7½", 10¼", 13", 15¾" and 18½". SIZE XXL: 13, 20, 27, 34, 41 and 48 cm / 5⅛", 8", 10⅝", 13⅜", 16⅛" and 19". SIZE XXXL: 14, 21, 28, 35, 42 and 49 cm / 5½", 8¼", 11" 13¾", 16½" and 19¼". -------------------------------------------------------- JACKET: Worked in parts back and forth on circular needle. BACK PIECE: See MEASUREMENT TIP! Cast on 107-119-125-137-149-155 sts (includes 1 edge st each side) on circular needle size 4.5 mm / US 7 with Nepal. P 1 row from WS and continue in rib as follows from RS: 1 edge st, * K3, P3 *, repeat from *-* until 4 sts remain and finish with K3 and 1 edge st. When rib measures 4 cm / 1½" change to circular needle size 5 mm / US 8. K 1 row from RS, AT THE SAME TIME dec 17-21-21-25-27-25 sts evenly = 90-98-104-112-122-130 sts. P 1 row from WS and continue in stockinette st. When piece measures 9 cm / 3½" dec 1 st each side, repeat the dec each side on every 4-4-4-4.5-4.5-4.5 cm / 1½"-1½"-1½"-1¾"-1¾"-1¾" a total of 7-7-7-6-6-6 times = 76-84-90-100-110-118 sts. When piece measures 34-34-34-33-33-33 cm / 13⅜"-13⅜"-13⅜"-13"-13"-13" change back to circular needle size 4.5 mm / US 7. Now continue in GARTER ST - see above - on all sts. When garter st section measures approx 6-6-6-7-7-7 cm / 2⅜"-2⅜"-2⅜"-2¾"-2¾"-2¾" (piece measures a total of approx 40 cm / 15¾" for all sizes – REMEMBER MEASUREMENT TIP) change back to circular needle size 5 mm / US 8. K 1 row from RS, AT THE SAME TIME inc 11-12-12-14-16-17 sts evenly = 87-96-102-114-126-135 sts. Now continue in M.1 with 1 edge st each side (first row = from WS) – NOTE: Beg and finish pattern with P1 (as seen from WS) inside edge st each side. Continue in M.1 until piece measures 50-51-52-53-54-55 cm / 19¾"-20"-20½"-21"-21¼"-21⅝". Now bind off for armhole at the beg of every row each side as follows: 3 sts 1-1-1-2-3-3 times, 2 sts 1-3-4-4-5-6 times and 1 st 3-3-3-4-4-5 times = 71-72-74-78-80-83 sts. Continue in pattern as before until piece measures 68-70-72-74-76-78 cm / 26¾"-27½"-28⅜"-29⅛"-30"-30¾" – REMEMBER MEASUREMENT TIP. Now bind off the middle 17-18-18-20-22-23 sts for neck and complete each shoulder separately. Bind off 1 st on neckline on next row = 26-26-27-28-28-29 sts left on shoulder. Bind off when piece measures 70-72-74-76-78-80 cm / 27½"-28⅜"-29⅛"-30"-30¾"-31½. RIGHT FRONT PIECE: Worked back and forth on circular needle. Cast on 55-61-67-73-79-85 sts (includes 1 edge st at the side and 6 front band sts towards front edge) on circular needle size 4.5 mm / US 7 with Nepal. P 1 row from WS with 6 front band sts towards front edge in garter st (front band worked in garter st until finished measurements). Now continue in rib as follows from RS: 6 front band sts, * K3, P3 *, repeat from *-* and finish with 1 edge st. When rib measures 4 cm / 1½" change to circular needle size 5 mm / US 8. K 1 row from RS, AT THE SAME TIME dec 4-6-9-11-12-14 sts evenly (do not dec on front band) = 51-55-58-62-67-71 sts. P 1 row from WS (front band in garter st) and continue in stockinette st with 6 front band sts towards front edge. When piece measures 9 cm / 3½" dec at the side as described for back piece = 44-48-51-56-61-65 sts. When piece measures 34-34-34-33-33-33 cm / 13⅜"-13⅜"-13⅜"-13"-13"-13" change back to circular needle size 4.5 mm / US 7. Now work garter st on all sts. When garter st section measures approx 6-6-6-7-7-7 cm / 2⅜"-2⅜"-2⅜"-2¾"-2¾"-2¾" (adjust to back piece) change back to circular needle size 5 mm / US 8. K 1 row from RS, AT THE SAME TIME inc 6-5-5-6-7-9 sts evenly = 50-53-56-62-68-74 sts. Now work M.1 with 1 edge st at the side and 6 front band sts towards front edge (first row = from WS) – NOTE: Beg and finish pattern with P1 (as seen from WS) inside edge st and front band. Continue in M.1 until piece measures 45-46-47-48-49-50 cm / 17¾"-18"-18½"-19"-19¼"-19¾". Now beg incorporating more sts in in the garter st on front band for collar as follows: work 1 st from front piece into the garter st on front band on every 4th row a total of 10-9-9-10-11-13 times. AT THE SAME TIME inc 1 st inside the outermost st on front band (inc by making 1 YO, on next row K YO into back of loop to avoid a hole). Repeat the inc on every 8-8-6-6-6-6 row a total of 6-7-9-8-9-7 times. AT THE SAME TIME when piece measures 50-51-52-53-54-55 cm / 19¾"-20"-20½"-21"-21¼"-21⅝" bind off for armhole at the beg of every row from the side as described for back piece. After all dec for armhole and inc for collar are complete there are 48-48-51-52-54-55 sts on needle. Continue in garter st and pattern until piece measures 70-72-74-76-78-80 cm / 27½"-28⅜"-29⅛"-30"-30¾"-31½ – REMEMBER MEASUREMENT TIP. On next row from the side (= from WS) bind off 26-26-27-28-28-29 sts for shoulder = 22-22-24-24-26-26 front band sts left on needle. Work remaining sts on row. Continue for collar as follows (row 1 = RS): * work back and forth on all sts, work back and forth on the first 10-10-12-12-14-14 sts only *, repeat from *-* until collar measures approx 7-7-7-8-8-9 cm / 2¾"-2¾"-2¾"-3⅛"-3⅛"-3½" from shoulder (measured where shortest). Bind off. LEFT FRONT PIECE: Like right front piece, but mirrored. SLEEVE: Worked back and forth on circular needle. Cast on 50-50-50-56-56-56 sts (includes 1 edge st each side) on circular needle size 4.5 mm / US 7 with Nepal. P 1 row from WS and continue in rib as follows from RS: 1 edge st, * K3, P3 *, repeat from *-* and finish with 1 edge st. When rib measures 6 cm / 2⅜" change to circular needle size 5 mm / US 8. K 1 row from RS, AT THE SAME TIME dec 8-8-6-12-10-10 sts evenly = 42-42-44-44-46-46 sts. P 1 row from WS and continue in stockinette st. When piece measures 9-7-9-8-6-8 cm / 3½"-2¾"-3½"-3⅛"-2⅜"-3⅛" inc 1 st each side (inc by making 1 YO inside edge st, on next row K YO into back of loop to avoid a hole). Repeat the inc on every 3.5-3-2.5-2-2-1.5 cm / 1¼"-1⅛"-⅞"-¾"-¾"-½" a total of 11-14-15-18-19-22 times. AT THE SAME TIME when piece measures 17-18-19-20-21-22 cm / 6¾"-7"-7½"-8"-8¼"-8¾" inc 6 sts evenly on row (this inc is in addition to the inc each side). On next row from RS continue in M.1 with 1 edge st each side. Incorporate inc sts at the sides in pattern as you go along. After all inc are complete there are 70-76-80-86-90-96 sts on needle. When piece measures 48-48-47-46-44-44 cm /19"-19"-18½"-18"-17¼"-17¼" - NOTE! Less for the larger sizes because of longer sleeve cap and wider shoulder - bind off for sleeve cap at the beg of every row each side as follows: 4 sts 1 time, then 2 sts at the beg of every row until piece measures approx 56-57-57-57-57-57 cm / 22"-22½"-22½"-22½"-22½"-22½". Bind off 4 sts at beg of the next 2 rows, and then bind off remaining sts. Piece measures approx 57-58-58-58-58-58 cm / 22½"-22¾"-22¾"-22¾"-22¾"-22¾". ASSEMBLY: Sew shoulder seams. Set in sleeves. Sew sleeve and side seams inside 1 edge st. Sew collar tog mid back – sew in outer loops of sts to avoid a chunky seam. Sew collar to neckline on back piece with neat sts. Sew on buttons. POCKETS: Cast on 31 sts on circular needle size 5 mm / US 8 with Nepal and work back and forth on needle as follows: K 1 row from RS and K 1 row from WS. Now K 1 row from RS, AT THE SAME TIME inc 14 sts evenly (do not inc on the outermost 2 sts each side) = 45 sts. P 1 row from WS. Continue in M.2 until pocket measures approx 18-18-20-20-22-22 cm / 7"-7"-8"-8"-8¾"-8¾" – finish after 1 or 3 rows after a cable. K 1 row from RS, AT THE SAME TIME dec 14 sts evenly (not on the 2 sts each side) = 31 sts. K 1 row from WS and K 1 row from RS. Now bind off with K sts from WS. Make 2. Place the pockets on front piece approx 7-9 cm / 2¾"-3½" from mid front with the bottom of pocket just covering the rib. Sew the pockets on with neat sts. |
||||||||||
Diagram explanations |
||||||||||
|
||||||||||
|
||||||||||
|
||||||||||
|
Have you made this or any other of our designs? Tag your pictures in social media with #dropsdesign so we can see them! Do you need help with this pattern?You'll find tutorial videos, a Comments/Questions area and more by visiting the pattern on garnstudio.com. © 1982-2024 DROPS Design A/S. We reserve all rights. This document, including all its sub-sections, has copyrights. Read more about what you can do with our patterns at the bottom of each pattern on our site. |
||||||||||


With over 40 years in knitting and crochet design, DROPS Design offers one of the most extensive collections of free patterns on the internet - translated to 17 languages. As of today we count 304 catalogs and 11422 patterns - 11417 of which are translated into English (US/in).
We work hard to bring you the best knitting and crochet have to offer, inspiration and advice as well as great quality yarns at incredible prices! Would you like to use our patterns for other than personal use? You can read what you are allowed to do in the Copyright text at the bottom of all our patterns. Happy crafting!
Comments / Questions (48)
Thank you so much! I finished the piece with ease! Now I start the mirrored one! Hopefully it will be easy enough... :)
21.04.2013 - 12:36Hello again, thanks for the response. I understood very clearly. Now I am at the very last stage and still stuck :( I did the 27 BO and have 24 sts left on my needle. Now it says *work back and forth on all stiches, work back and forth on the first 12 sts only*, repeat from *-* - this is where I am confused again. I have 24 sts rem on needle and am ready to knit on WS. I should k only 12 first sts? Then turn? Your help is very appreciated!
20.04.2013 - 14:26DROPS Design answered:
Dear Mrs Nault, you will now continue with short rows on the remaining sts, working alternatively 2 rows on all sts and 2 rows on the the outermost 12 sts (towards mid front). This video can help you. Happy knitting !
20.04.2013 - 16:51I am stuck on a project from pattern Drops design # 124-4 on page 3 of 6 at the collar stage it’s not clear to me this sentence: “Now begin incorporating more sts in the garter st on front band for collars as follows: work 1 st (what does work 1 st mean?) into the garter st on front band on every 4th row a total of 9 times. AT THE SAME TIME incr 1 st inside the outermost st on front band (outermost meaning the edge?) Can you please help me?
16.04.2013 - 23:06DROPS Design answered:
Dear Mrs Nault, it means you have to knit 1 more st in garter st (so that number of sts doesn't change but more in garter st and less in pattern). Then at the same time, you increase 1 st after the outermost edge st towards mid front (on front band). Happy knitting!
17.04.2013 - 09:16I need help with assembly please. Specifically, the collar. I'm stuck at the "sew shoulder seams" - If I sew just the knit area on the front pieces to the "shoulder" area of the back piece, the collar is just left to dangle. Then, when it says to "sew the collar together mid back" and then "sew collar to neckline on back piece" I can't get this to work. I've tried a couple times to put it together, and I just can't get it right.
13.12.2012 - 20:22DROPS Design answered:
Dear Sharon, shoulder seams are 26 -29 sts (see size) from front and back piece. You then sew together the 22-26 sts you worked in garter sts from both front pieces, this seam will be at the mid of nekline on back piece. The 7-9 cm worked in garter st (shorter side of collar) will be sewn along the casted off sts for neckline at back piece. Happy Knitting !
14.12.2012 - 09:40M1 pattern is confusing. I see the explanation to pattern diagram, but it just seems like 1x2rib to me. Is there one stitch in between that is a garter st? I can't get this . Would appreciate any help
01.12.2012 - 02:33DROPS Design answered:
Dear Diane, in the diagram 1 square = 1 st x 1 row. Seen from RS, you will have : *1 stocking st, 1 garter st, 1 reverse stocking st*, repeat from *-*. Happy Knitting!
01.12.2012 - 11:31M1 pattern is confusing. I see the explanation to pattern diagram, but it just seems like 1x2rib to me. Is there one stitch in between that is a garter st? I can't get this . Would appreciate any help
01.12.2012 - 02:32Reda wrote:
Hi , i have a problem in reading the chart can you please explain the M1 pattern for me
08.11.2012 - 21:38DROPS Design answered:
Hi Reda, you find the explanation above under” Explanation to pattern diagram”. Every row is shown in the diagram, so just follow it.
13.11.2012 - 12:24Een heel mooi patroon hartelijk bedankt
08.02.2012 - 15:48Hi Alice, 1. yes, convert st from M1 pattern into garter. 2. the outermost st is the one edge stitch at the edge of the piece.
02.01.2012 - 08:54When it is time to increase the garter st front band, there are two things I don't understand. 1. work 1 st *from front piece* into the garter st on front band ... does this mean converting from the M1 pattern to garter stitch? 2. inc 1 st inside the *outermost* st on front band What is outermost? The edge of the piece or the end of the garter st area next to the M1 pattern?
01.01.2012 - 22:26